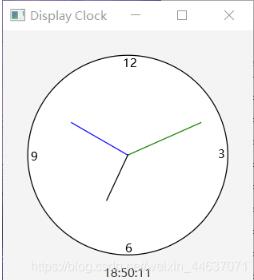
本文实例为大家分享了JavaFX实现简易时钟效果的具体代码,供大家参考,具体内容如下 效果图 用当前时间创建时钟,绘制表盘。 钟表是静止的。让指针动起来,请参照:绘制简易时钟
本文实例为大家分享了JavaFX实现简易时钟效果的具体代码,供大家参考,具体内容如下
效果图
用当前时间创建时钟,绘制表盘。
钟表是静止的。让指针动起来,请参照:绘制简易时钟(二)

主函数文件 ShowClock:
package primier;

import javafx.application.Application;
import javafx.geometry.Insets;
import javafx.geometry.Pos;
import javafx.scene.Scene;
import javafx.stage.Stage;
import javafx.scene.paint.Color;
import javafx.scene.layout.*;
import javafx.scene.control.*;
import javafx.scene.image.Image;
import javafx.scene.image.ImageView;
import javafx.scene.shape.Line;

public class ShowClock extends Application {
 @Override //Override the start method in the Application class
 public void start(Stage primaryStage) {
  // 创建时钟面板
  ClockPane clock = new ClockPane();
  // 当前时间整理为字符串
  String timeString = clock.getHour() + ":" + clock.getMinute()
    + ":" + clock.getSecond();
  Label lbCurrentTime = new Label(timeString);

  BorderPane pane = new BorderPane();
  pane.setCenter(clock);
  pane.setBottom(lbCurrentTime);
  // 将时钟字符串设为靠上居中
  BorderPane.setAlignment(lbCurrentTime, Pos.TOP_CENTER);

  Scene scene = new Scene(pane, 250,250);
  primaryStage.setTitle("Display Clock");
  primaryStage.setScene(scene);
  primaryStage.show();
 }
 public static void main (String[] args) {
  Application.launch(args);
 }
}
ClockPane 类
package primier;

import java.util.Calendar;
import java.util.GregorianCalendar;
import javafx.scene.layout.Pane;
import javafx.scene.paint.Color;
import javafx.scene.shape.Circle;
import javafx.scene.shape.Line;
import javafx.scene.text.Text;

public class ClockPane extends Pane {
 private int hour;
 private int minute;
 private int second;

 // 时钟面板的宽度和高度
 private double w = 250, h = 250;

 /** 用当前时间创建时钟 */
 public ClockPane() {
  setCurrentTime();
 }

 /** Return hour */
 public int getHour() { return hour; }

 /** Return minute */
 public int getMinute() { return minute; }

 /** Return second */
 public int getSecond() { return second; }

 /** Set the current time for the clock */
 public void setCurrentTime() {
  // 用当前时间创建Calendar类
  Calendar calendar = new GregorianCalendar();
  this.hour = calendar.get(Calendar.HOUR_OF_DAY);
  this.minute = calendar.get(Calendar.MINUTE);
  this.second = calendar.get(Calendar.SECOND);
  paintClock();
 }

 /** 绘制时钟 */
 protected void paintClock() {
  double clockRadius = Math.min(w,h)*0.4; // 时钟半径
  // 时钟中心x, y坐标
  double centerX = w/2;
  double centerY = h/2;

 // 绘制钟表
  Circle circle = new Circle(centerX, centerY, clockRadius);
  circle.setFill(Color.WHITE); // 填充颜色
  circle.setStroke(Color.BLACK); // 笔画颜色
  Text t1 = new Text(centerX-5, centerY-clockRadius+12,"12");
  Text t2 = new Text(centerX-clockRadius+3, centerY +5, "9");
  Text t3 = new Text(centerX+clockRadius-10, centerY+3, "3");
  Text t4 = new Text(centerX-3, centerY+clockRadius-3,"6");

  // 秒针
  double sLength = clockRadius * 0.8;
  double secondX = centerX + sLength * Math.sin(second * (2 * Math.PI / 60));
  double secondY = centerY - sLength * Math.cos(second * (2 * Math.PI / 60));
  Line sLine = new Line(centerX, centerY, secondX, secondY);
  sLine.setStroke(Color.GRAY);

  // 分针
  double mLength = clockRadius * 0.65;
  double minuteX = centerX + mLength * Math.sin(minute * (2 * Math.PI / 60));
  double minuteY = centerY - mLength * Math.cos(minute * (2 * Math.PI / 60));
  Line mLine = new Line(centerX, centerY, minuteX, minuteY);
  mLine.setStroke(Color.BLUE);

  // 时针
  double hLength = clockRadius * 0.5;
  double hourX = centerX + hLength *
    Math.sin((hour % 12 + minute / 60.0) * (2 * Math.PI / 12));
  double hourY = centerY - hLength *
    Math.cos((hour % 12 + minute / 60.0) * (2 * Math.PI / 12));
  Line hLine = new Line(centerX, centerY, hourX, hourY);
  sLine.setStroke(Color.GREEN);

 // 将之前的结点清空,绘制新创建的结点
  getChildren().clear();
  getChildren().addAll(circle, t1, t2, t3, t4, sLine, mLine, hLine);
 }
}
以上就是本文的全部内容,希望对大家的学习有所帮助,也希望大家多多支持易盾网络。
