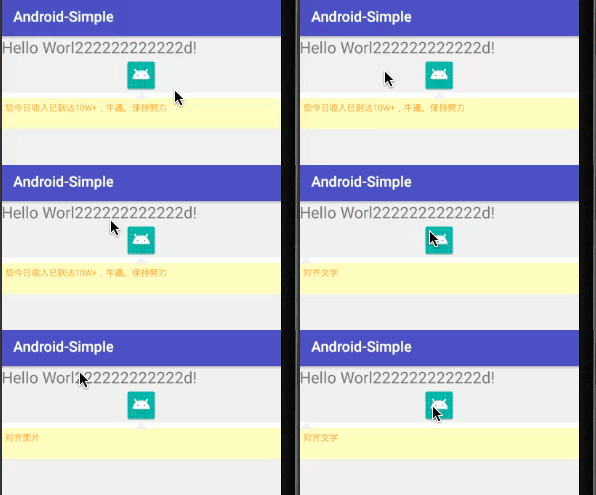
本文介绍了Android 带箭头的指引tipLayout实现示例代码,分享给大家,具体如下: 如上是从UI接过来的设计图,要求三角形指示器需要动态对齐上面的文本,需要动态的实现对其三角形。
本文介绍了Android 带箭头的指引tipLayout实现示例代码,分享给大家,具体如下:

如上是从UI接过来的设计图,要求三角形指示器需要动态对齐上面的文本,需要动态的实现对其三角形。
引用方式
compile 'com.xiaowei:TriangleTipLayout:1.0.0'
实现思路
准备一个三角形指引的图片即可。
先上代码
final TextPaint textPaint = mTextView.getPaint();
    final int textHeight = (int) (textPaint.descent() - textPaint.ascent());
    mRect.set(0, DEFAULT_TOP_HEIGHT, getWidth(), getHeight() + textHeight - DEFAULT_TOP_HEIGHT);
    canvas.drawRect(mRect, mRectPaint);
    final String text = mTextView.getText().toString();
    float left = 0;
    if (mIsShowTriangle) {
      if (mGravity == Gravity.LEFT || mGravity == Gravity.START) {
        LayoutParams layoutParams = (LayoutParams) mTarget.getLayoutParams();
        left = mTarget.getLeft() - layoutParams.rightMargin - layoutParams.leftMargin;
      } else {
        if (mTarget instanceof TextView) {
          ViewParent viewParent = mTarget.getParent();
          float textWidth = textPaint.measureText(text);
          if (viewParent instanceof LinearLayout) {
            final float width = mTarget.getWidth() / 2;
            left = mTarget.getLeft() + width - (mBitmap.getWidth() / 2);
          } else if (viewParent instanceof RelativeLayout) {
            left = mTarget.getLeft() + textWidth / 2;
          }
        } else if (mTarget instanceof ImageView) {
          final float width = mTarget.getWidth();
          left = mTarget.getLeft() + (width / 2) - (mBitmap.getWidth() / 2);
        }
      }
      canvas.drawBitmap(mBitmap, left, 0, mBitmapPaint);
    }
  }
核心代码如上,其思路是先绘制一个矩形,预留出三角形所需要的高度,最后将其三行图片绘制出来。
配置指示器
mTipsLayout.setRectBackgroundColor(Color.parseColor("#FFF8BE"));
    mTipsLayout.setTextColor(Color.parseColor("#FF9B33"));
    mTipsLayout.setTriangleBitmap(BitmapFactory.decodeResource(getResources(), R.mipmap.ic_triangle_arrow));
    mTipsLayout.setTriangleGravity(Gravity.START);
    mTipsLayout.bindView(findViewById(R.id.text2));
    mTipsLayout.setText("您今日收入已到达10W+,牛逼。保持努力");
注意:当调用setText之后会invalidate()重新绘制;
实现效果如下

github: 源码
以上就是本文的全部内容,希望对大家的学习有所帮助,也希望大家多多支持自由互联。
