目录
- 模板引擎简介
- 引入Thymeleaf模板引擎
- 分析Thymeleaf模板引擎
- 测试Thymeleaf模板引擎
- 1、编写一个TestController
- 2、编写一个测试页面 test.html 放在 templates 目录下
- 3、启动项目请求测试
- 4、结论
- Thymeleaf入门:
- 1、修改测试请求,增加数据传输
- 2、使用thymeleaf
- 3、我们去编写下前端页面
- 4、启动测试!
- thymeleaf语法学习
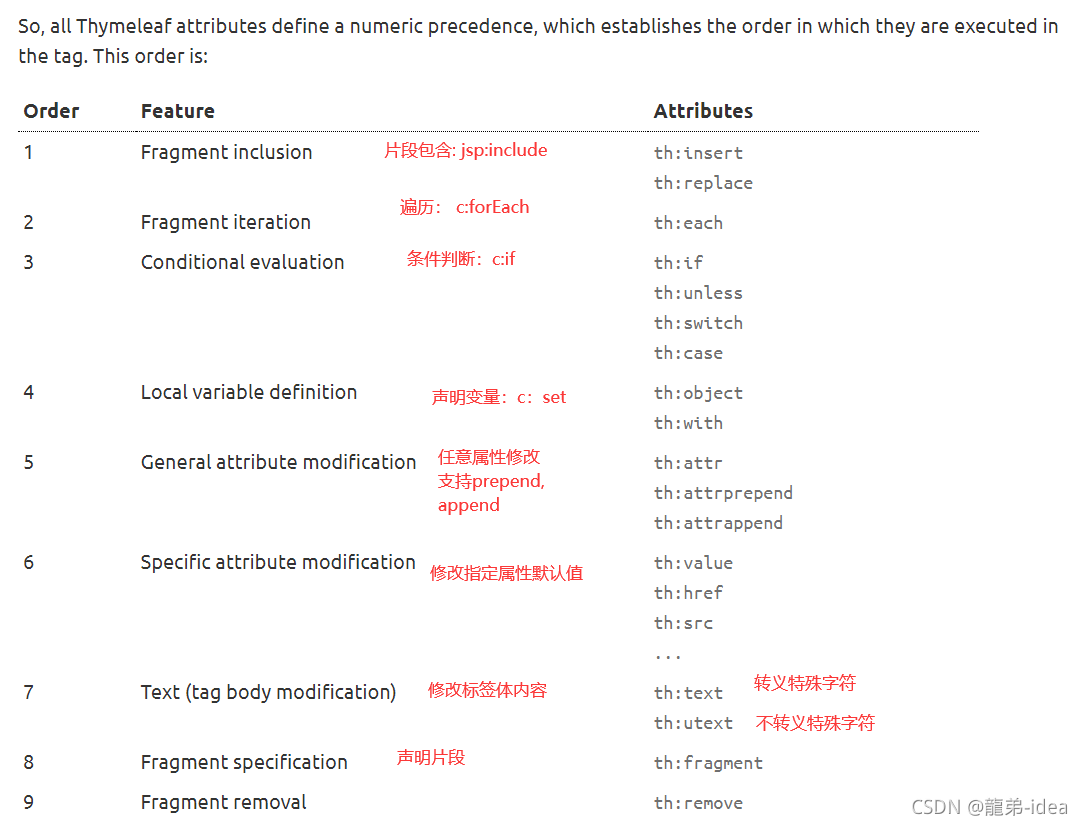
- 1、使用任意的 th:attr 来替换Html中原生属性的值!
- 2、表达式语法:
- 2、测试页面取出数据
- 3、启动项目测试!
- 总结:
模板引擎简介
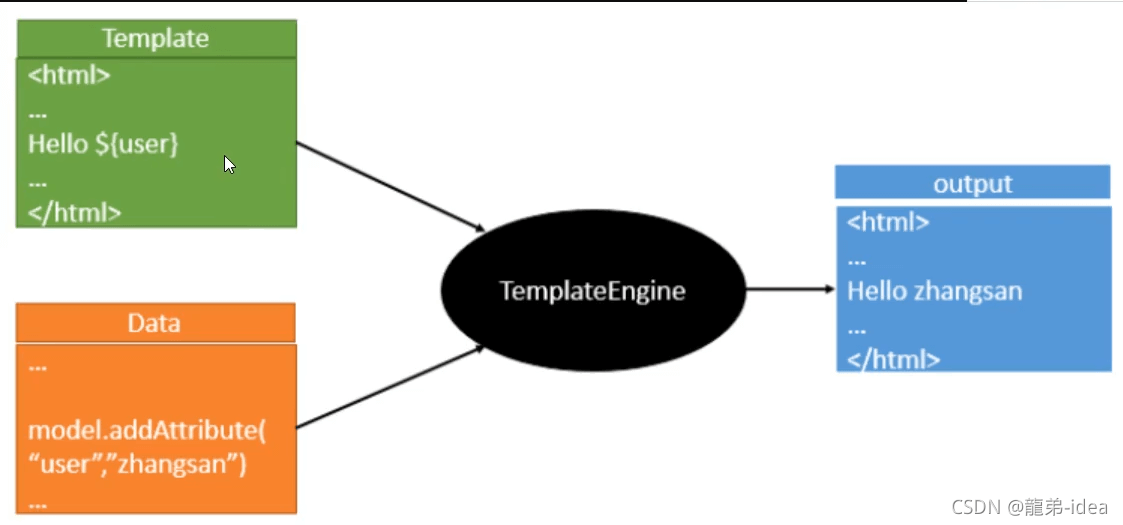
如果我们直接用纯静态页面方式,必然会给开发带来很大麻烦,所以springboot推荐使用模板引擎,其实jsp就是一个模板引擎,还有用的比较多的freemarker,包括SpringBoot给我们推荐的Thymeleaf!模板引擎的本质思想如下图:
引入Thymeleaf模板引擎
Thymeleaf 官网:Thymeleaf
Spring官方文档:
https://docs.spring.io/spring-boot/docs/2.2.5.RELEASE/reference/htmlsingle/#using-boot-starter
<!--thymeleaf-->
<dependency>
    <groupId>org.springframework.boot</groupId>
    <artifactId>spring-boot-starter-thymeleaf</artifactId>
</dependency>
Maven自动下载jar包,下图试maven下载的东西;

分析Thymeleaf模板引擎
首先按照SpringBoot的自动配置原理来看一下我们这个Thymeleaf的自动配置规则,再按照这个规则,我们进行使用。可以先去看看Thymeleaf的自动配置类:ThymeleafProperties
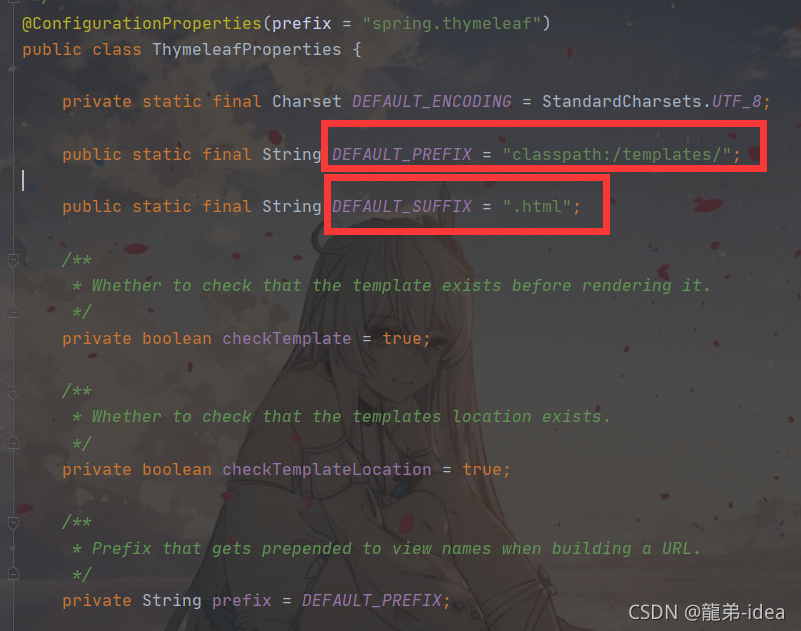
我们可以在配置文件看到默认的前缀和后缀!
我们只需要把我们的html页面放在类路径下的templates下,thymeleaf就可以帮我们自动渲染。
测试Thymeleaf模板引擎
1、编写一个TestController
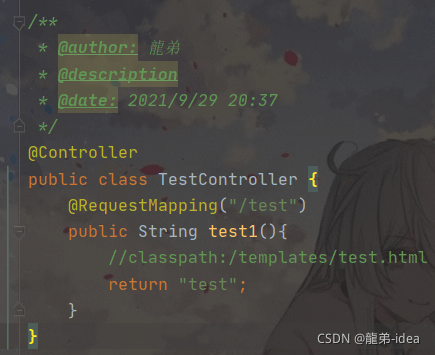
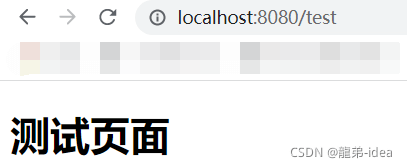
2、编写一个测试页面 test.html 放在 templates 目录下

3、启动项目请求测试
4、结论
只要需要使用thymeleaf,只需要导入对应的依赖就可以了,然后将html放在templates的目录下即可
Thymeleaf入门:
我们可以查看下Thymeleaf 官网:https://www.thymeleaf.org/
简单练习:查出一些数据,在页面中展示
1、修改测试请求,增加数据传输
@Controller
public class TestController {

    @RequestMapping("/t1")
    public String test1(Model model){
        //存入数据
        model.addAttribute("msg","Hello,Thymeleaf");
        //classpath:/templates/test.html
        return "test";
    }
}
2、使用thymeleaf
我们要使用thymeleaf,需要在html文件中导入命名空间的约束,方便提示。
xmlns:th=http://www.thymeleaf.org
3、我们去编写下前端页面
<!DOCTYPE html>
<html lang="en" xmlns:th="http://www.thymeleaf.org">
<head>
    <meta charset="UTF-8">
    <title>九阳真经---龍弟</title>
</head>
<body>
<h1>测试页面</h1>
<!--th:text就是将div中的内容设置为它指定的值-->
<div th:text="${msg}"></div>
</body>
</html>
4、启动测试!

thymeleaf语法学习
1、使用任意的 th:attr 来替换Html中原生属性的值!
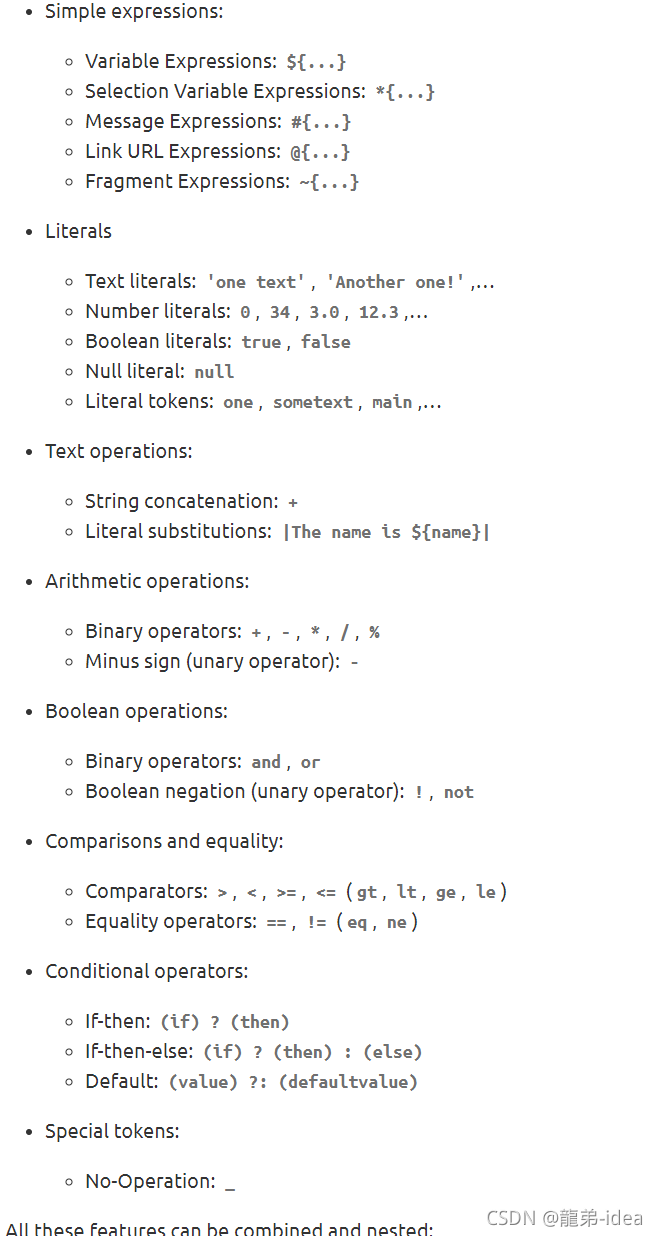
2、表达式语法:
练习测试
@Controller
public class TestController {
    @RequestMapping("/t2")
    public String test2(Map<String,Object> map){
        //存入数据
        map.put("msg","<h1>Hello,SpringBoot</h1>");
        map.put("users", Arrays.asList("dragon","longdi"));
        //classpath:/templates/test.html
        return "test";
    }
}
2、测试页面取出数据
<!DOCTYPE html>
<html lang="en" xmlns:th="http://www.thymeleaf.org">
<head>
    <meta charset="UTF-8">
    <title>九阳真经---龍弟</title>
</head>
<body>
<h1>测试页面</h1>

<div th:text="${msg}"></div>
<!--不转义-->
<div th:utext="${msg}"></div>
<!--遍历数据-->
<!--th:each每次遍历都会生成当前这个标签-->
<h4 th:each="user :${users}" th:text="${user}"></h4>
<hr>
    <!--行内写法-->
    <h4 th:each="user:${users}">[[${user}]]</h4>
</body>
</html>
3、启动项目测试!

总结:
由于thymeleaf很多语法样式,我们现在学了也会忘记,因此,在学习过程中,需要使用什么,根据官方文档来查询,所以要熟练使用官方文档!
到此这篇关于Java SpringBoot模板引擎之 Thymeleaf入门详解的文章就介绍到这了,更多相关Java SpringBoot Thymeleaf内容请搜索自由互联以前的文章或继续浏览下面的相关文章希望大家以后多多支持自由互联!