在编程过程中,现有的c#控件远远不能满足我们的需要,这时候就需要我们自己来开发控件了。本人在开发自定义控件时走了一些弯路,写下此篇,希望能够给有需要的朋友一些帮助,
在编程过程中,现有的c#控件远远不能满足我们的需要,这时候就需要我们自己来开发控件了。本人在开发自定义控件时走了一些弯路,写下此篇,希望能够给有需要的朋友一些帮助,也借此加深自己的印象。
1.创建自定义控件

2.添加控件,组合成一个新的控件
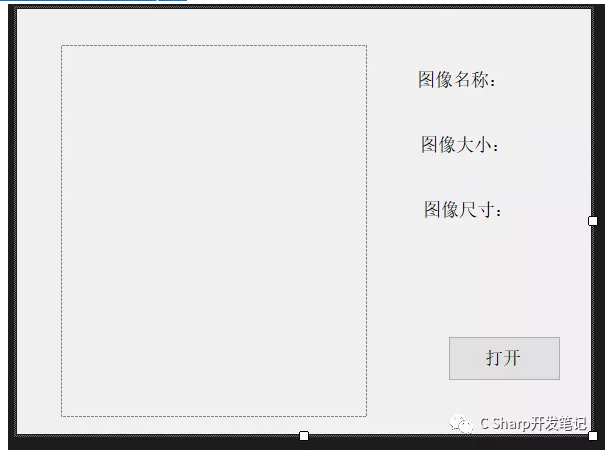
自定义控件功能:打开一张图片,将图片展示在pictureBox控件中,并将图片的名称、大小、尺寸显示出来
控件如下:
pictureBox1:命名为picBox
label1~label6 :左边三个显示文字,右边三个命名为:lblName lblLength lblSize
button1:命名为btnOpen
代码如下:
using System;
using System.Collections.Generic;
using System.ComponentModel;
using System.Drawing;
using System.Data;
using System.Linq;
using System.Text;
using System.Threading.Tasks;
using System.Windows.Forms;
using System.IO;

namespace WindowsFormsControlLibrary1
{
  public partial class UserControl1: UserControl
  {
    public UserControl1()
    {
      InitializeComponent();
    }

    private void button1_Click(object sender, EventArgs e)
    {
      OpenFileDialog ofdPic = new OpenFileDialog();
      ofdPic.Filter = "JPG(*.JPG;*.JPEG);gif文件(*.GIF);PNG(*.PNG)|*.jpg;*.jpeg;*.gif;*.png";
      ofdPic.FilterIndex = 1;
      ofdPic.RestoreDirectory = true;
      ofdPic.FileName = "";
      if (ofdPic.ShowDialog() == DialogResult.OK)
      {
        string sPicPaht = ofdPic.FileName.ToString();
        FileInfo fiPicInfo = new FileInfo(sPicPaht);
        long lPicLong = fiPicInfo.Length / 1024;
        string sPicName = fiPicInfo.Name;
        string sPicDirectory = fiPicInfo.Directory.ToString();
        string sPicDirectoryPath = fiPicInfo.DirectoryName;
        Bitmap bmPic = new Bitmap(sPicPaht);
        if (lPicLong > 400)
        {
          MessageBox.Show("此文件大小為" + lPicLong + "K;已超過最大限制的K范圍!");
        }
        else
        {
          Point ptLoction = new Point(bmPic.Size);
          if (ptLoction.X > picBox.Size.Width || ptLoction.Y > picBox.Size.Height)
          {
            picBox.SizeMode = PictureBoxSizeMode.Zoom;
          }
          else
          {
            picBox.SizeMode = PictureBoxSizeMode.CenterImage;
          }
        }
        picBox.LoadAsync(sPicPaht);
        lblName.Text = sPicName;
        lblLength.Text = lPicLong.ToString() + " KB";
        lblSize.Text = bmPic.Size.Width.ToString() + "×" + bmPic.Size.Height.ToString();
      }

    }
  }
}
点击【解决方案】,右键弹出窗口,点击【生成解决方案】
至此,自定义控件的创建已经完成!
生成的控件路径在Debug文件夹下,dll文件
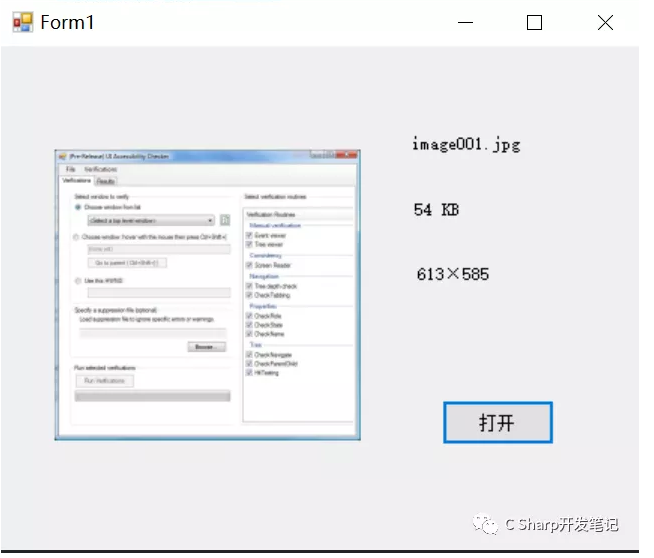
3.自定义控件测试
新建windows窗体应用程序
发现在左边的控件工具栏中并没有刚刚的自定义控件,不要急!!
选择工具下的【选择工具箱项】
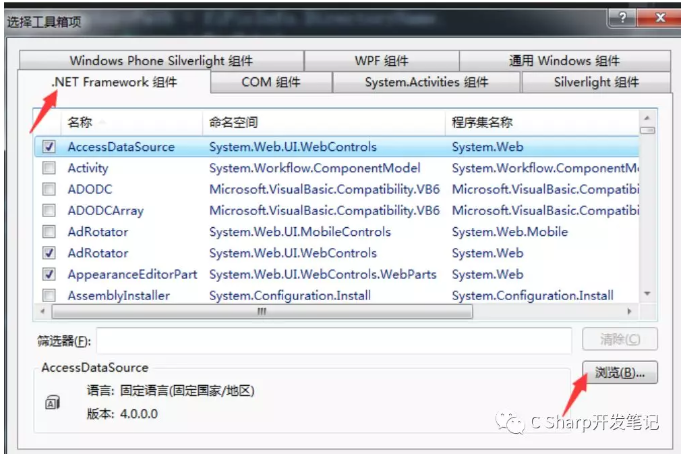
浏览,选择dll文件路径,注意路径中不能包含中文字符,切记!否则会出错!
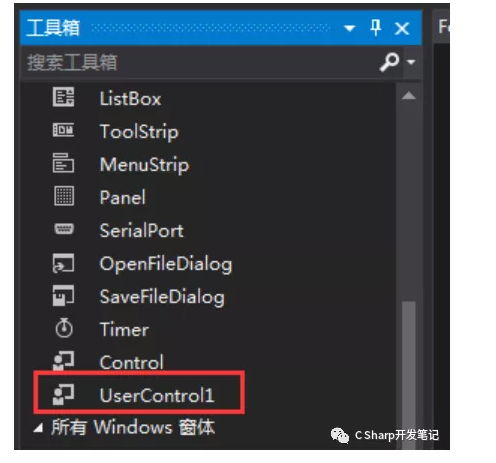
添加成功后,会发现工具箱中出现了刚刚定义的控件。
测试结果:
以上就是C#创建自定义控件的示例的详细内容,更多关于C#创建自定义控件的资料请关注易盾网络其它相关文章!