周五在群里面有小伙伴问,ASP.NET Core这个HttpContextAccessor为什么改成了这个样子?
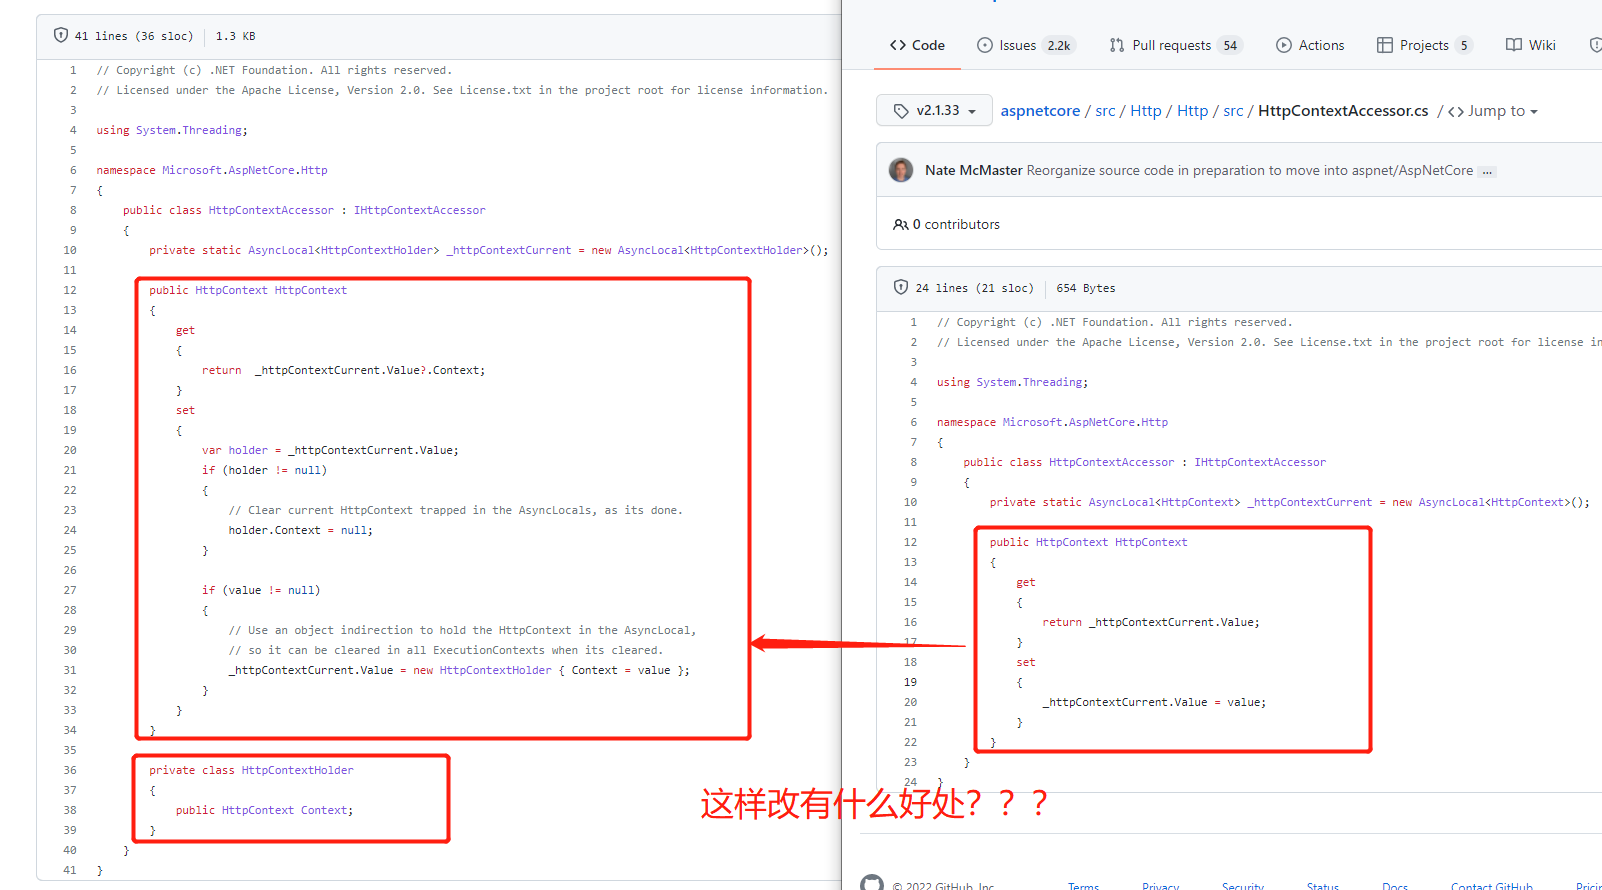
在印象中,这已经是第三次遇到有小伙伴问这个问题了,特意来写一篇记录,来回答一下这个问题。
关于HttpContext其实我们大家都不陌生,它封装了HttpRequest和HttpResponse,在处理Http请求时,起着至关重要的作用。
那么如何访问HttpContext对象呢?回到await/async出现以前的ASP.NET的时代,我们可以通过HttpContext.Current方法直接访问当前Http请求的HttpContext对象,因为当时基本都是同步的代码,一个Http请求只会在一个线程中处理,所以我们可以使用能在当前线程中传播的CallContext.HostContext来保存HttpContext对象,它的代码长这个样子。
namespace System.Web.Hosting {

    using System.Web;
    using System.Web.Configuration;
    using System.Runtime.Remoting.Messaging;
    using System.Security.Permissions;

    internal class ContextBase {

        internal static Object Current {
            get {
                // CallContext在不同的线程中不一样
                return CallContext.HostContext;
            }

            [SecurityPermission(SecurityAction.Demand, Unrestricted = true)]
            set {
                CallContext.HostContext = value;
            }
        }
        ......
    }
}}
一切都很美好,但是后面微软在C#为了进一步增强增强了异步IO的性能,从而实现的stackless协程,加入了await/async关键字(感兴趣的小伙伴可以阅读黑洞的这一系列文章),同一个方法内的代码await前与后不一定在同一个线程中执行,那么就会造成在await之后的代码使用HttpContext.Current的时候访问不到当前的HttpContext对象,下面有一段这个问题简单的复现代码。
// 设置当前线程HostContext
CallContext.HostContext = new Dictionary<string, string>
{
	["ContextKey"] = "ContextValue"
};
// await前,可以正常访问
Console.Write($"[{Thread.CurrentThread.ManagedThreadId}] await before:");
Console.WriteLine(((Dictionary<string,string>)CallContext.HostContext)["ContextKey"]);

await Task.Delay(100);

// await后,切换了线程,无法访问
Console.Write($"[{Thread.CurrentThread.ManagedThreadId}] await after:");
Console.WriteLine(((Dictionary<string,string>)CallContext.HostContext)["ContextKey"]);
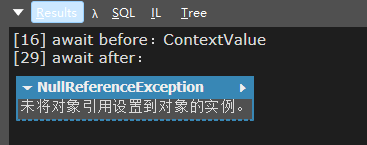
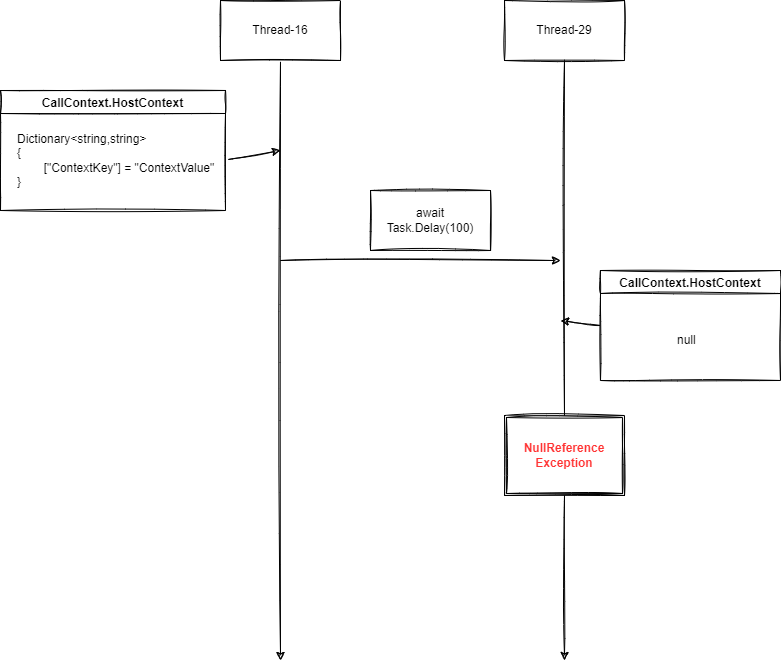
可以看到await执行之前HostContext是可以正确的输出赋值的对象和数据,但是await以后的代码由于线程从16切换到29,所以访问不到上面代码给HostContext设置的对象了。
为了解决这个问题,微软在.NET 4.6中引入了AsyncLocal<T>类,后面重新设计的ASP.NET Core自然就用上了AsyncLocal<T>来存储当前Http请求的HttpContext对象,也就是开头截图的代码一样,我们来尝试一下。
var asyncLocal = new AsyncLocal<Dictionary<string,string>>();

// 设置当前线程HostContext
asyncLocal.Value = new Dictionary<string, string>
{
	["ContextKey"] = "ContextValue"
};
// await前,可以正常访问
Console.Write($"[{Thread.CurrentThread.ManagedThreadId}] await before:");
Console.WriteLine(asyncLocal.Value["ContextKey"]);

await Task.Delay(100);

// await后,切换了线程,可以访问
Console.Write($"[{Thread.CurrentThread.ManagedThreadId}] await after:");
Console.WriteLine(asyncLocal.Value["ContextKey"]);
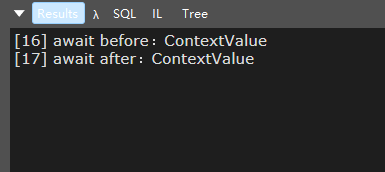
没有任何问题,线程从16切换到了17,一样的可以访问。对AsyncLocal感兴趣的小伙伴可以看黑洞的这篇文章。简单的说就是AsyncLocal默认会将当前线程保存的上下对象在发生await的时候传播到后续的线程上。
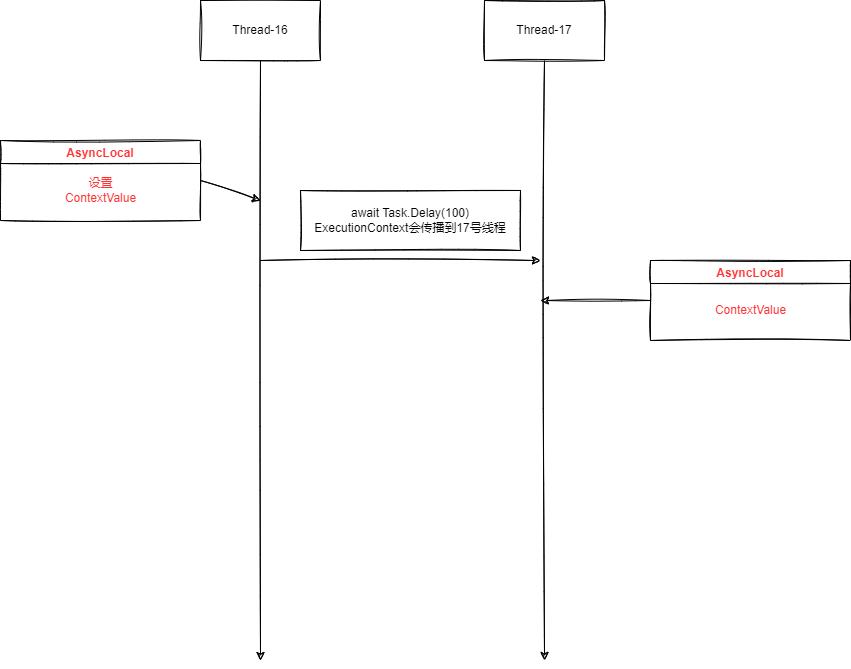
这看起来就非常的美好了,既能开开心心的用await/async又不用担心上下文数据访问不到,那为什么ASP.NET Core的后续版本需要修改HttpContextAccesor呢?我们自己来实现ContextAccessor,大家看下面一段代码。
// 给Context赋值一下
var accessor = new ContextAccessor();
accessor.Context =  "ContextValue";
Console.WriteLine($"[{Thread.CurrentThread.ManagedThreadId}] Main-1:{accessor.Context}");

// 执行方法
await Method();

// 再打印一下
Console.WriteLine($"[{Thread.CurrentThread.ManagedThreadId}] Main-2:{accessor.Context}");

async Task Method()
{
	// 输出Context内容
	Console.WriteLine($"[{Thread.CurrentThread.ManagedThreadId}] Method-1:{accessor.Context}");
	await Task.Delay(100);
	// 注意!!!,我在这里将Context对象清空
	Console.WriteLine($"[{Thread.CurrentThread.ManagedThreadId}] Method-2:{accessor.Context}");
	accessor.Context = null;
	Console.WriteLine($"[{Thread.CurrentThread.ManagedThreadId}] Method-3:{accessor.Context}");
}

// 实现一个简单的Context Accessor
public class ContextAccessor
{
	static AsyncLocal<string> _contextCurrent = new AsyncLocal<string>();

	public string Context
	{
		get => _contextCurrent.Value;
		set => _contextCurrent.Value = value;
	}
}
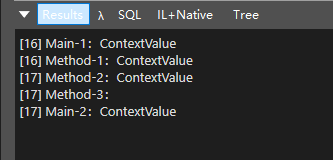
奇怪的事情就发生了,为什么明明在Method中把Context对象置为null了,Method-3中已经输出为null了,为啥在Main-2输出中还是ContextValue呢?
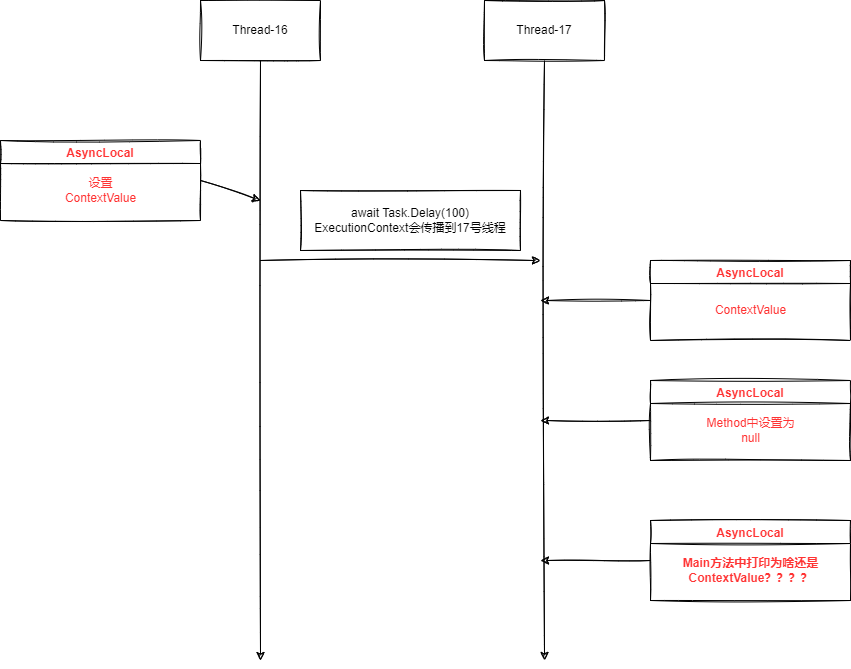
其实这已经解答了上面的问题,就是为什么在ASP.NET Core 6.0中的实现方式突然变了,有这样一种场景,已经当前线程中把HttpContext置空了,但是其它线程仍然能访问HttpContext对象,导致后续的行为可能不一致。
那为什么会造成这个问题呢?首先我们得知道AsyncLocal是如何实现的,这里我就不在赘述,详细可以看我前面给的链接(黑洞大佬的文章)。这里只简单的说一下,我们只需要知道AsyncLocal底层是通过ExecutionContext实现的,每次设置Value时都会用新的Context对象来覆盖原有的,代码如下所示(有删减)。
public sealed class AsyncLocal<T> : IAsyncLocal
{
    public T Value
    {
        [SecuritySafeCritical]
        get
        {
            // 从ExecutionContext中获取当前线程的值
            object obj = ExecutionContext.GetLocalValue(this);
            return (obj == null) ? default(T) : (T)obj;
        }
        [SecuritySafeCritical]
        set
        {
            // 设置值
            ExecutionContext.SetLocalValue(this, value, m_valueChangedHandler != null);
        }
    }
}

......
public sealed class ExecutionContext : IDisposable, ISerializable
{
	internal static void SetLocalValue(IAsyncLocal local, object newValue, bool needChangeNotifications)
	{
		var current = Thread.CurrentThread.GetMutableExecutionContext();

		object previousValue = null;

		if (previousValue == newValue)
			return;

		var newValues = current._localValues;
        // 无论是AsyncLocalValueMap.Create 还是 newValues.Set
        // 都会创建一个新的IAsyncLocalValueMap对象来覆盖原来的值
		if (newValues == null)
		{
			newValues = AsyncLocalValueMap.Create(local, newValue, treatNullValueAsNonexistent: !needChangeNotifications);
		}
		else
		{
			newValues = newValues.Set(local, newValue, treatNullValueAsNonexistent: !needChangeNotifications);
		}
		current._localValues = newValues;
        ......
	}
}
接下来我们需要避开await/async语法糖的影响,反编译一下IL代码,使用C# 1.0来重新组织代码(使用ilspy或者dnspy之类都可以)。

可以看到原本的语法糖已经被拆解成stackless状态机,这里我们重点关注Start方法。进入Start方法内部,我们可以看到以下代码,源码链接。
......
// Start方法
public static void Start<TStateMachine>(ref TStateMachine stateMachine) where TStateMachine : IAsyncStateMachine
{
    if (stateMachine == null)
    {
        ThrowHelper.ThrowArgumentNullException(ExceptionArgument.stateMachine);
    }

    Thread currentThread = Thread.CurrentThread;
    // 备份当前线程的 executionContext
    ExecutionContext? previousExecutionCtx = currentThread._executionContext;
    SynchronizationContext? previousSyncCtx = currentThread._synchronizationContext;

    try
    {
        // 执行状态机
        stateMachine.MoveNext();
    }
    finally
    {
        if (previousSyncCtx != currentThread._synchronizationContext)
        {
            // Restore changed SynchronizationContext back to previous
            currentThread._synchronizationContext = previousSyncCtx;
        }

        ExecutionContext? currentExecutionCtx = currentThread._executionContext;
        // 如果executionContext发生变化,那么调用RestoreChangedContextToThread方法还原
        if (previousExecutionCtx != currentExecutionCtx)
        {
            ExecutionContext.RestoreChangedContextToThread(currentThread, previousExecutionCtx, currentExecutionCtx);
        }
    }
}
......
// 调用RestoreChangedContextToThread方法
internal static void RestoreChangedContextToThread(Thread currentThread, ExecutionContext? contextToRestore, ExecutionContext? currentContext)
{
    Debug.Assert(currentThread == Thread.CurrentThread);
    Debug.Assert(contextToRestore != currentContext);

    // 将改变后的ExecutionContext恢复到之前的状态
    currentThread._executionContext = contextToRestore;
    ......
}
通过上面的代码我们就不难看出,为什么会存在这样的问题了,是因为状态机的Start方法会备份当前线程的ExecuteContext,如果ExecuteContext在状态机内方法调用时发生了改变,那么就会还原回去。
又因为上文提到的AsyncLocal底层实现是ExecuteContext,每次SetValue时都会生成一个新的IAsyncLocalValueMap对象覆盖当前的ExecuteContext,必然修改就会被还原回去了。
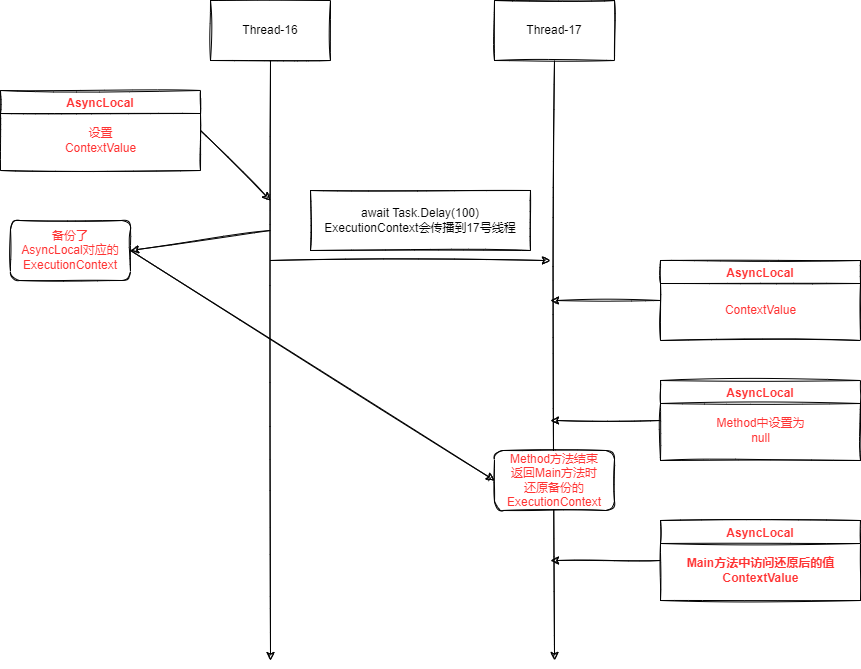
在ASP.NET Core中,解决这个问题的方法也很巧妙,就是简单的包了一层。我们也可以简单的包一层对象。
public class ContextHolder
{
	public string Context {get;set;}
}

public class ContextAccessor
{
	static AsyncLocal<ContextHolder> _contextCurrent = new AsyncLocal<ContextHolder>();

	public string Context
	{
		get => _contextCurrent.Value?.Context;
		set
		{
			var holder = _contextCurrent.Value;
            // 拿到原来的holder 直接修改成新的value
            // asp.net core源码是设置为null 因为在它的逻辑中执行到了这个Set方法
            // 就必然是一个新的http请求,需要把以前的清空
			if (holder != null) holder.Context = value;
            // 如果没有holder 那么新建
			else _contextCurrent.Value = new ContextHolder { Context = value};
		}
	}
}
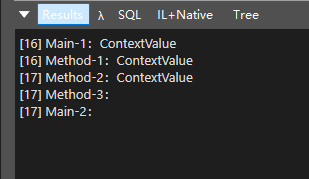
最终结果就和我们预期的一致了,流程也如下图一样。自始至终都是修改的同一个ContextHolder对象。
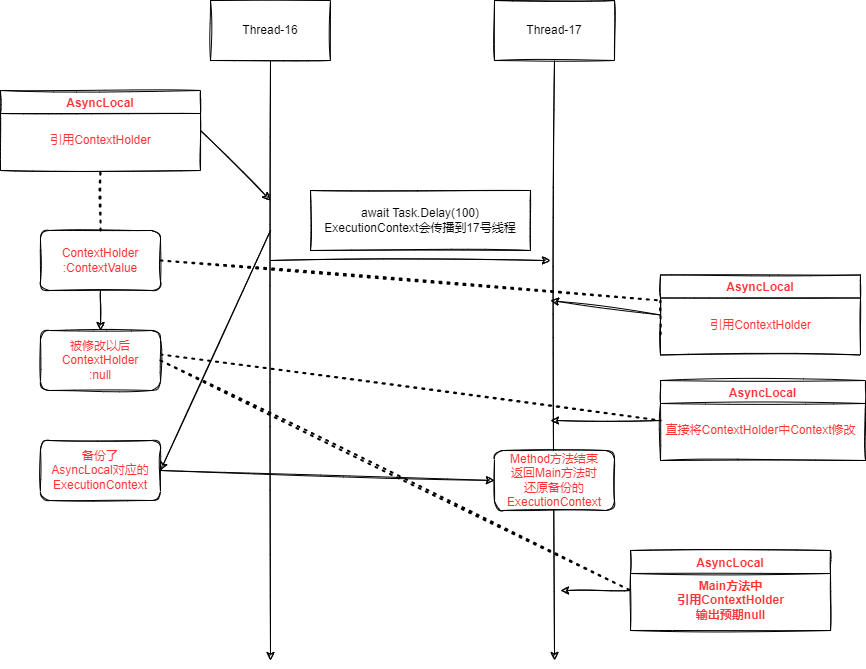
由上可见,ASP.NET Core 6.0的HttpContextAccessor那样设计的原因就是为了解决AsyncLocal在await环境中会发生复制,导致不能及时清除历史的HttpContext的问题。
笔者水平有限,如果错漏,欢迎指出,感谢各位的阅读!
ASP.NET Core 2.1 HttpContextAccessor源码:link
ASP.NET Core 6.0 HttpContextAccessor源码:link
AsyncMethod Start方法源码: link
AsyncLocal源码:link
