我不想卷,我是被逼的 在做了几年前端之后,发现互联网行情比想象的差,不如赶紧学点后端知识,被裁之后也可接个私活不至于饿死。学习两周Go,如盲人摸象般不知重点,那么重点
在做了几年前端之后,发现互联网行情比想象的差,不如赶紧学点后端知识,被裁之后也可接个私活不至于饿死。学习两周Go,如盲人摸象般不知重点,那么重点谁知道呢?肯定是使用Go的后端工程师,那便利用业余时间找了几个老哥对练一下。其中一位问道在利用多个goroutine发送请求拿到结果之后如果进行销毁。是个好问题,研究了一下需要利用Context,而我一向喜欢研究源码,继续深挖发现细节非常多,于是乎有此这篇文章。
有句话叫做初出茅庐天下无敌,再练三年寸步难行。本着不服输精神回来研究了一下这个问题,很简单需要使用Go提供的Context,api使用起来也很简单,但是我一向喜欢刨根问底,于是乎研究Context源码发现互斥锁(Mutex)、原子操作(atomic),研究atomic发现CAS,研究CAS发现了java的自旋锁、偏向锁、轻量级锁、重量级锁,研究锁发现Disruptor,研究Disruptor发现CPU伪共享、MESI协议、内存屏障。 所以这篇文章会自下向上的讲解,先讲CPU硬件设计带来的优势以及带来的问题(多核并发冲突、伪共享),从底层上理解并发问题存在的根因,然后讲解原子操作与CAS,之后讲解操作系统为解决并发问题的锁机制、信号量,然后介绍下高并发框架Disruptor利用这些机制的高性能实现,最后回到Go中的atomic.Value以及建立在aotmic.Value和Mutex之上的Context,最后的最后回答下那位老哥问题,怎么使用Context来做goroutine的调度。
并发与并行
并行是并发的一个子集;并发(ConcurrentMode)强调的是从任务调度角度来看,同时安排多个是任务;任务可以穿插着执行,并不一定是同一时刻在同时进行;并行(Parallel)是从实际执行角度来看真的有多个任务在同一时刻同时执行。
现代CPU多半是多核设计,所以我理解会存在以多核并行的方式进行高并发运行。当然单核单线程依然存在并行,它上面也存在真正的“并行”。只不过,这个并行并不是CPU内部的、线程之间的并行;而是CPU执行程序的同时,DMA控制器也在执行着网络报文收发、磁盘读写、音视频播放/录制等等任务。
不像js这种单线程异步的语言,向java、Go语法上看起来都是以多线程同步阻塞的形式运行,一般多个请求来时,都是开启一个线程池利用多线程的方式进行处理。得益于CPU多核的优势,可以快速并行运行请求任务,但是同样因为这个原因会天然的引起多线程访问数据冲突。
硬件底层原因
并发冲突
并发资源冲突的底层原因与CPU设计有关,先看CPU的缓存结构
所以这篇文章会自下向上的讲解,先讲CPU硬件设计带来的优势以及带来的问题(多核并发冲突、伪共享),从底层上理解并发问题存在的根因,然后讲解原子操作与CAS,之后讲解操作系统为解决并发问题的锁机制、信号量,然后介绍下高并发框架Disruptor利用这些机制的高性能实现,最后回到Go中的atomic.Value以及建立在aotmic.Value和Mutex之上的Context,最后的最后回答下那位老哥问题,怎么使用Context来做goroutine的调度。
并发与并行
并行是并发的一个子集;并发(ConcurrentMode)强调的是从任务调度角度来看,同时安排多个是任务;任务可以穿插着执行,并不一定是同一时刻在同时进行;并行(Parallel)是从实际执行角度来看真的有多个任务在同一时刻同时执行。
现代CPU多半是多核设计,所以我理解会存在以多核并行的方式进行高并发运行。当然单核单线程依然存在并行,它上面也存在真正的“并行”。只不过,这个并行并不是CPU内部的、线程之间的并行;而是CPU执行程序的同时,DMA控制器也在执行着网络报文收发、磁盘读写、音视频播放/录制等等任务。
不像js这种单线程异步的语言,向java、Go语法上看起来都是以多线程同步阻塞的形式运行,一般多个请求来时,都是开启一个线程池利用多线程的方式进行处理。得益于CPU多核的优势,可以快速并行运行请求任务,但是同样因为这个原因会天然的引起多线程访问数据冲突。
硬件底层原因
并发冲突
并发资源冲突的底层原因与CPU设计有关,先看CPU的缓存结构

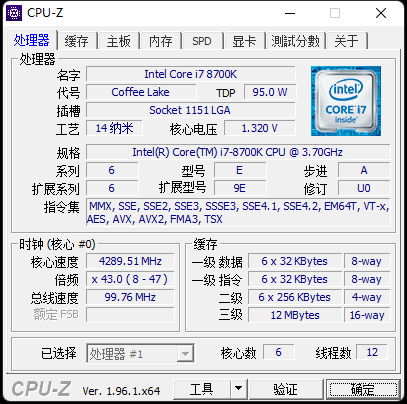 可以看到i7-8700k是6核,右下角L1、L2都6x多少kb,可以看到L1、L2缓存是各个核心独有的,L3是共用的,读取数据时会先从内存中把数据和指令读到自己的L1缓存中,这就可以知道当两个线程访问同一个数据时,CPU角度他们其实在各自核心中都是独有的。
同样在写的时候,CPU为了节省跟内存通信带来的性能开销,也并不一定是程序更新后立即放到内存中。而是有两种策略:写直达和写回。写直达比较简单,都是每次写入到内存中,性能开销大。而写回是当L1数据缓存中的变量A被更改后不立即写回内存,只是做一个脏标记,这样多次写同一个变量A可以一直在L1中处理,直到这个缓存位置的A不在处理了,需要A腾出地方给另一个变量B时,才把A的数据写到内存中,这样提升缓存命中率,减少与内存的通信提升性能。
可以想象的是,这种高性能在多核并发运行时,两个核心都读到了变量A值为0,核心1上运行的线程T1把A改成了10,但没有写到内存中,也没有通知核心2,它的L1缓存中A还是0,这时候核心2的线程T2把A改成了20;当他们都往内存写的时候,必然出现冲突。这就是在单机上多线程并发引起的资源冲突的底层原因,也是后续各种原子操作、锁、信号量等机制要解决的问题。推广到宏观业务场景是一样的,两个服务为了性能优化,先把数,0读到自己的内存中,一个改成了1,一个改成了2,而数据库看到的还是0,这时候两个服务都往数据库写,就会产生冲突。
原子操作
为了解决这个问题,早期科学家走了很多弯路,花了好多年才找到解决软件和硬件的解决方案。首先在CPU硬件层面,有两个手段:写传播和MESI协议。
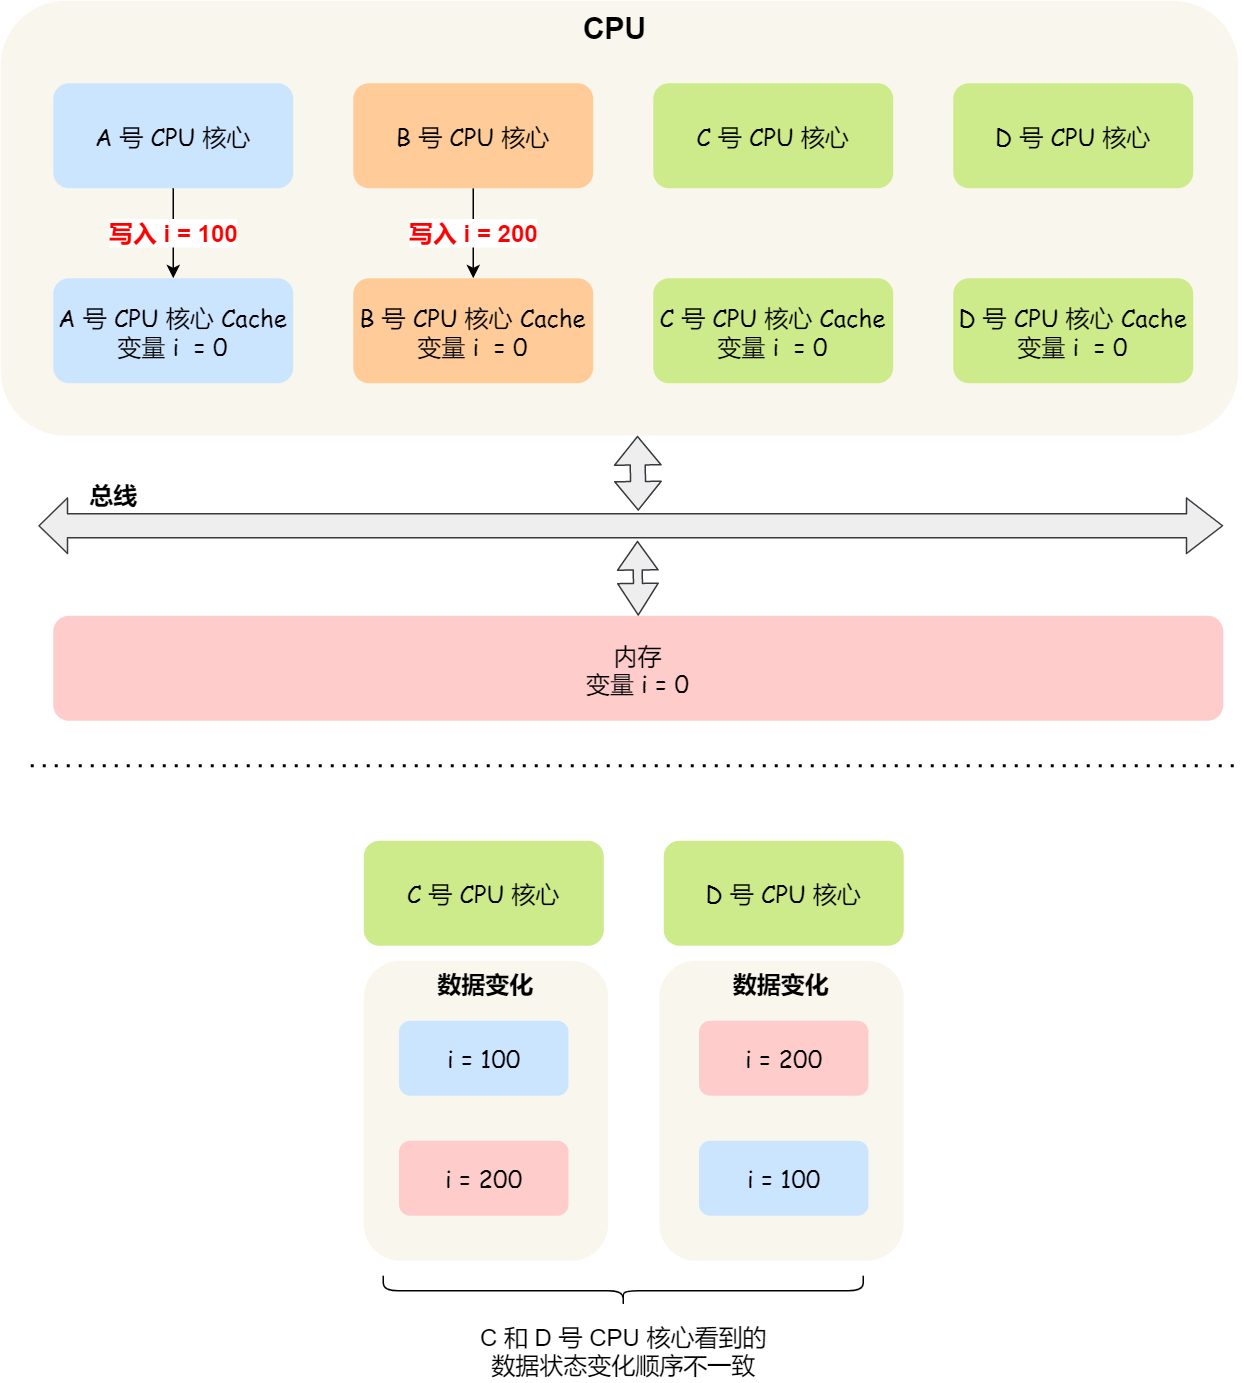
写传播的方案就是当某个核心更新了Cache数据后,要把事件广播通知到其他核心,但是并不能保证时序问题。比如核心1更改了A为100,核心2更改了A为200,这两个是在同一时间发生的,更改之后他们分别通知对方,那么在核心1看来A是先变成了100然后又被改成了200,核心2看来A是先被改成了200,然后有收到通知要改成100;当他们往内存写的时候还是存在冲突。
可以看到i7-8700k是6核,右下角L1、L2都6x多少kb,可以看到L1、L2缓存是各个核心独有的,L3是共用的,读取数据时会先从内存中把数据和指令读到自己的L1缓存中,这就可以知道当两个线程访问同一个数据时,CPU角度他们其实在各自核心中都是独有的。
同样在写的时候,CPU为了节省跟内存通信带来的性能开销,也并不一定是程序更新后立即放到内存中。而是有两种策略:写直达和写回。写直达比较简单,都是每次写入到内存中,性能开销大。而写回是当L1数据缓存中的变量A被更改后不立即写回内存,只是做一个脏标记,这样多次写同一个变量A可以一直在L1中处理,直到这个缓存位置的A不在处理了,需要A腾出地方给另一个变量B时,才把A的数据写到内存中,这样提升缓存命中率,减少与内存的通信提升性能。
可以想象的是,这种高性能在多核并发运行时,两个核心都读到了变量A值为0,核心1上运行的线程T1把A改成了10,但没有写到内存中,也没有通知核心2,它的L1缓存中A还是0,这时候核心2的线程T2把A改成了20;当他们都往内存写的时候,必然出现冲突。这就是在单机上多线程并发引起的资源冲突的底层原因,也是后续各种原子操作、锁、信号量等机制要解决的问题。推广到宏观业务场景是一样的,两个服务为了性能优化,先把数,0读到自己的内存中,一个改成了1,一个改成了2,而数据库看到的还是0,这时候两个服务都往数据库写,就会产生冲突。
原子操作
为了解决这个问题,早期科学家走了很多弯路,花了好多年才找到解决软件和硬件的解决方案。首先在CPU硬件层面,有两个手段:写传播和MESI协议。
写传播的方案就是当某个核心更新了Cache数据后,要把事件广播通知到其他核心,但是并不能保证时序问题。比如核心1更改了A为100,核心2更改了A为200,这两个是在同一时间发生的,更改之后他们分别通知对方,那么在核心1看来A是先变成了100然后又被改成了200,核心2看来A是先被改成了200,然后有收到通知要改成100;当他们往内存写的时候还是存在冲突。
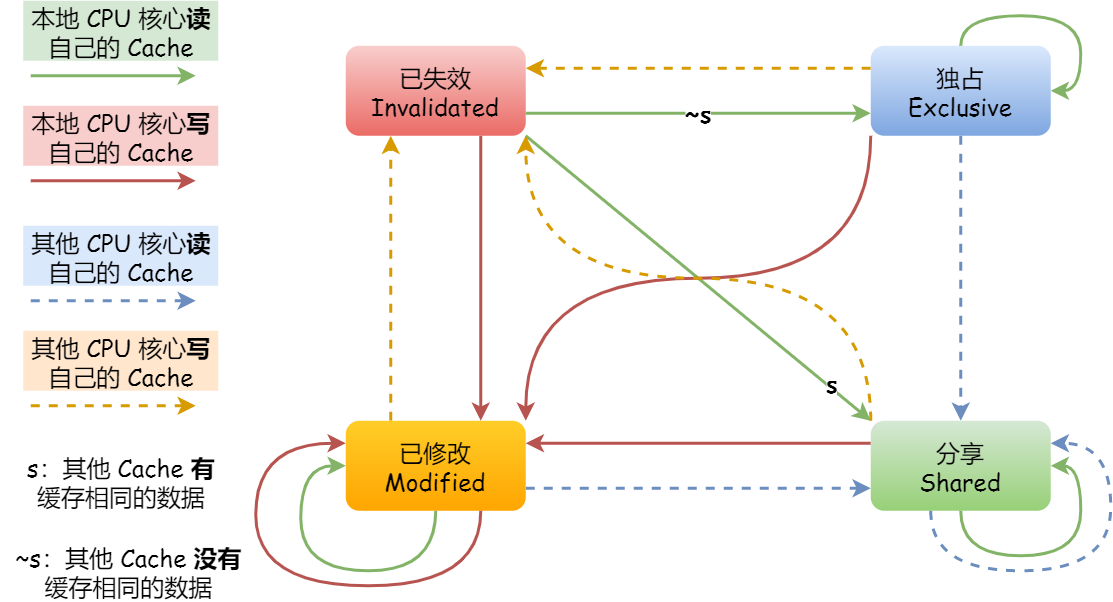
 解决这个问题就是要在CPU硬件上做到事务的串行化,MESI就是解决这个问题。
MESI 协议其实是 4 个状态单词的开头字母缩写,分别是:
解决这个问题就是要在CPU硬件上做到事务的串行化,MESI就是解决这个问题。
MESI 协议其实是 4 个状态单词的开头字母缩写,分别是:
- Modified,已修改
- Exclusive,独占
- Shared,共享
- Invalidated,已失效
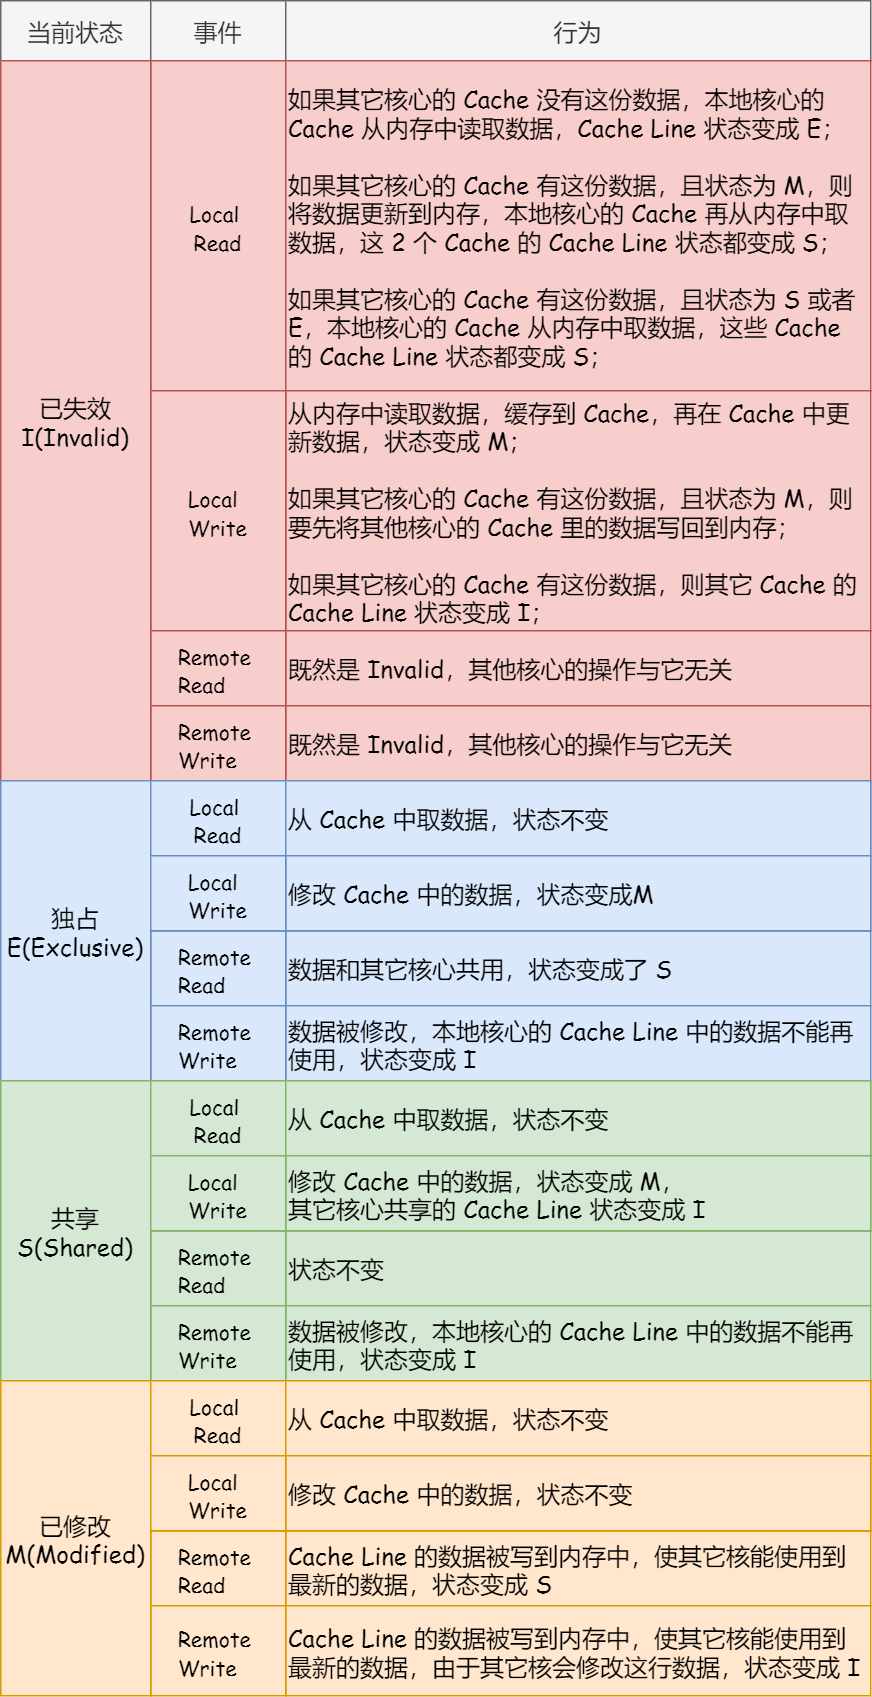 这个MESI协议在CPU硬件层面保证了并发访问变量的串行性,当然这需要做设置,你不开开关是不行的,毕竟高并发场景也不是那么多很多语言在设计层面上就杜绝了多线程安全性问题,所以没必要每次更新值都用这个协议有性能损耗的。而这个开关其实就是各语言和操作系统或者虚拟机封装出来的原子操作,这就是原子操作和内存屏障的底层原理。(原子操作和内存屏障是硬件层面提供的机制,而锁是操作系统提供的机制,所以原子操作和内存屏障比锁的性能更高)(MESI部分的图文取材自小林coding的图解系统,感谢)
原子操作与内存屏障
在了解CPU层面的硬件知识之后我们再来介绍在高并发场景中经常会遇到的原子操作和内存屏障是怎么回事。
原子操作
原子是是指化学反应中不可再分的基本微粒,所以引入到计算机场景中,原子操作是指一次操作是不可被打断分割的(非原子操作,比如我们自己写的一个函数执行可能是会被在某个语句中断一会儿后接着继续执行的);但是说到原子操作这个名词其实是存在歧义的,不同场景下含义不同(有的把事务也等同是原子操作),这里说的原子操作专门指需要依赖CPU硬件指令提供的方式。
原子操作微观粒度层面是通过硬件指令来实现的,比如读取一个L1缓存中的数据是原子(这是最小粒度的原子性),现在多核CPU基本上都是在cache lock层面即利用上文的MESI协议来保证原子性。
但是原子操作一般只能保证一个小变量操作的原子性,当是复杂类型时,一般使用COW(copy on wirte)方案,首先有一个指向这个对象的指针,在需要原子性修改这个大对象数据时,就把这个对象的数据拷贝一份(这里的拷贝指的是非常底层的拷贝可能是L1或者L2缓存),在对象副本上修改,然后在原子性的指向这个对象的指针(这里核心方案是利用指令来实现指针的原子替换,指针占用内存还是很小的)。这也是Go语言在atomic.Value中使用到的方案(LoadPointer、和StorePointer)。
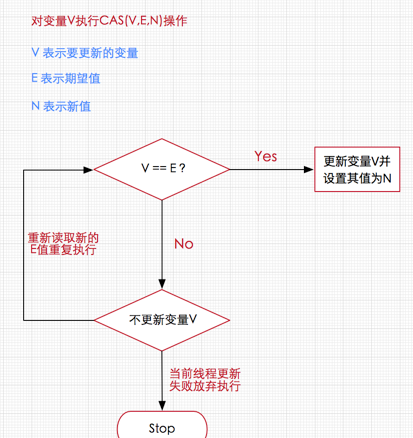
而我们在并发中一定经常听到CAS(Compare And Swap),这个其实是一个CPU指令,各种语言或者工具依赖这个指令提供了各种CAS(VEN)函数,如compareAndSwapInt、compareAndSwapPointer等,他做的事情很简单,V和E进行比较,如果V和E相等就把V设为N,不相等则失败,由CPU保证这个过程的原子性。这是一个非常底层的函数,用在并发场景中非常有用。一般用来在并发场景中尝试修改值,也是自旋锁的底层。
这个MESI协议在CPU硬件层面保证了并发访问变量的串行性,当然这需要做设置,你不开开关是不行的,毕竟高并发场景也不是那么多很多语言在设计层面上就杜绝了多线程安全性问题,所以没必要每次更新值都用这个协议有性能损耗的。而这个开关其实就是各语言和操作系统或者虚拟机封装出来的原子操作,这就是原子操作和内存屏障的底层原理。(原子操作和内存屏障是硬件层面提供的机制,而锁是操作系统提供的机制,所以原子操作和内存屏障比锁的性能更高)(MESI部分的图文取材自小林coding的图解系统,感谢)
原子操作与内存屏障
在了解CPU层面的硬件知识之后我们再来介绍在高并发场景中经常会遇到的原子操作和内存屏障是怎么回事。
原子操作
原子是是指化学反应中不可再分的基本微粒,所以引入到计算机场景中,原子操作是指一次操作是不可被打断分割的(非原子操作,比如我们自己写的一个函数执行可能是会被在某个语句中断一会儿后接着继续执行的);但是说到原子操作这个名词其实是存在歧义的,不同场景下含义不同(有的把事务也等同是原子操作),这里说的原子操作专门指需要依赖CPU硬件指令提供的方式。
原子操作微观粒度层面是通过硬件指令来实现的,比如读取一个L1缓存中的数据是原子(这是最小粒度的原子性),现在多核CPU基本上都是在cache lock层面即利用上文的MESI协议来保证原子性。
但是原子操作一般只能保证一个小变量操作的原子性,当是复杂类型时,一般使用COW(copy on wirte)方案,首先有一个指向这个对象的指针,在需要原子性修改这个大对象数据时,就把这个对象的数据拷贝一份(这里的拷贝指的是非常底层的拷贝可能是L1或者L2缓存),在对象副本上修改,然后在原子性的指向这个对象的指针(这里核心方案是利用指令来实现指针的原子替换,指针占用内存还是很小的)。这也是Go语言在atomic.Value中使用到的方案(LoadPointer、和StorePointer)。
而我们在并发中一定经常听到CAS(Compare And Swap),这个其实是一个CPU指令,各种语言或者工具依赖这个指令提供了各种CAS(VEN)函数,如compareAndSwapInt、compareAndSwapPointer等,他做的事情很简单,V和E进行比较,如果V和E相等就把V设为N,不相等则失败,由CPU保证这个过程的原子性。这是一个非常底层的函数,用在并发场景中非常有用。一般用来在并发场景中尝试修改值,也是自旋锁的底层。
 有了这个基础之后我们来看下Go中的atomic.Value的实现原理。它是在Go中用来设计为存储存储任意类型的数据,所以内部字段是一个interface{}类型。
type Value struct { v interface{} }
除此之外还有一个ifaceWords类型,这其实是对应于空interface的内部表示形式,主要为了得到其中的typ和data两个字段:
type ifaceWords struct {
  typ  unsafe.Pointer
  data unsafe.Pointer
}
这里用的是unsafe.Pointer它是可以直接操作内存,因为如果两种类型具有相同的内存结构,其实可以利用unsafe.Pointer来让两种类型的指针相互转换,来实现同一份内存的的不用解读。这里可以内部JavaScript中的ArrayBuffer可以被转化成DataView或者不同的TypedArray进行不同的解读。下面举了一个[]byte和string的例子,因为Go语言类型系统禁止他俩互转,但是可以利用unsafe.Pointer来绕过类型系统检查,直接转换。
bytes := []byte{104, 101, 108, 108, 111}

p := unsafe.Pointer(&bytes) //强制转换成unsafe.Pointer,编译器不会报错
str := *(*string)(p) //然后强制转换成string类型的指针,再将这个指针的值当做string类型取出来
fmt.Println(str) //输出 "hello"
下面来看下Store函数的代码:
func (v *Value) Store(x interface{}) {
  if x == nil {
    panic("sync/atomic: store of nil value into Value")
  }
  // 通过unsafe.Pointer将现有的和要写入的值分别转成ifaceWords类型,
  // 这样我们下一步就可以得到这两个interface{}的原始类型(typ)和真正的值(data)
  vp := (*ifaceWords)(unsafe.Pointer(v))  // Old value
  xp := (*ifaceWords)(unsafe.Pointer(&x)) // New value
  // 这里开始利用CAS来自旋了
  for {
    // 通过LoadPointer这个原子操作拿到当前Value中存储的类型
    typ := LoadPointer(&vp.typ)
    if typ == nil {
      // typ为nil代表Value实例被初始化,还没有被写入数据,则进行初始写入;
      // 初始写入需要确定typ和data两个值,非初始写入只需要更改data

      // Attempt to start first store.
      // Disable preemption so that other goroutines can use
      // active spin wait to wait for completion; and so that
      // GC does not see the fake type accidentally.
      // 获取runtime总当前P(调度器)并设置禁止抢占,使得goroutine执行当前逻辑不被打断以便尽快完成,同时这时候也不会发生GC
      // pin函数会将当前 goroutine绑定的P, 禁止抢占(preemption) 并从 poolLocal 池中返回 P 对应的 poolLocal
      runtime_procPin()
      // 使用CAS操作,先尝试将typ设置为^uintptr(0)这个中间状态。
      // 如果失败,则证明已经有别的线程抢先完成了赋值操作,那它就解除抢占锁,然后重新回到 for 循环第一步进行自旋
      // 回到第一步后,则进入到if uintptr(typ) == ^uintptr(0)这个逻辑判断和后面的设置StorePointer(&vp.data, xp.data)
      if !CompareAndSwapPointer(&vp.typ, nil, unsafe.Pointer(^uintptr(0))) {
        // 设置成功则将P恢复原样
        runtime_procUnpin()
        continue
      }
      // Complete first store.
      // 这里先写data字段在写typ字段,因为这个两个单独都是原子的
      // 但是两个原子放在一起未必是原子操作,所以先写data字段,typ用来做判断
      StorePointer(&vp.data, xp.data)
      StorePointer(&vp.typ, xp.typ)
      runtime_procUnpin()
      return
    }
    if uintptr(typ) == ^uintptr(0) {
        // 这个时候typ不为nil,但可能为^uintptr(0),代表当前有一个goroutine正在写入,还没写完
        // 我们先不做处理,保证那个写入线程操作的原子性
      // First store in progress. Wait.
      // Since we disable preemption around the first store,
      // we can wait with active spinning.
      continue
    }
    // First store completed. Check type and overwrite data.
    if typ != xp.typ { // atomic.Value第一确定类型之后,后续都不能改变
      panic("sync/atomic: store of inconsistently typed value into Value")
    }
    // 非第一次写入,则利用StorePointer这个原子操作直接写入。
    StorePointer(&vp.data, xp.data)
    return
  }
}
这个逻辑的主要思想就是,为了完成多个字段的原子性写入,我们可以抓住其中的一个字段,以它的状态来标志整个原子写入的状态。这个想法在 TiDB 的事务实现中叫Percolator模型,主要思想也是先选出一个primaryRow,然后所有的操作也是以primaryRow的成功与否作为标志。 atomic.Value的读取则简单很多。
func (v *Value) Load() (x interface{}) {
  vp := (*ifaceWords)(unsafe.Pointer(v))
  typ := LoadPointer(&vp.typ) // 原子性读
  // 如果当前的typ是 nil 或者^uintptr(0),那就证明第一次写入还没有开始,或者还没完成,那就直接返回 nil (不对外暴露中间状态)。
  if typ == nil || uintptr(typ) == ^uintptr(0) {
    // First store not yet completed.
    return nil
  }
  // 否则,根据当前看到的typ和data构造出一个新的interface{}返回出去
  data := LoadPointer(&vp.data)
  xp := (*ifaceWords)(unsafe.Pointer(&x))
  xp.typ = typ
  xp.data = data
  return
}
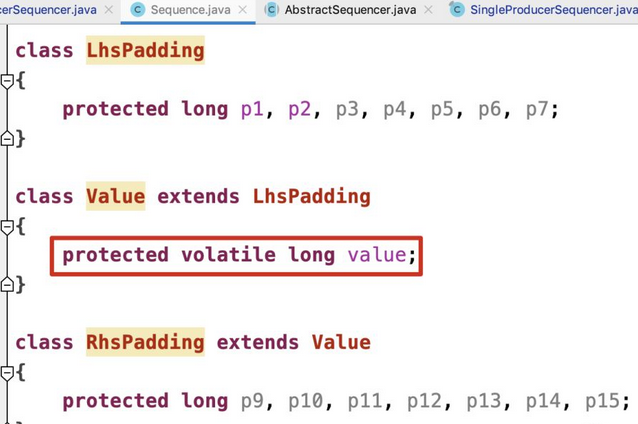
内存屏障 在编译器层面也会对我们写的代码做优化,导致CPU看到的指令顺序跟我们写的代码术顺序并不完全是一致的,这就也会导致多核执行情况下,数据不一致问题。而内存屏障也是解决这些问题的一种手段,各个语言封装底层指令,强制CPU指令按照代码写的顺序执行。 在上文中可以看到为提供缓冲命中和减少与内存通信频率,CPU做了各种优化策略,有的会给我们带来一些问题,比如某个核心更新了数据之后,如果没有进行原子操作会导致各个核心在L1中的数据不一致问题。内存屏障另一个作用是强制更新CPU的缓存,比如一个写屏障指令会把这个屏障前写入的数据更新到缓存中,这样任何后面试图读取该数据的线程都将得到最新值。 一般来说读写屏障是一起使用的,比如在java中,如果用volatile来修饰一个字段,Java内存模型将在写操作后插入一个写屏障指令,而在读操作前插入一个读屏障指令。所以如果对一个volatile字段进行操作,一旦完成写入,任何访问这个字段的线程都会得到最新值;在写入前volatile字段前,会被保证所有之前发生的事情都已经发生,并且任何更新过的数据值也是可见的,因为内存屏障会把之前的写入值都更新到缓存。 实际中Disruptor的Sequence就是利用了内存屏障这点(新版本已经不用了https://github.com/LMAX-Exchange/disruptor/blob/master/src/main/java/com/lmax/disruptor/Sequence.java)
 偏向锁、轻量级锁、重量级锁、自旋锁
锁是一个逻辑上的概念,锁的底层是互斥量和CAS;CAS我们前面已经介绍过了,他的底层是原子操作。互斥:是指某一资源同时只允许一个访问者对其进行访问,具有唯一性和排它性。但互斥无法限制访问者对资源的访问顺序,即访问是无序的。互斥是在操作系统级别提供的多线程对共享资源的访问机制,没有竞争到访问权的线程会被挂起,等资源被释放后线程又被恢复,整个过程是操作系统的调度机制实现的,线程挂起恢复虽然比进程要快但在高并发场景来讲还是太慢。
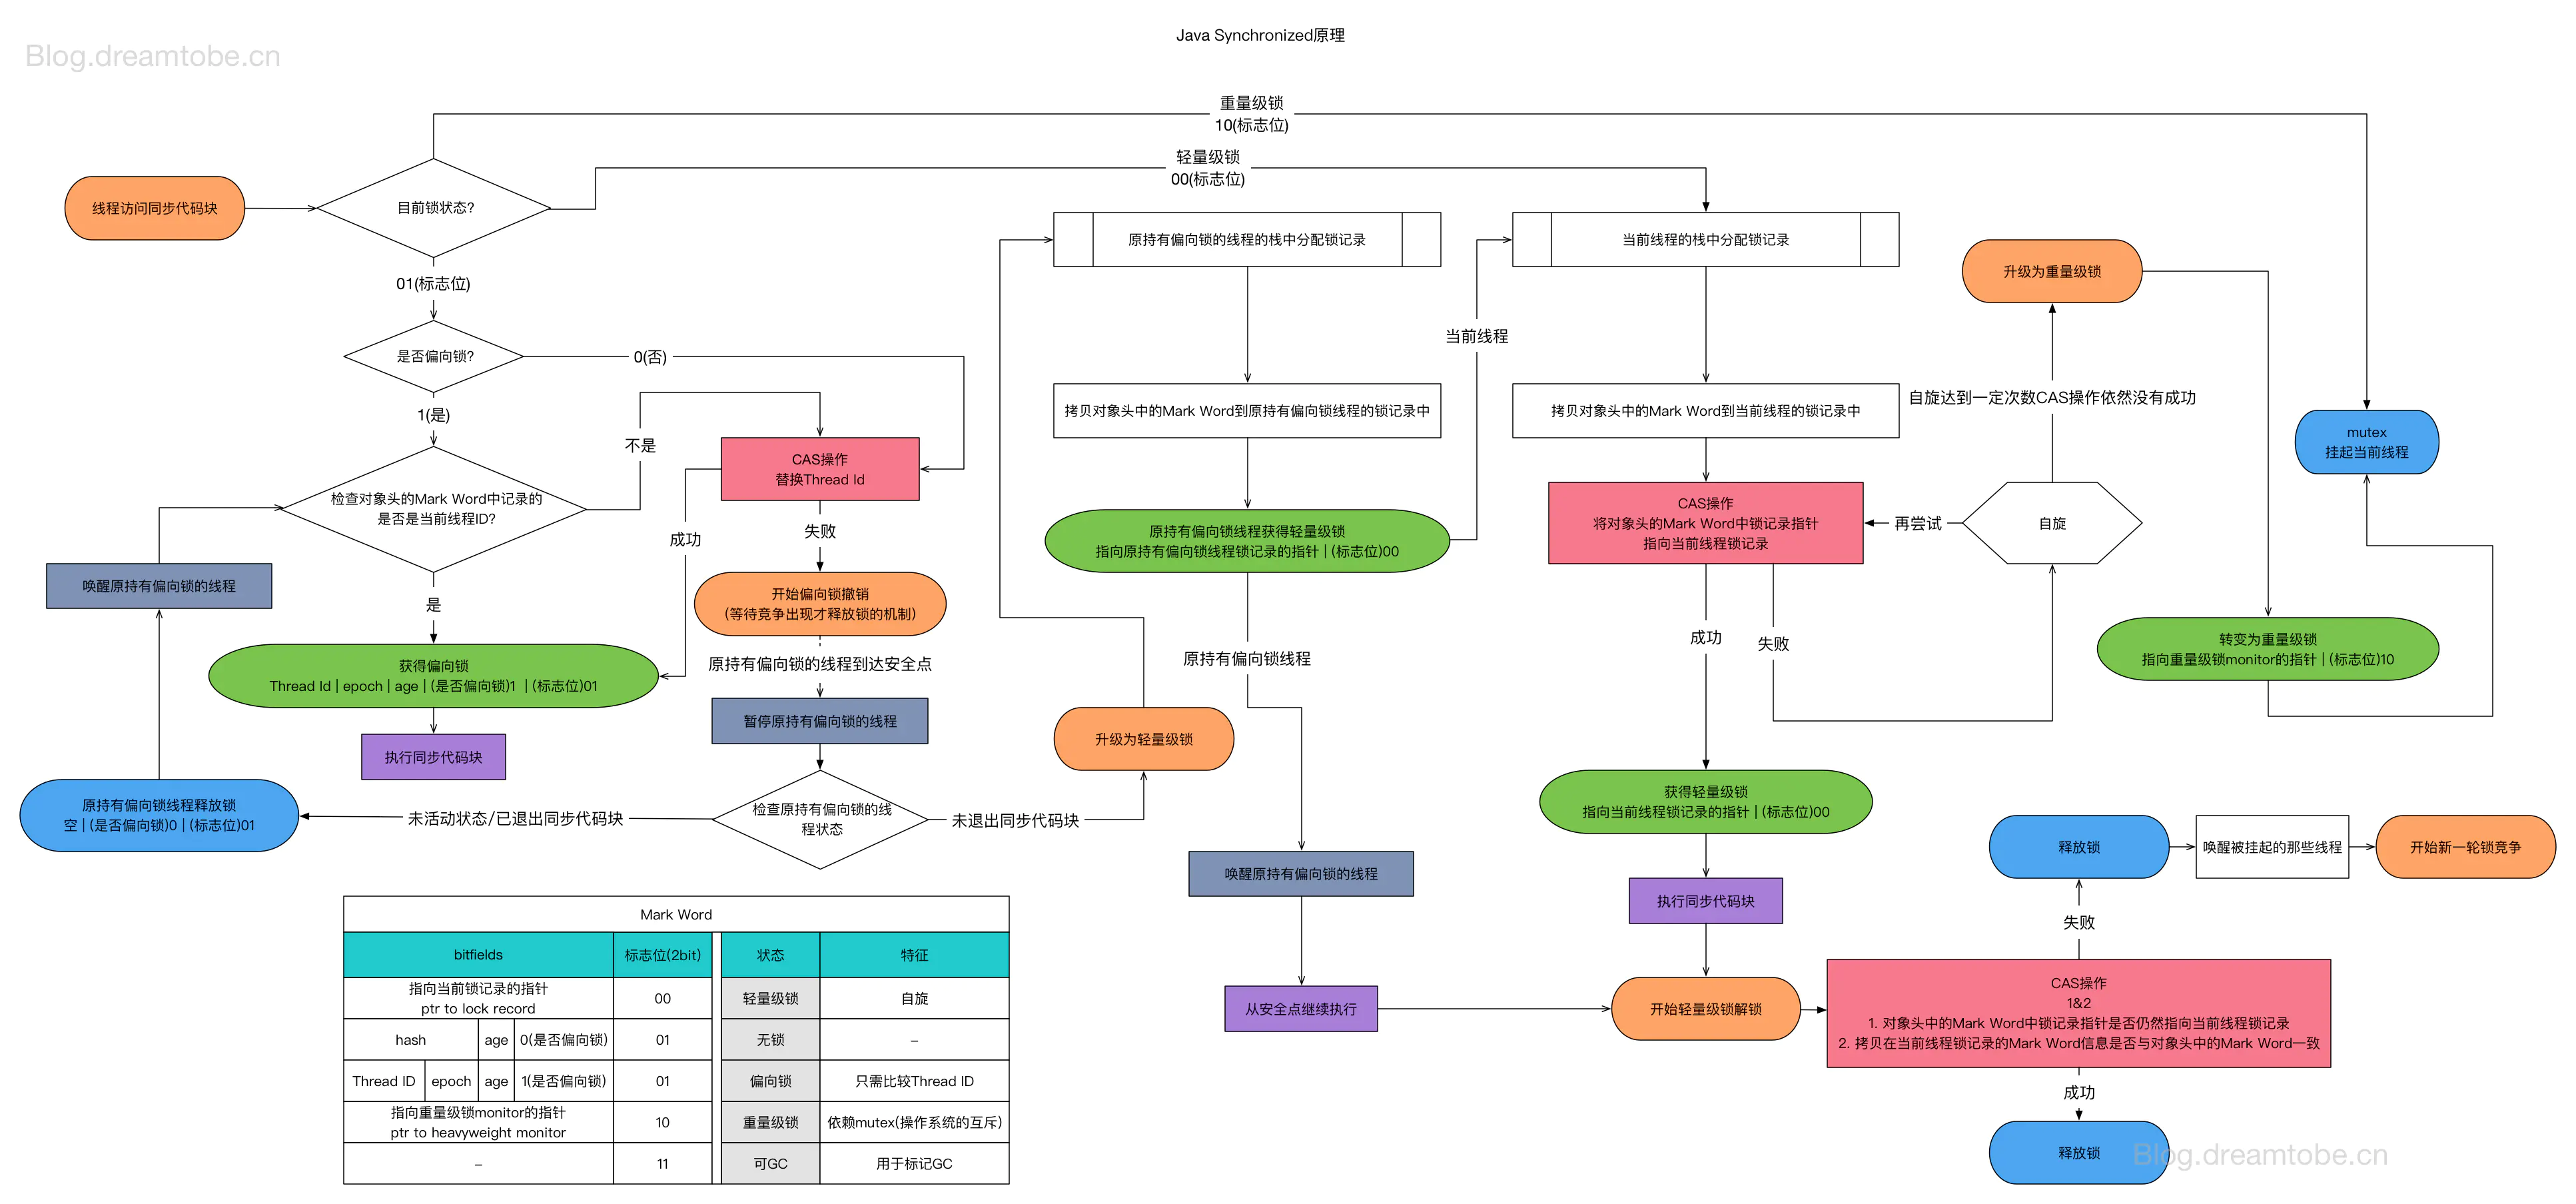
一般来讲我们说锁都是指操作系统级别通过互斥来进行调度的方式,自旋锁是特指依赖CAS进行资源抢占的方式(也有的地方把CAS自旋这种叫做无锁设计,概念比较混乱)。而Java语言中直接使用互斥锁比较重,在某些场景下可以在JVM层面做一些轻量级的调度,所以它创造了很多概念。所以重量级锁就是synchronized关键字,底层是互斥锁。偏向锁、轻量级锁、自旋锁底层都是CAS。
偏向锁和轻量级锁
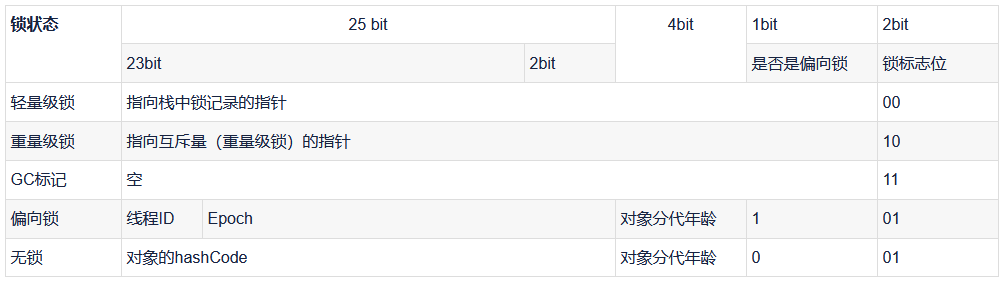
在JVM中,Java对象内存模式分为三部分,对象头、实例数据和对齐填充。对象头中有一部分MarkWord,在这部分中存储了一些锁的策略:
偏向锁、轻量级锁、重量级锁、自旋锁
锁是一个逻辑上的概念,锁的底层是互斥量和CAS;CAS我们前面已经介绍过了,他的底层是原子操作。互斥:是指某一资源同时只允许一个访问者对其进行访问,具有唯一性和排它性。但互斥无法限制访问者对资源的访问顺序,即访问是无序的。互斥是在操作系统级别提供的多线程对共享资源的访问机制,没有竞争到访问权的线程会被挂起,等资源被释放后线程又被恢复,整个过程是操作系统的调度机制实现的,线程挂起恢复虽然比进程要快但在高并发场景来讲还是太慢。
一般来讲我们说锁都是指操作系统级别通过互斥来进行调度的方式,自旋锁是特指依赖CAS进行资源抢占的方式(也有的地方把CAS自旋这种叫做无锁设计,概念比较混乱)。而Java语言中直接使用互斥锁比较重,在某些场景下可以在JVM层面做一些轻量级的调度,所以它创造了很多概念。所以重量级锁就是synchronized关键字,底层是互斥锁。偏向锁、轻量级锁、自旋锁底层都是CAS。
偏向锁和轻量级锁
在JVM中,Java对象内存模式分为三部分,对象头、实例数据和对齐填充。对象头中有一部分MarkWord,在这部分中存储了一些锁的策略:
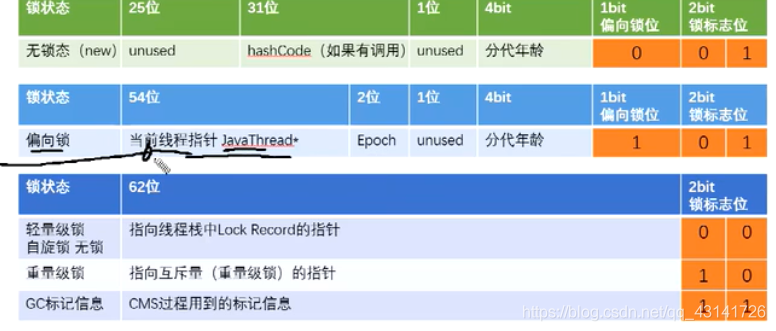
 JVM默认是开启偏向锁的,在竞争比较少的情况下,偏向锁或轻量级锁会提升性能,JVM会根据竞争条件,来进行锁的升级,保证逻辑正确性。(详细原理可以了解:https://blog.csdn.net/qq_43141726/article/details/118581304和https://www.jianshu.com/p/36eedeb3f912)
 自旋锁
自旋是指线程不被挂起而是,在使用CPU不停的空转等待其他线程释放锁,我的理解自旋锁一般是结合CAS来进行抢占资源。如Disruptor中对Entry的更新尝试,其实是利用了CAS自旋。
自旋锁
自旋是指线程不被挂起而是,在使用CPU不停的空转等待其他线程释放锁,我的理解自旋锁一般是结合CAS来进行抢占资源。如Disruptor中对Entry的更新尝试,其实是利用了CAS自旋。
/**@param delta the value to add
 * @return the previous value
 */
 * Atomically adds the given value to the current value.
 *
 *
public final int getAndAdd(int delta) {
    for (;;) {
        int current = get();
        int next = current + delta;
        if (compareAndSet(current, next))
            return current;
    }
}

/**@code ==} the expected value.
 *
 * @param expect the expected value
 * @param update the new value
 * @return true if successful. False return indicates that
 * the actual value was not equal to the expected value.
 */
 * Atomically sets the value to the given updated value
 * if the current value {
public final boolean compareAndSet(int expect, int update) {
    return unsafe.compareAndSwapInt(this, valueOffset, expect, update);
}
从Go的Context到atomic.Value,再到去学习CAS,再到发现各种锁,然后找锁存在的意义找到CPU层,整个过程其实是带着问题自上向下的,而文章是我在理解这些概念原理之后,自下向上一步步解答其中的问题,希望没有后端经验的前端同学能够看懂。原来想把整个Disruptor和Go的Context全部写完,现在已经十点多了,不卷洗洗睡,剩下文章等下周把。 参考资料 本文大量引用了相关参考资料的图片和语言,尤其是CPU硬件部分图片大部分来自于小林coding(https://xiaolincoding.com/os/1_hardware/cpu_mesi.html)的图片。版权问题请与我联系,侵删。
- 深入理解Go Context:https://article.itxueyuan.com/39dbvb
- context源码:https://github.com/golang/go/blob/master/src/context/context.go
- 聊一聊Go的Context上下文:https://studygolang.com/articles/28726
- go context详解:https://www.cnblogs.com/juanmaofeifei/p/14439957.html
- Go语言Context(上下文):http://c.biancheng.net/view/5714.html
- atomic原理以及实现:https://blog.csdn.net/u010853261/article/details/103996679
- atomic前世今生:https://blog.betacat.io/post/golang-atomic-value-exploration/
- CAS乐观锁:https://blog.csdn.net/yanluandai1985/article/details/82686486
- CAS乐观锁:https://blog.csdn.net/nrsc272420199/article/details/105032873
- 偏向锁、轻量级锁、重量级锁、自旋锁原理:https://blog.csdn.net/qq_43141726/article/details/118581304
- 自旋锁,偏向锁,轻量级锁,重量级锁:https://www.jianshu.com/p/27290e67e4d0
- CAS与自旋锁:https://blog.csdn.net/weixin_52904390/article/details/113700649
- 自旋锁、CAS、悲观锁、乐观锁:https://blog.csdn.net/weixin_45102619/article/details/120605691
- Go并发面试总结:https://www.iamshuaidi.com/8942.html
- 高性能队列-Disruptor:https://tech.meituan.com/2016/11/18/disruptor.html
- 锁与原子操作的关系:https://www.cnblogs.com/luconsole/p/4944304.html
- 多线程顺序打印:https://www.cnblogs.com/lazyegg/p/13900847.html
- 如何实现一个乐观锁:https://zhuanlan.zhihu.com/p/137818729
- disruptor与内存屏障:http://ifeve.com/disruptor-memory-barrier/
- Java volatile的作用:http://www.51gjie.com/java/574.html
- 浅谈原子操作:https://zhuanlan.zhihu.com/p/333675803
- sync.Pool设计思路:https://blog.csdn.net/u010853261/article/details/90647884