本文实例为大家分享了Android自定义输入法软键盘的具体代码,供大家参考,具体内容如下 1 功能描述 触屏设备主界面中有一个文本编辑框,底部区域固定显示一个数字键盘,键盘中除
本文实例为大家分享了Android自定义输入法软键盘的具体代码,供大家参考,具体内容如下
1 功能描述
- 触屏设备主界面中有一个文本编辑框,底部区域固定显示一个数字键盘,键盘中除数字键外,还带有*和#键功能;
- 提供一个自定义的数字输入法,生成apk安装包文件,嵌入到img镜像文件中去。
2 设计实现
1、创建类名为SimpleIME,继承父类InputMethodService,实现KeyboardView.OnKeyboardActionListener接口。
2、编写键盘对象加载的.xml文件。
3、重写onCreateInputView()方法,初始化键盘视图和创建键盘对象,使用键盘视图对象设置键盘的监听。
4、重写onKey、onPress、onRelease、onText、swipeDown、swipeLeft、swipeRight和swipeUp等方法,在onKey方法中可处理对键盘的操作,在这个方法里通过传入的primaryCode进行相应的操作。其他方法没有具体的实现。
5、配置清单文件的声明service,还向系统申请了IME的BIND_INPUT_METHOD权限,并且给IME添加了一个名称为android.view.InputMethod的过滤器,用来存放意图的属性。
3 贴出代码
1、SimpleIME.java
import android.inputmethodservice.InputMethodService;
import android.inputmethodservice.Keyboard;
import android.inputmethodservice.KeyboardView;
import android.media.AudioManager;
import android.view.KeyEvent;
import android.view.View;
import android.view.inputmethod.InputConnection;

/**
 * @description: 自定义输入法
 * @version: v1.0
 * @author: yeyl
 * @date: 2018/6/26 14:57
 * @history:
 */
public class SimpleIME extends InputMethodService
 implements KeyboardView.OnKeyboardActionListener {

 private KeyboardView mKeyboardView;
 private Keyboard mKeyboard;
 /**
 * 大小写转换的flag
 */
 private boolean mCaps = false;

 @Override
 public View onCreateInputView() {
 mKeyboardView = (KeyboardView) getLayoutInflater().inflate(R.layout.layout_keyboard, null);
 mKeyboard = new Keyboard(this, R.xml.keyboard_number);
 mKeyboardView.setKeyboard(mKeyboard);
 mKeyboardView.setOnKeyboardActionListener(this);
 return mKeyboardView;
 }

 @Override
 public boolean onKeyDown(int keyCode, KeyEvent event) {
 return super.onKeyDown(keyCode, event);
 }

 @Override
 public void onKey(int primaryCode, int[] keyCodes) {
 InputConnection ic = getCurrentInputConnection();
 playClick(primaryCode);
 switch (primaryCode) {
  case Keyboard.KEYCODE_DELETE:
  // 回退
  ic.deleteSurroundingText(1, 0);
  break;
  case Keyboard.KEYCODE_SHIFT:
  // 大小写切换
  mCaps = !mCaps;
  mKeyboard.setShifted(mCaps);
  mKeyboardView.invalidateAllKeys();
  break;
  case Keyboard.KEYCODE_DONE:
  // 完成
  ic.sendKeyEvent(new KeyEvent(KeyEvent.ACTION_UP, KeyEvent.KEYCODE_ENTER));
  break;
  case Keyboard.KEYCODE_CANCEL:
  // 取消
  ic.sendKeyEvent(new KeyEvent(KeyEvent.ACTION_DOWN, KeyEvent.KEYCODE_BACK));
  ic.sendKeyEvent(new KeyEvent(KeyEvent.ACTION_UP, KeyEvent.KEYCODE_BACK));
  break;
  default:
  char code = (char) primaryCode;
  if (Character.isLetter(code) && mCaps) {
   code = Character.toUpperCase(code);
  }
  ic.commitText(String.valueOf(code), 1);
 }
 }

 /**
 * 播放按键音
 *
 * @param keyCode 键码
 */
 private void playClick(int keyCode) {
 AudioManager am = (AudioManager) getSystemService(AUDIO_SERVICE);
 switch (keyCode) {
  case 32:
  am.playSoundEffect(AudioManager.FX_KEYPRESS_SPACEBAR);
  break;
  case Keyboard.KEYCODE_DONE:
  case 10:
  am.playSoundEffect(AudioManager.FX_KEYPRESS_RETURN);
  break;
  case Keyboard.KEYCODE_DELETE:
  am.playSoundEffect(AudioManager.FX_KEYPRESS_DELETE);
  break;
  default:
  am.playSoundEffect(AudioManager.FX_KEYPRESS_STANDARD);
 }
 }

 @Override
 public void onPress(int primaryCode) {
 }

 @Override
 public void onRelease(int primaryCode) {
 }

 @Override
 public void onText(CharSequence text) {
 }

 @Override
 public void swipeDown() {
 }

 @Override
 public void swipeLeft() {
 }

 @Override
 public void swipeRight() {
 }

 @Override
 public void swipeUp() {
 }
}
2、layout_keyboard.xml
<?xml version="1.0" encoding="UTF-8"?>
<android.inputmethodservice.KeyboardView xmlns:android="http://schemas.android.com/apk/res/android"
 android:id="@+id/keyboard"
 android:layout_width="match_parent"
 android:layout_height="wrap_content"
 android:layout_alignParentBottom="true"
 android:keyPreviewLayout="@layout/layout_preview" />
3、layout_preview.xml
<?xml version="1.0" encoding="utf-8"?>
<TextView xmlns:android="http://schemas.android.com/apk/res/android"
 android:layout_width="match_parent"
 android:layout_height="match_parent"
 android:background="#FFFF00"
 android:gravity="center"
 android:textSize="30sp"
 android:textStyle="bold" />
4、keyboard_number.xml
<?xml version="1.0" encoding="utf-8"?>
<Keyboard xmlns:android="http://schemas.android.com/apk/res/android"
 android:horizontalGap="0px"
 android:keyWidth="33.3%p"
 android:keyHeight="9%p"
 android:verticalGap="0px">
 <Row>
 <Key
  android:codes="49"
  android:keyEdgeFlags="left"
  android:keyLabel="1" />
 <Key
  android:codes="50"
  android:keyLabel="2" />
 <Key
  android:codes="51"
  android:keyEdgeFlags="right"
  android:keyLabel="3" />
 </Row>
 <Row>
 <Key
  android:codes="52"
  android:keyEdgeFlags="left"
  android:keyLabel="4" />
 <Key
  android:codes="53"
  android:keyLabel="5" />
 <Key
  android:codes="54"
  android:keyEdgeFlags="right"
  android:keyLabel="6" />
 </Row>
 <Row>
 <Key
  android:codes="55"
  android:keyEdgeFlags="left"
  android:keyLabel="7" />
 <Key
  android:codes="56"
  android:keyLabel="8" />
 <Key
  android:codes="57"
  android:keyEdgeFlags="right"
  android:keyLabel="9" />
 </Row>
 <Row android:rowEdgeFlags="bottom">
 <Key
  android:codes="-3"
  android:keyEdgeFlags="left"
  android:keyLabel="*" />
 <Key
  android:codes="48"
  android:keyLabel="0" />
 <Key
  android:codes="-4"
  android:isRepeatable="true"
  android:keyEdgeFlags="right"
  android:keyLabel="完成" />
 </Row>
</Keyboard>
5、AndroidManifest.xml
<service
  android:name=".SimpleIME"
  android:label="@string/simple_ime"
  android:permission="android.permission.BIND_INPUT_METHOD">
  <meta-data
  android:name="android.view.im"
  android:resource="@xml/method" />
  <intent-filter>
  <action android:name="android.view.InputMethod" />
  </intent-filter>
</service>
6、method.xml
<?xml version="1.0" encoding="utf-8"?>
<input-method xmlns:android="http://schemas.android.com/apk/res/android">
 <subtype
 android:imeSubtypeLocale="en_US"
 android:imeSubtypeMode="keyboard"
 android:label="@string/subtype_en_US" />
</input-method>
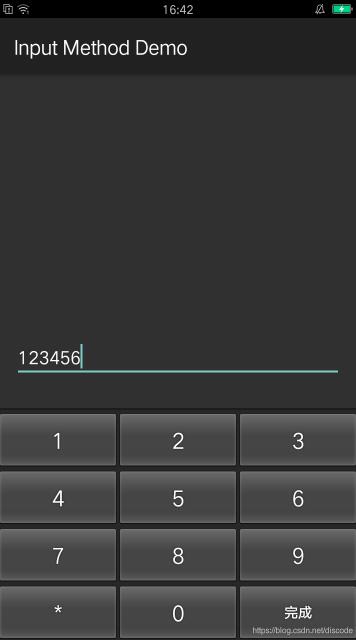
4 Demo截图
以上就是本文的全部内容,希望对大家的学习有所帮助,也希望大家多多支持自由互联。