一、知识点
不详细展开 PopupWindow 或者视图动画的所有具体使用方式,仅仅介绍一下使用的一个大概流程和一些知识要点,具体的介绍在下面设计实现中讲述
(一)PopupWindow
1. 初始化
- 加载弹窗的布局
- 实例化 PopupWindow 传入布局和弹窗的宽高
- 对布局里面的控件的操作
- 对布局本身的一些设置
// 加载弹窗的布局
pwView = LayoutInflater.from(this).inflate(R.layout.pw_search_engine, null, false)
//实例化 PopupWindow
popupWindow = PopupWindow(
 pwView,
 ViewGroup.LayoutParams.MATCH_PARENT,
 ViewGroup.LayoutParams.WRAP_CONTENT
)
// 对布局里面的控件的操作
initRecyclerView()
// 对布局本身的一些设置
popupWindow.isOutsideTouchable = true
popupWindow.isTouchable = true
popupWindow.isFocusable = true
popupWindow.animationStyle = R.style.pw_bottom_anim_style
popupWindow.setOnDismissListener {
 backgroundAlpha(1f)
}
2. 展示弹窗
弹出弹窗修改背景亮度—变暗
// 弹出弹窗
val rootView = LayoutInflater.from(this).inflate(R.layout.activity_main,null)
popupWindow.showAtLocation(rootView, Gravity.BOTTOM, 0, 0)
// 修改背景亮度—变暗
backgroundAlpha(0.7f)
3. 关闭弹窗
- 关闭弹窗
- 修改背景亮度—变亮
// 关闭弹窗
popupWindow.dismiss()
// 修改背景亮度—变亮
backgroundAlpha(1f)
4. 背景亮度修改
// 控制背景亮度
private fun backgroundAlpha(bgAlpha: Float) {
 val lp = window.attributes
 lp.alpha = bgAlpha //0.0-1.0
 window.attributes = lp
}
(二)视图动画
使用 XML 标签定义并使用视图动画:
1. XML 标签
- alpha 渐变透明度
- scale 渐变尺寸伸缩
- translate 画面位置移动
- rotate 画面转移旋转
- set 定义动画集
2. 给 PopupWindow 添加动画
popupWindow.animationStyle = R.style.pw_bottom_anim_style
二、界面效果

三、设计实现
(一)需求分析
- 点击主页按钮弹出底部弹窗
- 点击弹窗引擎,以Toast显示引擎名称并关闭弹窗
- 点击弹窗外部可以关闭弹窗
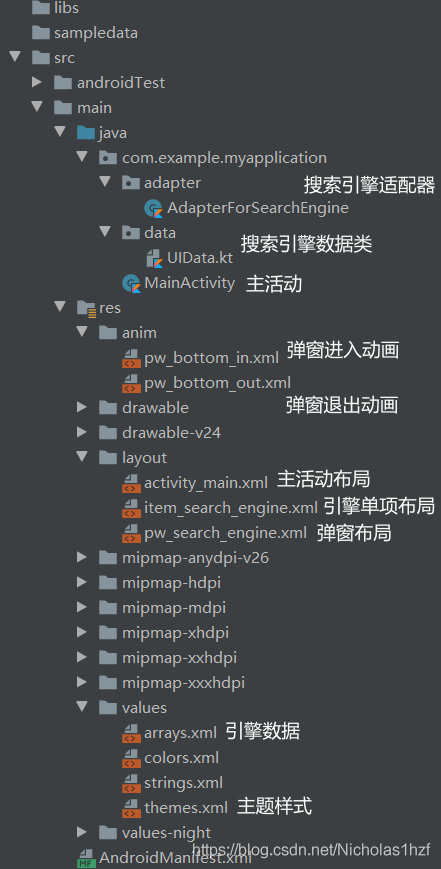
(二)文件列表
(三)布局设计
1. 主界面样式设计
(activity_main.xml)
主界面的样式十分简单,就是一个普通的按钮
<?xml version="1.0" encoding="utf-8"?>
<LinearLayout xmlns:android="http://schemas.android.com/apk/res/android"
 xmlns:app="http://schemas.android.com/apk/res-auto"
 xmlns:tools="http://schemas.android.com/tools"
 android:layout_width="match_parent"
 android:layout_height="match_parent"
 android:orientation="vertical"
 tools:context=".MainActivity">

 <Button
  android:id="@+id/btn"
  android:layout_width="match_parent"
  android:layout_height="wrap_content"
  android:layout_margin="14dp"
  android:text="点击——底部弹窗"
  android:textColor="@color/white"/>

</LinearLayout>
2. 弹窗样式设计
(pw_search_engine.xml)
弹窗样式的布局也十分简单,就是一个基本的线性布局的 RecyclerView
值得注意的是,最基本的 layoutManager 可以通过指定 app:layoutManager 来实现
<?xml version="1.0" encoding="utf-8"?>
<LinearLayout xmlns:android="http://schemas.android.com/apk/res/android"
 xmlns:app="http://schemas.android.com/apk/res-auto"
 android:orientation="vertical"
 android:layout_width="match_parent"
 android:layout_height="wrap_content"
 android:background="@color/white">

 <androidx.recyclerview.widget.RecyclerView
  android:id="@+id/recyclerView"
  android:layout_width="match_parent"
  android:layout_height="wrap_content"
  android:overScrollMode="never"
  app:layoutManager="androidx.recyclerview.widget.LinearLayoutManager" />

</LinearLayout>
3. 弹窗列表 item 样式设计
(item_search_engine.xml)
列表单项,因为是 Demo 示例,所以简单地用一个横向布局,内置一个图标 icon 和一个名称 TextView 来进行展示
<?xml version="1.0" encoding="utf-8"?>
<LinearLayout xmlns:android="http://schemas.android.com/apk/res/android"
 android:orientation="horizontal"
 android:layout_width="match_parent"
 android:layout_height="wrap_content"
 android:gravity="center">

 <ImageView
  android:id="@+id/iconIV"
  android:layout_width="36dp"
  android:layout_height="36dp"
  android:layout_margin="14dp" />

 <TextView
  android:id="@+id/titleTV"
  android:layout_width="0dp"
  android:layout_height="wrap_content"
  android:layout_weight="1"
  android:layout_marginEnd="36dp"
  android:maxLines="1"
  android:ellipsize = "end"
  android:textColor="@color/black"
  android:textSize="16sp" />

</LinearLayout>
4. 弹窗动画设计
(pw_bottom_in.xml 与 pw_bottom_out.xml)
<!--pw_bottom_in.xml-->
<?xml version="1.0" encoding="utf-8"?>
<set xmlns:android="http://schemas.android.com/apk/res/android">
 <!--
  平移动画
  duration--动画持续时间
  android:fromXDelta,android:fromYDelta--起始 x,y
  android:toXDelta,android:toYDelta--终点 x,y
 -->
 <translate
  android:duration="300"
  android:fromXDelta="0"
  android:fromYDelta="1000"
  android:toXDelta="0"
  android:toYDelta="0" />
</set>
<!--pw_bottom_out.xml-->
<?xml version="1.0" encoding="utf-8"?>
<set xmlns:android="http://schemas.android.com/apk/res/android">
 <translate
  android:duration="300"
  android:fromXDelta="0"
  android:fromYDelta="0"
  android:toXDelta="0"
  android:toYDelta="1000" />
</set>
(四)数据存储与加载
1. 数据存储(UIData.kt 与 arrays.xml)
// 搜索引擎的数据实体类,包含名称和 icon 资源 id 两个属性
data class SearchEngine(
 val title : String,
 val res : Int
)
以字符串数组的形式存储搜索引擎的名称以及对应的图标资源
<?xml version="1.0" encoding="utf-8"?>
<resources>
 <string-array name="search_engine_title_list">
  <item>百度</item>
  <item>搜狗</item>
  <item>360</item>
  <item>必应</item>
  <item>神马</item>
 </string-array>
 <string-array name="search_engine_res_list">
  <item>@drawable/ic_baidu</item>
  <item>@drawable/ic_sougou</item>
  <item>@drawable/ic_360</item>
  <item>@drawable/ic_bing</item>
  <item>@drawable/ic_shenma</item>
 </string-array>
</resources>
2. 数据加载(MainActivity.kt)
private lateinit var engines : MutableList<SearchEngine>

private fun initData() {
	// 初始化引擎列表
 engines = mutableListOf()
	// 从 arrays.xml 获取引擎名称数组
 val titleList = resources.getStringArray(R.array.search_engine_title_list)
	// 由于资源 id 是整型,但是在 arrays.xml 中存储的是字符串,
	// 所以这里先初始化一个资源 id 的数组,元素类型为整型
 val iconResList : MutableList<Int> = mutableListOf()
 // 通过类型数组加载相关引擎资源列表,遍历其中元素,传入索引值,
 // 通过调用 getResourceId(index,0) 获取 icon 的资源 id 存入刚才初始化的 id 数组中
 val resList: TypedArray =
 resources.obtainTypedArray(R.array.search_engine_res_list)
 for (index in 0 until resList.length()) {
  iconResList.add(resList.getResourceId(index,0))
 }
 // 记得及时调用 recycle() 回收 TypedArray 对象
 resList.recycle()
	// 循环,用获得的 title 和 id 生成对应的搜索引擎对象,存入搜索引擎列表中
 for (index in titleList.indices){
  if (index < iconResList.size){
   engines.add(SearchEngine(titleList[index],iconResList[index]))
  }
 }
}
(五)剩余内容
上述提及的内容代码,此处将不再进行展示;因为重点是介绍底部弹窗的实现,弹窗布局中的 RecyclerView 的实现就不过多介绍
1. AdapterForSearchEngine.kt 弹窗列表适配器
class AdapterForSearchEngine (dataList: MutableList<SearchEngine>) :
  RecyclerView.Adapter<AdapterForSearchEngine.ViewHolder>() {

 // 搜索引擎数据集合
 private val mDataList: MutableList<SearchEngine> = mutableListOf()

 init {
  // 初始化 主要是对数据进行初始化
  mDataList.clear()
  mDataList.addAll(dataList)
 }

 // ViewHolder 方便 item 复用
 class ViewHolder(view: View) : RecyclerView.ViewHolder(view) {}

 // 获取列表 item 数量
 override fun getItemCount(): Int {
  return mDataList.size
 }

 // 绑定视图与数据
 override fun onBindViewHolder(holder: ViewHolder, position: Int) {
  val engine: SearchEngine = mDataList[position]
  holder.itemView.titleTV.text = engine.title
  holder.itemView.iconIV.setImageResource(engine.res)

  holder.itemView.setOnClickListener {
   listener?.click(engine)
  }
 }

 // 创建 ViewHolder 实例
 override fun onCreateViewHolder(parent: ViewGroup, viewType: Int): ViewHolder {
  val view: View = LayoutInflater.from(parent.context).inflate(R.layout.item_search_engine, parent, false)
  return ViewHolder(view)
 }

 // 点击事件
 private var listener :OnItemClickListener? = null

 interface OnItemClickListener {
  fun click(engine: SearchEngine)
 }

 fun setOnItemClickListener(listener: OnItemClickListener) {
  this.listener = listener
 }
}
2. MainActivity.kt
class MainActivity : AppCompatActivity() {

 private lateinit var engines : MutableList<SearchEngine>

 private lateinit var popupWindow : PopupWindow
 private lateinit var pwView : View

 private lateinit var mAdapter : AdapterForSearchEngine

 override fun onCreate(savedInstanceState: Bundle?) {
  super.onCreate(savedInstanceState)
  setContentView(R.layout.activity_main)
  // 初始化数据
  initData()
  // 初始化 PopupWindow
  initPopupWindow()
  // 按钮点击事件
  btn.setOnClickListener {
   // 显示弹窗
   showPopWindow()
  }
 }

 private fun initPopupWindow() {
  // 加载弹窗布局
  pwView = LayoutInflater.from(this).inflate(R.layout.pw_search_engine, null, false)
  // 实例化 PopupWindow
  popupWindow = PopupWindow(
    pwView,
    ViewGroup.LayoutParams.MATCH_PARENT,
    ViewGroup.LayoutParams.WRAP_CONTENT
  )
  // 初始化弹窗列表
  initRecyclerView()
  // 设置 popupWindow
  popupWindow.isOutsideTouchable = true
  popupWindow.isTouchable = true
  popupWindow.isFocusable = true
  // 加载弹窗动画
  popupWindow.animationStyle = R.style.pw_bottom_anim_style
  // 设置弹窗关闭监听——恢复亮度
  popupWindow.setOnDismissListener {
   backgroundAlpha(1f)
  }
 }

 private fun showPopWindow() {
  val rootView = LayoutInflater.from(this).inflate(
    R.layout.activity_main,
    null
  )
  // 设置弹窗位置
  popupWindow.showAtLocation(rootView, Gravity.BOTTOM, 0, 0)
  // 使得背景亮度变暗
  backgroundAlpha(0.7f)
 }

 // 控制背景亮度
 private fun backgroundAlpha(bgAlpha: Float) {
  val lp = window.attributes
  lp.alpha = bgAlpha //0.0-1.0
  window.attributes = lp
 }

 private fun initRecyclerView() {
  mAdapter = AdapterForSearchEngine(engines)
  pwView.recyclerView?.adapter = mAdapter
  mAdapter.setOnItemClickListener(object : AdapterForSearchEngine.OnItemClickListener{
   override fun click(engine: SearchEngine) {
    Toast.makeText(this@MainActivity, engine.title, Toast.LENGTH_SHORT).show()
    popupWindow.dismiss()
   }
  })
 }

 private fun initData() {
  // 初始化引擎列表
  engines = mutableListOf()
  // 从 arrays.xml 获取引擎名称数组
  val titleList = resources.getStringArray(R.array.search_engine_title_list)
  // 由于资源 id 是整型,但是在 arrays.xml 中存储的是字符串,
  // 所以这里先初始化一个资源 id 的数组,元素类型为整型
  val iconResList : MutableList<Int> = mutableListOf()
  // 通过类型数组加载相关引擎资源列表,遍历其中元素,传入索引值,
  // 通过调用 getResourceId(index,0) 获取 icon 的资源 id 存入刚才初始化的 id 数组中
  val resList: TypedArray =
    resources.obtainTypedArray(R.array.search_engine_res_list)
  for (index in 0 until resList.length()) {
   iconResList.add(resList.getResourceId(index,0))
  }
  // 记得及时调用 recycle() 回收 TypedArray 对象
  resList.recycle()
  // 循环,用获得的 title 和 id 生成对应的搜索引擎对象,存入搜索引擎列表中
  for (index in titleList.indices){
   if (index < iconResList.size){
    engines.add(SearchEngine(titleList[index],iconResList[index]))
   }
  }
 }

}
到此这篇关于Android使用 PopupWindow 实现底部弹窗功能的文章就介绍到这了,更多相关Android PopupWindow底部弹窗内容请搜索自由互联以前的文章或继续浏览下面的相关文章希望大家以后多多支持自由互联!