前言
本文主要介绍JWT的实战运用。
准备工作
首先我们创建一个Asp.Net的,包含MVC和WebApi的Web项目。
然后使用Nuget搜索JWT,安装JWT类库,如下图。

设计思路
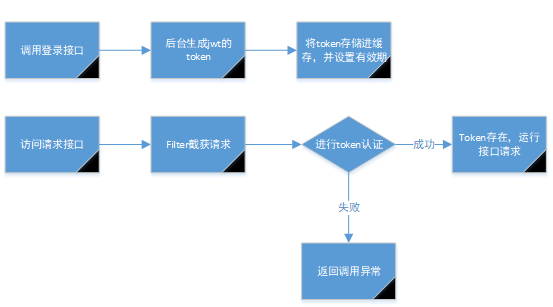
这里我们简单的做了一个token验证的设计,设计思路如下图所示:

代码实现
缓存
首先,我们先开发工具类,根据设计思路图可得知,我们需要一个缓存类,用于在服务器端存储token。
编写缓存相关类代码如下:
public class CacheHelper
{
public static object GetCache(string key)
{
return HttpRuntime.Cache[key];
}
public static T GetCache<T>(string key) where T : class
{
return (T)HttpRuntime.Cache[key];
}
public static bool ContainsKey(string key)
{
return GetCache(key) != null;
}
public static void RemoveCache(string key)
{
HttpRuntime.Cache.Remove(key);
}
public static void SetKeyExpire(string key, TimeSpan expire)
{
object value = GetCache(key);
SetCache(key, value, expire);
}
public static void SetCache(string key, object value)
{
_SetCache(key, value, null, null);
}
public static void SetCache(string key, object value, TimeSpan timeout)
{
_SetCache(key, value, timeout, ExpireType.Absolute);
}
public static void SetCache(string key, object value, TimeSpan timeout, ExpireType expireType)
{
_SetCache(key, value, timeout, expireType);
}
private static void _SetCache(string key, object value, TimeSpan? timeout, ExpireType? expireType)
{
if (timeout == null)
HttpRuntime.Cache[key] = value;
else
{
if (expireType == ExpireType.Absolute)
{
DateTime endTime = DateTime.Now.AddTicks(timeout.Value.Ticks);
HttpRuntime.Cache.Insert(key, value, null, endTime, Cache.NoSlidingExpiration);
}
else
{
HttpRuntime.Cache.Insert(key, value, null, Cache.NoAbsoluteExpiration, timeout.Value);
}
}
}
}
/// <summary>
/// 过期类型
/// </summary>
public enum ExpireType
{
/// <summary>
/// 绝对过期
/// 注:即自创建一段时间后就过期
/// </summary>
Absolute,
/// <summary>
/// 相对过期
/// 注:即该键未被访问后一段时间后过期,若此键一直被访问则过期时间自动延长
/// </summary>
Relative,
}
如上述代码所示,我们编写了缓存帮助类—CacheHelper类。
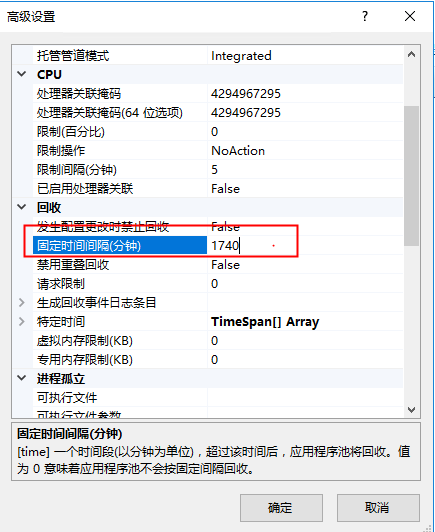
CacheHelper类:使用HttpRuntime的缓存,类里实现缓存的增删改,因为使用的是HttpRuntime,所以,如果没有设置缓存的超时时间,则缓存的超时时间等于HttpRuntime.Cache配置的默认超时时间。
如果网站挂载在IIS里,那么,HttpRuntime.Cache配置超时时间的地方在该网站的应用程序池中,如下图:

Jwt的帮助类
现在我们编写Jwt的帮助类,代码如下:
public class JwtHelper
{
//私钥
public const string secret = "MIGfMA0GCSqGSIb3DQEBAQUAA4GNAmD7RTE2drj6hf3oZjJpMPZUQ1Qjb5H3K3PNwIDAQAB";
/// <summary>
/// <summary>
/// 生成JwtToken
/// </summary>
/// <param name="payload">不敏感的用户数据</param>
/// <returns></returns>
public static string SetJwtEncode(string username,int expiresMinutes)
{
//格式如下
var payload = new Dictionary<string, object>
{
{ "username",username },
{ "exp ", expiresMinutes },
{ "domain", "" }
};
IJwtAlgorithm algorithm = new HMACSHA256Algorithm();
IJsonSerializer serializer = new JsonNetSerializer();
IBase64UrlEncoder urlEncoder = new JwtBase64UrlEncoder();
IJwtEncoder encoder = new JwtEncoder(algorithm, serializer, urlEncoder);
var token = encoder.Encode(payload, secret);
return token;
}
/// <summary>
/// 根据jwtToken 获取实体
/// </summary>
/// <param name="token">jwtToken</param>
/// <returns></returns>
public static IDictionary<string,object> GetJwtDecode(string token)
{
IJsonSerializer serializer = new JsonNetSerializer();
IDateTimeProvider provider = new UtcDateTimeProvider();
IJwtValidator validator = new JwtValidator(serializer, provider);
IBase64UrlEncoder urlEncoder = new JwtBase64UrlEncoder();
IJwtAlgorithm algorithm = new HMACSHA256Algorithm();
IJwtDecoder decoder = new JwtDecoder(serializer, validator, urlEncoder, algorithm);
var dicInfo = decoder.DecodeToObject(token, secret, verify: true);//token为之前生成的字符串
return dicInfo;
}
}
代码很简单,实现了JWT的Code的创建和解析。
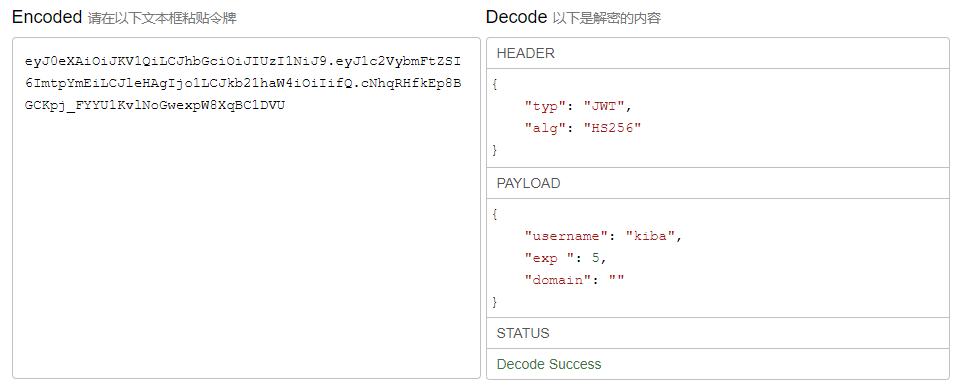
注:JWT的Code虽然是密文,但它是可以被解析的,所以我们不要在Code里存储重要信息,比如密码。
JWT的Code与解析后的内容如下图所示,左边未Code,右边未解析的内容。

AuthenticationHelper验证帮助类
现在,我们已经可以编写验证类了,利用刚刚已创建的缓存帮助类和JWT帮助类。
AuthenticationHelper验证帮助类代码如下:
public class AuthenticationHelper
{
/// <summary>
/// 默认30分钟
/// </summary>
/// <param name="username"></param>
public static void AddUserAuth(string username)
{
var token = JwtHelper.SetJwtEncode(username, 30);
CacheHelper.SetCache(username, token, new TimeSpan(TimeSpan.TicksPerHour / 2));
}
public static void AddUserAuth(string username, TimeSpan ts)
{
var token = JwtHelper.SetJwtEncode(username, ts.Minutes);
CacheHelper.SetCache(username, token, ts);
}
public static string GetToken(string username)
{
var cachetoken = CacheHelper.GetCache(username);
return cachetoken.ParseToString();
}
public static bool CheckAuth(string token)
{
var dicInfo = JwtHelper.GetJwtDecode(token);
var username = dicInfo["username"];
var cachetoken = CacheHelper.GetCache(username.ToString());
if (!cachetoken.IsNullOrEmpty() && cachetoken.ToString() == token)
{
return true;
}
else
{
return false;
}
}
}
如代码所示,我们实现了验证token创建、验证token获取、验证Token校验三个方法。
到此,我们的基础代码已经编写完了,下面进入验证的应用。
Fliter
首先,在Global.asax文件中,为我们WebApi添加一个过滤器,代码如下:
public class WebApiApplication : System.Web.HttpApplication
{
 protected void Application_Start()
 {
 AreaRegistration.RegisterAllAreas();
 GlobalConfiguration.Configure(WebApiConfig.Register);
 //webapiFilter
 System.Web.Http.GlobalConfiguration.Configuration.Filters.Add(new HttpPermissionFilter());
 System.Web.Http.GlobalConfiguration.Configuration.Filters.Add(new HttpExceptionFilter());
 //mvcFliter
 System.Web.Mvc.GlobalFilters.Filters.Add(new MvcExceptionFilter());
 System.Web.Mvc.GlobalFilters.Filters.Add(new MvcPermissionFilter());
 RouteConfig.RegisterRoutes(RouteTable.Routes);
 BundleConfig.RegisterBundles(BundleTable.Bundles);
 }
}
代码中创建了四个过滤器,分别是MVC的请求和异常过滤器和WebApi的请求和异常过滤器。
这里我们主要看WebApi的请求过滤器——HttpPermissionFilter。代码如下:
public class HttpPermissionFilter : System.Web.Http.Filters.ActionFilterAttribute
{
 public override void OnActionExecuting(HttpActionContext actionContext)
 {
 string url ="请求Url" + actionContext.Request.RequestUri.ToString();
 var action = actionContext.ActionDescriptor.ActionName.ToLower();
 var controller = actionContext.ControllerContext.ControllerDescriptor.ControllerName.ToLower();
 if (controller != "login" && controller != "loginout")
 {
  //客户端段token获取
  var token = actionContext.Request.Headers.Authorization != null ? actionContext.Request.Headers.Authorization.ToString() : "";
  //服务端获取token 与客户端token进行比较
  if (!token.IsNullOrEmpty() && AuthenticationHelper.CheckAuth(token))
  {
  //认证通过,可进行日志等处理
  }
  else
  {
  throw new Exception("Token无效");
  }
 }
 }
}
我们的HttpPermissionFilter类继承了System.Web.Http.Filters.ActionFilterAttribute,这样他就可以截获所有的WebApi请求了。
然后我们重写了他的OnActionExecuting方法,在方法里,我们查询到当前请求的Controller的名称,然后对其进行了一个简单的判断,如果是login(登录)或loginout(登出),那我们就不对他的token进行验证。如果是其他请求,则会从请求的Headers的Authorization属性里读取token,并使用AuthenticationHelper类对这个token进行正确性的验证。
WebApi接口
现在我们编写WebApi接口,编写一个登录接口和一个普通请求接口。
登录接口:这里我们使用AuthenticationHelper类创建一个token,并把他存储到缓存中。
然后再把token返回给调用者。
普通接口:这里我们不做任何操作,就是简单的返回成功,因为是否可以访问这个接口,已经又Filter控制了。
代码如下:
public class LoginController : ApiController
{
 public string Get(string username,string pwd)
 {
 AuthenticationHelper.AddUserAuth(username, new TimeSpan(TimeSpan.TicksPerMinute * 5));//5分钟
 string token = AuthenticationHelper.GetToken(username);
 return token;
 }
}
public class RequestController : ApiController
{
 public string Get()
 {
 return "请求成功";
 }
}
测试页面
现在我们编写测试页面,这里我们实现三个按钮,登录、带token访问Api、无token访问Api。
代码如下:
<div>
<script>
$(document).ready(function () {
$("#request").click(function () {
var token = window.localStorage.getItem('token');
if (token) {
$.ajax({
type: "GET",
url: "http://localhost:50525/api/Request",
success: function (data) {
$('#con').append('<div> success:' + data + '</div>');
console.log(data);
},
beforeSend: function (xhr) {
//向Header头中添加Authirization
xhr.setRequestHeader("Authorization", token);
},
error: function (XMLHttpRequest, textStatus, errorThrown) {
$('#con').append('<div> error:' + errorThrown + '</div>');
}
});
}
else {
alert("token不存在");
}
});
$("#requestNotoken").click(function () {
var token = window.localStorage.getItem('token');
if (token) {
$.ajax({
type: "GET",
url: "http://localhost:50525/api/Request",
success: function (data) {
$('#con').append('<div> success:' + data + '</div>');
console.log(data);
},
error: function (XMLHttpRequest, textStatus, errorThrown) {
$('#con').append('<div> error:' + errorThrown + '</div>');
}
});
}
else {
alert("token不存在");
}
});
$("#login").click(function () {
$.ajax({
type: "GET",
url: "http://localhost:50525/api/Login/?username=kiba&pwd=518",
success: function (data) {
$('#con').append('<div> token:' + data + '</div>');
console.log(data);
window.localStorage.setItem('token', data)
}
});
});
});
</script>
<h1>测试JWT</h1>
<button id="login">登录</button>
<button id="request">带token访问Api</button>
<button id="requestNotoken">无token访问Api</button>
<div id="con"></div>
</div>
测试结果如下:

如上图所示,我们已经成功实现简单的token验证。
到此JWT的实战应用就已经介绍完了。
代码已经传到Github上了,欢迎大家下载。
Github地址: https://github.com/kiba518/JwtNet
到此这篇关于C#实现JWT无状态验证的实战应用的文章就介绍到这了,更多相关C#实现JWT无状态验证内容请搜索自由互联以前的文章或继续浏览下面的相关文章希望大家以后多多支持自由互联!
