Unity支持自定义图片字体(CustomFont),网上有很多教程,细节不尽相同,当概括起来基本就是两种方式。一是使用BMFont,导出图集和.fnt文件,再使用图集在Unity中设置得到字体。二是不用BMFont,使用Unity自带的Sprite类似图集的功能。两种方式原理相同,只是手段有区别。基本原理都是先有一张贴图,比如:

需要知道的信息是贴图中每一个字符对应的ASCII码(例如0的ASCII码为48)与该字符在图集中对应的位置(0为x:0;y:0;w:55;h:76)。然后在Unity中创建材质和CustomFont并根据信息进行设置。
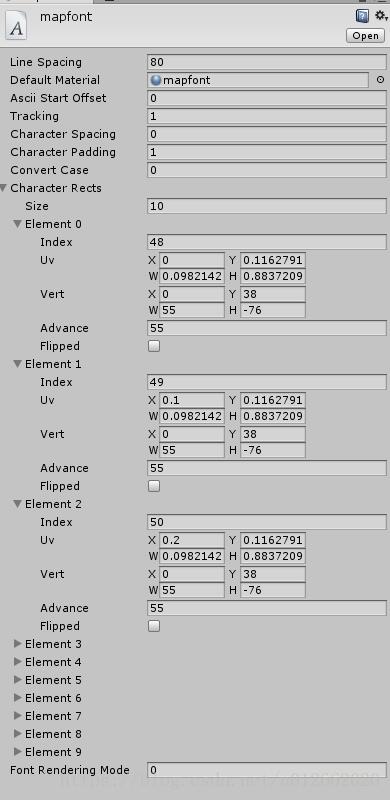
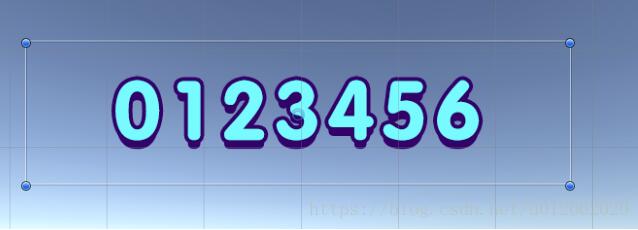
最后得到字体。
两种方式的区别仅在于第一步中如何得到图集的信息。具体的:
对于第一种使用BMFont的方式,目的是得到.fnt文件,实际上是xml格式文件。具体的信息为:

BMFont的使用方法不再详述。得到图集个fnt文件后,网上一般的方法是手动计算在Unity中的参数,有些繁琐,在这里写一个Editor脚本来自动完成这个过程。直接上代码:
using System;
using System.Collections.Generic;
using System.IO;
using System.Xml;
using UnityEditor;
using UnityEngine;

public class CreateFontFromFnt : EditorWindow
{
 [MenuItem("Tools/创建字体(Fnt)")]
 static void DoIt()
 {
  GetWindow<CreateFontFromFnt>("创建字体");
 }
 private string fontName;
 private string fontPath;
 private Texture2D tex;
 private string fntFilePath;

 private void OnGUI()
 {
  GUILayout.BeginVertical();

  GUILayout.BeginHorizontal();
  GUILayout.Label("字体名称:");
  fontName = EditorGUILayout.TextField(fontName);
  GUILayout.EndHorizontal();

  GUILayout.BeginHorizontal();
  GUILayout.Label("字体图片:");
  tex = (Texture2D)EditorGUILayout.ObjectField(tex, typeof(Texture2D), true);
  GUILayout.EndHorizontal();

  GUILayout.BeginHorizontal();
  if (GUILayout.Button(string.IsNullOrEmpty(fontPath) ? "选择路径" : fontPath))
  {
   fontPath = EditorUtility.OpenFolderPanel("字体路径", Application.dataPath, "");
   if (string.IsNullOrEmpty(fontPath))
   {
    Debug.Log("取消选择路径");
   }
   else
   {
    fontPath = fontPath.Replace(Application.dataPath, "") + "/";
   }
  }
  GUILayout.EndHorizontal();

  GUILayout.BeginHorizontal();
  if (GUILayout.Button(string.IsNullOrEmpty(fntFilePath) ? "选择fnt文件" : fntFilePath))
  {
   fntFilePath = EditorUtility.OpenFilePanelWithFilters("选择fnt文件", Environment.GetFolderPath(Environment.SpecialFolder.Desktop), new string[] { "", "fnt" });
   if (string.IsNullOrEmpty(fntFilePath))
   {
    Debug.Log("取消选择路径");
   }
  }
  GUILayout.EndHorizontal();

  GUILayout.BeginHorizontal();
  if (GUILayout.Button("创建"))
  {
   Create();
  }
  GUILayout.EndHorizontal();

  GUILayout.EndVertical();
 }

 private void Create()
 {
  if (string.IsNullOrEmpty(fntFilePath))
  {
   Debug.LogError("fnt为空");
   return;
  }
  if (tex == null)
  {
   Debug.LogError("字体图片为空");
   return;
  }

  string fontSettingPath = fontPath + fontName + ".fontsettings";
  string matPath = fontPath + fontName + ".mat";
  if (File.Exists(Application.dataPath + fontSettingPath))
  {
   Debug.LogErrorFormat("已存在同名字体文件:{0}", fontSettingPath);
   return;
  }
  if (File.Exists(Application.dataPath + matPath))
  {
   Debug.LogErrorFormat("已存在同名字体材质:{0}", matPath);
   return;
  }
  var list = new List<CharacterInfo>();
  XmlDocument xmlDoc = new XmlDocument();
  var content = File.ReadAllText(fntFilePath, System.Text.Encoding.UTF8);
  xmlDoc.LoadXml(content);
  var nodelist = xmlDoc.SelectNodes("font/chars/char");
  foreach (XmlElement item in nodelist)
  {
   CharacterInfo info = new CharacterInfo();
   var id = int.Parse(item.GetAttribute("id"));
   var x = float.Parse(item.GetAttribute("x"));
   var y = float.Parse(item.GetAttribute("y"));
   var width = float.Parse(item.GetAttribute("width"));
   var height = float.Parse(item.GetAttribute("height"));

   info.index = id;
   //纹理映射,上下翻转
   info.uvBottomLeft = new Vector2(x / tex.width, 1 - (y + height) / tex.height);
   info.uvBottomRight = new Vector2((x + width) / tex.width, 1 - (y + height) / tex.height);
   info.uvTopLeft = new Vector2(x / tex.width, 1 - y / tex.height);
   info.uvTopRight = new Vector2((x + width) / tex.width, 1 - y / tex.height);

   info.minX = 0;
   info.maxX = (int)width;
   info.minY = -(int)height / 2;
   info.maxY = (int)height / 2;
   info.advance = (int)width;

   list.Add(info);
  }

  Material mat = new Material(Shader.Find("GUI/Text Shader"));
  mat.SetTexture("_MainTex", tex);
  Font m_myFont = new Font();
  m_myFont.material = mat;
  AssetDatabase.CreateAsset(mat, "Assets" + matPath);
  AssetDatabase.CreateAsset(m_myFont, "Assets" + fontSettingPath);
  m_myFont.characterInfo = list.ToArray();
  EditorUtility.SetDirty(m_myFont);
  AssetDatabase.SaveAssets();
  AssetDatabase.Refresh();
  Debug.Log("创建成功!");
 }
}
使用起来很简单:
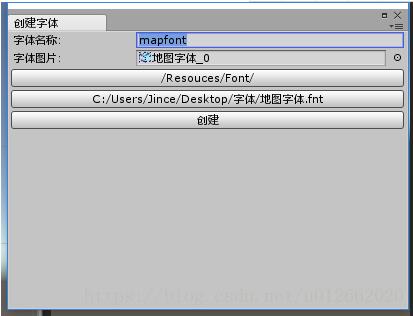
代码也没什么可深究的,目的是代替手动计算,只是在纹理映射的时候有一个小坑。
第二种方式使用Unity中的Sprite。Unity支持把一个Sprite切割成多个。可以用这种方式代替BMFont导出的fnt文件。需要手动做的工作是将图集的TextureType设置为Sprite,然后把SpriteMode设为Multiple,打开SpriteEditor,对图片进行切割。Slice就基本可以完成这个工作,如果需要再手动微调一下。
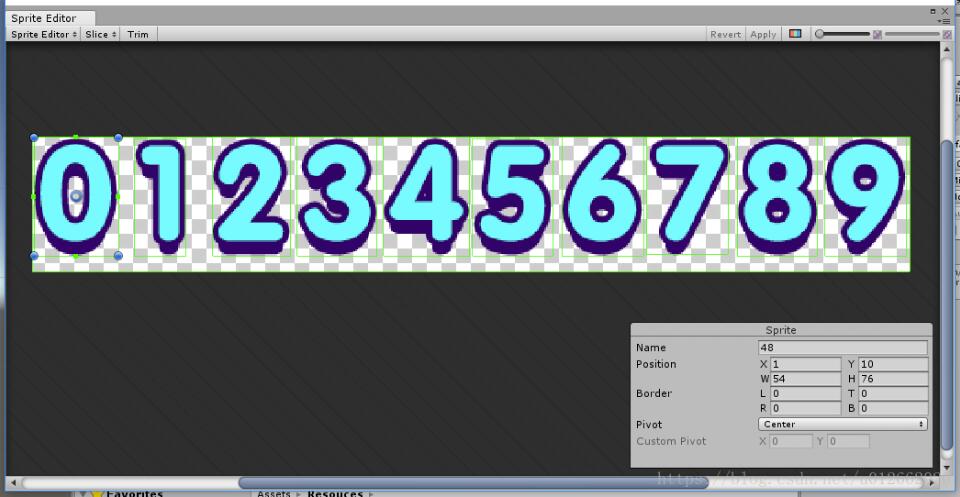
一张图按照字符的位置分割成了10个Sprite。然后选中每一个Sprite把Name设置成字符对应的ASCII码。这样第一种方法里fnt文件包含的信息基本都包含在这个“图集”里了。同样写一个Editor脚本把这些信息写入到CustomFont里面,并不用手动去创建。
using UnityEngine;
using UnityEditor;
using System.IO;

public class CreateFont : EditorWindow
{
 [MenuItem("Tools/创建字体(sprite)")]
 public static void Open()
 {
  GetWindow<CreateFont>("创建字体");
 }

 private Texture2D tex;
 private string fontName;
 private string fontPath;

 private void OnGUI()
 {
  GUILayout.BeginVertical();

  GUILayout.BeginHorizontal();
  GUILayout.Label("字体图片:");
  tex = (Texture2D)EditorGUILayout.ObjectField(tex, typeof(Texture2D), true);
  GUILayout.EndHorizontal();

  GUILayout.BeginHorizontal();
  GUILayout.Label("字体名称:");
  fontName = EditorGUILayout.TextField(fontName);
  GUILayout.EndHorizontal();

  GUILayout.BeginHorizontal();
  if (GUILayout.Button(string.IsNullOrEmpty(fontPath) ? "选择路径" : fontPath))
  {
   fontPath = EditorUtility.OpenFolderPanel("字体路径", Application.dataPath, "");
   if (string.IsNullOrEmpty(fontPath))
   {
    Debug.Log("取消选择路径");
   }
   else
   {
    fontPath = fontPath.Replace(Application.dataPath, "") + "/";
   }
  }
  GUILayout.EndHorizontal();

  GUILayout.BeginHorizontal();
  if (GUILayout.Button("创建"))
  {
   Create();
  }
  GUILayout.EndHorizontal();

  GUILayout.EndVertical();
 }

 private void Create()
 {
  if (tex == null)
  {
   Debug.LogWarning("创建失败,图片为空!");
   return;
  }

  if (string.IsNullOrEmpty(fontPath))
  {
   Debug.LogWarning("字体路径为空!");
   return;
  }
  if (fontName == null)
  {
   Debug.LogWarning("创建失败,字体名称为空!");
   return;
  }
  else
  {
   if (File.Exists(Application.dataPath + fontPath + fontName + ".fontsettings"))
   {
    Debug.LogError("创建失败,已存在同名字体文件");
    return;
   }
   if (File.Exists(Application.dataPath + fontPath + fontName + ".mat"))
   {
    Debug.LogError("创建失败,已存在同名字体材质文件");
    return;
   }
  }

  string selectionPath = AssetDatabase.GetAssetPath(tex);
  if (selectionPath.Contains("/Resources/"))
  {
   string selectionExt = Path.GetExtension(selectionPath);
   if (selectionExt.Length == 0)
   {
    Debug.LogError("创建失败!");
    return;
   }

   string fontPathName = fontPath + fontName + ".fontsettings";
   string matPathName = fontPath + fontName + ".mat";
   float lineSpace = 0.1f;
   //string loadPath = selectionPath.Remove(selectionPath.Length - selectionExt.Length).Replace("Assets/Resources/", "");
   string loadPath = selectionPath.Replace(selectionExt, "").Substring(selectionPath.IndexOf("/Resources/") + "/Resources/".Length);
   Sprite[] sprites = Resources.LoadAll<Sprite>(loadPath);
   if (sprites.Length > 0)
   {
    Material mat = new Material(Shader.Find("GUI/Text Shader"));
    mat.SetTexture("_MainTex", tex);
    Font m_myFont = new Font();
    m_myFont.material = mat;
    CharacterInfo[] characterInfo = new CharacterInfo[sprites.Length];
    for (int i = 0; i < sprites.Length; i++)
    {
     if (sprites[i].rect.height > lineSpace)
     {
      lineSpace = sprites[i].rect.height;
     }
    }
    for (int i = 0; i < sprites.Length; i++)
    {
     Sprite spr = sprites[i];
     CharacterInfo info = new CharacterInfo();
     try
     {
      info.index = System.Convert.ToInt32(spr.name);
     }
     catch
     {
      Debug.LogError("创建失败,Sprite名称错误!");
      return;
     }
     Rect rect = spr.rect;
     float pivot = spr.pivot.y / rect.height - 0.5f;
     if (pivot > 0)
     {
      pivot = -lineSpace / 2 - spr.pivot.y;
     }
     else if (pivot < 0)
     {
      pivot = -lineSpace / 2 + rect.height - spr.pivot.y;
     }
     else
     {
      pivot = -lineSpace / 2;
     }
     int offsetY = (int)(pivot + (lineSpace - rect.height) / 2);
     info.uvBottomLeft = new Vector2((float)rect.x / tex.width, (float)(rect.y) / tex.height);
     info.uvBottomRight = new Vector2((float)(rect.x + rect.width) / tex.width, (float)(rect.y) / tex.height);
     info.uvTopLeft = new Vector2((float)rect.x / tex.width, (float)(rect.y + rect.height) / tex.height);
     info.uvTopRight = new Vector2((float)(rect.x + rect.width) / tex.width, (float)(rect.y + rect.height) / tex.height);
     info.minX = 0;
     info.minY = -(int)rect.height - offsetY;
     info.maxX = (int)rect.width;
     info.maxY = -offsetY;
     info.advance = (int)rect.width;
     characterInfo[i] = info;
    }
    AssetDatabase.CreateAsset(mat, "Assets" + matPathName);
    AssetDatabase.CreateAsset(m_myFont, "Assets" + fontPathName);
    m_myFont.characterInfo = characterInfo;
    EditorUtility.SetDirty(m_myFont);
    AssetDatabase.SaveAssets();
    AssetDatabase.Refresh();//刷新资源
    Debug.Log("创建字体成功");

   }
   else
   {
    Debug.LogError("图集错误!");
   }
  }
  else
  {
   Debug.LogError("创建失败,选择的图片不在Resources文件夹内!");
  }
 }
}
这个脚本参考了某一篇博文,时间长了实在是找不到了。
原理跟第一种方法一样,只是计算细节略有差异。使用起来还是很简单:
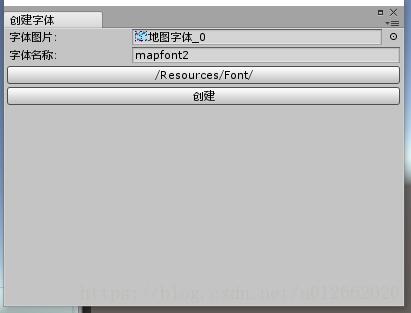
大同小异的两种方法,个人更喜欢用第二种。不需要使用额外的软件,一键搞定,基本上可以丢给美术童鞋来做了。
以上就是本文的全部内容,希望对大家的学习有所帮助,也希望大家多多支持自由互联。
