矿场自动化运维的实现 最近帮人管理矿场,由于矿机数量较多,于是编写了几个脚本,并借用ansible实现自动化运维。 一、搭建文件共享服务 $ sudo apt install apache2$ sudo systemctl start apac
矿场自动化运维的实现
最近帮人管理矿场,由于矿机数量较多,于是编写了几个脚本,并借用ansible实现自动化运维。
一、搭建文件共享服务
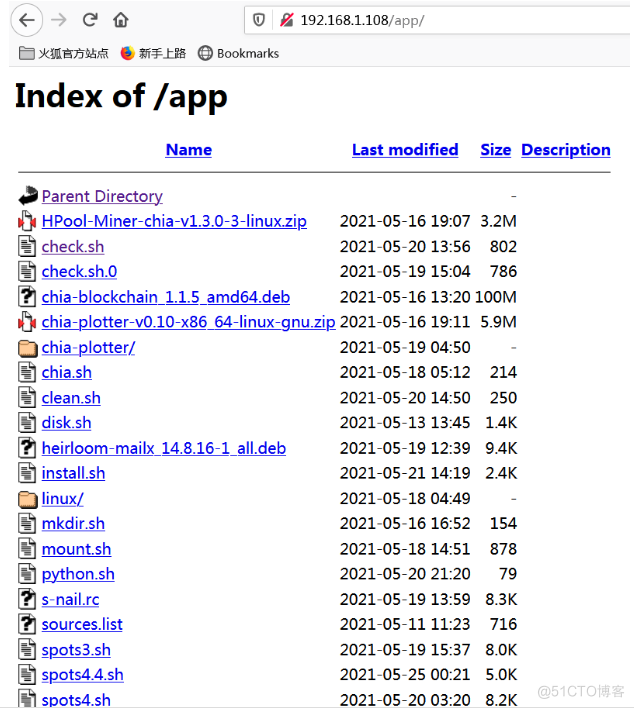
$ sudo apt install apache2 $ sudo systemctl start apache2 $ sudo systemctl enable apache2 $ mkdir /var/www/html/app将需要软件、脚本、配置文件拷贝到/var/ww/html/app,文件服务器搭建完成,并能顺利访问。

二、开机进入系统操作
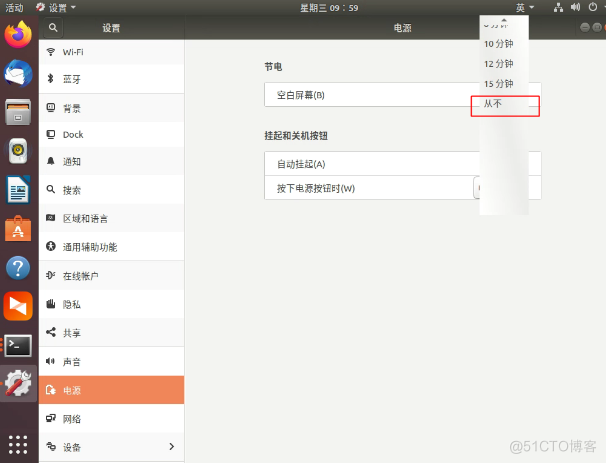
2.1 关闭自动锁屏
按客户要求关闭自动锁屏。


2.2 配置root口令
worker@harv1-3:~$ sudo passwd root二、系统初始化配置
2.1 更新soures.list并对系统进行初步设置
#!/bin/bash #定义显示颜色 RED="\e[1;31m" GREEN="\e[1;32m" END="\e[0m" #文件共享服务器地址 ip=192.168.1.## #ubuntu系统启动后,软件会自动升级,因而锁住一些文件,为了后续操作顺利,先删掉锁 rm /var/cache/apt/archives/lock rm /var/lib/dpkg/lock #关闭系统自动升级 sed -i.bak s/"1"/"0"/ /etc/apt/apt.conf.d/10periodic if [ $? -eq 0 ];then echo -e "$GREEN The update is closed.$END" else echo -e "$RED The update can not be closed!!$END" fi #关闭防火墙,我所使用的ubuntu版本,默认关闭 systemctl close ufw &> /dev/null if [ $? -eq 0 ];then echo -e "$GREEN The ufw is closed.$END" else echo -e "$RED The ufw can not be closed!!$END" fi #禁止防火墙启动 systemctl disable ufw &> /dev/null if [ $? -eq 0 ];then echo -e "$GREEN The ufw is disabled.$END" else echo -e "$RED The ufw can not be closed!!$END" fi #将apt源指向国内,需要在文件服务器上事先准备好soures.list文件 cd /etc/apt mv ./sources.list ./sources.list`date +%F_%H:%H` wget -q http://$ip/app/sources.list apt update if [ $? -eq 0 ];then echo -e "$GREEN The apt update is finished,You should reboot the system.$END" else echo -e "$RED Apt update is error!!$END" fiapt update之后,有时系统会锁住部分文件,尝试多次,无法手动解锁,最后简单粗暴重启系统,再安装软件!
2.2 软件安装脚本
#!/bin/bash RED="\e[1;31m" GREEN="\e[1;32m" END="\e[0m" ip=192.168.1.# hchia=chia-blockchain_1.1.6_amd64.deb #安装常用工具 apt install -y vim htop iotop nload gparted lrzsz net-tools openssh-server s-nail ethtool python2.7 #安装挖矿软件 cd /home/worker wget http://$ip/app/$hchia dpkg -i ./$hchia if [ $? -eq 0 ];then echo -e "$GREEN The chia-blockchain is installed.$END" else echo -e "$RED Can not install the chia-blickhain!!$END" fi #安装向日葵 cd /home/worker wget http://$ip/app/sunloginclient-11.0.0.36662-amd64.deb dpkg -i ./sunloginclient-11.0.0.36662-amd64.deb if [ $? -eq 0 ];then echo -e "$GREEN The sunloginclient is installed. $END" else echo -e "$RED Can not install the sunloginclient!!$END" fi #安装heirloom-mailx cd /home/worker wget http://$ip/app/heirloom-mailx_14.8.16-1_all.deb dpkg -i ./heirloom-mailx_14.8.16-1_all.deb if [ $? -eq 0 ];then echo -e "$GREEN The mailx is installed. $END" else echo -e "$RED Can not install the mailx!!$END" fi #禁止ssh连接时提示用户输入yes sed -i.bak s/"# StrictHostKeyChecking ask"/" StrictHostKeyChecking no"/ /etc/ssh/ssh_config if [ $? -eq 0 ];then echo -e "$GREEN The ssh_config is changed.$END" else echo -e "$RED The ssh_config can not be changed!!$END" fi #允许root ssh登录 sed -i.bak s/"#PermitRootLogin prohibit-password"/"PermitRootLogin yes"/ /etc/ssh/sshd_config if [ $? -eq 0 ];then echo -e "$GREEN The sshd_config is changed.$END" else echo -e "$RED The sshd_config can not be changed!!$END" fi #设置python ln -s /usr/bin/python2.7 /usr/bin/python #设置chia环境 echo "export PATH=$PATH:/usr/lib/chia-blockchain/resources/app.asar.unpacked/daemon/" > /etc/profile.d/chia.sh echo "source /etc/profile.d/chia.sh" >> /home/worker/.bashrc source /etc/profile.d/chia.sh三、矿机添加硬盘挂载文件系统脚本
#!/bin/bash RED="\e[1;31m" GREEN="\e[1;32m" END="\e[0m" scan () { for disk in `ls /sys/class/scsi_host`;do # echo $disk; echo '- - -' > /sys/class/scsi_host/$disk/scan; done } while true do scan; lsblk -f; read -p "Please input the disk:" indisk if [ $indisk = q ];then exit; fi read -p "Please input the path:" inpath if [ $inpath = q ];then exit; fi parted /dev/"$indisk" mklabel gpt parted /dev/"$indisk" mkpart primary 0 100% mkfs.ext4 -F -O 64bit /dev/"$indisk" if [ $? -ne 0 ];then echo -e "$REDCan not make filesystem /dev/"$indisk" on $inpath!!$END" exit; fi lsblk -f | grep "$indisk"; echo -e "$GREEN The disk $indisk is parted!!$END" ls $inpath &> /dev/null if [ $? -eq 0 ];then read -p "The $inpath is exit!! Are you sure continu?" con fi if [ "$con" = "q" ];then exit; fi if [ "$con" = "n" ];then exit; fi mkdir -p "$inpath" if [ "$con" = "q" ];then exit; fi mount /dev/"$indisk" "$inpath" if [ $? -eq 0 ];then echo -e "$GREEN The new filesystem $inpath is mount!!$END" else echo -e "$RED The new filesystem $inpath is not mount!!$END" fi fsta=`lsblk -f|grep "$indisk" |awk {'print $3'}` echo "UUID="$fsta" $inpath ext4 defaults 0 0" >> /etc/fstab mount -a &> /dev/null if [ $? -eq 0 ];then echo -e "$GREEN The /etc/fstab is correct!!!!$END" else echo -e "$RED The /etc/fstab is not edit correct!!$END" fi done四、挂载有数据硬盘脚本
#!/bin/bash RED="\e[1;31m" GREEN="\e[1;32m" END="\e[0m" scan () { for disk in `ls /sys/class/scsi_host`;do echo '- - -' > /sys/class/scsi_host/$disk/scan; done } while true do scan; lsblk -f; read -p "Please input the disk:" indisk if [ $indisk = q ];then exit; fi read -p "Please input the path:" inpath if [ $inpath = q ];then exit; fi ls $inpath &> /dev/null || mkdir -p "$inpath" mount /dev/"$indisk" "$inpath" if [ $? -eq 0 ];then echo -e "$GREEN The $indisk is mount on $inpath.$END" else echo -e "$RED The $indisk is mount on $inpath.$END" exit; fi fsta=`lsblk -f|grep "$indisk" |awk {'print $3'}` echo "UUID="$fsta" $inpath ext4 defaults 0 0" >> /etc/fstab mount -a &> /dev/null if [ $? -eq 0 ];then echo -e "$GREEN The fstab is correct.$END" else echo -e "$RED The fstab is not correct.$END" exit; fi done五、缓存区(SSD盘)清理脚本
#!/bin/bash read -p "Please input the directory num:" max cd /famer1 rm -r harv* for i in $(seq 1 $max);do mkdir harv$i; done cd /famer2 rm -r harv* for i in $(seq 1 $max);do mkdir harv$i; done chmod -R 777 /famer* chmod -R 777 /data* ls /famer1 ls /famer2六、某币程序并行启动脚本
#!/bin/bash gnome-terminal --tab -e 'bash -c "cd ~;source .bashrc;cd /home/worker/chia-plotter;./chia-plotter-linux-amd64 -action plotting -plotting-fpk 0xa1bc03290bdf9958520b906ca09564e83a9a9d327d007c8862f82f735502cd69515d8bd84466fcb17695570e8152cadf -plotting-ppk 0xa7f1e072ba0af9a2272daf3db375db81c3ae0449e983ce8fb3b502f2651c364c1d7b014d2beaa8d4a047f0430fdb3103 -plotting-n 100 -r 14 -b 9216 -d /data1 -t /famer1/harv1;exec bash"' gnome-terminal --tab -e 'bash -c "cd ~;source .bashrc;cd /home/worker/chia-plotter;./chia-plotter-linux-amd64 -action plotting -plotting-fpk 0xa1bc03290bdf9958520b906ca09564e83a9a9d327d007c8862f82f735502cd69515d8bd84466fcb17695570e8152cadf -plotting-ppk 0xa7f1e072ba0af9a2272daf3db375db81c3ae0449e983ce8fb3b502f2651c364c1d7b014d2beaa8d4a047f0430fdb3103 -plotting-n 100 -r 14 -b 9216 -d /data2 -t /famer1/harv2;exec bash"'脚本需要在worker用户下运行,并行多少个job,各参数大小如何确定,需要根据自己矿机的实际情况确定。
七、利用ansible监控矿机运行状态
7.1 安装ansible并配置参数
$ apt install ansible # $ vim /etc/ansible/ansible.cfg host_key_checking = False log_path = /var/log/ansible.log module_name = shell $ vim /etc/ansible/hosts [group1] 192.168.1.112 192.168.1.100 192.168.1.110 192.168.1.117 192.168.1.1147.2 ssh实现基于证书登录
在ansible控制端:
$ sudo apt install sshpass $ ssh-keygen Generating public/private rsa key pair. Enter file in which to save the key (/home/worker/.ssh/id_rsa): Enter passphrase (empty for no passphrase): Enter same passphrase again: Your identification has been saved in /home/worker/.ssh/id_rsa. Your public key has been saved in /home/worker/.ssh/id_rsa.pub. The key fingerprint is: SHA256:9RDQQ9aRtx53zKICijZK6ZGUh8gZt4V4wjDyv7IMMmM worker@ubuntu The key's randomart image is: +---[RSA 2048]----+ |* . . .++..o | |.B + . .o.o . | |..Boo o. . + | |.o+o. .. o + =| | . +.. .S. .o +.| | = +.. . . . | |=E.+.. . | |o=oo | | o | +----[SHA256]-----+添加管理端证书被管理端脚本
#!/bin/bash IPLIST=" 192.168.1.xxx 192.168.1.xx 192.168.1.xx 192.168.1.xx" export SSHPASS=xxxx for IP in $IPLIST;do sshpass -e ssh-copy-id -o StrictHostKeyChecking=no $IP done $ ./addlist.sh $ ansible group1 -a hostname [WARNING]: log file at /var/log/ansible.log is not writeable and we cannot create it, aborting 192.168.1.114 | SUCCESS | rc=0 >> harv4-1 192.168.1.100 | SUCCESS | rc=0 >> harv1-2 192.168.1.112 | SUCCESS | rc=0 >> harv1-1 192.168.1.110 | SUCCESS | rc=0 >> harv2-2 192.168.1.117 | SUCCESS | rc=0 >> harv2-3