前面的文章我们介绍了LVM的基本概念,这篇文章就来动手实际操作一下,记录馒头(LVM逻辑卷)的加工过程,这里我的演示环境是VMware虚拟机,操作系统是RedHat Enterprise 5.3 64位操作系统
前面的文章我们介绍了LVM的基本概念,这篇文章就来动手实际操作一下,记录馒头(LVM逻辑卷)的加工过程,这里我的演示环境是VMware虚拟机,操作系统是RedHat Enterprise 5.3 64位操作系统,不同的Linux操作系统之间差别不大,这里也推荐大家使用虚拟机操作,因为这样可以更加灵活的添加硬盘。
实现目标
在接下来的操作中,我们将创建LVM逻辑卷,为系统分别添加3个“物理”硬盘,大小分别为1GB,这里的硬盘就做为LVM中的物理卷PV,然后创建卷组PV及逻辑卷LV。
准备面粉(物理卷PV)
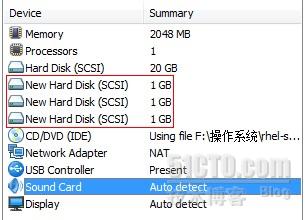
由于使用的是虚拟机,那么可以轻松的为Linux系统添加磁盘,如下图所示,我为系统该虚拟机添加3块独立的SCSI硬盘。

添加好物理磁盘后我们启动系统,通过系统命令我们可以看到磁盘已经添加成功,显示分别为/dev/sdb、/dev/sdc、/dev/sdd
[root@localhost ~] Disk /dev/sda: 21.4 GB, 21474836480 bytes 255 heads, 63 sectors/track, 2610 cylinders Units = cylinders of 16065 * 512 = 8225280 bytes Device Boot Start End Blocks Id System /dev/sda1 * 1 13 104391 83 Linux /dev/sda2 14 2610 20860402+ 8e Linux LVM Disk /dev/sdb: 1073 MB, 1073741824 bytes 255 heads, 63 sectors/track, 130 cylinders Units = cylinders of 16065 * 512 = 8225280 bytes Disk /dev/sdb doesn't contain a valid partition table Disk /dev/sdc: 1073 MB, 1073741824 bytes 255 heads, 63 sectors/track, 130 cylinders Units = cylinders of 16065 * 512 = 8225280 bytes Disk /dev/sdc doesn't contain a valid partition table Disk /dev/sdd: 1073 MB, 1073741824 bytes 255 heads, 63 sectors/track, 130 cylinders Units = cylinders of 16065 * 512 = 8225280 bytes Disk /dev/sdd doesn't contain a valid partition table
虽然物理磁盘添加好了,但我们还要为其创建一个分区,并将系统识别码标示为“Linux LVM”,基本操作如下
[root@localhost ~]# fdisk /dev/sdb //使用fdisk工具为磁盘创建分区 Device contains neither a valid DOS partition table, nor Sun, SGI or OSF disklabel Building a new DOS disklabel. Changes will remain in memory only, until you decide to write them. After that, of course, the previous content won't be recoverable. Warning: invalid flag 0x0000 of partition table 4 will be corrected by w(rite) Command (m for help): p //显示当前磁盘下已经存在的分区(目前为空) Disk /dev/sdb: 1073 MB, 1073741824 bytes 255 heads, 63 sectors/track, 130 cylinders Units = cylinders of 16065 * 512 = 8225280 bytes Device Boot Start End Blocks Id System Command (m for help): n //为磁盘添加分区 Command action e extended p primary partition (1-4) //这里选择创建主分区即可 p Partition number (1-4): 1 //输入分区号,这里输入1即可 First cylinder (1-130, default 1): //分区标记开始,使用默认即可 Using default value 1 Last cylinder or +size or +sizeM or +sizeK (1-130, default 130): //分区标记结束,这里分配磁盘全部可用空间 Using default value 130 Command (m for help): t //改变分区系统识别ID Selected partition 1 Hex code (type L to list codes): 8e //这里8e代表LVM标示,可以输入L来查看系统支持的ID标示码 Changed system type of partition 1 to 8e (Linux LVM) Command (m for help): p //再次显示分区,可以看到分区已经创建好 Disk /dev/sdb: 1073 MB, 1073741824 bytes 255 heads, 63 sectors/track, 130 cylinders Units = cylinders of 16065 * 512 = 8225280 bytes Device Boot Start End Blocks Id System /dev/sdb1 1 130 1044193+ 8e Linux LVM Command (m for help): w //最后输入w来报错分区操作The partition table has been altered! Calling ioctl() to re-read partition table. Syncing disks. [root@localhost ~]# pvcreate /dev/sdb1 /dev/sdc1 /dev/sdd1 //创建物理卷PV Physical volume "/dev/sdb1" successfully created Physical volume "/dev/sdc1" successfully created Physical volume "/dev/sdd1" successfully created
上面的操作我们即可完成面粉(PV物理卷)的准备工作,其他两个盘符都按照这样的操作创建好分区,最后使用pvcreate命令创建物理卷PV。
准备面团(卷组VG)
卷组的操作非常简单,通过下面的命令即可将3个物理卷添加到卷组中
[root@localhost ~] Volume group "myVG" successfully created
准备馒头(逻辑卷LV)
准备工作完成后,我们就可以从卷组中划分逻辑卷了,通过下面的命令我为系统分别创建3个大小为1000M的逻辑卷
[root@localhost ~] Logical volume "lv01" created [root@localhost ~] Logical volume "lv02" created [root@localhost ~] Logical volume "lv03" created
蒸馒头(分配文件系统、挂载)
虽然我们已经完成了最后逻辑卷的创建,但是现在还不能用,因为逻辑卷还没有自己的文件系统,通过下面的操作为逻辑卷创建文件系统,并挂载到Linux中。
[root@localhost ~] [root@localhost ~] [root@localhost ~] [root@localhost ~] [root@localhost ~] [root@localhost ~] [root@localhost ~]
至此我们已经将最终的逻辑卷挂载到Linux操作系统中了,并且已经可以正常使用,为了系统下次启动时能够自动将逻辑卷添挂载到系统中,我们通过下面的操作来配置系统开机自动挂载。
[root@localhost ~] /dev/VolGroup00/LogVol00 / ext3 defaults 1 1 LABEL=/boot /boot ext3 defaults 1 2 tmpfs /dev/shm tmpfs defaults 0 0 devpts /dev/pts devpts gid=5,mode=620 0 0 sysfs /sys sysfs defaults 0 0 proc /proc proc defaults 0 0 /dev/VolGroup00/LogVol01 swap swap defaults 0 0 /dev/myVG/lv01 /lv01 ext3 defaults 0 0 //这里为添加的挂载点 /dev/myVG/lv02 /lv02 ext3 defaults 0 0 /dev/myVG/lv03 /lv03 ext3 defaults 0 0
通过上面的操作即完成了逻辑卷的创建,后续我们会近一步讨论逻辑卷的管理及使用。

