NFS共享存储
课前环境准备
主机名
WanIP
LanIP
角色
web01
10.0.0.7
172.16.1.7
网站服务(nfs客户端)
web02
10.0.0.8
172.16.1.8
网站服务(nfs客户端)
nfs
10.0.0.31
172.16.1.31
网站服务(nfs服务端)
NFS概述
NFS(Network File System)通过网络来做文件存储 NFS用于企业集群架构中, 如果是大型网站, 会用到更复杂的分布式文件系统FastDFS,glusterfs,HDFS
为什么使用共享存储
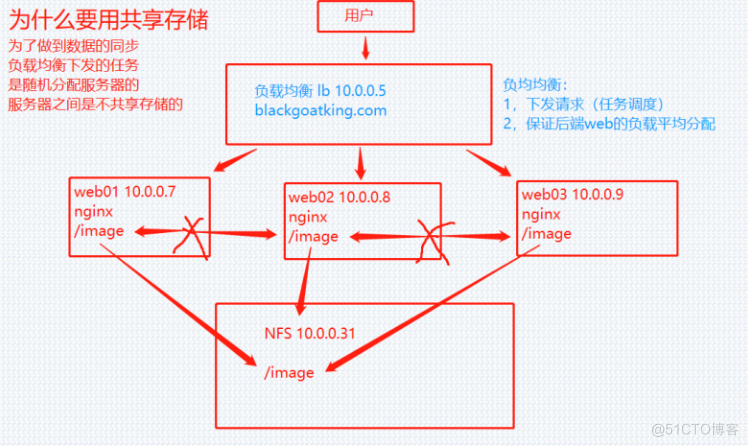
## 没有共享存储:
http://10.0.0.7/2022-05-18/33_pikachu.jpg
http://10.0.0.8/2022-05-18/33_pikachu.jpg

NFS工作原理
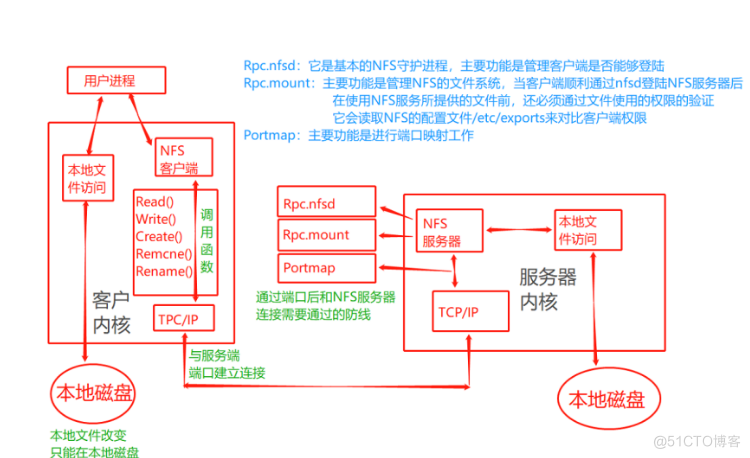
1.用户进程访问NFS客户端,使用不同的函数对数据进行处理
2.NFS客户端通过TCP/IP的方式传递给NFS服务端。
3.NFS服务端接收到请求后,会先调用portmap进程进行端口映射。
4.nfsd进程用于判断NFS客户端是否拥有权限连接NFS服务端。
5.Rpc.mount进程判断客户端是否有对应的权限进行验证。
6.idmap进程实现用户映射和压缩
7.最后NFS服务端会将对应请求的函数转换为本地能识别的命令,传递至内核,由内核驱动硬件。
注意: rpc是一个远程过程调用,那么使用nfs必须有rpc服务 服务名:rpcbind
安装部署NFS服务端
## C5 C6安装nfs服务
[root@nfs ~]# yum install -y nfs rpcbind
## C7安装nfs服务
[root@nfs ~]# yum install -y nfs-utils
## 配置NFS服务端
NFS配置文件的位置
[root@nfs ~]# ll /etc/exports
-rw-r--r--. 1 root root 0 Jun 7 2013 /etc/exports
[root@nfs ~]# vim /etc/exports
# 共享目录 允许访问NFS服务端的网段 (可读可写,同步,任何用户都映射成nfs的匿名用户)
/data 172.16.1.0/24(rw,sync,all_squash)
## 创建共享目录
[root@nfs ~]# mkdir /data
## 修改共享目录的属主和属组为nfs的匿名用户
[root@nfs ~]# chown nfsnobody:nfsnobody /data
## 启动服务
[root@nfs ~]# systemctl start nfs
## 加入开机自启
[root@nfs ~]# systemctl enable nfs
## 检查进程
[root@nfs ~]# ps -ef|grep nfs
## 检测配置文件是否生效
[root@nfs ~]# cat /var/lib/nfs/etab
/data
172.16.1.0/24(rw,sync,wdelay,hide,nocrossmnt,secure,root_squash,all_squash,no_subtree_check
,secure_locks,acl,no_pnfs,anonuid=65534,anongid=65534,sec=sys,rw,secure,root_squash,all_squ
ash)
客户端操作
# 1.安装nfs
[root@web01 ~]# yum install -y nfs-utils
[root@web02 ~]# yum install -y nfs-utils
# 2.查看哪些目录可以挂载
[root@web01 ~]# showmount -e 172.16.1.31
[root@web02 ~]# showmount -e 172.16.1.31
# 3.挂载共享目录
[root@web01 ~]# mount -t nfs 172.16.1.31:/data /opt
[root@web02 ~]# mount -t nfs 172.16.1.31:/data /opt
# 4.取消挂载
[root@web01 ~]# umount /opt
[root@web02 ~]# umount /opt
NFS共享存储实战
环境
主机名
WanIP
LanIP
角色
部署应用
web01
10.0.0.7
172.16.1.7
网站服务(nfs客户端)
httpd、php、nfs
web02
10.0.0.8
172.16.1.8
网站服务(nfs客户端)
httpd、php、nfs
nfs
10.0.0.31
172.16.1.31
网站服务(nfs服务端)
nfs
部署交作业网站
# 1.安装apache和php
[root@web01 ~]# yum install -y httpd php
[root@web02 ~]# yum install -y httpd php
# 2.下载代码(到站点目录下)
[root@web01 html]# ll
-rw-r--r-- 1 root root 26927 May 18 09:33 kaoshi.zip
[root@web01 html]# pwd
/var/www/html
# 3.解压代码
[root@web01 html]# unzip kaoshi_modify.zip
[root@web02 html]# unzip kaoshi_modify.zip
# 4.启动apache服务
[root@web01 html]# systemctl start httpd
[root@web02 html]# systemctl start httpd
# 5.检查进程
[root@web01 html]# ps -ef|grep 'httpd'
[root@web02 html]# ps -ef|grep 'httpd'
# 6.端口检查
[root@web01 html]# netstat -lntup|grep httpd
tcp6 0 0 :::80 :::* LISTEN 21802/httpd
[root@web02 html]# netstat -lntup|grep httpd
tcp6 0 0 :::80 :::* LISTEN 21802/httpd
# 7.打开浏览器访问
http://10.0.0.7/
http://10.0.0.8/
# 8.授权站点目录
umount /var/www/html/user_data/
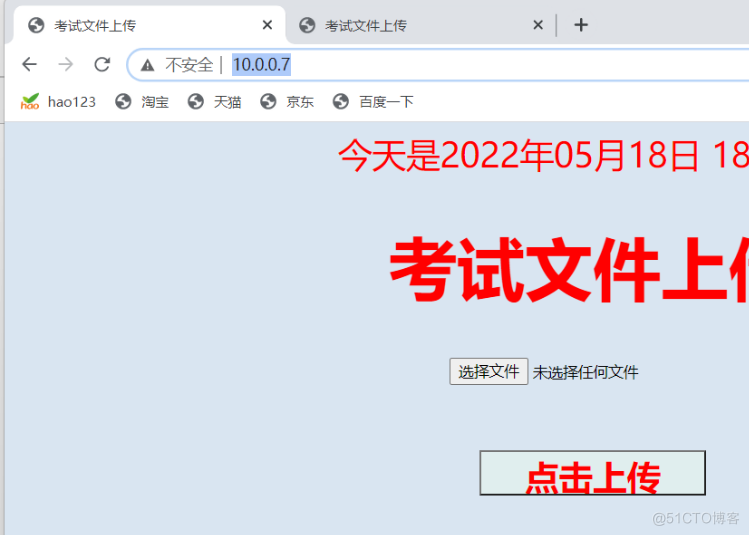
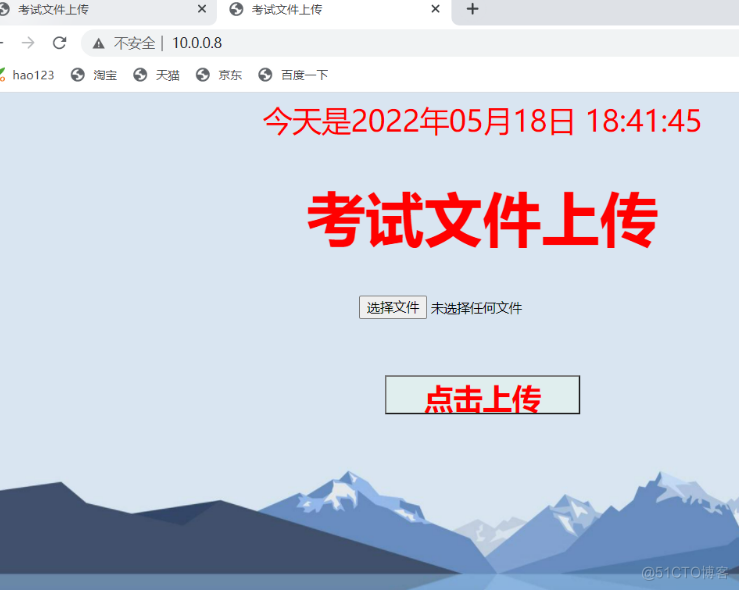
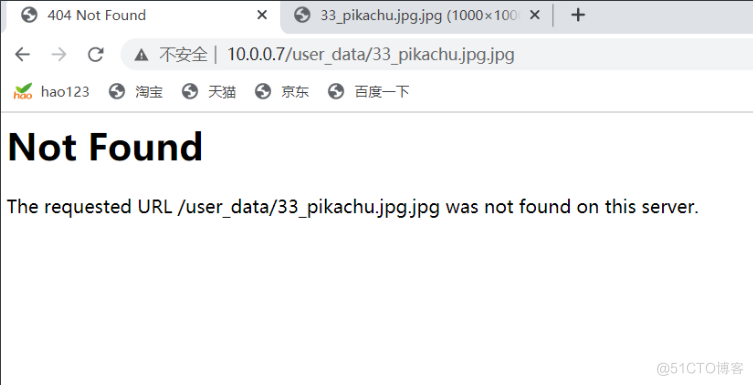
测试上传图片
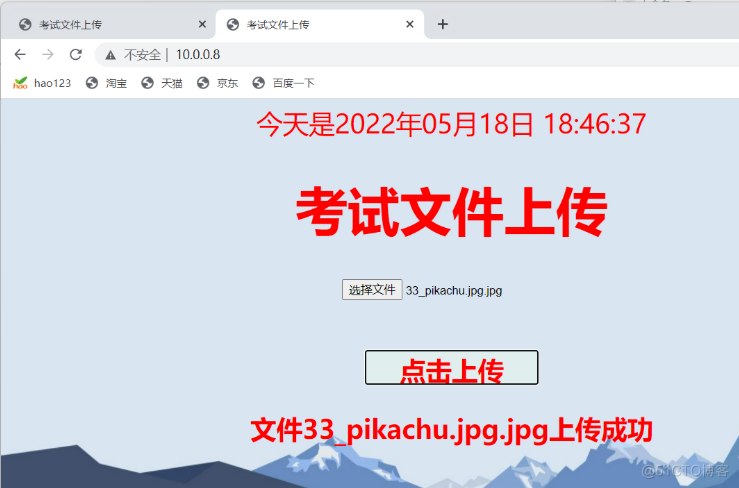
[root@web02 html]# ll /var/www/html/user_data/
-rw-r--r-- 1 apache apache 76653 May 18 18:53 33_pikachu.jpg.jpg
给交作业网站部署共享存储
# 1.先部署nfs的服务端
## C5 C6安装nfs服务
[root@nfs ~]# yum install -y nfs rpcbind
## C7安装nfs服务
[root@nfs ~]# yum install -y nfs-utils
## 配置NFS服务端
NFS配置文件的位置
[root@nfs ~]# ll /etc/exports
-rw-r--r--. 1 root root 0 Jun 7 2013 /etc/exports
[root@nfs ~]# vim /etc/exports
# 共享目录 允许访问NFS服务端的网段 (可读可写,同步,任何用户都映射成nfs的匿名用户)
/data 172.16.1.0/24(rw,sync,all_squash)
## 创建共享目录
[root@nfs ~]# mkdir /data
## 修改共享目录的属主和属组为nfs的匿名用户
[root@nfs ~]# chown nfsnobody:nfsnobody /data
## 启动服务
[root@nfs ~]# systemctl start nfs
## 加入开机自启
[root@nfs ~]# systemctl enable nfs
## 检查进程
[root@nfs ~]# ps -ef|grep nfs
## 检测配置文件是否生效
[root@nfs ~]# cat /var/lib/nfs/etab
/data
172.16.1.0/24(rw,sync,wdelay,hide,nocrossmnt,secure,root_squash,all_squash,no_subtree_check
,secure_locks,acl,no_pnfs,anonuid=65534,anongid=65534,sec=sys,rw,secure,root_squash,all_squ
ash)
# 2.先创建用户数据上传目录
[root@web01 html]# mkdir /var/www/html/user_data/
[root@web02 html]# mkdir /var/www/html/user_data/
# 3.客户端挂载nfs服务端
[root@web01 html]# mount -t nfs 172.16.1.31:/data /var/www/html/user_data/
[root@web02 html]# mount -t nfs 172.16.1.31:/data /var/www/html/user_data/
apache和nfs统一使用www用户uid是666 gid也是666
环境
主机名
WanIP
LanIP
角色
部署应用
web01
10.0.0.7
172.16.1.7
网站服务(nfs客户端)
httpd、php、nfs
web02
10.0.0.8
172.16.1.8
网站服务(nfs客户端)
httpd、php、nfs
nfs
10.0.0.31
172.16.1.31
网站服务(nfs客户端)
nfs
部署web
# 1.安装http和php
[root@web01 ~]# yum install -y httpd php
[root@web02 ~]# yum install -y httpd php
# 2.创建www用户
[root@web01 ~]# groupadd www -g 666
[root@web01 ~]# useradd www -u 666 -g 666 -s /sbin/nologin -M
[root@web02 ~]# groupadd www -g 666
[root@web02 ~]# useradd www -u 666 -g 666 -s /sbin/nologin -M
# 3.修改apache配置文件(启动用户)
[root@web01 ~]# vim /etc/httpd/conf/httpd.conf
66 User www
67 Group www
[root@web02 ~]# vim /etc/httpd/conf/httpd.conf
66 User www
67 Group www
# 4.启动apache服务
[root@web01 ~]# systemctl start httpd
[root@web02 ~]# systemctl start httpd
# 5.添加开机自启
[root@web01 ~]# systemctl enable httpd
[root@web02 ~]# systemctl enable httpd
# 6.下载代码
[root@web01 html]# pwd
/var/www/html
[root@web01 html]# ll
total 28
-rw-r--r-- 1 root root 27020 May 18 11:54 kaoshi_modify.zip
[root@web02 html]# pwd
/var/www/html
[root@web02 html]# ll
total 28
-rw-r--r-- 1 root root 27020 May 18 11:54 kaoshi_modify.zip
# 7.解压代码
[root@web01 html]# unzip kaoshi_modify.zip
[root@web02 html]# unzip kaoshi_modify.zip
# 8.授权html目录
[root@web01 html]# chown -R www.www /var/www/html/
[root@web02 html]# chown -R www.www /var/www/html/
# 9.进程检查
# 10.端口检查
# 11.浏览器访问
http://10.0.0.7/
http://10.0.0.8/
共享存储-服务端
# 1.安装nfs
[root@nfs ~]# yum install -y nfs-utils
# 2.创建www用户
[root@nfs ~]# groupadd www -g 666
[root@nfs ~]# useradd www -u 666 -g 666 -s /sbin/nologin -M
# 3.修改nfs配置文件
[root@nfs ~]# vim /etc/exports
/data 172.16.1.0/24(rw,sync,anonuid=666,anongid=666,all_squash)
# 4.创建共享目录
[root@nfs ~]# mkdir /data
# 5.授权共享目录
[root@nfs ~]# chown -R www.www /data
# 6.启动nfs服务
[root@nfs ~]# systemctl start nfs
# 7.检查进程
[root@nfs ~]# ps -ef|grep nfs
共享存储-客户端
# 1.查看挂载点
[root@web01 html]# showmount -e 172.16.1.31
Export list for 172.16.1.31:
/data 172.16.1.0/24
# 2.创建用户数据目录
[root@web01 html]# mkdir /var/www/html/user_data
# 3.挂载用户数据目录
[root@web01 html]# mount -t nfs 172.16.1.31:/data /var/www/html/user_data/
# 4.检查挂载点
[root@web02 html]# df -h
Filesystem Size Used Avail Use% Mounted on
172.16.1.31:/data 19G 1.4G 18G 8% /var/www/html/user_data
测试上传图片
[root@web01 html]# ll user_data/
total 184
-rw-r--r-- 1 www www 186520 May 19 10:40 33_pikachu.jpg
[root@web02 html]# ll user_data/
total 184
-rw-r--r-- 1 www www 186520 May 19 10:40 33_pikachu.jpg
[root@nfs ~]# ll /data/
total 184
-rw-r--r-- 1 www www 186520 May 19 10:40 33_pikachu.jpg
排错流程
# 1.网络问题
[root@web01 html]# showmount -e 172.16.1.31
[root@web01 html]# ping 172.16.1.31
1)不通
- 检查网卡配置文件
- 虚拟机物理网卡设置
- 虚拟网络编辑器中的设置
2)通
- 防火墙
- selinux
- 服务没有启动
- 服务启动了,但是配置没有生效 cat /var/lib/nfs/etab
# 2.权限问题
1)服务端权限
- 配置文件
[root@nfs ~]# cat /etc/exports
/data 172.16.1.0/24(rw,sync,anonuid=666,anongid=666,all_squash)
- 共享目录权限
[root@nfs ~]# ll -d /data/
drwxr-xr-x 2 www www 28 May 19 10:40 /data/
- 用户信息
[root@nfs html]# id www
uid=666(www) gid=666(www) groups=666(www)
2)客户端权限
- 站点目录权限
[root@web01 html]# ll /var/www/html/ -d
drwxr-xr-x 3 www www 119 May 19 10:38 /var/www/html/
- 用户上传数据的目录权限
[root@web01 html]# ll /var/www/html/user_data/ -d
drwxr-xr-x 2 www www 28 May 19 10:40 /var/www/html/user_data/
- apache配置文件中用户和组
[root@web01 html]# grep -E '^User|^Group' /etc/httpd/conf/httpd.conf
User www
Group www
- apache服务启动用户
[root@web01 html]# ps -ef|grep [h]ttpd
root 8161 1 0 10:15 ? 00:00:00 /usr/sbin/httpd -DFOREGROUND
www 8162 8161 0 10:15 ? 00:00:00 /usr/sbin/httpd -DFOREGROUND
www 8163 8161 0 10:15 ? 00:00:00 /usr/sbin/httpd -DFOREGROUND
www 8164 8161 0 10:15 ? 00:00:00 /usr/sbin/httpd -DFOREGROUND
www 8165 8161 0 10:15 ? 00:00:00 /usr/sbin/httpd -DFOREGROUND
www 8166 8161 0 10:15 ? 00:00:00 /usr/sbin/httpd -DFOREGROUND
www 8305 8161 0 10:28 ? 00:00:00 /usr/sbin/httpd -DFOREGROUND
- 用户信息
[root@web01 html]# id www
uid=666(www) gid=666(www) groups=666(www)
- 错误日志
[root@web02 html]# tail -f /var/log/httpd/error_log