Redis高可用Cluster 什么是Redis Cluster 1)Redis集群是一个可以在多个Redis主从复制节点之间进行数据共享的设施(installation) 2)Redis集群不支持那些需要同时处理多个键的Redis命令,因为执
Redis高可用Cluster
什么是Redis Cluster
1)Redis集群是一个可以在多个Redis主从复制节点之间进行数据共享的设施(installation)
2)Redis集群不支持那些需要同时处理多个键的Redis命令,因为执行这些命令需要在多个Redis节点之间移动数据,并且在高负载的情况下,这些命令将降低Redis集群的性能,并导致不可预测的行为。
3)Redis集群通过分区(partition)来提供一定程度的可用性(availability):即使集群中有一部分节点失效或者无法进行通讯,集群也可以继续处理命令请求。
4)Redis集群有将数据自动切分(split)到多个节点的能力。
redis Cluster特性
高性能
1.在多酚片节点中,将16384个槽位,均匀分布到多个分片节点中
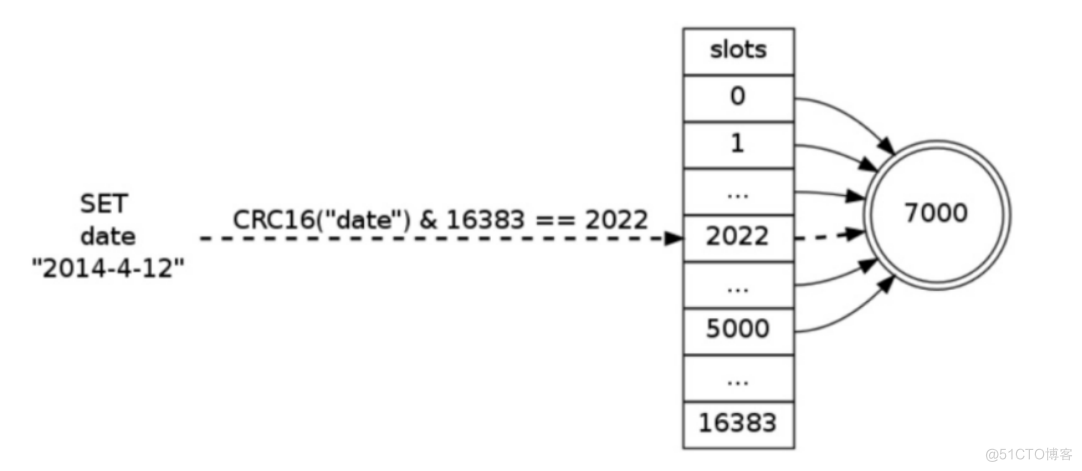
2.存数据时,将key做crc16(key),然后和16384进行取模,得出槽位值(0-16384之间)
3.根据计算得出的槽位值,找到相对应的分片节点的主节点,存储到相应槽位上
4.如果客户端当时连接的节点不是将来要存储的分片节点,分片集群会将客户端连接切换至真正存储节点进行数据存储
高可用
在搭建集群时,会为每一个分片的主节点,对应一个从节点,实现slaveof功能,同时当主节点down,实现类似于sentinel的自动failover的功能。
redis cluster可以连接任意节点提供服务
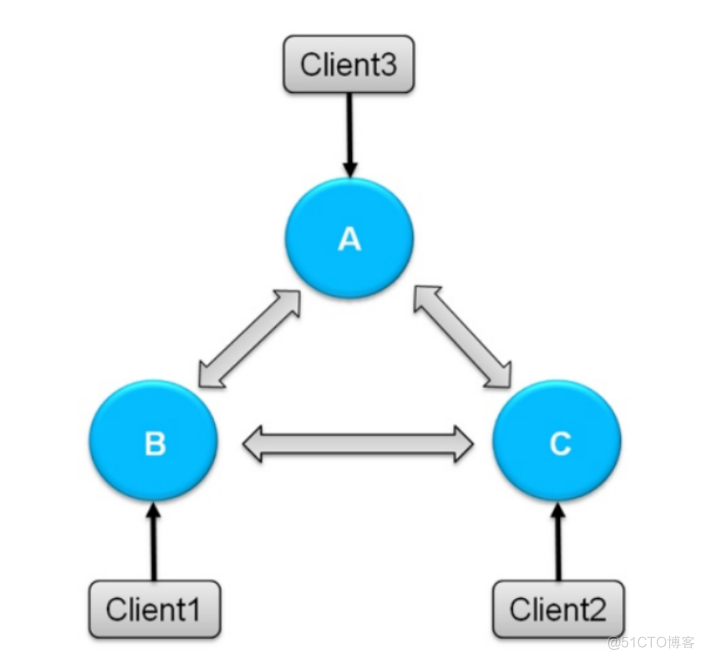
如图所示,当我们用客户端连接A分片时,如果按照数据的取模,我们想要访问的数据,不在A分片中,那么集群会自动将请求进行转发。
redis cluster共享数据
Redis 集群使用数据分片(sharding)而非一致性哈希(consistency hashing)来实现: 一个 Redis 集群包含 16384 个哈希槽(hash slot), 数据库中的每个键都属于这 16384 个哈希槽的其中一个, 集群使用公式 CRC16(key) % 16384 来计算键 key 属于哪个槽, 其中 CRC16(key) 语句用于计算键 key 的 CRC16 校验和 。
1.节点 A 负责处理 0 号至 5500 号哈希槽。
2.节点 B 负责处理 5501 号至 11000 号哈希槽。
3.节点 C 负责处理 11001 号至 16384 号哈希槽。
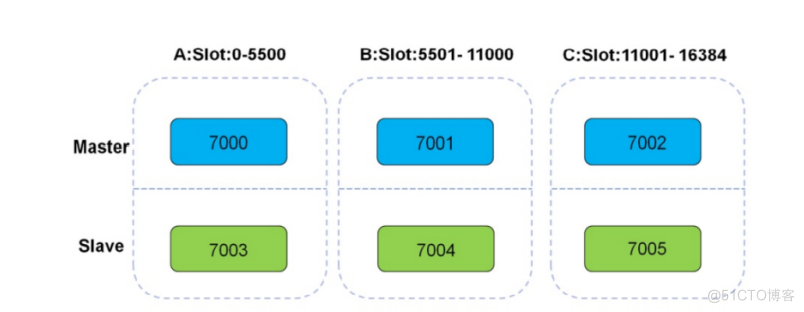
所有的redis节点彼此互联(PING-PONG机制),内部使用二进制协议优化传输速度和带宽.
节点的fail是通过集群中超过半数的master节点检测失效时才生效.
客户端与redis节点直连,不需要中间proxy层.客户端不需要连接集群所有节点,连接集群中任何一个可用节点即可
把所有的物理节点映射到[0-16383]slot上,cluster 负责维护node<->slot<->key
集群如何做复制
为了使得集群在一部分节点下线或者无法与集群的大多数(majority)节点进行通讯的情况下, 仍然可以正常运作, Redis 集群对节点使用了主从复制功能: 集群中的每个节点都有 1 个至 N 个复制品(replica), 其中一个复制品为主节点(master), 而其余的 N-1 个复制品为从节点(slave)。
在之前列举的节点 A 、B 、C 的例子中, 如果节点 B 下线了, 那么集群将无法正常运行, 因为集群找不到节点来处理 5501 号至 11000 号的哈希槽。
假如在创建集群的时候(或者至少在节点 B 下线之前), 我们为主节点 B 添加了从节点 B1 , 那么当主节点 B 下线的时候, 集群就会将 B1 设置为新的主节点, 并让它代替下线的主节点 B , 继续处理 5501 号至 11000 号的哈希槽, 这样集群就不会因为主节点 B 的下线而无法正常运作了。
不过如果节点 B 和 B1 都下线的话, Redis 集群还是会停止运作。
集群的复制特性重用了 SLAVEOF 命令的代码,所以集群节点的复制行为和 SLAVEOF 命令的复制行为完全相同。
Rdis Cluster故障转移
1)在集群里面,节点会对其他节点进行下线检测。
2)当一个主节点下线时,集群里面的其他主节点负责对下线主节点进行故障移。
3)换句话说,集群的节点集成了下线检测和故障转移等类似 Sentinel 的功能。
4)因为 Sentinel 是一个独立运行的监控程序,而集群的下线检测和故障转移等功能是集成在节点里面的,它们的运行模式非常地不同,所以尽管这两者的功能很相似,但集群的实现没有重用 Sentinel 的代码。
redis cluster执行命令的两种情况
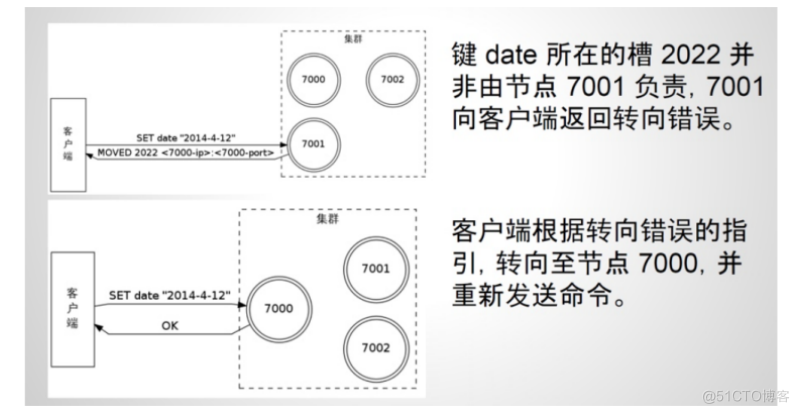
1)命令发送到了正确的节点:命令要处理的键所在的槽正好是由接收命令的节点负责,那么该节点执行命令,就像单机 Redis 服务器一样。
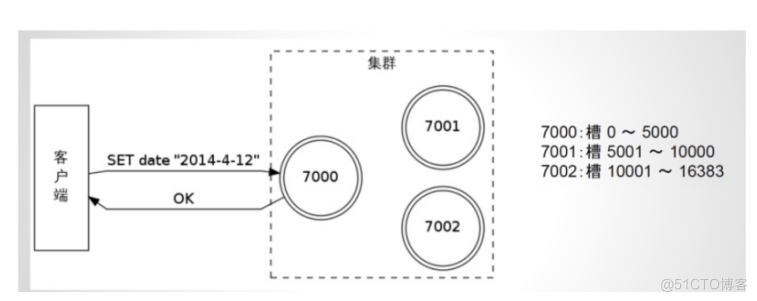
2)命令发送到了错误的节点:接收到命令的节点并非处理键所在槽的节点,那么节点将向客户端返回一个转向(redirection)错误,告知客户端应该到哪个节点去执行这个命令,客户端会根据错误提示的信息,重新向正确的节点发送命令。
Redis Cluster部署(只有redis5.0版本以上才可以实现)
环境准备
外网IP
内网IP
端口
安装包
10.0.0.52
172.16.1.52
7000,7001
redis-3.2.12.tar.gz
10.0.0.53
172.16.1.53
7002,7003
redis-3.2.12.tar.gz
10.0.0.54
172.16.1.54
7004,7005
redis-3.2.12.tar.gz
## 安装redis
[root@db02 ~]# wget wget https://download.redis.io/redis-stable.tar.gz
[root@db02 ~]# tar xf redis-stable.tar.gz
[root@db02 ~]# cd redis-stable/
[root@db02 redis-stable]# make
[root@db02 redis-stable]# make install
[root@db04 ~]# wget wget https://download.redis.io/redis-stable.tar.gz
[root@db04 ~]# tar xf redis-stable.tar.gz
[root@db04 ~]# cd redis-stable/
[root@db04 redis-stable]# make
[root@db04 redis-stable]# make install
## 创建redis多实例目录
[root@db02 ~]# mkdir -p /data/{7000..7001}
[root@db03 ~]# mkdir -p /data/{7002..7003}
[root@db04 ~]# mkdir -p /data/{7004..7005}
## 编辑多实例配置文件
[root@db02 ~]# vim /data/7000/redis.conf
port 7000 # 端口
bind 127.0.0.1 10.0.0.52 172.16.1.52 # 本地ip
daemonize yes # 放入后台
pidfile /data/7000/redis.pid # pid文件路径
loglevel notice # log的级别(notice)
logfile "/data/7000/redis.log" # 日志文件
dbfilename dump.rdb # 备份的文件名
dir /data/7000 # 存放备份文件的目录
protected-mode no # 关闭安全模式
cluster-enabled yes # 是否是集群
cluster-config-file nodes.conf # 集群配置文件
cluster-node-timeout 5000 # 集群连接超时时间
appendonly yes # 数据持久化类型
[root@db02 ~]# vim /data/7001/redis.conf
port 7001
bind 127.0.0.1 10.0.0.52 172.16.1.52
daemonize yes
pidfile /data/7001/redis.pid
loglevel notice
logfile "/data/7001/redis.log"
dbfilename dump.rdb
dir /data/7001
protected-mode no
cluster-enabled yes
cluster-config-file nodes.conf
cluster-node-timeout 5000
appendonly yes
[root@db03 ~]# vim /data/7002/redis.conf
port 7002
bind 127.0.0.1 10.0.0.53 172.16.1.53
daemonize yes
pidfile /data/7002/redis.pid
loglevel notice
logfile "/data/7002/redis.log"
dbfilename dump.rdb
dir /data/7002
protected-mode no
cluster-enabled yes
cluster-config-file nodes.conf
cluster-node-timeout 5000
appendonly yes
[root@db03 ~]# vim /data/7003/redis.conf
port 7003
bind 127.0.0.1 10.0.0.53 172.16.1.53
daemonize yes
pidfile /data/7003/redis.pid
loglevel notice
logfile "/data/7003/redis.log"
dbfilename dump.rdb
dir /data/7003
protected-mode no
cluster-enabled yes
cluster-config-file nodes.conf
cluster-node-timeout 5000
appendonly yes
[root@db04 ~]# vim /data/7004/redis.conf
port 7004
bind 127.0.0.1 10.0.0.54 172.16.1.54
daemonize yes
pidfile /data/7004/redis.pid
loglevel notice
logfile "/data/7004/redis.log"
dbfilename dump.rdb
dir /data/7004
protected-mode no
cluster-enabled yes
cluster-config-file nodes.conf
cluster-node-timeout 5000
appendonly yes
[root@db04 ~]# vim /data/7005/redis.conf
port 7005
bind 127.0.0.1 10.0.0.54 172.16.1.54
daemonize yes
pidfile /data/7005/redis.pid
loglevel notice
logfile "/data/7005/redis.log"
dbfilename dump.rdb
dir /data/7005
protected-mode no
cluster-enabled yes
cluster-config-file nodes.conf
cluster-node-timeout 5000
appendonly yes
## 启动redis
[root@db02 ~]# redis-server /data/7000/redis.conf
[root@db02 ~]# redis-server /data/7001/redis.conf
[root@db03 ~]# redis-server /data/7002/redis.conf
[root@db03 ~]# redis-server /data/7003/redis.conf
[root@db04 ~]# redis-server /data/7004/redis.conf
[root@db04 ~]# redis-server /data/7005/redis.conf
## 安装redis-cluster插件
# 1.安装ruby环境
[root@db02 ~]# yum install ruby rubygems -y
# 2.更换gem源
[root@db02 ~]# gem source list
[root@db02 ~]# gem sources --remove https://rubygems.org/
https://rubygems.org/ removed from sources
[root@db02 ~]# gem sources -a http://mirrors.aliyun.com/rubygems/
source http://mirrors.aliyun.com/rubygems/ added to sources
[root@db03 ~]# gem source list
[root@db03 ~]# gem sources --remove https://rubygems.org/
https://rubygems.org/ removed from sources
[root@db03 ~]# gem sources -a http://mirrors.aliyun.com/rubygems/
source http://mirrors.aliyun.com/rubygems/ added to sources
[root@db04 ~]# gem source list
[root@db04 ~]# gem sources --remove https://rubygems.org/
https://rubygems.org/ removed from sources
[root@db04 ~]# gem sources -a http://mirrors.aliyun.com/rubygems/
source http://mirrors.aliyun.com/rubygems/ added to sources
# 3.安装redis cluster插件
[root@db02 ~]# gem install redis -v 3.3.3
[root@db03 ~]# gem install redis -v 3.3.3
[root@db04 ~]# gem install redis -v 3.3.3
# 4.将节点加入集群
[root@db02 ~]# redis-cli --cluster create 172.16.1.52:7000 172.16.1.52:7001 172.16.1.53:7002 172.16.1.53:7003 172.16.1.54:7004 172.16.1.54:7005 --cluster-replicas 1
>>> Performing hash slots allocation on 6 nodes...
Master[0] -> Slots 0 - 5460
Master[1] -> Slots 5461 - 10922
Master[2] -> Slots 10923 - 16383
Adding replica 172.16.1.53:7003 to 172.16.1.52:7000
Adding replica 172.16.1.54:7005 to 172.16.1.53:7002
Adding replica 172.16.1.52:7001 to 172.16.1.54:7004
M: 5064156c03853f2281976fa2a70ebc28229eaf00 172.16.1.52:7000
slots:[0-5460] (5461 slots) master
S: c2af01070a1ee3c64ba0a4ce5b5b40255d219aee 172.16.1.52:7001
replicates 41a2c56c3a05e455806bcbf6f1355bbb386e8106
M: dad534b8587511a86dc166c2a2668c7880a1e678 172.16.1.53:7002
slots:[5461-10922] (5462 slots) master
S: 594c72e3da1c272db32004a71c7c1a4728b38d18 172.16.1.53:7003
replicates 5064156c03853f2281976fa2a70ebc28229eaf00
M: 41a2c56c3a05e455806bcbf6f1355bbb386e8106 172.16.1.54:7004
slots:[10923-16383] (5461 slots) master
S: 08ead59decf461e44e5d29b87a8f1ae41c42aedd 172.16.1.54:7005
replicates dad534b8587511a86dc166c2a2668c7880a1e678
Can I set the above configuration? (type 'yes' to accept): yes
>>> Nodes configuration updated
>>> Assign a different config epoch to each node
>>> Sending CLUSTER MEET messages to join the cluster
Waiting for the cluster to join
.
>>> Performing Cluster Check (using node 172.16.1.52:7000)
M: 5064156c03853f2281976fa2a70ebc28229eaf00 172.16.1.52:7000
slots:[0-5460] (5461 slots) master
1 additional replica(s)
M: dad534b8587511a86dc166c2a2668c7880a1e678 172.16.1.53:7002
slots:[5461-10922] (5462 slots) master
1 additional replica(s)
S: c2af01070a1ee3c64ba0a4ce5b5b40255d219aee 172.16.1.52:7001
slots: (0 slots) slave
replicates 41a2c56c3a05e455806bcbf6f1355bbb386e8106
S: 594c72e3da1c272db32004a71c7c1a4728b38d18 172.16.1.53:7003
slots: (0 slots) slave
replicates 5064156c03853f2281976fa2a70ebc28229eaf00
M: 41a2c56c3a05e455806bcbf6f1355bbb386e8106 172.16.1.54:7004
slots:[10923-16383] (5461 slots) master
1 additional replica(s)
S: 08ead59decf461e44e5d29b87a8f1ae41c42aedd 172.16.1.54:7005
slots: (0 slots) slave
replicates dad534b8587511a86dc166c2a2668c7880a1e678
[OK] All nodes agree about slots configuration.
>>> Check for open slots...
>>> Check slots coverage...
[OK] All 16384 slots covered.
## 查看master和slave信息
[root@db02 ~]# redis-cli -p 7000 cluster nodes
dad534b8587511a86dc166c2a2668c7880a1e678 172.16.1.53:7002@17002 master - 0 1663867162553 3 connected 5461-10922
c2af01070a1ee3c64ba0a4ce5b5b40255d219aee 172.16.1.52:7001@17001 slave 41a2c56c3a05e455806bcbf6f1355bbb386e8106 0 1663867163456 5 connected
594c72e3da1c272db32004a71c7c1a4728b38d18 172.16.1.53:7003@17003 slave 5064156c03853f2281976fa2a70ebc28229eaf00 0 1663867162451 1 connected
41a2c56c3a05e455806bcbf6f1355bbb386e8106 172.16.1.54:7004@17004 master - 0 1663867161000 5 connected 10923-16383
08ead59decf461e44e5d29b87a8f1ae41c42aedd 172.16.1.54:7005@17005 slave dad534b8587511a86dc166c2a2668c7880a1e678 0 1663867163000 3 connected
5064156c03853f2281976fa2a70ebc28229eaf00 172.16.1.52:7000@17000 myself,master - 0 1663867162000 1 connected 0-5460
## 连接集群并set key
[root@db02 ~]# redis-cli -c -p 7000
127.0.0.1:7000> set name 'qqq'
-> Redirected to slot [5798] located at 172.16.1.53:7002
OK
[root@db03 ~]# redis-cli -c -p 7002
127.0.0.1:7002> keys *
1) "name"
127.0.0.1:7002> get name
"qqq"
Redis Cluster扩展集群
## 准备两台新节点
[root@db01 ~]# mkdir -p /data/{7006..7007}
[root@db01 ~]# vim /data/7006/redis.conf
port 7006
bind 10.0.0.51 172.16.1.51 127.0.0.1
daemonize yes
pidfile /data/7006/redis.pid
loglevel notice
logfile "/data/7006/redis.log"
dbfilename dump.rdb
dir /data/7006
protected-mode no
cluster-enabled yes
cluster-config-file nodes.conf
cluster-node-timeout 5000
appendonly yes
[root@db01 ~]# vim /data/7007/redis.conf
port 7007
bind 10.0.0.51 172.16.1.51 127.0.0.1
daemonize yes
pidfile /data/7007/redis.pid
loglevel notice
logfile "/data/7007/redis.log"
dbfilename dump.rdb
dir /data/7007
protected-mode no
cluster-enabled yes
cluster-config-file nodes.conf
cluster-node-timeout 5000
appendonly yes
# 安装redis
[root@db01 ~]# wget wget https://download.redis.io/redis-stable.tar.gz
[root@db01 ~]# tar xf redis-stable.tar.gz
[root@db01 ~]# cd redis-stable/
[root@db01 redis-stable]# make
[root@db01 redis-stable]# make install
## 安装redis-cluster插件
# 1.安装ruby环境
[root@db01 ~]# yum install ruby rubygems -y
# 2.更换gem源
[root@db01 ~]# gem source list
*** CURRENT SOURCES ***
https://rubygems.org/
[root@db01 ~]# gem sources --remove https://rubygems.org/
https://rubygems.org/ removed from sources
[root@db01 ~]# gem sources -a http://mirrors.aliyun.com/rubygems/
# 3.安装redis cluster插件
[root@db01 ~]# gem install redis -v 3.3.3
## 启动redis
[root@db01 ~]# redis-server /data/7006/redis.conf
[root@db01 ~]# redis-server /data/7007/redis.conf
## 将新节点的7006端口加入集群
[root@db01 ~]# redis-cli --cluster add-node 172.16.1.51:7006 172.16.1.52:7000
>>> Adding node 172.16.1.51:7006 to cluster 172.16.1.52:7000
>>> Performing Cluster Check (using node 172.16.1.52:7000)
M: 5064156c03853f2281976fa2a70ebc28229eaf00 172.16.1.52:7000
slots:[0-5460] (5461 slots) master
1 additional replica(s)
S: c2af01070a1ee3c64ba0a4ce5b5b40255d219aee 172.16.1.52:7001
slots: (0 slots) slave
replicates 41a2c56c3a05e455806bcbf6f1355bbb386e8106
S: dad534b8587511a86dc166c2a2668c7880a1e678 172.16.1.53:7002
slots: (0 slots) slave
replicates 08ead59decf461e44e5d29b87a8f1ae41c42aedd
M: 41a2c56c3a05e455806bcbf6f1355bbb386e8106 172.16.1.54:7004
slots:[10923-16383] (5461 slots) master
1 additional replica(s)
S: 594c72e3da1c272db32004a71c7c1a4728b38d18 172.16.1.53:7003
slots: (0 slots) slave
replicates 5064156c03853f2281976fa2a70ebc28229eaf00
M: 08ead59decf461e44e5d29b87a8f1ae41c42aedd 172.16.1.54:7005
slots:[5461-10922] (5462 slots) master
1 additional replica(s)
[OK] All nodes agree about slots configuration.
>>> Check for open slots...
>>> Check slots coverage...
[OK] All 16384 slots covered.
>>> Getting functions from cluster
>>> Send FUNCTION LIST to 172.16.1.51:7006 to verify there is no functions in it
>>> Send FUNCTION RESTORE to 172.16.1.51:7006
>>> Send CLUSTER MEET to node 172.16.1.51:7006 to make it join the cluster.
[OK] New node added correctly.
## 查看master和slave信息
[root@db01 ~]# redis-cli -p 7006 cluster nodes
2572f478f7b82f9729302bf729502e390f73fb0f 172.16.1.51:7006@17006 myself,master - 0 1663873710000 0 connected
c2af01070a1ee3c64ba0a4ce5b5b40255d219aee 172.16.1.52:7001@17001 slave 41a2c56c3a05e455806bcbf6f1355bbb386e8106 0 1663873712000 5 connected
594c72e3da1c272db32004a71c7c1a4728b38d18 172.16.1.53:7003@17003 slave 5064156c03853f2281976fa2a70ebc28229eaf00 0 1663873712495 1 connected
41a2c56c3a05e455806bcbf6f1355bbb386e8106 172.16.1.54:7004@17004 master - 0 1663873712000 5 connected 10923-16383
5064156c03853f2281976fa2a70ebc28229eaf00 172.16.1.52:7000@17000 master - 0 1663873712000 1 connected 0-5460
dad534b8587511a86dc166c2a2668c7880a1e678 172.16.1.53:7002@17002 slave 08ead59decf461e44e5d29b87a8f1ae41c42aedd 0 1663873713000 7 connected
08ead59decf461e44e5d29b87a8f1ae41c42aedd 172.16.1.54:7005@17005 master - 0 1663873713506 7 connected 5461-10922
## 重新分片(重新规划槽位)
[root@db01 ~]# redis-cli --cluster reshard 172.16.1.52:7000
# 你要分出多少个槽位
How many slots do you want to move (from 1 to 16384)? 2000
# 接收4096槽位的ID是什么?
What is the receiving node ID? 2572f478f7b82f9729302bf729502e390f73fb0f
# 是不是全部接收
Please enter all the source node IDs.
Type 'all' to use all the nodes as source nodes for the hash slots.
Type 'done' once you entered all the source nodes IDs.
Source node #1: all
# 是按照上面的计划执行
Do you want to proceed with the proposed reshard plan (yes/no)? yes
## 查看master信息
[root@db01 ~]# redis-cli -p 7006 cluster nodes| grep master
2572f478f7b82f9729302bf729502e390f73fb0f 172.16.1.51:7006@17006 myself,master - 0 1663874052000 8 connected 0-1364 5461-6826 10923-12287
41a2c56c3a05e455806bcbf6f1355bbb386e8106 172.16.1.54:7004@17004 master - 0 1663874052553 5 connected 12288-16383
5064156c03853f2281976fa2a70ebc28229eaf00 172.16.1.52:7000@17000 master - 0 1663874052858 1 connected 1365-5460
08ead59decf461e44e5d29b87a8f1ae41c42aedd 172.16.1.54:7005@17005 master - 0 1663874051339 7 connected 6827-10922
## 将7007从节点加入7006的主节点
[root@db01 ~]# redis-cli --cluster add-node --cluster-slave --cluster-master-id 2572f478f7b82f9729302bf729502e390f73fb0f 172.16.1.51:7007 172.16.1.51:7006
## 查看slave信息
[root@db01 ~]# redis-cli -p 7006 cluster nodes| grep slave
a5793ea280714f84f249ae703ee9b4b4ea887c8f 172.16.1.51:7007@17007 slave 2572f478f7b82f9729302bf729502e390f73fb0f 0 1663874419519 8 connected
c2af01070a1ee3c64ba0a4ce5b5b40255d219aee 172.16.1.52:7001@17001 slave 41a2c56c3a05e455806bcbf6f1355bbb386e8106 0 1663874420000 5 connected
594c72e3da1c272db32004a71c7c1a4728b38d18 172.16.1.53:7003@17003 slave 5064156c03853f2281976fa2a70ebc28229eaf00 0 1663874420717 1 connected
dad534b8587511a86dc166c2a2668c7880a1e678 172.16.1.53:7002@17002 slave 08ead59decf461e44e5d29b87a8f1ae41c42aedd 0 1663874418555 7 connected
Redis Cluster删除节点
## 重新分片
[root@db02 ~]# redis-cli --cluster reshard 127.0.0.1:7000
# 需要重新分片多少个slot
How many slots do you want to move (from 1 to 16384)? 200
# 谁来接收这些槽位7000
What is the receiving node ID? 5064156c03853f2281976fa2a70ebc28229eaf0
Please enter all the source node IDs.
Type 'all' to use all the nodes as source nodes for the hash slots.
Type 'done' once you entered all the source nodes IDs.
# 源节点:谁要给出这些槽位7006
Source node #1: 2572f478f7b82f9729302bf729502e390f73fb0f
# done结束
Source node #2: done
## 删除节点
[root@db02 ~]# redis-cli --cluster del-node 172.16.1.51:7006 2572f478f7b82f9729302bf729502e390f73fb0f
[root@db02 ~]# redis-cli --cluster del-node 172.16.1.51:7007 a5793ea280714f84f249ae703ee9b4b4ea887c8f
Redis存在的问题
缓存穿透
概念:
访问一个不存在的key,缓存不起作用,请求会穿透到DB,流量大时DB会挂掉。
解决方案:
采用布隆过滤器,使用一个足够大的bitmap,用于存储可能访问的key,不存在的key直接被过滤;
访问key未在DB查询到值,也将空值写进缓存,但可以设置较短过期时间。
缓存雪崩
概念:
大量的key设置了相同的过期时间,导致在缓存在同一时刻全部失效,造成瞬时DB请求量大、压力骤增,引起雪崩。
解决方案:
可以给缓存设置过期时间时加上一个随机值时间,使得每个key的过期时间分布开来,不会集中在同一时刻失效。
缓存击穿
概念:
一个存在的key,在缓存过期的一刻,同时有大量的请求,这些请求都会击穿到DB,造成瞬时DB请求量大、压力骤增。
解决方案:
在访问key之前,采用SETNX(set if not exists)来设置另一个短期key来锁住当前key的访问,访问结束再删除该短期key。


