概述
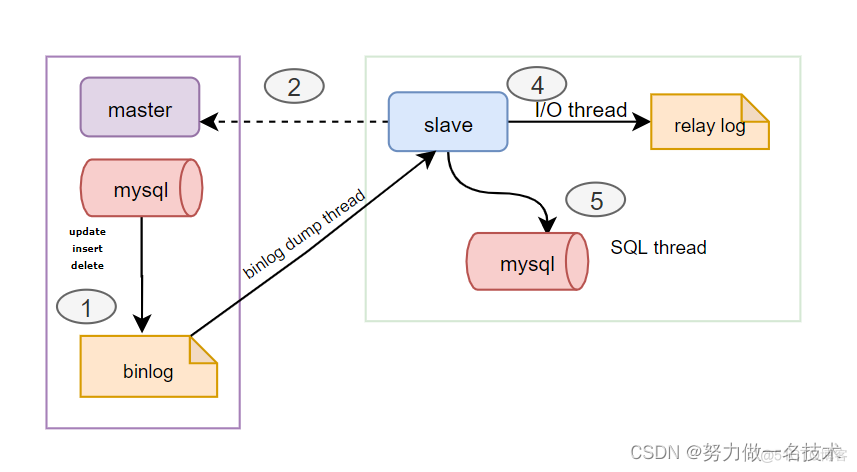
主从复制是将主库的DDL和DML操作通过二进制日志传递到复制服务器(从库)上,然后从库对这些日志重新执行,从而使得主库和从库保持数据一致。
DML指的是数据库操纵语言,例如:SELECT、UPDATE、DELETE
DDL指的是数据库定义语言,例如:CREATE、DROP、ALTER
作用
-
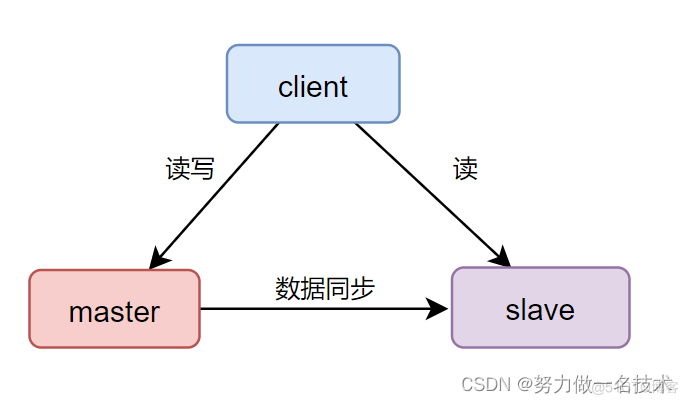
读写分离,使数据库能⽀撑更⼤的并发
-
发扬不同表引擎的优点
-
实现服务器负载均衡
-
通过复制实现数据的异地备份
-
提⾼数据库系统的可⽤性
部署
部署环境:centos7
- 主服务器:192.168.100.10
- 从服务器:192.168.100.20
1.安装mariadb
我们这里使用mariadb做演示,只要是部署方便。
[root@master ~]# yum -y install mariadb mariadb-server Loaded plugins: fastestmirror ······ Complete!mariadb是mysql的一个分支,完全兼容mysql。直接当作mysql使用
2.启动并开机自启
[root@master ~]# systemctl start mariadb ; systemctl enable mariadb Created symlink from /etc/systemd/system/multi-user.target.wants/mariadb.service to /usr/lib/systemd/system/mariadb.service.3.数据库初始化
[root@master ~]# mysql_secure_installation NOTE: RUNNING ALL PARTS OF THIS SCRIPT IS RECOMMENDED FOR ALL MariaDB SERVERS IN PRODUCTION USE! PLEASE READ EACH STEP CAREFULLY! In order to log into MariaDB to secure it, we'll need the current password for the root user. If you've just installed MariaDB, and you haven't set the root password yet, the password will be blank, so you should just press enter here. Enter current password for root (enter for none): OK, successfully used password, moving on... Setting the root password ensures that nobody can log into the MariaDB root user without the proper authorisation. Set root password? [Y/n] y New password: ************设置密码 Re-enter new password: ************重复密码 Password updated successfully! Reloading privilege tables.. ... Success! By default, a MariaDB installation has an anonymous user, allowing anyone to log into MariaDB without having to have a user account created for them. This is intended only for testing, and to make the installation go a bit smoother. You should remove them before moving into a production environment. Remove anonymous users? [Y/n] y ... Success! Normally, root should only be allowed to connect from 'localhost'. This ensures that someone cannot guess at the root password from the network. Disallow root login remotely? [Y/n] y ... Success! By default, MariaDB comes with a database named 'test' that anyone can access. This is also intended only for testing, and should be removed before moving into a production environment. Remove test database and access to it? [Y/n] y - Dropping test database... ... Success! - Removing privileges on test database... ... Success! Reloading the privilege tables will ensure that all changes made so far will take effect immediately. Reload privilege tables now? [Y/n] y ... Success! Cleaning up... All done! If you've completed all of the above steps, your MariaDB installation should now be secure. Thanks for using MariaDB!配置
master节点
1.添加配置文件,在[mysqld]部分添加如下所示,如果使用MySQL,这里需要自己添加[mysqld]部分
[root@master ~]# vi /etc/my.cnf [mysqld] datadir=/var/lib/mysql log-bin=mysql-bin server-id=10 socket=/var/lib/mysql/mysql.socklog-bin 没指定存储⽬录,则是默认 datadir 指向的⽬录
每个服务器都需要添加 server_id 配置,各个服务器的 server_id 需要保证唯⼀性,实践中通过设置为服务器 ip 地址的最后⼀位
2.重启服务
[root@master ~]# systemctl restart mariadb3.登录数据库,并对从库账号赋权
[root@master ~]# mysql -uroot -p123456 Welcome to the MariaDB monitor. Commands end with ; or \g. Your MariaDB connection id is 2 Server version: 5.5.68-MariaDB MariaDB Server Copyright (c) 2000, 2018, Oracle, MariaDB Corporation Ab and others. Type 'help;' or '\h' for help. Type '\c' to clear the current input statement. MariaDB [(none)]> grant replication slave on *.* to 'root'@'192.168.100.20' identified by '123456'; Query OK, 0 rows affected (0.00 sec)-u 指定数据库用户,-p 数据库密码,这里使用我们刚刚初始化时配置的密码,正常尽量不要使用明文密码
grant replication 设置当前服务器(192.168.100.20)为主服务器(192.168.100.10)的从库
4.并记录从库log文件及当前位置
MariaDB [(none)]> show master status ; +------------------+----------+--------------+------------------+ | File | Position | Binlog_Do_DB | Binlog_Ignore_DB | +------------------+----------+--------------+------------------+ | mysql-bin.000001 | 400 | | | +------------------+----------+--------------+------------------+ 1 row in set (0.00 sec)加锁,实际⼯作中,备份的时候是不让往数据库中写数据的,所以数据库要加锁,只能读
这里File和Position部分,从节点都会用到。
slave节点
1.添加配置文件
[root@master ~]# vi /etc/my.cnf [mysqld] datadir=/var/lib/mysql log-bin=mysql-bin server-id=20 socket=/var/lib/mysql/mysql.sock2.重启服务
[root@master ~]# systemctl restart mariadb3.登录并设置主从复制
[root@slave ~]# mysql -uroot -p123456 Welcome to the MariaDB monitor. Commands end with ; or \g. Your MariaDB connection id is 2 Server version: 5.5.68-MariaDB MariaDB Server Copyright (c) 2000, 2018, Oracle, MariaDB Corporation Ab and others. Type 'help;' or '\h' for help. Type '\c' to clear the current input statement. MariaDB [(none)]> change master to master_host='192.168.100.10',master_user='root',master_password='123456',master_log_file='mysql-bin.000001',master_log_pos=400; Query OK, 0 rows affected (0.11 sec)设置的指定从库开始复制主库时需要使⽤的⽇志⽂件和⽂件位置,即上⾯主库执⾏ show master status;显示结果中的 file 和 position,这里一定要对应正常,不然后面会失败。
4.开启并查看主从复制
MariaDB [(none)]> start slave; Query OK, 0 rows affected (0.00 sec) MariaDB [(none)]> show slave status \G; *************************** 1. row *************************** Slave_IO_State: Waiting for master to send event Master_Host: 192.168.100.10 Master_User: root Master_Port: 3306 Connect_Retry: 60 Master_Log_File: mysql-bin.000001 Read_Master_Log_Pos: 400 Relay_Log_File: mariadb-relay-bin.000002 Relay_Log_Pos: 529 Relay_Master_Log_File: mysql-bin.000001 Slave_IO_Running: Yes Slave_SQL_Running: Yes Replicate_Do_DB: Replicate_Ignore_DB: Replicate_Do_Table: Replicate_Ignore_Table: Replicate_Wild_Do_Table: Replicate_Wild_Ignore_Table: Last_Errno: 0 Last_Error: Skip_Counter: 0 Exec_Master_Log_Pos: 400 Relay_Log_Space: 825 Until_Condition: None Until_Log_File: Until_Log_Pos: 0 Master_SSL_Allowed: No Master_SSL_CA_File: Master_SSL_CA_Path: Master_SSL_Cert: Master_SSL_Cipher: Master_SSL_Key: Seconds_Behind_Master: 0 Master_SSL_Verify_Server_Cert: No Last_IO_Errno: 0 Last_IO_Error: Last_SQL_Errno: 0 Last_SQL_Error: Replicate_Ignore_Server_Ids: Master_Server_Id: 10 1 row in set (0.00 sec)- Slave_IO_Running: Yes
- Slave_SQL_Running: Yes
这两个地方一定要是yes,说明这里主从复制已经成功了
验证
在主库中创建ycloud数据库,并添加表插入内容
MariaDB [(none)]> create database ycloud; Query OK, 1 row affected (0.00 sec) MariaDB [(none)]> use ycloud; Database changed MariaDB [ycloud]> create table roll(name varchar(10),age int(10)); Query OK, 0 rows affected (0.11 sec) MariaDB [ycloud]> insert into roll values ('张三',20); Query OK, 1 row affected, 1 warning (0.00 sec)通过从库查看,是否复制成功
MariaDB [(none)]> show databases; +--------------------+ | Database | +--------------------+ | information_schema | | mysql | | performance_schema | | ycloud | +--------------------+ 4 rows in set (0.00 sec) MariaDB [(none)]> use ycloud; Reading table information for completion of table and column names You can turn off this feature to get a quicker startup with -A Database changed MariaDB [ycloud]> show tables; +------------------+ | Tables_in_ycloud | +------------------+ | roll | +------------------+ 1 row in set (0.00 sec) MariaDB [ycloud]> select * from roll; +------+------+ | name | age | +------+------+ | ?? | 20 | +------+------+ 1 row in set (0.01 sec)我们发现主库的数据都⾃动同步到了从库中,说明我们的主从数据库搭建成功。
备份数据库
实际⼯作中,备份数据的时候是不让往数据库中写数据的,所以数据库要加锁只能读,数据备份完成后就可以释放锁
MariaDB [(none)]> flush tables with read lock; #加锁只读权限 Query OK, 0 rows affected (0.00 sec) [root@master ~]# mysqldump -uroot -p123456 --all-databases > /root/mysql.sql [root@master ~]# ls anaconda-ks.cfg mysql.sql MariaDB [(none)]> unlock tables; Query OK, 0 rows affected (0.00 sec)