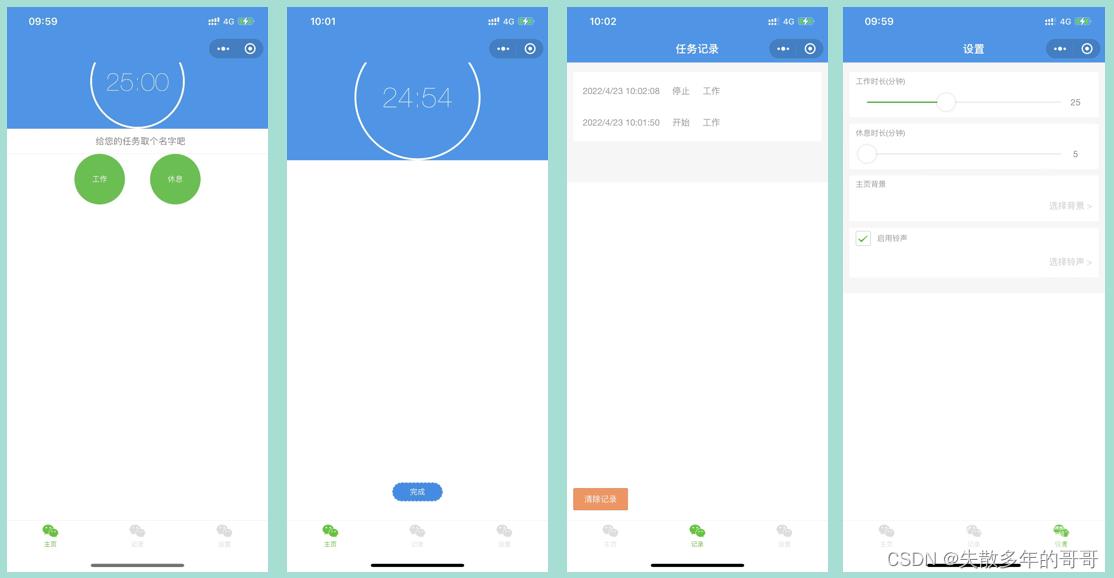
目录 一、项目展示 二、首页 三、设置 文末:项目代码 一、项目展示 这是一款简单实用的小时钟工具 分为工作和休息两种状态 用户可以设置相应的时间 所有的时钟记录都会被保存下
目录
- 一、项目展示
- 二、首页
- 三、设置
- 文末:项目代码
一、项目展示
这是一款简单实用的小时钟工具
分为工作和休息两种状态
用户可以设置相应的时间
所有的时钟记录都会被保存下来

二、首页
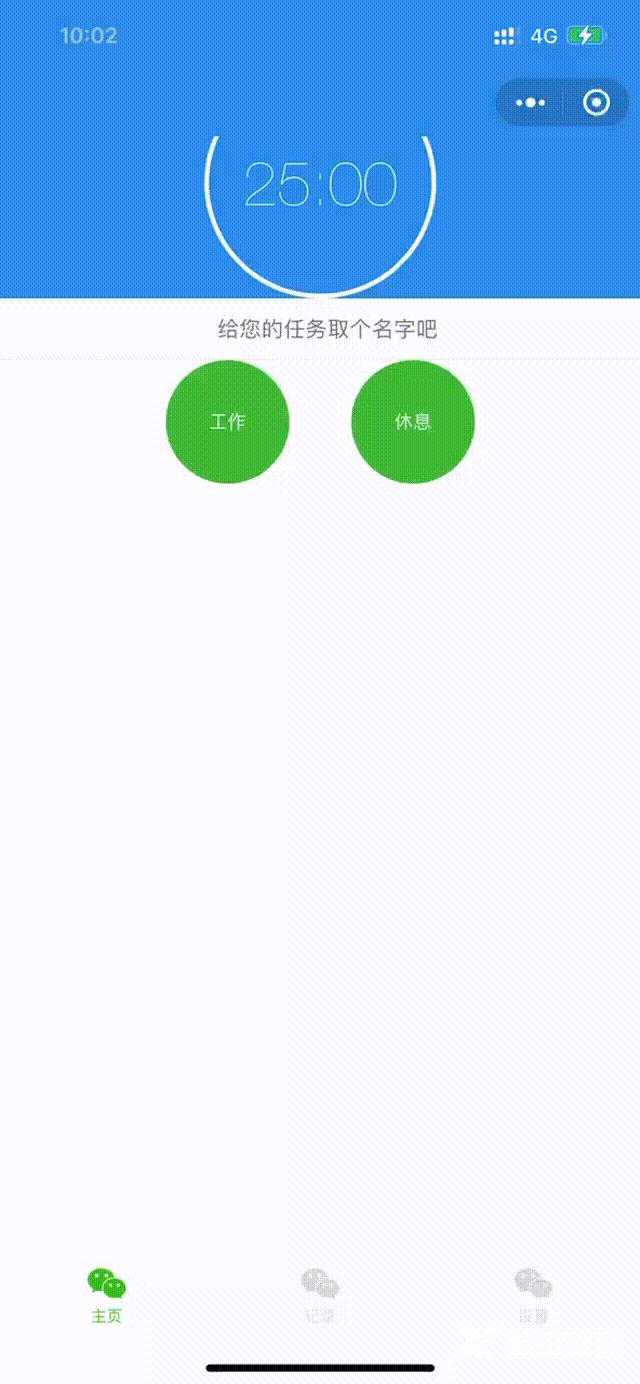
首页由计时器、任务输入框和两个计时按钮组成
<view class="container timer {{isRuning ? 'timer--runing': ''}}">
	<view class="timer_main">
		 <view class="timer_time-wrap">
		 		<view class="timer_progress_mask"></view>
		 		<view class="timer_progress timer_left">
		 			<view class="timer_circle timer_circle--left" style="transform: rotate({{leftDeg}}deg);"></view>
		 		</view>
		 		<view class="timer_progress timer_right">
		 			<view class="timer_circle timer_circle--right" style="transform: rotate({{rightDeg}}deg);"></view>
		 		</view>
			 	<text wx:if="{{!completed}}" class="timer_time">{{remainTimeText}}</text>
			 	<text
			 		wx:if="{{isRuning}}"
			 		animation="{{nameAnimation}}"
			 		class="timer_taskName">{{taskName}}{{completed ? '已完成!' : '中'}}</text>
		 		<image
		 			wx:if="{{completed}}"
		 			class="timer_done"
		 			src="../../image/complete.png"></image>
		 </view>
		 <input
		 	type="text"
		 	placeholder-style="text-align:center"
		 	class="timer_inputname"
		 	bindinput="changeLogName"
		 	placeholder="给您的任务取个名字吧"/>
	</view>
	<view class="timer_footer">
	  <view
	  	bindtap="startTimer"
	  	data-type="work"
	  	class="timer_ctrl {{isRuning && timerType == 'rest' ? 'hide' : ''}}" >{{isRuning ? '完成': '工作'}}</view>
	  <view
	  	bindtap="startTimer"
	  	data-type="rest"
	  	class="timer_ctrl {{isRuning && timerType == 'work' ? 'hide' : ''}}" >{{isRuning ? '完成': '休息'}}</view>
	</view>
</view>
效果图如下:

三、设置
用户在设置界面可以更改工作时长和休息时长
<view class="container">
	<view class="section panel">
	  <text class="section_title">工作时长(分钟)</text>
	  <view class="section_body">
	    <slider
	    	bindchange="changeWorkTime"
	    	show-value="true"
	    	min="1"
	    	max="60"
	    	value="{{workTime}}"
	    	left-icon="cancel"
	    	right-icon="success_no_circle"/>
	  </view>
	</view>
	<view class="section panel">
	  <text class="section_title">休息时长(分钟)</text>
	  <view class="section_body">
	    <slider
	    	bindchange="changeRestTime"
	    	show-value="true"
	    	min="5"
	    	max="60"
	    	value="{{restTime}}"
	    	left-icon="cancel"
	    	right-icon="success_no_circle"/>
	  </view>
	</view>
	<view class="section panel">
	  <view class="section_title">
	  	<text>主页背景</text>
	  </view>
	  <view class="section_body">
	  	<text bindtab="" class="section_tip">选择背景 > </text>
	  </view>
	</view>
	<view class="section panel">
	  <view class="section_title">
	  	<switch class="section_check" type="checkbox" size="mini" checked bindchange="switch1Change"/>
	  	<text>启用铃声</text>
	  </view>
	  <view class="section_body">
	  	<text bindtab="" class="section_tip">选择铃声 > </text>
	  </view>
	</view>
</view>
效果图如下:

文末:项目代码
点击下载
以上就是JavaScript实现微信小程序打卡时钟项目实例的详细内容,更多关于JavaScript微信小程序打卡时钟的资料请关注自由互联其它相关文章!
