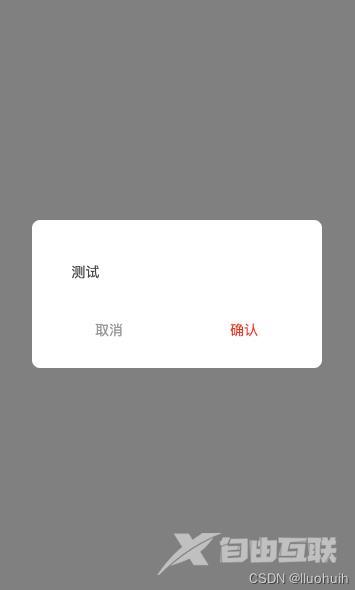
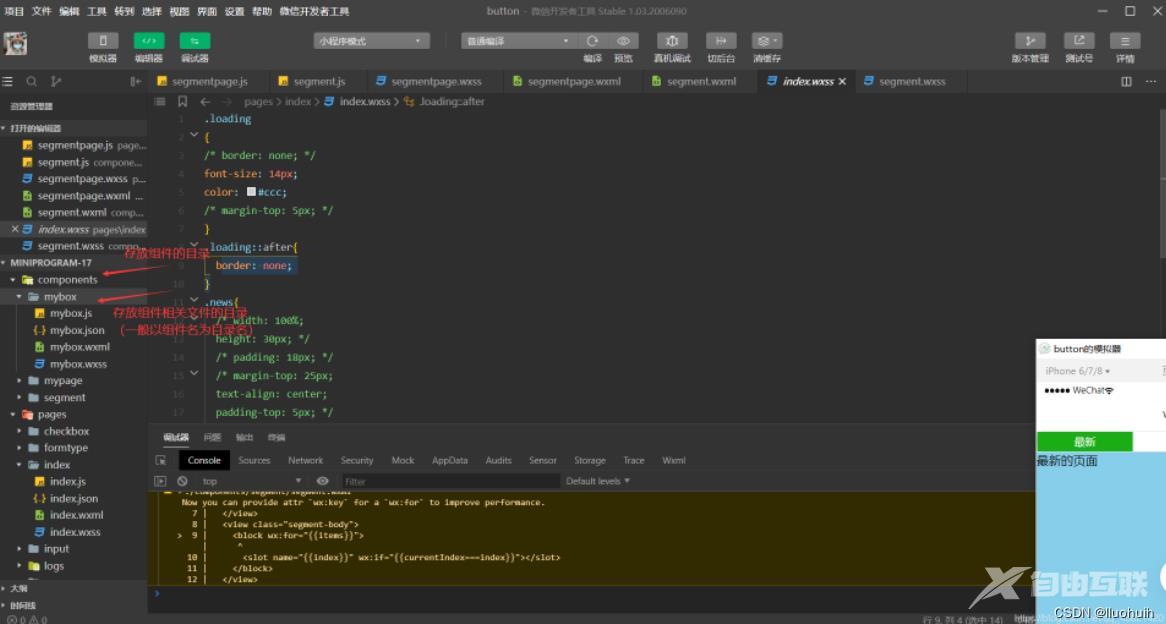
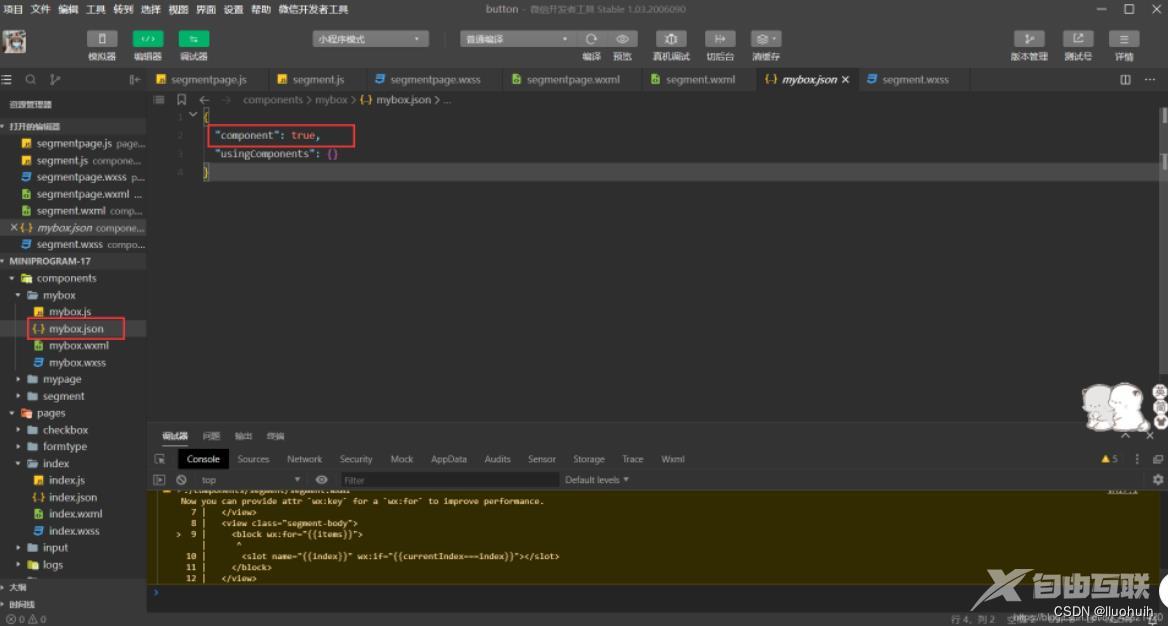
本文实例为大家分享了微信小程序自定义Dialog弹框的具体代码,供大家参考,具体内容如下 一、创建组件 1、在根目录下自定义一个components文件夹,用来存放自定义的组件。 2、再针对
本文实例为大家分享了微信小程序自定义Dialog弹框的具体代码,供大家参考,具体内容如下

一、创建组件
1、在根目录下自定义一个components文件夹,用来存放自定义的组件。
2、再针对每一个组件创建一个文件夹,用来存放这个组件相关的文件。

3、在指定组件的文件夹中右键->新建Component创建组件。这样创建的目的是在json文件中添加"component": true,将其声明为一个组件。

下面开始例子:
1、组件页面 index.wxml
<!-- 确认框 -->
<!-- 遮罩层 -->
<view class="dialog-overlay-view" style="width: {{ windowWidth }}px; height: {{ windowHeight }}px; display: {{ show ? 'block' : 'none' }};"></view>

<view class="col-center" style="width: {{ windowWidth }}px; height: {{ windowHeight }}px; display: {{ show ? 'flex' : 'none' }};">
    <view>
        <view class="dialog-content-view">
            <view>
                <text class="dialog-content-text">{{ message }}</text>
            </view>

            <view class="operation-view">
                <view class="operation-col-view" bindtouchend="onCancel">
                    <text class="cancel-text">{{ cancelButtonText }}</text>
                </view>
                <view class="operation-col-view" bindtouchend="onConfirm">
                    <text class="confirm-text">{{ confirmButtonText }}</text>
                </view>
            </view>
        </view>
    </view>
</view>
2、组件样式 index.wxss
/* components/dialog/index.wxss */
.dialog-overlay-view {
    background-color: #000000;
    opacity: 0.5;
    position: fixed;
    z-index: 10;
}
.col-center {
    position: fixed;
    z-index: 11;
    display: flex;
    flex-direction: column;
    justify-content: center;
    align-items: center;
}
.dialog-content-view {
    width: 210px;
    background: #FFFFFF;
    border-radius: 8px;
    display: flex;
    flex-direction: column;
    justify-content: center;
    padding: 40px 40px 20px 40px;
}
.dialog-content-text {
    font-size: 14px;
    font-family: PingFangSC-Regular, PingFang SC;
    font-weight: 400;
    color: #454545;
    line-height: 20px;
}

.operation-view {
    display: flex;
    flex-direction: row;
    justify-content: space-between;
    margin-top: 30px;
}
.operation-col-view {
    height: 36px;
    width: 75px;
    display: flex;
    flex-direction: column;
    justify-content: center;
    align-items: center;
}

.cancel-text {
    height: 14px;
    font-size: 14px;
    font-family: PingFangSC-Regular, PingFang SC;
    font-weight: 400;
    color: #999999;
    line-height: 14px;
}
.confirm-text {
    height: 14px;
    font-size: 14px;
    font-family: PingFangSC-Regular, PingFang SC;
    font-weight: 400;
    color: #E63719;
    line-height: 14px;
}
3、组件json配置 index.json
{
    "component": true,
    "usingComponents": {}
}
4、组件页面的js index.js
// components/dialog/index.js
Component({
    options: {
        /**
            styleIsolation 选项从基础库版本 2.6.5 开始支持。它支持以下取值:
                isolated 表示启用样式隔离,在自定义组件内外,使用 class 指定的样式将不会相互影响(一般情况下的默认值);
                apply-shared 表示页面 wxss 样式将影响到自定义组件,但自定义组件 wxss 中指定的样式不会影响页面;
                shared 表示页面 wxss 样式将影响到自定义组件,自定义组件 wxss 中指定的样式也会影响页面和其他设置了 apply-shared 或 shared 的自定义组件。(这个选项在插件中不可用。)
         */
        styleIsolation: 'isolated'
    },
    /**
     * 组件的属性列表
     */
    properties: {
        cancelButtonText: {
            type: String,
            value: '取消'
        },
        confirmButtonText: {
            type: String,
            value: '确定'
        },
        message: {
            type: String,
            value: ''
        },
        show: {
            type: Boolean,
            value: false,
        },
        confirmCallback: null,
        cancelCallback: null,
    },
    /**
     * 组件的初始数据
     */
    data: {
        windowWidth: 0,
        windowHeight: 0,
    },
    /**
     * 生命周期函数
     */
    ready: function() {
        var _this = this;
        wx.getSystemInfo({
            success: function(res) {
                _this.setData({
                    windowWidth: res.windowWidth,
                    windowHeight: res.windowHeight,
                });
            }
        });
    },
    /**
     * 组件的方法列表
     */
    methods: {
        onConfirm() {
            if (this.properties.confirmCallback) {
                this.properties.confirmCallback();
            }
            this.setData({ show: false });
        },
        onCancel() {
            if (this.properties.cancelCallback) {
                this.properties.cancelCallback();
            }
            this.setData({ show: false });
        },
    }
});
5、组件js dialog.js
const defaultOptions = {
    show: false,
    message: '',
    selector: '#cus-dialog',
    confirmButtonText: '确认',
    cancelButtonText: '取消',
    confirmCallback: null,
    cancelCallback: null,
};
let currentOptions = Object.assign({}, defaultOptions);
function getContext() {
    const pages = getCurrentPages();
    return pages[pages.length - 1];
}
const Dialog = (options) => {
    options = Object.assign(Object.assign({}, currentOptions), options);
    const context = options.context || getContext();
    const dialog = context.selectComponent(options.selector);
    delete options.context;
    delete options.selector;
    if (dialog) {
        dialog.setData(options);
        wx.nextTick(() => {
            dialog.setData({ show: true });
        });
    }
    else {
        console.warn('未找到 cus-dialog 节点,请确认 selector 及 context 是否正确');
    }
};
Dialog.confirm = (options) => Dialog(Object.assign({ showCancelButton: true }, options));
export default Dialog;
6、使用方法
需要用到dialog的页面引入dialog组件:
{
    "usingComponents": {
        "cus-dialog": "../../components/dialog/index"
    }
}
页面加入dialog节点:
<cus-dialog id="cus-dialog"/>
在页面的js中弹出dialog窗口:
//引入dialog组件
import Dialog from '../../components/dialog/dialog';

//在代码中调用
Dialog.confirm({
    message: '弹窗内容',
    selector: '#cus-dialog',
    confirmCallback: function() {
        console.log('确认啦');
    }
});
以上就是本文的全部内容,希望对大家的学习有所帮助,也希望大家多多支持自由互联。
