目录 一、创建自定义组件verification-code 二、在index页面使用 本文实例为大家分享了微信小程序实现动态验证码的具体代码,供大家参考,具体内容如下 一、创建自定义组件verification-
目录
- 一、创建自定义组件verification-code
- 二、在index页面使用
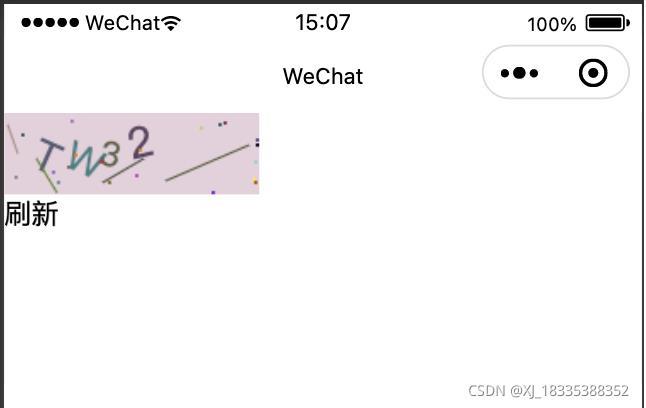
本文实例为大家分享了微信小程序实现动态验证码的具体代码,供大家参考,具体内容如下

一、创建自定义组件verification-code
verification-code.js
// pages/test1/verificationQr/verificationQr.js
var ctx;
Component({
  /**
   * 组件的属性列表
   */
  properties: {
    width:{
      type: Number,
      value: 150
    },
    height: {
      type: Number,
      value: 48
    },
    count:{
      type:Number,
      value:4
    },
    fontSize: {
      type: Number,
      value: 34
    },
    fontFamily:{
      type: String,
      value: "SimHei"
    }
  },

  /**
   * 组件的初始数据
   */
  data: {
    text: '',
    count: 4,
    width:90,
    height:28,
    fontSize:30,
    fontFamily:"SimHei"
  },

  ready() {
    this.setData({
      count:this.properties.count,
      width:this.properties.width,
      height:this.properties.height,
      fontSize:this.properties.fontSize,
      fontFamily:this.properties.fontFamily
    })
    this.drawPic(this)
  },
  /**
   * 组件的方法列表
   */
  methods: {
    crash(){
      this.drawPic(this)
    },
    /**绘制验证码图片**/
    drawPic(that) {
      ctx = wx.createCanvasContext('canvas',this);
      /**绘制背景色**/
      ctx.fillStyle = randomColor(180, 240); //颜色若太深可能导致看不清
      ctx.fillRect(0, 0, that.data.width, that.data.height)
      /**绘制文字**/
      var arr;
      var text = '';
      var str = 'ABCEFGHJKLMNPQRSTWXY123456789';
      for (var i = 0; i < that.data.count; i++) {
        var txt = str[randomNum(0, str.length)];
        ctx.fillStyle = randomColor(50, 160); //随机生成字体颜色
        ctx.font = randomNum(20, 26) + 'px SimHei'; //随机生成字体大小
        var x = 10 + i * 20;
        var y = randomNum(25, 30);
        var deg = randomNum(-30, 30);
        //修改坐标原点和旋转角度
        ctx.translate(x, y);
        ctx.rotate(deg * Math.PI / 180);
        ctx.fillText(txt, 5, 0);
        text = text + txt;
        //恢复坐标原点和旋转角度
        ctx.rotate(-deg * Math.PI / 180);
        ctx.translate(-x, -y);
      }
      /**绘制干扰线**/
      for (var i = 0; i < 4; i++) {
        ctx.strokeStyle = randomColor(40, 180);
        ctx.beginPath();
        ctx.moveTo(randomNum(0, that.data.width), randomNum(0, that.data.height));
        ctx.lineTo(randomNum(0, that.data.width), randomNum(0, that.data.height));
        ctx.stroke();
      }
      /**绘制干扰点**/
      for (var i = 0; i < 20; i++) {
        ctx.fillStyle = randomColor(0, 255);
        ctx.beginPath();
        ctx.arc(randomNum(0, that.data.width), randomNum(0, that.data.height), 1, 0, 2 * Math.PI);
        ctx.fill();
      }
      ctx.draw(false, function() {
        console.log(text)
        that.triggerEvent('result', { text });
        that.setData({
          text: text,
        })
      })
    }
  }
})
function randomNum(min, max) {
  return Math.floor(Math.random() * (max - min) + min);
}
/**生成一个随机色**/
function randomColor(min, max) {
  var r = randomNum(min, max);
  var g = randomNum(min, max);
  var b = randomNum(min, max);
  return "rgb(" + r + "," + g + "," + b + ")";
}
verification-puzzle.json
{
  "component": true,
  "usingComponents": {}
}
verification-puzzle.wxml
<canvas style="width:{{width}}px;height:{{height}}px" canvas-id="canvas" bindtap='crash'></canvas>
二、在index页面使用
index.wxml
<verification-code id="verification"></verification-code>
<view bindtap="crash">刷新</view>
index.js
// pages/test/test/test.js
Page({

  /**
   * 页面的初始数据
   */
  data: {},
  crash() {
    this.verification.crash()
  },
  /**
   * 生命周期函数--监听页面加载
   */
  onLoad: function (options) {

  },

  /**
   * 生命周期函数--监听页面初次渲染完成
   */
  onReady: function () {
    this.verification = this.selectComponent('#verification')
  },

  /**
   * 生命周期函数--监听页面显示
   */
  onShow: function () {

  },

  /**
   * 生命周期函数--监听页面隐藏
   */
  onHide: function () {

  },

  /**
   * 生命周期函数--监听页面卸载
   */
  onUnload: function () {

  },

  /**
   * 页面相关事件处理函数--监听用户下拉动作
   */
  onPullDownRefresh: function () {

  },

  /**
   * 页面上拉触底事件的处理函数
   */
  onReachBottom: function () {

  },

  /**
   * 用户点击右上角分享
   */
  onShareAppMessage: function () {

  }
})
index.json
{
  "usingComponents": {
      "verification-code": "/components/verification-code/verification-code"
    }
}
以上就是本文的全部内容,希望对大家的学习有所帮助,也希望大家多多支持自由互联。
