微信小程序实现人脸识别,具体应用场景 前端实现人脸信息采集 拍到正面照片 发送给后端 该方法暂时只针对微信小程序 前端具体效果展示 如下: 我们分开来分开解释这个方法哈 首
微信小程序实现人脸识别,具体应用场景 前端实现人脸信息采集 拍到正面照片 发送给后端
该方法暂时只针对微信小程序
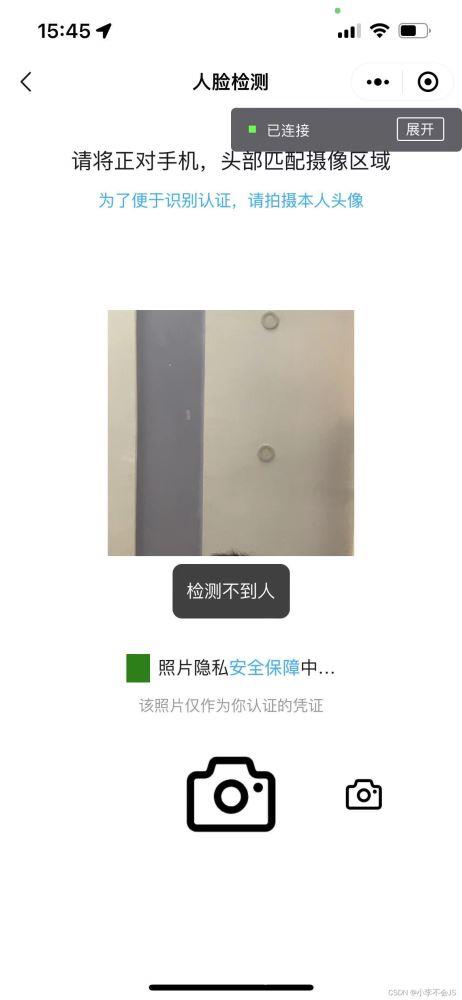
前端具体效果展示 如下:
我们分开来分开解释这个方法哈
首先要新写一个页面用来跳转,具体页面的布局可以自由发挥 根据实际要求来 ,
主要运用了 wx.initFaceDetect(Object object) 具体想了解更多可以去查看官方文档哈,链接放在下面了 wx.initFaceDetect(Object object) | Weixin public doc
在项目里进入页面初始化人脸识别 可以识别到是否拍摄的是人脸 检测五官哈
具体实现方法 下面就直接贴代码了
代码语法语句都放在了代码注释中
html部分:
template>
	<view class="page-content">
		<view class="containerV">
			<view class="headerV">
				<view class="top-tips1">
					<view>请将正对手机,头部匹配摄像区域</view>
				</view>
				<view class="top-tips2">
					为了便于识别认证,请拍摄本人头像
				</view>
			</view>
			<view class="contentV">
				<view class="mark"></view>
				<image v-if="tempImg" mode="widthFix" :src="tempImg" />
				<camera v-if='isAuthCamera' :device-position="devicePosition ?'front': 'back'" class="camera"
					flash="off" resolution='high' />
				<view v-show="!tempImg && tipsText" class="tipV">{{ tipsText }}</view>
			</view>
			<view class="footerV">
				<view style="width: 100%;">
					<view v-if="!tempImg" style="width: 100%;">
						<view class="privacyV">
							<view class="icon"></view>
							<view class="text">
								照片隐私<text @click="handleJumpSecurityClick">安全保障</text>中…
							</view>
						</view>
						<view class="bottom-tips-2">该照片仅作为你认证的凭证</view>
						<view class="take-photo-bgV">
							<!-- 图片上传   -->
							<view v-show="true" class="btn-change-upload" @click="handleChooseImage" ></view>
							<!--拍照-->
							<view class="btn-take-photo" @click="handleTakePhotoClick" ></view>
							<!-- 切换镜头 -->
							<view class="btn-change-camera" @click="handleChangeCameraClick" ></view>
						</view>
					</view>
					<view class="confirmV" v-else>
						<view class="btn-cancel" @click="handleCancelClick">
							取消
						</view>
						<view class="btn-ok" @click="handleOkClick">
							确定
						</view>
					</view>
				</view>
			</view>
		</view>
	</view>
</template>
下面是js部分 按钮都暂时用背景颜色来填充 自己更换所需要的图片哈
<style lang="scss" scoped>
	.page-content {
		width: 100%;
		height: 100%;
		.containerV {
			width: 100%;
			height: 100%;
			.headerV {
				.top-tips1 {
					margin-top: 60rpx;
					color: #1C1C1C;
					font-size: 36rpx;
					text-align: center;
				}
				.top-tips2 {
					margin-top: 20rpx;
					color: #00AAFF;
					font-size: 28rpx;
					text-align: center;
				}
			}
			.contentV {
				position: relative;
				display: flex;
				flex-direction: column;
				align-items: center;
				justify-content: center;
				height: 661rpx;
				margin-top: 30rpx;
				.tipV {
					bottom: 30rpx;
					position: absolute;
					line-height: 90rpx;
					padding-left: 24rpx;
					padding-right: 24rpx;
					max-width: calc(100vw - 50rpx * 2);
					text-align: center;
					font-size: 30rpx;
					background: #000000;
					opacity: 0.75;
					color: #FFFFFF;
					border-radius: 16rpx;
					overflow: hidden;
					white-space: nowrap;
					text-overflow: ellipsis;
					z-index: 5;
				}
				.camera {
					width: 400upx;
					height: 400upx;
					border-radius: 50%;
				}
				.mark {
					position: absolute;
					left: 0;
					top: 0;
					z-index: 2;
					width: 750rpx;
					height: 100%;
					// background:deeppink;
					background-size: 750rpx 661rpx;
				}
				image {
					position: absolute;
					width: 100%;
					height: 100%;
					z-index: 3;
				}
			}

			.footerV {
				width: 100%;
				display: flex;
				flex-direction: row;
				align-items: center;
				justify-content: center;
				.privacyV {
					padding-top: 30rpx;
					display: flex;
					flex-direction: row;
					align-items: center;
					justify-content: center;
					.text {
						font-size: 30rpx;
						color: #1C1C1C;
						text-align: center;
						line-height: 42rpx;
						margin-left: 15rpx;
						text {
							font-size: 30rpx;
							color: #00AAFF;
							text-align: center;
							line-height: 42rpx;
						}
					}
					.icon {
						width: 40rpx;
						height: 47rpx;
						background:green;
						background-size: 100% auto;
					}
				}

				.bottom-tips-2 {
					margin-top: 20rpx;
					color: #999999;
					text-align: center;
					font-size: 26rpx;
				}
				.take-photo-bgV {
					width: 100%;
					margin-top: 30rpx;
					display: flex;
					flex-direction: row;
					align-items: center;
					justify-content: center;
					.btn-take-photo {
						margin: 0rpx 80rpx 0rpx 80rpx;
						width: 196rpx;
						height: 196rpx;
						background: yellow;
						background-size: 100% auto;
					}
					.btn-change-upload {
						left: 130rpx;
						width: 80rpx;
						height: 80rpx;
						background: blue;
						background-size: 100% auto;
					}
					.btn-change-camera {
						right: 130rpx;
						width: 80rpx;
						height: 80rpx;
						background:red;
						background-size: 100% auto;
					}
				}
				.confirmV {
					margin: 200rpx 100rpx 0rpx 100rpx;
					display: flex;
					flex-direction: row;
					align-items: center;
					justify-content: space-between;
					.btn-cancel {
						font-size: 32rpx;
						color: #1C1C1C;
					}
					.btn-ok {
						font-size: 32rpx;
						color: #00AAFF;
					}
				}
			}
		}
	}
</style>
js部分,一定要注意 上传图片接收到的路径和拍照接受到的路径
<script>
	export default {
		name: 'index',
		components: {
		},
		data() {
			return {
				tipsText: '', // 错误文案提示
				tempImg: '', // 本地图片路径
				BASE_API,
				cameraEngine: null, // 相机引擎
				devicePosition: false, // 摄像头朝向
				isAuthCamera: true, // 是否拥有相机权限
			}
		},

		onLoad(options) {
			this.initData()
		},
		mounted(){
		},
		methods: {
			// 初始化相机引擎
			initData() {
				// #ifdef MP-WEIXIN
				// 1、初始化人脸识别
				wx.initFaceDetect()
				// 2、创建 camera 上下文 CameraContext 对象
				this.cameraEngine = wx.createCameraContext()
				// 3、获取 Camera 实时帧数据
				const listener = this.cameraEngine.onCameraFrame((frame) => {
					if (this.tempImg) {
						return;
					}
					// 4、人脸识别,使用前需要通过 wx.initFaceDetect 进行一次初始化,推荐使用相机接口返回的帧数据
					wx.faceDetect({
						frameBuffer: frame.data,
						width: frame.width,
						height: frame.height,
						enablePoint: true,
						enableConf: true,
						enableAngle: true,
						enableMultiFace: true,
						success: (faceData) => {
							let face = faceData.faceInfo[0]
							if (faceData.x == -1 || faceData.y == -1) {
								this.tipsText = '检测不到人'
							}
							if (faceData.faceInfo.length > 1) {
								this.tipsText = '请保证只有一个人'
							} else {
								const {
									pitch,
									roll,
									yaw
								} = face.angleArray;
								const standard = 0.5
								if (Math.abs(pitch) >= standard || Math.abs(roll) >= standard ||
									Math.abs(yaw) >= standard) {
									this.tipsText = '请平视摄像头'
								} else if (face.confArray.global <= 0.8 || face.confArray.leftEye <=
									0.8 || face.confArray.mouth <= 0.8 || face.confArray.nose <= 0.8 ||
									face.confArray.rightEye <= 0.8) {
									this.tipsText = '请勿遮挡五官'
								} else {
									this.tipsText = '请拍照'
									// 这里可以写自己的逻辑了
								}
							}
						},
						fail: (err) => {
							if (err.x == -1 || err.y == -1) {
								this.tipsText = '检测不到人'
							} else {
								this.tipsText = err.errMsg || '网络错误,请退出页面重试'
							}
						},
					})
				})
				// 5、开始监听帧数据
				listener.start()
				// #endif
			},
			// 切换设备镜头
			handleChangeCameraClick() {
				this.devicePosition = !this.devicePosition;
			},
			// 图片上传
			handleChooseImage() {
				uni.chooseImage({
					count: 1,
					sizeType: ['original', 'compressed'],
					sourceType: ['album','camera'],
					success: (res) => {
						console.log(res,'打印res,哈哈哈哈哈')
						if (res.errMsg === 'chooseImage:ok') {
							uni.showLoading({
								title: '照片上传中...'
							})
							const tempFilePaths = res.tempFilePaths[0]
							  this.upLoad(res.tempFilePaths);
						}
					},
					fail: (res) => {
					},
				});
			},
            // 拍照点击
			handleTakePhotoClick() {
				if (this.tipsText != "" && this.tipsText != "请拍照") {
					return;
				}
				uni.getSetting({
					success: (res) => {
						if (!res.authSetting['scope.camera']) {
							this.isAuthCamera = false
							uni.openSetting({
								success: (res) => {
									if (res.authSetting['scope.camera']) {
										this.isAuthCamera = true;
									}
								}
							})
						}
					}
				})
				this.cameraEngine.takePhoto({
					quality: "high",
					success: ({
						tempImagePath
					}) => {
						this.tempImg = tempImagePath
					}
				})
			},
			// 点击确定上传
			handleOkClick() {
                //  这里的 this.tempImg 是经过人脸检测后  拍照拿到的路径
				this.upLoadOne(this.tempImg)
				uni.navigateBack({
					delta: 1
				});
			},
			upLoad(tempFilePaths) {
                // #  注意  这里上传图片拿到的tempFilePaths是一个数组啊
			    // 图片上传
			    uni.showLoading({
			        title: "上传中,请稍后...",
			    });
			    let proAll = [];
			    tempFilePaths.forEach((item) => {
					console.log(item,'打印item')
			        proAll.push(this.upLoadOne(item));
			    });
			    Promise.all(proAll).then((res) => {
			        // 上传完成
			        uni.hideLoading();
			    });
			},
			upLoadOne(imgPath) {
			    //  然后这里imgPath 传过来的是 要上传的临时本地图片的路径
                //  具体上传方法根据自己的请求方式   请求自己的接口
			},
			// 点击 - 取消上传
			handleCancelClick() {
				this.tempImg = ''
			},
			// 点击 - 人脸安全保障按钮
			handleJumpSecurityClick() {
				uni.showToast({
					icon: "none",
					title: "假装跳转人脸安全保障",
					duration: 2000,
				})
			},
		}
	}
</script>
总结
到此这篇关于uniapp实现人脸识别功能的文章就介绍到这了,更多相关uniapp人脸识别内容请搜索自由互联以前的文章或继续浏览下面的相关文章希望大家以后多多支持自由互联!