目录
- 1 ThreadLocal原理
- set() 方法
- get() 方法
- withInitial()方法
- ThreadLocal中的内存泄漏问题
- 2 自定义上下文Scope
- 3 在线程池中传递Scope
- 4 通过Filter、Scope实现Request上下文
- 5 总结
- 源代码
本文基于ThreadLocal原理,实现了一个上下文状态管理组件Scope,通过开启一个自定义的Scope,在Scope范围内,可以通过Scope各个方法读写数据;
通过自定义线程池实现上下文状态数据的线程间传递;
提出了一种基于Filter和Scope的Request粒度的上下文管理方案。
github:https://github.com/pengchengSU/demo-request-scope
1 ThreadLocal原理
ThreadLocal主要作用就是实现线程间变量隔离,对于一个变量,每个线程维护一个自己的实例,防止多线程环境下的资源竞争,那ThreadLocal是如何实现这一特性的呢?
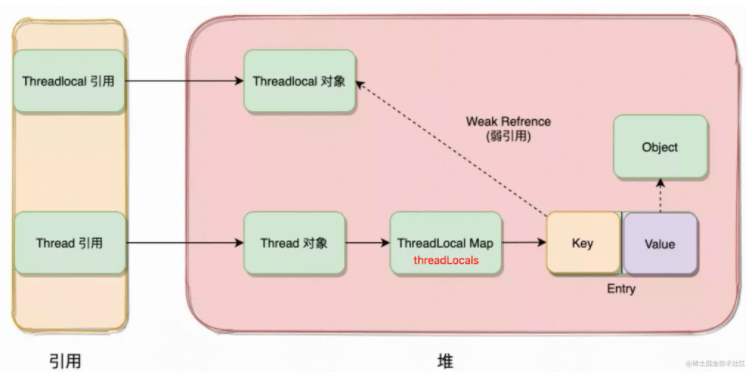
图1
从上图可知:
- 每个
Thread对象中都包含一个ThreadLocal.ThreadLocalMap类型的threadlocals成员变量; - 该map对应的每个元素
Entry对象中:key是ThreadLocal对象的弱引用,value是该threadlocal变量在当前线程中的对应的变量实体; - 当某一线程执行获取该
ThreadLocal对象对应的变量时,首先从当前线程对象中获取对应的threadlocals哈希表,再以该ThreadLocal对象为key查询哈希表中对应的value; - 由于每个线程独占一个
threadlocals哈希表,因此线程间ThreadLocal对象对应的变量实体也是独占的,不存在竞争问题,也就避免了多线程问题。
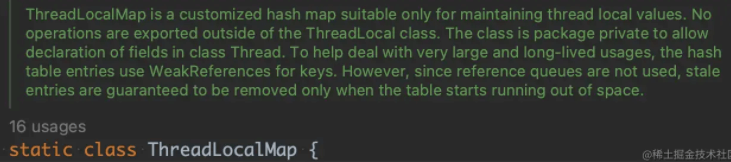
有人可能会问:ThreadLocalMap是Thread成员变量(非public,只有包访问权限,Thread和Threadlocal都在java.lang 包下,Thread可以访问ThreadLocal.ThreadLocalMap),定义却在ThreadLocal中,为什么要这么设计?
源码的注释给出了解释:ThreadLocalMap就是维护线程本地变量设计的,就是让使用者知道ThreadLocalMap就只做保存线程局部变量这一件事。
set() 方法
public void set(T value) {
    Thread t = Thread.currentThread();	//获取当前线程
    ThreadLocalMap map = getMap(t);	//从当前线程对象中获取threadlocals,该map保存了所用的变量实例
    if (map != null) {
        map.set(this, value);
    } else {
        createMap(t, value);	//初始threadlocals,并设置当前变量
    }
}
ThreadLocalMap getMap(Thread t) {
    return t.threadLocals;
}
void createMap(Thread t, T firstValue) {
    t.threadLocals = new ThreadLocalMap(this, firstValue);
}
get() 方法
public T get() {
    Thread t = Thread.currentThread();
    ThreadLocalMap map = getMap(t); //从当前线程对象中获取threadlocals,该map保存了所用的变量实体
    if (map != null) {
        // 获取当前threadlocal对象对应的变量实体
        ThreadLocalMap.Entry e = map.getEntry(this);
        if (e != null) {
            @SuppressWarnings("unchecked")
            T result = (T)e.value;
            return result;
        }
    }
    // 如果map没有初始化,那么在这里初始化一下
    return setInitialValue();
}
withInitial()方法
由于通过 ThreadLocal 的 set() 设置的值,只会设置当前线程对应变量实体,无法实现统一初始化所有线程的ThreadLocal的值。ThreadLocal提供了一个 withInitial() 方法实现这一功能:
ThreadLocal<String> initValue = ThreadLocal.withInitial(() -> "initValue");
public static <S> ThreadLocal<S> withInitial(Supplier<? extends S> supplier) {
    // 返回SuppliedThreadLocal类型对象
    return new SuppliedThreadLocal<>(supplier);
}
static final class SuppliedThreadLocal<T> extends ThreadLocal<T> {

    private final Supplier<? extends T> supplier;

    SuppliedThreadLocal(Supplier<? extends T> supplier) {
        this.supplier = Objects.requireNonNull(supplier);
    }

    @Override
    protected T initialValue() {
        // 获取初始化值
        return supplier.get();
    }
}
ThreadLocal中的内存泄漏问题
由图1可知,ThreadLocal.ThreadLocalMap 对应的Entry中,key为ThreadLocal对象的弱引用,方法执行对应栈帧中的ThreadLocal引用为强引用。当方法执行过程中,由于栈帧销毁或者主动释放等原因,释放了ThreadLocal对象的强引用,即表示该ThreadLocal对象可以被回收了。又因为Entry中key为ThreadLocal对象的弱引用,所以当jvm执行GC操作时是能够回收该ThreadLocal对象的。
而Entry中value对应的是变量实体对象的强引用,因此释放一个ThreadLocal对象,是无法释放ThreadLocal.ThreadLocalMap中对应的value对象的,也就造成了内存泄漏。除非释放当前线程对象,这样整个threadlocals都被回收了。但是日常开发中会经常使用线程池等线程池化技术,释放线程对象的条件往往无法达到。
JDK处理的方法是,在ThreadLocalMap进行set()、get()、remove()的时候,都会进行清理:
private Entry getEntry(ThreadLocal<?> key) {
    int i = key.threadLocalHashCode & (table.length - 1);
    Entry e = table[i];
    if (e != null && e.get() == key)
        return e;
    else
        return getEntryAfterMiss(key, i, e);
}
private Entry getEntryAfterMiss(ThreadLocal<?> key, int i, Entry e) {
    Entry[] tab = table;
    int len = tab.length;

    while (e != null) {
        ThreadLocal<?> k = e.get();
        if (k == key)
            return e;
        if (k == null)
            //如果key为null,对应的threadlocal对象已经被回收,清理该Entry
            expungeStaleEntry(i);
        else
            i = nextIndex(i, len);
        e = tab[i];
    }
    return null;
}
2 自定义上下文Scope
在工作中,我们经常需要维护一些上下文,这样可以避免在方法调用过程中传入过多的参数,需要查询/修改一些数据的时候,直接在当前上下文中操作就行了。举个具体点的例子:当web服务器收到一个请求时,需要解析当前登录态的用户,在后续的业务执行流程中都需要这个用户名。
如果只需要维护一个上下文状态数据还比较好处理,可以通过方法传参的形式,执行每个业务方法的时候都通过添加一个表示用户名方法参数传递进去,但是如果需要维护上下文状态数据比较多的话,这个方式就不太优雅了。
一个可行的方案是通过Threadlocal实现请求线程的上下文,只要是同一线程的执行过程,不同方法间不传递上下文状态变量,直接操作ThreadLocal对象实现状态数据的读写。当存在多个上下文状态的话,则需要维护多个ThreadLocal,似乎也可以勉强接受。但是当遇到业务流程中使用线程池的情况下,从Tomcat传递这些ThreadLocal到线程池中的线程里就变的比较麻烦了。
基于以上考虑,下面介绍一种基于Threadlocal实现的上下文管理组件Scope:
Scope.java
public class Scope {

    // 静态变量,维护不同线程的上下文Scope
    private static final ThreadLocal<Scope> SCOPE_THREAD_LOCAL = new ThreadLocal<>();

    // 实例变量,维护每个上下文中所有的状态数据,为了区分不同的状态数据,使用ScopeKey类型的实例作为key
    private final ConcurrentMap<ScopeKey<?>, Object> values = new ConcurrentHashMap<>();

    // 获取当前上下文
    public static Scope getCurrentScope() {
        return SCOPE_THREAD_LOCAL.get();
    }

    // 在当前上下文设置一个状态数据
    public <T> void set(ScopeKey<T> key, T value) {
        if (value != null) {
            values.put(key, value);
        } else {
            values.remove(key);
        }
    }

    // 在当前上下文读取一个状态数据
    public <T> T get(ScopeKey<T> key) {
        T value = (T) values.get(key);
        if (value == null && key.initializer() != null) {
            value = key.initializer().get();
        }
        return value;
    }

    // 开启一个上下文
    public static Scope beginScope() {
        Scope scope = SCOPE_THREAD_LOCAL.get();
        if (scope != null) {
            throw new IllegalStateException("start a scope in an exist scope.");
        }
        scope = new Scope();
        SCOPE_THREAD_LOCAL.set(scope);
        return scope;
    }

    // 关闭当前上下文
    public static void endScope() {
        SCOPE_THREAD_LOCAL.remove();
    }
}
ScopeKey.java
public final class ScopeKey<T> {

    // 初始化器,参考 ThreadLocal 的 withInitial()
    private final Supplier<T> initializer;

    public ScopeKey() {
        this(null);
    }

    public ScopeKey(Supplier<T> initializer) {
        this.initializer = initializer;
    }

    // 统一初始化所有线程的 ScopeKey 对应的值,参考 ThreadLocal 的 withInitial()
    public static <T> ScopeKey<T> withInitial(Supplier<T> initializer) {
        return new ScopeKey<>(initializer);
    }

    public Supplier<T> initializer() {
        return this.initializer;
    }

    // 获取当前上下文中 ScopeKey 对应的变量
    public T get() {
        Scope currentScope = getCurrentScope();
        return currentScope.get(this);
    }

    // 设置当前上下文中 ScopeKey 对应的变量
    public boolean set(T value) {
        Scope currentScope = getCurrentScope();
        if (currentScope != null) {
            currentScope.set(this, value);
            return true;
        } else {
            return false;
        }
    }
}
使用方式
@Test
public void testScopeKey() {
    ScopeKey<String> localThreadName = new ScopeKey<>();

    // 不同线程中执行时,开启独占的 Scope
    Runnable r = () -> {
        // 开启 Scope
        Scope.beginScope();
        try {
            String currentThreadName = Thread.currentThread().getName();
            localThreadName.set(currentThreadName);
            log.info("currentThread: {}", localThreadName.get());
        } finally {
            // 关闭 Scope
            Scope.endScope();
        }
    };

    new Thread(r, "thread-1").start();
    new Thread(r, "thread-2").start();

    /** 执行结果
     * [thread-1] INFO com.example.demo.testscope.TestScope - currentThread: thread-1
     * [thread-2] INFO com.example.demo.testscope.TestScope - currentThread: thread-2
     */
}

@Test
public void testWithInitial() {
    ScopeKey<String> initValue = ScopeKey.withInitial(() -> "initVal");

    Runnable r = () -> {
        Scope.beginScope();
        try {
            log.info("initValue: {}", initValue.get());
        } finally {
            Scope.endScope();
        }
    };

    new Thread(r, "thread-1").start();
    new Thread(r, "thread-2").start();

    /** 执行结果
     * [thread-1] INFO com.example.demo.testscope.TestScope - initValue: initVal
     * [thread-2] INFO com.example.demo.testscope.TestScope - initValue: initVal
     */
}
上面的测试用例中在代码中手动开启和关闭Scope不太优雅,可以在Scope中添加两个个静态方法包装下Runnable和Supplier接口:
public static <X extends Throwable> void runWithNewScope(@Nonnull ThrowableRunnable<X> runnable)
        throws X {
    supplyWithNewScope(() -> {
        runnable.run();
        return null;
    });
}

public static <T, X extends Throwable> T
        supplyWithNewScope(@Nonnull ThrowableSupplier<T, X> supplier) throws X {
    beginScope();
    try {
        return supplier.get();
    } finally {
        endScope();
    }
}
@FunctionalInterface
public interface ThrowableRunnable<X extends Throwable> {
    void run() throws X;
}

public interface ThrowableSupplier<T, X extends Throwable> {
    T get() throws X;
}
以新的Scope执行,可以这样写:
@Test
public void testRunWithNewScope() {
    ScopeKey<String> localThreadName = new ScopeKey<>();

    ThrowableRunnable r = () -> {
        String currentThreadName = Thread.currentThread().getName();
        localThreadName.set(currentThreadName);
        log.info("currentThread: {}", localThreadName.get());
    };

    // 不同线程中执行时,开启独占的 Scope
    new Thread(() -> Scope.runWithNewScope(r), "thread-1").start();
    new Thread(() -> Scope.runWithNewScope(r), "thread-2").start();

    /** 执行结果
     * [thread-2] INFO com.example.demo.TestScope.testscope - currentThread: thread-2
     * [thread-1] INFO com.example.demo.TestScope.testscope - currentThread: thread-1
     */
}
3 在线程池中传递Scope
在上一节中实现的Scope,通过ThreadLocal实现了了一个自定义的上下文组件,在同一个线程中通过ScopeKey.set() / ScopeKey.get()读写同一个上下文中的状态数据。
现在需要实现这样一个功能,在一个线程执行过程中开启了一个Scope,随后使用线程池执行任务,要求在线程池中也能获取当前Scope中的状态数据。典型的使用场景是:服务收到一个用户请求,通过Scope将登陆态数据存到当前线程的上下文中,随后使用线程池执行一些耗时的操作,希望线程池中的线程也能拿到Scope中的登陆态数据。
由于线程池中的线程和请求线程不是一个线程,按照目前的实现,线程池中的线程是无法拿到请求线程上下文中的数据的。
解决方法是,在提交runnable时,将当前的Scope引用存到runnable对象中,当获得线程执行时,将Scope替换到执行线程中,执行完成后,再恢复现场。在Scope中新增如下静态方法:
// 以给定的上下文执行 Runnable
public static <X extends Throwable> void runWithExistScope(Scope scope, ThrowableRunnable<X> runnable) throws X {
    supplyWithExistScope(scope, () -> {
        runnable.run();
        return null;
    });
}

// 以给定的上下文执行 Supplier
public static <T, X extends Throwable> T supplyWithExistScope(Scope scope, ThrowableSupplier<T, X> supplier) throws X {
    // 保留现场
    Scope oldScope = SCOPE_THREAD_LOCAL.get();
    // 替换成外部传入的 Scope
    SCOPE_THREAD_LOCAL.set(scope);
    try {
        return supplier.get();
    } finally {
        if (oldScope != null) {
            // 恢复线程
            SCOPE_THREAD_LOCAL.set(oldScope);
        } else {
            SCOPE_THREAD_LOCAL.remove();
        }
    }
}
实现支持Scope切换的自定义线程池ScopeThreadPoolExecutor:
public class ScopeThreadPoolExecutor extends ThreadPoolExecutor {

    ScopeThreadPoolExecutor(int corePoolSize, int maximumPoolSize, long keepAliveTime,
                            TimeUnit unit, BlockingQueue<Runnable> workQueue) {
        super(corePoolSize, maximumPoolSize, keepAliveTime, unit, workQueue);
    }

    public static ScopeThreadPoolExecutor newFixedThreadPool(int nThreads) {
        return new ScopeThreadPoolExecutor(nThreads, nThreads, 0L, TimeUnit.MILLISECONDS,
                new LinkedBlockingQueue<Runnable>());
    }

    /**
     * 只要override这一个方法就可以
     * 所有submit, invokeAll等方法都会代理到这里来
     */
    @Override
    public void execute(Runnable command) {
        Scope scope = getCurrentScope();
        // 提交任务时,把执行 execute 方法的线程中的 Scope 传进去
        super.execute(() -> runWithExistScope(scope, command::run));
    }
}
测试下ScopeThreadPoolExecutor是否生效:
@Test
public void testScopeThreadPoolExecutor() {
    ScopeKey<String> localVariable = new ScopeKey<>();
    Scope.beginScope();

    try {
        localVariable.set("value out of thread pool");
        Runnable r = () -> log.info("localVariable in thread pool: {}", localVariable.get());

        // 使用线程池执行,能获取到外部Scope中的数据
        ExecutorService executor = ScopeThreadPoolExecutor.newFixedThreadPool(10);
        executor.execute(r);
        executor.submit(r);

    } finally {
        Scope.endScope();
    }

    /** 执行结果
     * [pool-1-thread-1] INFO com.example.demo.testscope.TestScope - localVariable in thread pool: value out of thread pool
     * [pool-1-thread-2] INFO com.example.demo.testscope.TestScope - localVariable in thread pool: value out of thread pool
     */
}

@Test
public void testScopeThreadPoolExecutor2() {
    ScopeKey<String> localVariable = new ScopeKey<>();
    Scope.runWithNewScope(() -> {
        localVariable.set("value out of thread pool");
        Runnable r = () -> log.info("localVariable in thread pool: {}", localVariable.get());

        // 使用线程池执行,能获取到外部Scope中的数据
        ExecutorService executor = ScopeThreadPoolExecutor.newFixedThreadPool(10);
        executor.execute(r);
        executor.submit(r);
    });

    /** 执行结果
     * [pool-1-thread-2] INFO com.example.demo.testscope.TestScope - localVariable in thread pool: value out of thread pool
     * [pool-1-thread-1] INFO com.example.demo.testscope.TestScope - localVariable in thread pool: value out of thread pool
     */
}
以上两个测试用例,分别通过手动开启Scope、借助runWithNewScope工具方法自动开启Scope两种方式验证了自定义线程池ScopeThreadPoolExecutor的Scope可传递性。
4 通过Filter、Scope实现Request上下文
接下来介绍如何通过Filter和Scope实现Request粒度的Scope上下文。思路是:通过注入一个拦截器,在进入拦截器后开启Scope作为一个请求的上下文,解析Request对象获取获取相关状态信息(如登陆用户),并在Scope中设置,在离开拦截器时关闭Scope。
AuthScope.java
// 获取登录态的工具类
public class AuthScope {
    private static final ScopeKey<String> LOGIN_USER = new ScopeKey<>();

    public static String getLoginUser() {
        return LOGIN_USER.get();
    }

    public static void setLoginUser(String loginUser) {
        if (loginUser == null) {
            loginUser = "unknownUser";
        }
        LOGIN_USER.set(loginUser);
    }
}
ScopeFilter.java
@Lazy
@Order(0)
@Service("scopeFilter")
public class ScopeFilter extends OncePerRequestFilter {

    @Override
    protected String getAlreadyFilteredAttributeName() {
        return this.getClass().getName();
    }

    @Override
    protected void doFilterInternal(HttpServletRequest request, HttpServletResponse response,
                                    FilterChain filterChain) throws ServletException, IOException {
        // 开启Scope
        beginScope();
        try {
            Cookie[] cookies = request.getCookies();
            String loginUser = "unknownUser";
            if (cookies != null) {
                for (Cookie cookie : cookies) {
                    if (cookie.getName().equals("login_user")) {
                        loginUser = cookie.getValue();
                        break;
                    }
                }
            }

            // 设置该 Request 上下文对用的登陆用户
            AuthScope.setLoginUser(loginUser);

            filterChain.doFilter(request, response);
        } finally {
            // 关闭Scope
            endScope();
        }
    }
}
注入Filter
@Slf4j
@Configuration
public class FilterConfig {

    @Bean
    public FilterRegistrationBean<ScopeFilter> scopeFilterRegistration() {
        FilterRegistrationBean<ScopeFilter> registration = new FilterRegistrationBean<>();
        registration.setFilter(new ScopeFilter());
        registration.addUrlPatterns("/rest/*");
        registration.setOrder(0);
        log.info("scope filter registered");
        return registration;
    }
}
UserController.java
@Slf4j
@RestController
@RequestMapping("/rest")
public class UserController {

    // curl --location --request GET 'localhost:8080/rest/getLoginUser' --header 'Cookie: login_user=zhangsan'
    @GetMapping("/getLoginUser")
    public String getLoginUser() {
        return AuthScope.getLoginUser();
    }

    // curl --location --request GET 'localhost:8080/rest/getLoginUserInThreadPool' --header 'Cookie: login_user=zhangsan'
    @GetMapping("/getLoginUserInThreadPool")
    public String getLoginUserInThreadPool() {
        ScopeThreadPoolExecutor executor = ScopeThreadPoolExecutor.newFixedThreadPool(4);
        executor.execute(() -> {
            log.info("get login user in thread pool: {}", AuthScope.getLoginUser());
        });

        return AuthScope.getLoginUser();
    }
}
通过以下请求验证,请求线程和线程池线程是否能获取登录态,其中登录态通过Cookie模拟:
curl --location --request GET 'localhost:8080/rest/getLoginUser' --header 'Cookie: login_user=zhangsan'
curl --location --request GET 'localhost:8080/rest/getLoginUserInThreadPool' --header 'Cookie: login_user=zhangsan'
5 总结
源代码
github:https://github.com/pengchengSU/demo-request-scope
以上就是利用ThreadLocal实现一个上下文管理组件的详细内容,更多关于ThreadLocal上下文管理组件的资料请关注自由互联其它相关文章!