目录
- 概念
- 链表的分类
- 链表的结构
- 代码实现链表
- 1.创建节点类
- 2.创建链表
- 3.打印链表:public void display()
- 4.查找是否包含关键字key是否在单链表当中:public boolean contains(int key)
- 5.得到单链表的长度:public int Size()
- 6.任意位置插入,第一个数据节点为0号下标:public boolean addIndex(int index,int data)
- 7.删除第一次出现关键字为key的节点:public void remove(int key)
- 8.删除所有值为key的节点:public void removeAllKey(int key)
- 9.清空链表:public void clear()
- 源码
- 总结
概念
链表(linked list):是一种物理存储结构上非连续存储结构,数据元素的逻辑顺序是通过链表中的引用链接次序实现的.
链表由一系列结点(链表中每一个元素称为结点)组成,结点可以在运行时动态生成。每个结点包括两个部分:一个是存储数据元素的数据域,另一个是存储下一个结点地址的指针域。 相比于线性表顺序结构,操作复杂。由于不必须按顺序存储,链表在插入的时候可以达到O(1)的复杂度,比另一种线性表顺序表快得多,但是查找一个节点或者访问特定编号的节点则需要O(n)的时间,而线性表和顺序表相应的时间复杂度分别是O(logn)和O(1)。
链表的分类
- 单向链表,双向链表
- 带头链表,不带头链表
- 循环的,非循环的
排列组合后一共有

即一共8种链表,其中单向、不带头、非循环以及双向、不带头、非循环的链表最为重要,也是本文主要介绍的链表类型。
链表的结构
对于链表的结构,可以用如下这个图来模拟。

图中所示的为链表的一个节点,value是这个节点的所存储的数据值,next为下一节点的地址。
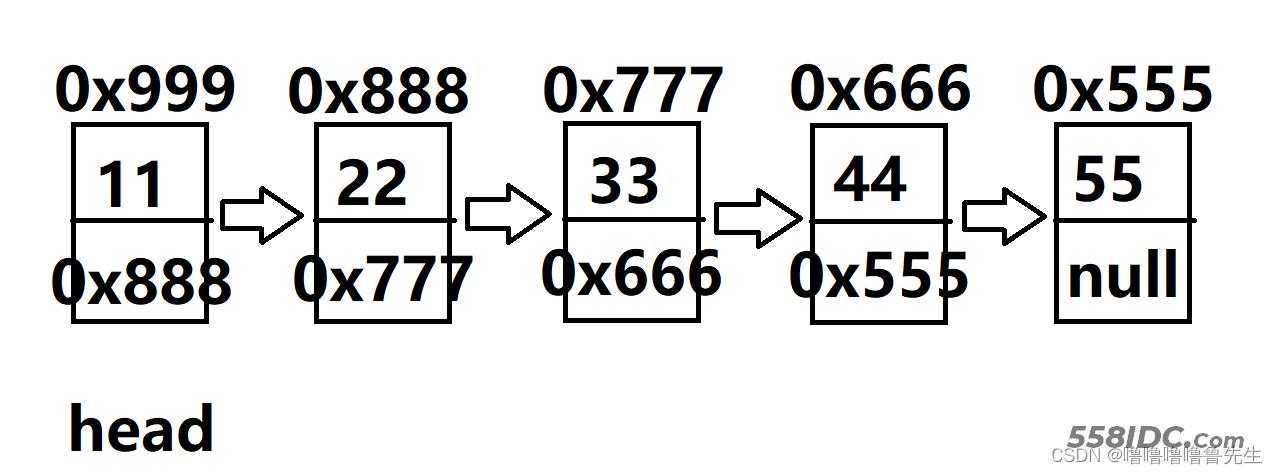
下面是一个5个节点的链表。

接下来,我们来实现这样的链表的增删查改:

第一个节点,地址假设是0x999,存储的数据是11,next存储的是下一个节点的地址(假设是0x888)
第二个节点,地址假设是0x888,存储的数据是22,next存储的是下一个节点的地址(假设是0x777)
第三个节点,地址假设是0x777,存储的数据是33,next存储的是下一个节点的地址(假设是0x666)
第四个节点,地址假设是0x666,存储的数据是44,next存储的是下一个节点的地址(假设是0x555)
第五个节点,地址假设是0x555,存储的数据是55,由于没有后续节点,next存储的是空指针null
定义一个head,存储头节点(第一个节点)的地址(假设为0x999)。
代码实现链表
1.创建节点类
节点由val域(数据域),以及next域(指针域)组成,对于next域,其是引用类型,存放下一个节点的地址,故
用public ListNode next来创建next。
同时设置构造函数,方便对val进行初始化。
//ListNode代表一个节点
class ListNode{
    public int val;
    public ListNode next;

    //构造函数
    public ListNode(int a){
        this.val = a;
    }
}
2.创建链表
方法一:枚举法(略简单,略low)
public class MyLinkedList {

    public ListNode head;//链表的头

    public void creatList(){
        ListNode listNode1 = new ListNode(11);
        ListNode listNode2 = new ListNode(22);
        ListNode listNode3 = new ListNode(33);
        ListNode listNode4 = new ListNode(44);
        ListNode listNode5 = new ListNode(55);

        this.head = listNode1;

        listNode1.next = listNode2;
        listNode2.next = listNode3;
        listNode3.next = listNode4;
        listNode4.next = listNode5;

    }
}
直接进行val的赋值以及对next的初始化。
注意:不用对最后一个节点的next进行赋值,因为next是引用类型,不赋值则默认为null。
- 方法二:头插法public void addFirst(int data)
头插法是指在链表的头节点的位置插入一个新节点,定义一个node表示该节点,然后就是对node的next进行赋值,用node.next = this.head即可完成(注意:head应指向新节点)
代码实现
    public void addFirst(int data){
        ListNode node = new ListNode(data);
        node.next = this.head;
        this.head = node;
    }
- 方法三:尾插法public void addLast(int data)
尾插法是指在链表的尾节点的位置插入一个新节点,定义一个node表示该节点,然后就是对原来最后一个节点的next进行赋值,先将head移动至原来最后一个节点,用head.next = node进行赋值(注意,如果链表不为空,需要定义cur来代替head)
代码实现
    public void addLast(int data){
        ListNode node = new ListNode(data);
        if(this.head == null){
            this.head = node;
        }else {
            ListNode cur = this.head;
            while(cur.next != null){
                cur = cur.next;
            }
            cur.next = node;
        }
    }
3.打印链表:public void display()
认识了链表的结构,我们可以知道,节点与节点之间通过next产生联系。并且我们已将创建了head,即头节点的地址,通过head的移动来实现链表的打印。
注意:为了使head一直存在且有意义,我们在display()函数中定义一个cur:ListNode cur = this.head;来替代head。
对于head的移动,可用head = head.next来实现。
代码实现:
    public void display(){
        ListNode cur = this.head;
        while(cur != null){
            System.out.print(cur.val+" ");
            cur = cur.next;
        }
        System.out.println();
    }
4.查找是否包含关键字key是否在单链表当中:public boolean contains(int key)
查找key,可以利用head移动,实现对于key的查找(注意:同样要定义一个cur来代替head)
代码实现
    public boolean contains(int key){
        ListNode cur = this.head;
        while(cur != null){
            if(cur.val == key){
                return true;
            }
            cur = cur.next;
        }
        return false;
    }
5.得到单链表的长度:public int Size()
定义计数器count = 0,通过head的移动来判断链表长度(注意:同样要定义一个cur来代替head)
代码实现
    public int Size(){
        int count = 0;
        ListNode cur = this.head;
        while(cur != null){
            count++;
            cur = cur.next;
        }
        return count;
    }
6.任意位置插入,第一个数据节点为0号下标:public boolean addIndex(int index,int data)
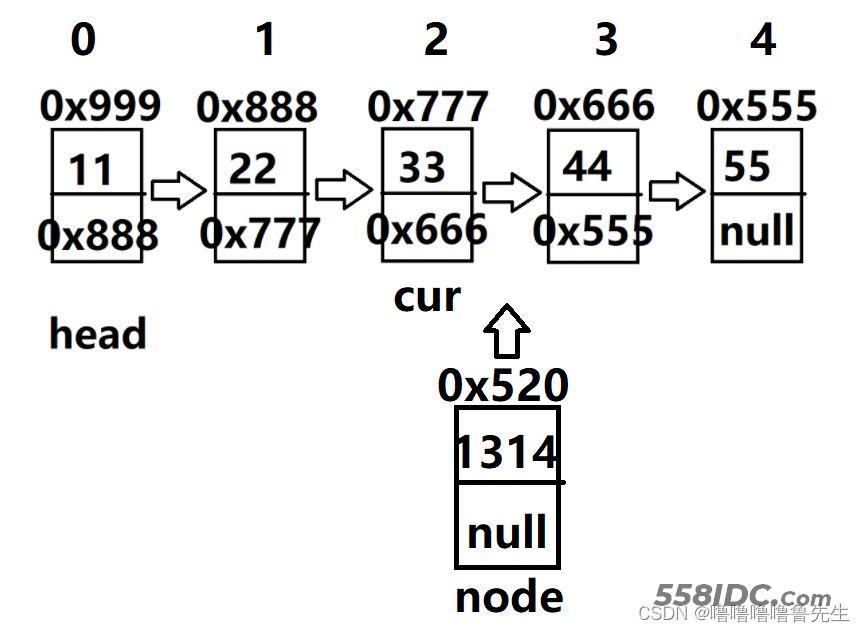
比如,我们把一个值为1314,地址是0x520(设为node引用)的节点,即val域值为1314,next域为null,地址是520,将该节点插入至3号位置,

经过分析,需要将head先移至2号位置(注意:用cur代替head,防止head丢失),然后
node.next = cur.next使该节点的next域改为下一节点的地址,再cur.next = node.next使前一节点
的next域改为该节点的地址。
    public void addIndex(int index,int data){
        if(index < 0 ||index > Size()){   //对index位置的合法性进行判断
            return;
        }
        if(index == 0){          //相当于头插法
            addFirst(data);
            return;
        }
        if(index = Size()){      //相当于尾插法
            addLast(data);
            return;
        }
        ListNode cur = findIndex(index);//找到index位置前一位置的地址
        ListNode node = new ListNode(data);//初始化node
        node.next = cur.next;
        cur.next = node;
    }
7.删除第一次出现关键字为key的节点:public void remove(int key)
对于删除第一次出现的key值的节点,若不是头节点,我们只需将key值对应的节点的前一节点的next的域改为key值对应的节点的next域即可。
对于头节点,直接head = head.next即可。
对于key值对应的节点的前一节点,我们可以写一个函数来找到它,方便后续的代码书写。
    //找到key的前驱(前一节点)
    public ListNode searchPrev(int key){
        ListNode cur = this.head;
        while(cur.next != null){
            if(cur.next.val == key){
                return cur;
            }
            cur = cur.next;
        }
        return null;
    }
    //删除第一次出现关键字为key的节点
    public void remove(int key){
        if(this.head == null){
            return;
        }
        if(this.head.val == key){
            this.head = this.head.next;
            return;
        }
        ListNode cur = searchPrev(key);
        if(cur == null){
            return;             //没有要删除的节点
        }
        ListNode del = cur.next;//定义要删除的节点
        cur.next = del.next;
    }
8.删除所有值为key的节点:public void removeAllKey(int key)
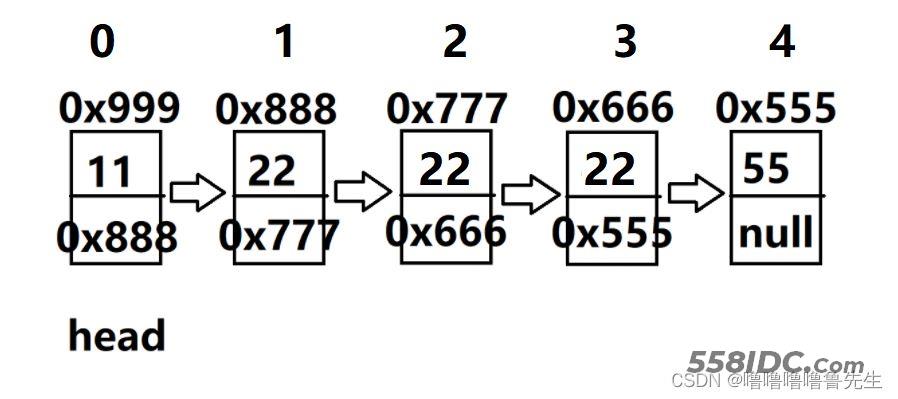
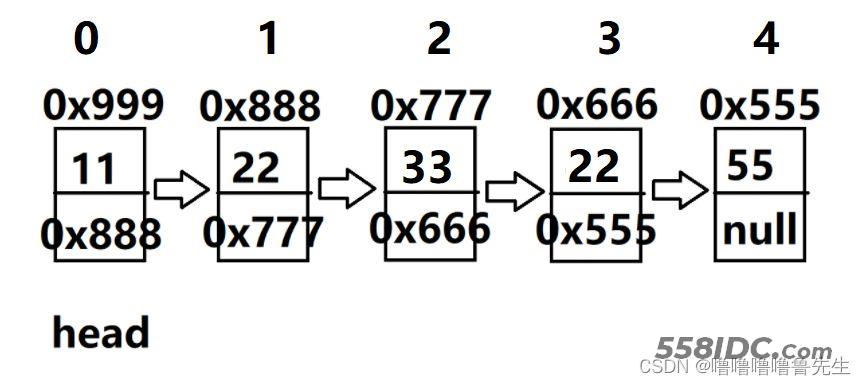
若要删除所有值为key的节点,其实我们只需多次调用上面所写的remove函数即可完成,但是,
若要达到面试难度,那么要求就是遍历一遍链表,删除所有值为key的节点。
情况一:key连续,如下(1,2,3节点)

情况二:key不连续,如下(1,3节点)

代码实现:
    public ListNode removeAllKey(int key){
        if(this.head = null){
            return null;
        }
        ListNode prev = this.head;
        ListNode cur = this.head.next;
        while(cur != null){
            if(cur.val == key){
                prev.next = cur.next;
                cur = cur.next;
            }else {
                prev = cur;
                cur = cur.next;
            }
        }
        if(this.head.val == key){
            this.head = this.head.next;
        }
        return this.head;
    }
9.清空链表:public void clear()
1.简单粗暴的方法:将头节点置为空head = null;即可
2.细腻温柔的做法:将每一个节点都置为空
    public void clear(){
        while(this.head != null){
            ListNode curNext = this.head.next;
            this.head.next = null;
            this.head = curNext;
        }
    }
源码
import java.util.List;


//ListNode代表一个节点
class ListNode{
    public int val;
    public ListNode next;

    //构造函数
    public ListNode(int a){
        this.val = a;
    }
}
public class MyLinkedList {

    public ListNode head;//链表的头

    public void creatList() {
        ListNode listNode1 = new ListNode(11);
        ListNode listNode2 = new ListNode(22);
        ListNode listNode3 = new ListNode(33);
        ListNode listNode4 = new ListNode(44);
        ListNode listNode5 = new ListNode(55);

        this.head = listNode1;

        listNode1.next = listNode2;
        listNode2.next = listNode3;
        listNode3.next = listNode4;
        listNode4.next = listNode5;

    }

    //头插法
    public void addFirst(int data) {
        ListNode node = new ListNode(data);
        node.next = this.head;
        this.head = node;
        /*if(this.head == null){
            this.head = node;
        }else{
            node.next = this.head;
            this.head = node;
        }*/
    }

    //尾插法
    public void addLast(int data) {
        ListNode node = new ListNode(data);
        if (this.head == null) {
            this.head = node;
        } else {
            ListNode cur = this.head;
            while (cur.next != null) {
                cur = cur.next;
            }
            cur.next = node;
        }
    }

    //打印顺序表
    public void display() {
        ListNode cur = this.head;
        while (cur != null) {
            System.out.print(cur.val + " ");
            cur = cur.next;
        }
        System.out.println();
    }

    //查找是否包含关键字key是否在单链表当中
    public boolean contains(int key) {
        ListNode cur = this.head;
        while (cur != null) {
            if (cur.val == key) {
                return true;
            }
            cur = cur.next;
        }
        return false;
    }

    //得到单链表的长度
    public int Size() {
        int count = 0;
        ListNode cur = this.head;
        while (cur != null) {
            count++;
            cur = cur.next;
        }
        return count;
    }

    //找到index位置的前一位置的地址
    public ListNode findIndex(int index) {
        ListNode cur = head.next;
        while (index - 1 != 0) {
            cur = cur.next;
            index--;
        }
        return cur;
    }

    //任意位置插入,第一个数据节点为0号下标
    public void addIndex(int index, int data) {
        if (index < 0 || index > Size()) {
            return;
        }
        if (index == 0) {          //相当于头插法
            addFirst(data);
            return;
        }
        if (index == Size()) {      //相当于尾插法
            addLast(data);
            return;
        }
        ListNode cur = findIndex(index);//找到index位置前一位置的地址
        ListNode node = new ListNode(data);//初始化node
        node.next = cur.next;
        cur.next = node;
    }

    //找到key的前驱(前一节点)
    public ListNode searchPrev(int key) {
        ListNode cur = this.head;
        while (cur.next != null) {
            if (cur.next.val == key) {
                return cur;
            }
            cur = cur.next;
        }
        return null;
    }

    //删除第一次出现关键字为key的节点
    public void remove(int key) {
        if (this.head == null) {
            return;
        }
        if (this.head.val == key) {
            this.head = this.head.next;
            return;
        }
        ListNode cur = searchPrev(key);
        if (cur == null) {
            return;             //没有要删除的节点
        }
        ListNode del = cur.next;//定义要删除的节点
        cur.next = del.next;
    }

    //删除所有值为key的节点
    public ListNode removeAllKey(int key) {
        if (this.head = null) {
            return null;
        }
        ListNode prev = this.head;
        ListNode cur = this.head.next;
        while (cur != null) {
            if (cur.val == key) {
                prev.next = cur.next;
                cur = cur.next;
            } else {
                prev = cur;
                cur = cur.next;
            }
        }
        if (this.head.val == key) {
            this.head = this.head.next;
        }
        return this.head;
    }

    //清空链表
    public void clear() {
        while (this.head != null) {
            ListNode curNext = this.head.next;
            this.head.next = null;
            this.head = curNext;
        }
    }
}
总结
到此这篇关于Java链表超详细讲解的文章就介绍到这了,更多相关Java链表详解内容请搜索自由互联以前的文章或继续浏览下面的相关文章希望大家以后多多支持自由互联!
