目录
- 一、基于xml形式开启Transaction
- 1. 创建数据库user
- 2. 创建一个maven 项目
- 3. 通过xml形式配置事务
- 1) 创建Spring命名空间
- 2) 开启事务配置
- 3) 创建UserService类
- 4. 测试事务
- 1) 抛出RuntimeException
- 2) 注释掉RuntimeException
- 二、事务开启入口TxNamespaceHandler
- AnnotationDrivenBeanDefinitionParser
- 三、AOP驱动事务
- TransactionInterceptor
- 创建事务
- 回滚事务
一、基于xml形式开启Transaction
1. 创建数据库user
/*
 Navicat Premium Data Transfer
 Source Server         : win-local
 Source Server Type    : MySQL
 Source Server Version : 50737
 Source Host           : localhost:3306
 Source Schema         : db0
 Target Server Type    : MySQL
 Target Server Version : 50737
 File Encoding         : 65001
 Date: 24/04/2022 20:27:41
*/
SET NAMES utf8mb4;
SET FOREIGN_KEY_CHECKS = 0;
-- ----------------------------
-- Table structure for user
-- ----------------------------
DROP TABLE IF EXISTS `user`;
CREATE TABLE `user`  (
  `id` bigint(20) NOT NULL AUTO_INCREMENT,
  `name` varchar(255) CHARACTER SET utf8mb4 COLLATE utf8mb4_general_ci NULL DEFAULT NULL,
  `age` int(11) NULL DEFAULT NULL,
  PRIMARY KEY (`id`) USING BTREE
) ENGINE = InnoDB AUTO_INCREMENT = 1 CHARACTER SET = utf8mb4 COLLATE = utf8mb4_general_ci ROW_FORMAT = Dynamic;
SET FOREIGN_KEY_CHECKS = 1;
2. 创建一个maven 项目
不用Springboot依赖,引入mysql驱动依赖、spring-beans、spring-jdbc、Spring-context依赖
    <dependencies>
        <dependency>
            <groupId>mysql</groupId>
            <artifactId>mysql-connector-java</artifactId>
            <version>5.1.46</version>
        </dependency>
        <dependency>
            <groupId>org.springframework</groupId>
            <artifactId>spring-beans</artifactId>
            <version>5.3.18</version>
        </dependency>
        <!-- spring jdbc 依赖spring-tx -->
        <dependency>
            <groupId>org.springframework</groupId>
            <artifactId>spring-jdbc</artifactId>
            <version>5.3.18</version>
        </dependency>
        <dependency>
            <groupId>org.apache.commons</groupId>
            <artifactId>commons-dbcp2</artifactId>
            <version>2.7.0</version>
        </dependency>
        <dependency>
            <groupId>org.springframework</groupId>
            <artifactId>spring-context</artifactId>
            <version>5.3.18</version>
        </dependency>
        <dependency>
            <groupId>junit</groupId>
            <artifactId>junit</artifactId>
            <version>4.13.2</version>
        </dependency>
    </dependencies>
3. 通过xml形式配置事务
1) 创建Spring命名空间
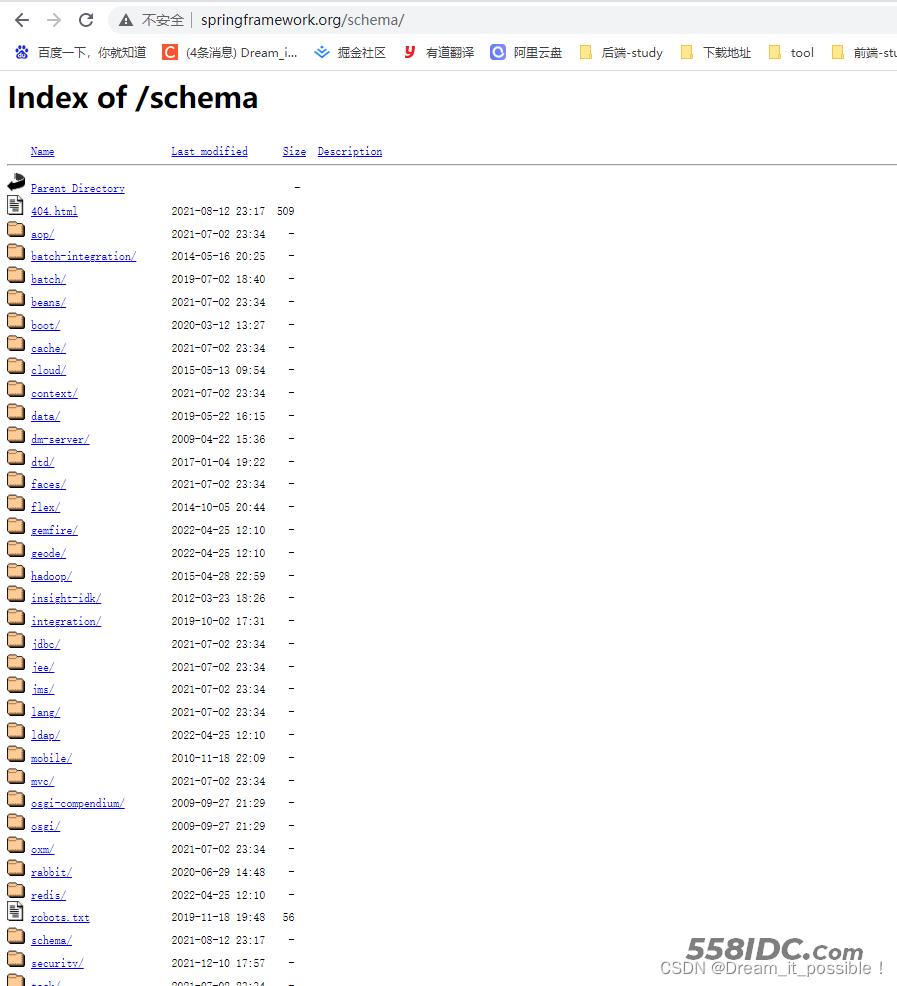
首先在resources目录下创建一个spring.xml文件,Spring框架为了声明自己的Xml规范,在<beans>标签里定义了spring 框架指定模块的协议配置, 我们可以通过Index of /schema访问spring框架的所有模块包,各模块包含了不同版本的xsd文件。
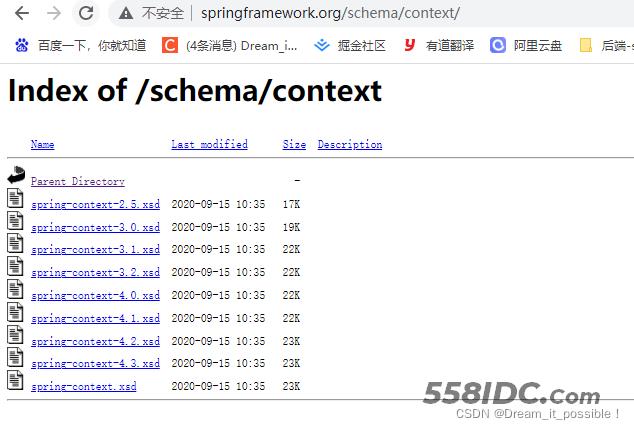
点击进入context目录,查看xsd文件:
比如我要通过xml的形式配置一个bean, 需要在beans标签中声明 xmln的值为:
http://www.springframework.org/schema/beans
如果我想用spring的context模块,那么需要声明
xmlns:context="http://www.springframework.org/schema/context"
同时在xsi: schemeLocation里添加context的url和spring-contxt.xsd的url:
http://www.springframework.org/schema/context
https://www.springframework.org/schema/context/spring-context.xsd
例如我创建一个能在xml中使用spring-beans模块,spring-txt模块,spring-context模块的配置如下:
<?xml version="1.0" encoding="UTF-8" ?>
<beans xmlns="http://www.springframework.org/schema/beans"
       xmlns:xsi="http://www.w3.org/2001/XMLSchema-instance"
       xmlns:context="http://www.springframework.org/schema/context"
       xmlns:tx="http://www.springframework.org/schema/tx"
       xsi:schemaLocation="
        http://www.springframework.org/schema/beans https://www.springframework.org/schema/beans/spring-beans.xsd
        http://www.springframework.org/schema/context https://www.springframework.org/schema/context/spring-context.xsd
        http://www.springframework.org/schema/tx https://www.springframework.org/schema/tx/spring-tx.xsd
">
</beans>
如果没有在beans标签里声明协议,那么在配置bean时会出现找不到指定标签的问题。
2) 开启事务配置
在spring.xml文件中添加配置事务配置,使用 annotation-driven 属性开启事务启动,
<tx:annotation-driven transaction-manager="transactionManager" proxy-target-class="true" mode="proxy"/>
proxy-target-class默认为false, mode默认模式为proxy,可不用配置,待会从源码角度分析不同模式的事务开启。
接着配置transactionManager, 指定class="org.springframework.jdbc.datasource.DataSourceTransactionManager"
    <tx:annotation-driven transaction-manager="transactionManager" proxy-target-class="true" mode="proxy"/>
    <bean id="transactionManager" class="org.springframework.jdbc.datasource.DataSourceTransactionManager">
        <property name="dataSource" ref="ds"/>
    </bean>
DataSourceTransactionManager里包含了DataSource属性配置:

因此我们需要接着配置数据源bean 别名为
    <bean id="ds" class="org.apache.commons.dbcp2.BasicDataSource" destroy-method="close">
        <property name="driverClassName" value="com.mysql.jdbc.Driver"/>
        <property name="username" value="root"/>
        <property name="password" value="root"/>
        <property name="url" value="jdbc:mysql://localhost:3306/db0?useSSL=false"/>
        <property name="initialSize" value="5"/>
        <property name="maxIdle" value="2"/>
        <property name="maxTotal" value="100"/>
    </bean>
接着给Service配置一个bean, 引用dataSource数据源。
    <!-- 配置bean,指定数据源-->
    <bean id="userService" class="service.UserService">
        <property name="dataSource" ref="ds"/>
    </bean>
3) 创建UserService类
通过dataSouce bean注入JDBCTemplate, 添加一个update(int id,String name)方法, 类上添加@Transactional(propagation = Propagation.REQUIRED)。
package service;
import org.springframework.jdbc.core.JdbcTemplate;
import org.springframework.transaction.annotation.Propagation;
import org.springframework.transaction.annotation.Transactional;
import javax.sql.DataSource;
@Transactional(propagation = Propagation.REQUIRED)
public class UserService {
private JdbcTemplate jdbcTemplate;
public void setDataSource(DataSource dataSource) {
this.jdbcTemplate = new JdbcTemplate(dataSource);
}
public String getUserName(int id) {
return jdbcTemplate.query("select * from db0.user where id= ?", rs -> rs.next() ? rs.getString(2) : "", new Object[]{id});
}
public void updateUser(int id, String name) {
jdbcTemplate.update(" update user set name =? where id= ?", new Object[]{name, id});
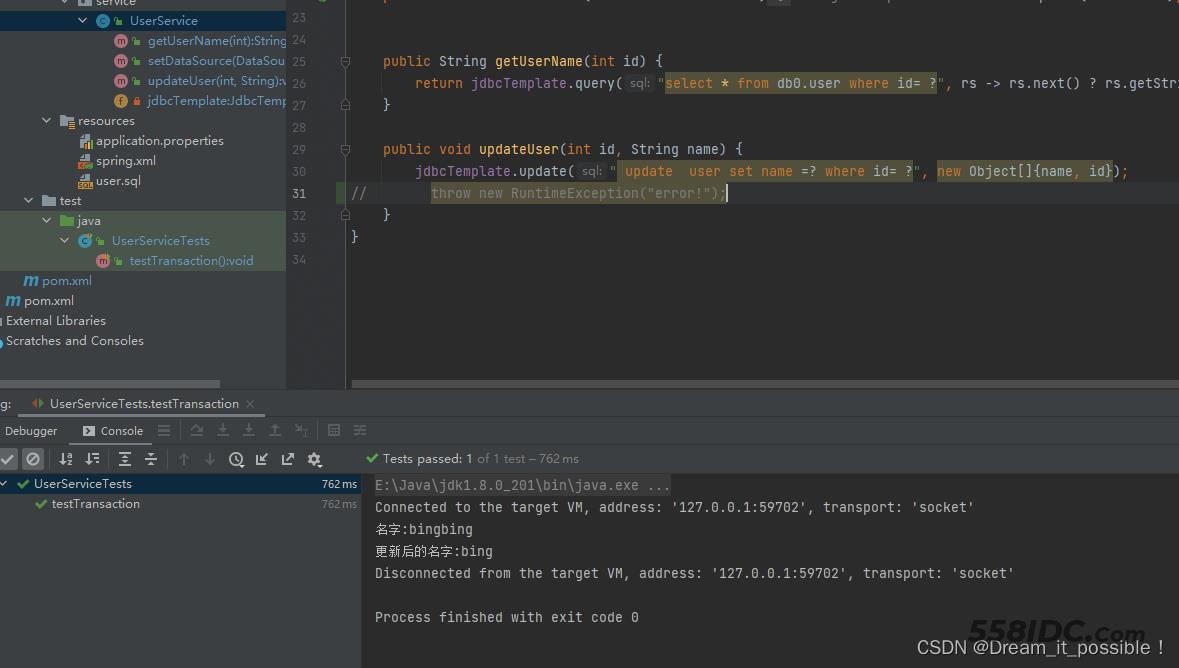
// throw new RuntimeException("error!");
}
}
4. 测试事务
使用ClassPathXmlApplicationContext类加载spring.xml文件
import org.junit.Test;
import org.springframework.context.ApplicationContext;
import org.springframework.context.support.ClassPathXmlApplicationContext;
import service.UserService;
public class UserServiceTests {
    @Test
    public void testTransaction() {
        ApplicationContext context = new ClassPathXmlApplicationContext("spring.xml");
        UserService userService = context.getBean("userService", UserService.class);
        String name = userService.getUserName(1);
        System.out.println("名字:"+name);
        userService.updateUser(1, "bing");
        String updateName = userService.getUserName(1);
        System.out.println("更新后的名字:" + updateName);
    }
}
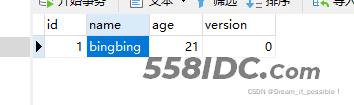
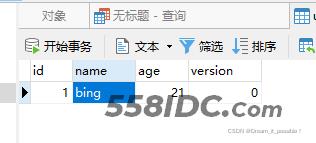
数据库一条记录:
1) 抛出RuntimeException
update方法里放开//throw new RuntimeException("error!"); 注释,执行后
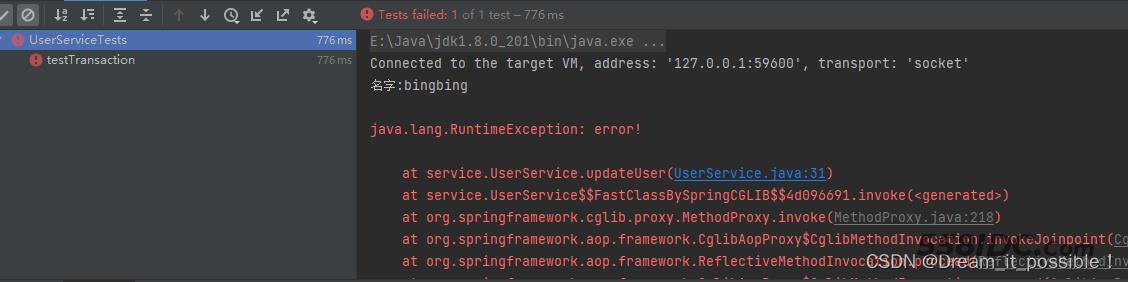
数据库里的记录没有修改,@Tranasctional注解生效。
2) 注释掉RuntimeException
重新执行后,观察结果
数据库也更新过来了。
前面的篇幅从xml的配置形式解释了Transaction集成过程,为什么要从xml形式入手transaction, 是为了后面阅读Spring-tx源码做准备。
二、事务开启入口TxNamespaceHandler
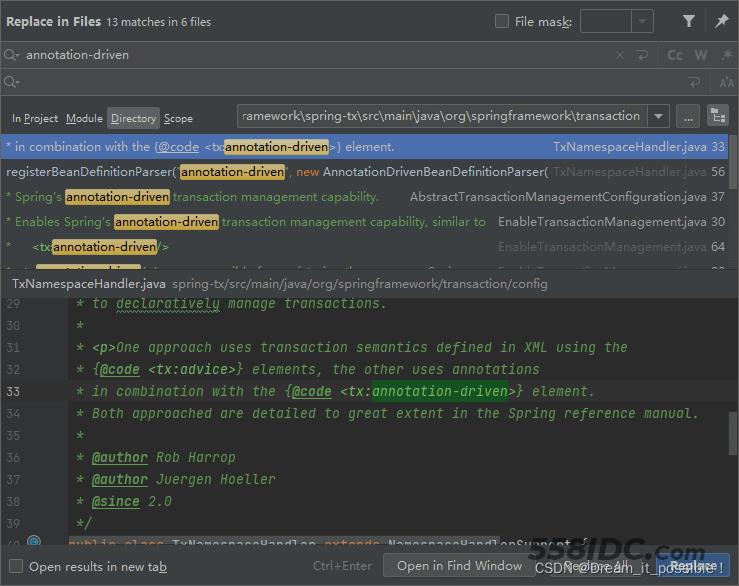
根据spring.xml文件里配置的tx:annitation-driven 关键字在Spring框架里全局搜索,找到目标类TxNamespaceHandler。位于spring-tx模块中的 org.springframework.transaction.config包下。
/*
 * Copyright 2002-2012 the original author or authors.
 *
 * Licensed under the Apache License, Version 2.0 (the "License");
 * you may not use this file except in compliance with the License.
 * You may obtain a copy of the License at
 *
 *      http://www.apache.org/licenses/LICENSE-2.0
 *
 * Unless required by applicable law or agreed to in writing, software
 * distributed under the License is distributed on an "AS IS" BASIS,
 * WITHOUT WARRANTIES OR CONDITIONS OF ANY KIND, either express or implied.
 * See the License for the specific language governing permissions and
 * limitations under the License.
 */
package org.springframework.transaction.config;
import org.w3c.dom.Element;
import org.springframework.beans.factory.xml.NamespaceHandlerSupport;
/**
 * {@code NamespaceHandler} allowing for the configuration of
 * declarative transaction management using either XML or using annotations.
 *
 * <p>This namespace handler is the central piece of functionality in the
 * Spring transaction management facilities and offers two approaches
 * to declaratively manage transactions.
 *
 * <p>One approach uses transaction semantics defined in XML using the
 * {@code <tx:advice>} elements, the other uses annotations
 * in combination with the {@code <tx:annotation-driven>} element.
 * Both approached are detailed to great extent in the Spring reference manual.
 *
 * @author Rob Harrop
 * @author Juergen Hoeller
 * @since 2.0
 */
public class TxNamespaceHandler extends NamespaceHandlerSupport {
	static final String TRANSACTION_MANAGER_ATTRIBUTE = "transaction-manager";
	static final String DEFAULT_TRANSACTION_MANAGER_BEAN_NAME = "transactionManager";
	static String getTransactionManagerName(Element element) {
		return (element.hasAttribute(TRANSACTION_MANAGER_ATTRIBUTE) ?
				element.getAttribute(TRANSACTION_MANAGER_ATTRIBUTE) : DEFAULT_TRANSACTION_MANAGER_BEAN_NAME);
	}
	@Override
	public void init() {
		registerBeanDefinitionParser("advice", new TxAdviceBeanDefinitionParser());
		// 注册事务
		registerBeanDefinitionParser("annotation-driven", new AnnotationDrivenBeanDefinitionParser());
		registerBeanDefinitionParser("jta-transaction-manager", new JtaTransactionManagerBeanDefinitionParser());
	}
}
找到了annotation-driven, 这个地方创建了一个AnnotationDrivenBeanDefinitionParser实例。
AnnotationDrivenBeanDefinitionParser
AnnotationDrivenBeanDefinitionParser 类的作用是解析spring.xml里的配置<tx:annotation-driven>标签,并根据配置的mode选择不同的模式取创建Transaction的整个初始化流程,此处也就是整个架Transaction架构的开始地方。
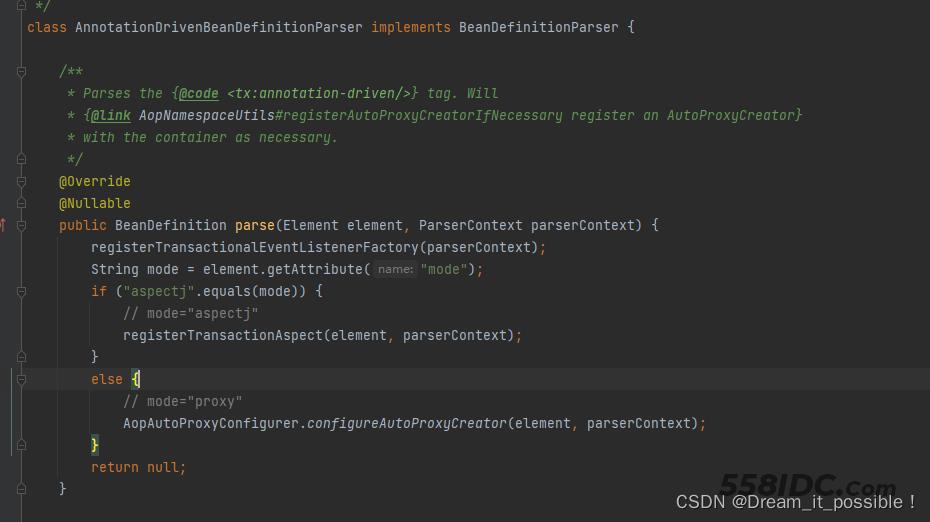
Spring事务注册的模式为动态代理模式,具体实现有2种: aspectj和proxy,可通过配置来选择使用那种形式的事务注册, 如果不配置mode那么使用默认的proxy形式创建,如果我们要使用aspectj模式开启事务,那么就配置mode="aspectj"。
<tx:annotation-driven transaction-manager="transactionManager" mode="aspectj">
我们可以看到Spring事务的开启是默认是以AOP为基础的。
三、AOP驱动事务
AopAutoProxyConfigurer 的configureAutoProxyCreator方法注册了3个Bean, 该3个Bean 是驱动Spring 事务架构的核心支柱,分别是TransactionAttributeSource、TransactionInterceptor、TransactionAttributeSourceAdvisor。
	private static class AopAutoProxyConfigurer {
		public static void configureAutoProxyCreator(Element element, ParserContext parserContext) {
			AopNamespaceUtils.registerAutoProxyCreatorIfNecessary(parserContext, element);
			String txAdvisorBeanName = TransactionManagementConfigUtils.TRANSACTION_ADVISOR_BEAN_NAME;
			if (!parserContext.getRegistry().containsBeanDefinition(txAdvisorBeanName)) {
				Object eleSource = parserContext.extractSource(element);
				// Create the TransactionAttributeSource definition.
				RootBeanDefinition sourceDef = new RootBeanDefinition(
						"org.springframework.transaction.annotation.AnnotationTransactionAttributeSource");
				sourceDef.setSource(eleSource);
				sourceDef.setRole(BeanDefinition.ROLE_INFRASTRUCTURE);
				String sourceName = parserContext.getReaderContext().registerWithGeneratedName(sourceDef);
				// Create the TransactionInterceptor definition.
				RootBeanDefinition interceptorDef = new RootBeanDefinition(TransactionInterceptor.class);
				interceptorDef.setSource(eleSource);
				interceptorDef.setRole(BeanDefinition.ROLE_INFRASTRUCTURE);
				registerTransactionManager(element, interceptorDef);
				interceptorDef.getPropertyValues().add("transactionAttributeSource", new RuntimeBeanReference(sourceName));
				String interceptorName = parserContext.getReaderContext().registerWithGeneratedName(interceptorDef);
				// Create the TransactionAttributeSourceAdvisor definition.
				RootBeanDefinition advisorDef = new RootBeanDefinition(BeanFactoryTransactionAttributeSourceAdvisor.class);
				advisorDef.setSource(eleSource);
				advisorDef.setRole(BeanDefinition.ROLE_INFRASTRUCTURE);
				advisorDef.getPropertyValues().add("transactionAttributeSource", new RuntimeBeanReference(sourceName));
				advisorDef.getPropertyValues().add("adviceBeanName", interceptorName);
				if (element.hasAttribute("order")) {
					advisorDef.getPropertyValues().add("order", element.getAttribute("order"));
				}
				// 事务通知器 transaction advisor, 基于AOP实现的advisor
				parserContext.getRegistry().registerBeanDefinition(txAdvisorBeanName, advisorDef);
				CompositeComponentDefinition compositeDef = new CompositeComponentDefinition(element.getTagName(), eleSource);
				compositeDef.addNestedComponent(new BeanComponentDefinition(sourceDef, sourceName));
				compositeDef.addNestedComponent(new BeanComponentDefinition(interceptorDef, interceptorName));
				compositeDef.addNestedComponent(new BeanComponentDefinition(advisorDef, txAdvisorBeanName));
				parserContext.registerComponent(compositeDef);
			}
		}
	}
其中TransactionInterceptor是Spring事务的目标方法的增强,通过代理完成Spring 事务的提交、异常处理和回滚。
TransactionInterceptor
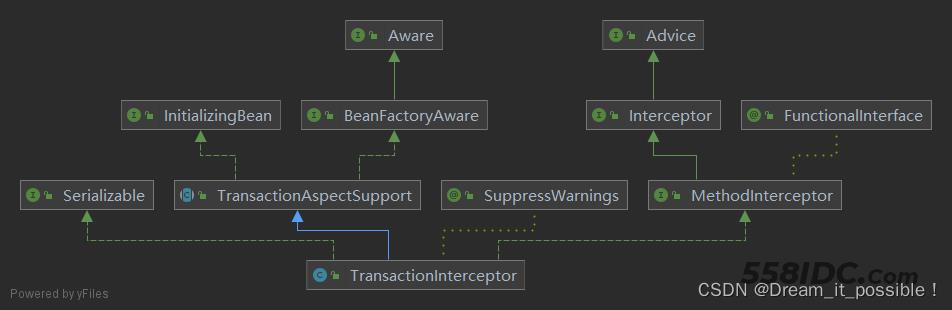
TransactionInterceptor是Spring 事务对目标方法的增强器,说简单点就是一层代理,基于Aop实现,实现了spring-aop的Advice接口,同时实现了IntializingBean和BeanFactoryAware接口,只要有事务的执行,那么目标方法的调用类在invoke()方法会生成一个代理对象,通过invoke()方法对目标调用方法进行增强。
@FunctionalInterface
public interface MethodInterceptor extends Interceptor {
	/**
	 * Implement this method to perform extra treatments before and
	 * after the invocation. Polite implementations would certainly
	 * like to invoke {@link Joinpoint#proceed()}.
	 * @param invocation the method invocation joinpoint
	 * @return the result of the call to {@link Joinpoint#proceed()};
	 * might be intercepted by the interceptor
	 * @throws Throwable if the interceptors or the target object
	 * throws an exception
	 */
	Object invoke(MethodInvocation invocation) throws Throwable;
}
TransactionInterceptor的invoke()实现:
	@Override
	@Nullable
	public Object invoke(final MethodInvocation invocation) throws Throwable {
		// Work out the target class: may be {@code null}.
		// The TransactionAttributeSource should be passed the target class
		// as well as the method, which may be from an interface.
		Class<?> targetClass = (invocation.getThis() != null ? AopUtils.getTargetClass(invocation.getThis()) : null);
		// Adapt to TransactionAspectSupport's invokeWithinTransaction...
		return invokeWithinTransaction(invocation.getMethod(), targetClass, invocation::proceed);
	}
创建事务
Spring 创建事务的方式有二种: 声明式事务和编程式事务, 我们可以通过分析一种理解核心流程和原理即可。
进入invokeWithinTransaction()方法直接看声明式事务执行过程的源代码:
	if (txAttr == null || !(tm instanceof CallbackPreferringPlatformTransactionManager)) {
			// Standard transaction demarcation with getTransaction and commit/rollback calls.
			// 创建事务
			TransactionInfo txInfo = createTransactionIfNecessary(tm, txAttr, joinpointIdentification);
			Object retVal = null;
			try {
				// This is an around advice: Invoke the next interceptor in the chain.
				// This will normally result in a target object being invoked.
				retVal = invocation.proceedWithInvocation();
			} catch (Throwable ex) {
				// target invocation exception
				// 根据指定异常进行回滚。
				completeTransactionAfterThrowing(txInfo, ex);
				throw ex;
			} finally {
				cleanupTransactionInfo(txInfo);
			}
			// 提交事务
			commitTransactionAfterReturning(txInfo);
			return retVal;
		}
invokeWithinTransaction方法做了哪些事?
1)通过createTransactionIfNecessary方法创建一个事务,相当于此处开启一个事务。
2)invocation.proceedWithInvocation() 执行目标方法调用。
3) 如果出现异常,那么completeTransactionAfterThrowing处理异常。
4) 在finally 清除掉transaction相关的信息,同时在commitTransactionAfterReturning 提交事务。
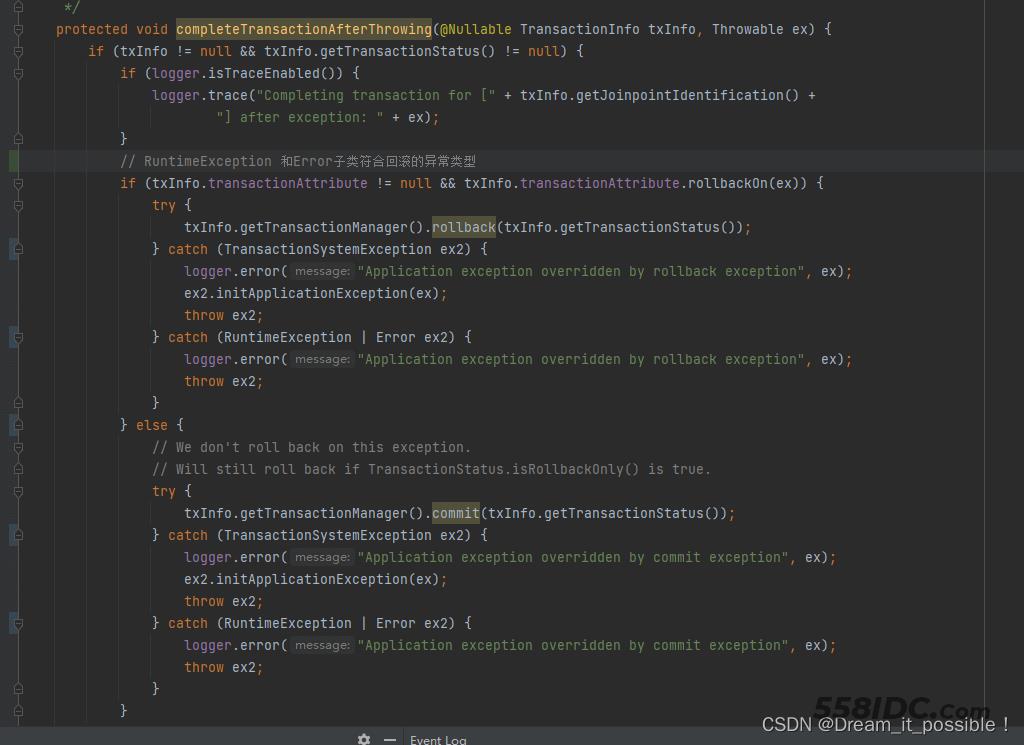
回滚事务
我们可以从上面的源码中发现通过transactionManager执行回滚操作。
txInfo.getTransactionManager().rollback(txInfo.getTransactionStatus());
到此这篇关于Spring Transaction事务实现流程源码解析的文章就介绍到这了,更多相关Spring Transaction内容请搜索自由互联以前的文章或继续浏览下面的相关文章希望大家以后多多支持自由互联!