目录
- 前言
- Paint事件中实现圆角控件
- 提取绘制圆角矩形和旁边小尖角的代码为扩展方法
- 介绍
- 扩展方法
- 测试尖角的显示位置
- 重绘控件后文本的处理
- 同时重绘文本
- 通过添加Label控件实现对文本的处理【有尖角时需要额外处理】
- Paint事件中绘制圆角的优点
- 窗体失去焦点时按钮外观边框问题
- Paint事件中绘制控件的问题【不要使用(事件)参数e.ClipRectangle】
前言
Windows 11下所有控件已经默认采用圆角,其效果更好、相对有着更好的优化,只是这是默认的行为,无法进一步自定义。
注意两点:
- Paint事件方法中实现圆角控件不要通过事件参数
e.ClipRectangle获取控件区域范围 - 注意设置控件背景透明(虽然Winform中的透明不是完全透明,
实现圆角控件比较好的一个思路是在控件的Paint事件中进行绘制,不太好的地方在于每次实现时都要添加事件处理,且不能在设计器中实时看到效果。
只要有Paint事件的组件都实现绘制圆角【如果没有,也可以通过将控件放在Panel中,借助Panel的圆角实现】。
Paint事件中实现圆角控件
注意:由于控件在Paint事件方法中进行了重新绘制,因此文本也被覆盖了,需要处理文本的绘制显示
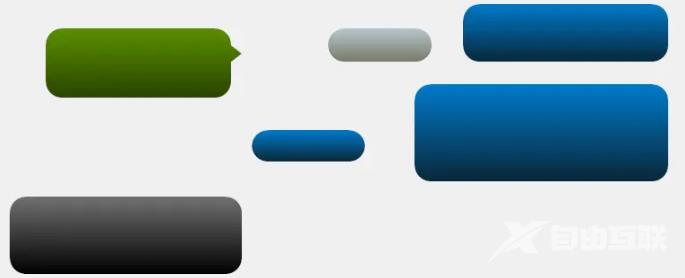
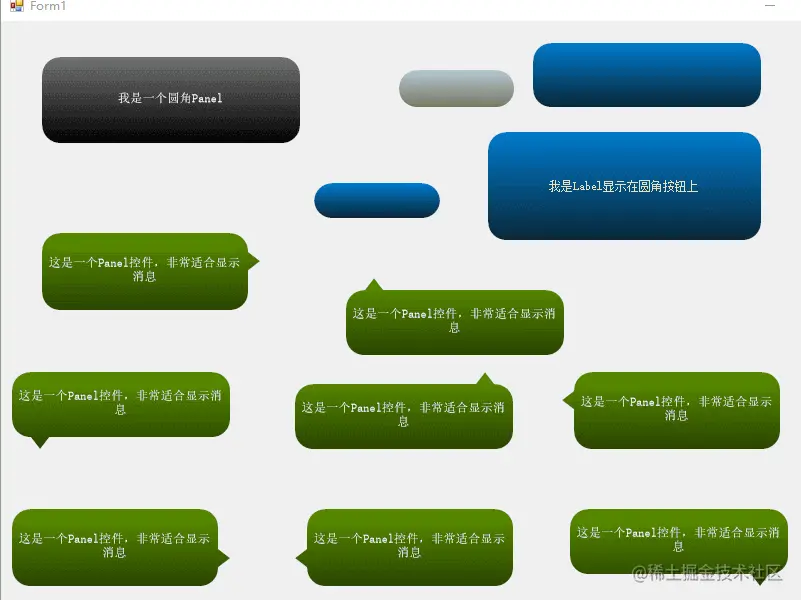
新建项目 CustomControlRound,窗体中添加两个Panel、三个Button、一个Label控件。button设置Flat样式、边框为0。
然后在Paint事件方法中调用绘制圆角区域的方法(具体代码参见下一部分的扩展方法),具体如下:
public partial class Form1 : Form
{
    public Form1()
    {
        InitializeComponent();

        panel1.Paint += Panel1_Paint;
        panel2.Paint += Panel2_Paint;

        panel1.BackColor = panel2.BackColor = Color.Transparent;

        button1.Paint += Button1_Paint;
        button1.FlatStyle = FlatStyle.Flat;
        button1.FlatAppearance.BorderSize = 0;
        button1.FlatAppearance.MouseDownBackColor = Color.Transparent;
        button1.FlatAppearance.MouseOverBackColor = Color.Transparent;
        button1.FlatAppearance.CheckedBackColor = Color.Transparent;


        button2.Paint += Button1_Paint;
        button2.FlatStyle = FlatStyle.Flat;
        button2.FlatAppearance.BorderSize = 0;
        //button2.FlatAppearance.BorderColor = SystemColors.ButtonFace;
        button2.FlatAppearance.MouseDownBackColor = Color.Transparent;
        button2.FlatAppearance.MouseOverBackColor = Color.Transparent;
        button2.FlatAppearance.CheckedBackColor = Color.Transparent;

        button3.Paint += Button1_Paint;
        button3.FlatStyle = FlatStyle.Flat;
        button3.FlatAppearance.BorderSize = 0;
        //button3.FlatAppearance.BorderColor = SystemColors.ButtonFace;
        button3.FlatAppearance.MouseDownBackColor = Color.Transparent;
        button3.FlatAppearance.MouseOverBackColor = Color.Transparent;
        button3.FlatAppearance.CheckedBackColor = Color.Transparent;

        label1.Paint += Label1_Paint;
        label1.BackColor = Color.Transparent;
    }

    private void Label1_Paint(object sender, PaintEventArgs e)
    {
        var l = (Label)sender;
        // e.Graphics.DrawRoundRectAndCusp(e.ClipRectangle,  18, Color.FromArgb(180, 200, 210), Color.FromArgb(120, 120, 100)); // 不推荐
        e.Graphics.DrawRoundRectAndCusp(new Rectangle(0,0, l.Width,l.Height),  18, Color.FromArgb(180, 200, 210), Color.FromArgb(120, 120, 100));
    }

    private void Button1_Paint(object sender, PaintEventArgs e)
    {
        var btn = (Button)sender;
        e.Graphics.DrawRoundRectAndCusp(new Rectangle(0, 0, btn.Width, btn.Height), 18, Color.FromArgb(0, 122, 204), Color.FromArgb(8, 39, 57));

        ((Button)sender).NotifyDefault(false); // 去除窗体失去焦点时最新激活的按钮边框外观样式
    }

    private void Panel1_Paint(object sender, PaintEventArgs e)
    {
        var panel = sender as Panel;
        var rect=e.Graphics.DrawRoundRectAndCusp(new Rectangle(0, 0, panel.Width, panel.Height), 18, Color.FromArgb(90, 143, 0), Color.FromArgb(41, 67, 0),true, rectAlign);
    }

    private void Panel2_Paint(object sender, PaintEventArgs e)
    {
        var panel = sender as Panel;
        var rect = e.Graphics.DrawRoundRectAndCusp(new Rectangle(0, 0, panel.Width, panel.Height), 18, Color.FromArgb(113, 113, 113), Color.FromArgb(0, 0, 0));
    }
}
查看效果:
在Paint事件中不需要调用
base.OnPaint(e);,只有在继承控件重写OnPaint方法时,才应该(在函数方法开始时)调用base.OnPaint(e);。
提取绘制圆角矩形和旁边小尖角的代码为扩展方法
介绍
下面是提取的扩展方法,对源代码进行了修改和优化。
- 1、可绘制渐变背景色、指定背景色、指定画刷绘制的背景;可指定渐变背景的方向
- 2、指定圆角半径的绘制,如果半径小于等于0,将绘制直角矩形。
- 3、指定三角小尖,默认不绘制;指定三角小尖的位置,可供八个位置选择
- 4、三角小尖的大小,目前感觉作为参数传递不够灵活,如果需要调整可直接从代码中修改,主要修改部分为:
// 尖角的大小 默认为 开始位置为_radius 底边为20,高度为13的等腰三角形
var cuspHemlineStart = _radius;
var cuspHemlineLength = 20;
var cuspHeight = 13;
扩展方法
扩展方法代码如下,将其放在namespace System.Drawing.Drawing2D下,可直接方便的从Graphics对象调用。
/// <summary>
/// 绘制可渐变的圆角矩形,并指定是否有三角小尖及其位置
/// </summary>
/// <param name="g"></param>
/// <param name="rectangle">矩形区域</param>
/// <param name="_radius">圆角半径</param>
/// <param name="begin_bgcolor">背景渐变开始色</param>
/// <param name="end_bgcolor">背景渐变结束色</param>
/// <param name="cusp">是否有三角小尖,默认无</param>
/// <param name="rectAlign">三角小尖的位置,默认右上</param>
/// <param name="gradientMode">渐变模式,默认垂直方向渐变</param>
public static void DrawRoundRectAndCusp(this Graphics g, Rectangle rectangle, int _radius, Color begin_bgcolor, Color end_bgcolor, bool cusp = false, RectangleAlign rectAlign= RectangleAlign.RightTop, LinearGradientMode gradientMode = LinearGradientMode.Vertical)
{
    ////抗锯齿 等模式在Graphics外层自定义设置
    //g.SmoothingMode = SmoothingMode.AntiAlias;
    //渐变填充
    LinearGradientBrush linearGradientBrush = new LinearGradientBrush(rectangle, begin_bgcolor, end_bgcolor, gradientMode);
    g.DrawRoundRectAndCusp(rectangle, _radius, linearGradientBrush, cusp, rectAlign);
}

/// <summary>
/// 绘制指定背景的圆角矩形,并指定是否有三角小尖及其位置
/// </summary>
/// <param name="g"></param>
/// <param name="rectangle">矩形区域</param>
/// <param name="_radius">圆角半径</param>
/// <param name="bgcolor">指定背景色</param>
/// <param name="cusp">是否有三角小尖,默认无</param>
/// <param name="rectAlign">三角小尖的位置,默认右上</param>
public static void DrawRoundRectAndCusp(this Graphics g, Rectangle rectangle, int _radius, Color bgcolor, bool cusp = false, RectangleAlign rectAlign = RectangleAlign.RightTop)
{
    ////抗锯齿 等模式在Graphics外层自定义设置
    //g.SmoothingMode = SmoothingMode.AntiAlias;
    //渐变填充
    var  brush = new SolidBrush(bgcolor);
    g.DrawRoundRectAndCusp(rectangle, _radius, brush, cusp, rectAlign);
}

/// <summary>
/// 绘制Brush画刷的圆角矩形,并指定是否有三角小尖及其位置
/// </summary>
/// <param name="g"></param>
/// <param name="rectangle">矩形区域</param>
/// <param name="_radius">圆角半径</param>
/// <param name="bgbrush">指定背景画刷</param>
/// <param name="cusp">是否有三角小尖,默认无</param>
/// <param name="rectAlign">三角小尖的位置,默认右上</param>
public static void DrawRoundRectAndCusp(this Graphics g, Rectangle rectangle, int _radius, Brush bgbrush, bool cusp = false, RectangleAlign rectAlign = RectangleAlign.RightTop)
{
    ////抗锯齿 尽可能高质量绘制
    g.TextRenderingHint = System.Drawing.Text.TextRenderingHint.AntiAlias;
    g.PixelOffsetMode = PixelOffsetMode.HighQuality;
    g.SmoothingMode = SmoothingMode.AntiAlias; // SmoothingMode.HighQuality
    g.CompositingQuality = CompositingQuality.HighQuality;
    g.InterpolationMode = InterpolationMode.HighQualityBilinear;

    var rect = rectangle;
    //画尖角 对应的变更rect区域
    if (cusp)
    {
        // 尖角的大小 默认为 开始位置为_radius 底边为20,高度为13的等腰三角形
        var cuspHemlineStart = _radius;
        var cuspHemlineLength = 20;
        var cuspHeight = 13;

        // 让位出来的间隔暂时为尖角高度-1
        var span = cuspHeight - 1;

        // 三角顶点
        PointF p1, p2, p3;

        switch (rectAlign)
        {
            case RectangleAlign.AboveLeft:
                p1 = new PointF(rectangle.X + cuspHemlineStart, rectangle.Y + cuspHeight);
                p2 = new PointF(rectangle.X + cuspHemlineStart + cuspHemlineLength, rectangle.Y + cuspHeight);
                p3 = new PointF(rectangle.X + cuspHemlineStart + cuspHemlineLength / 2, rectangle.Y);
                rect = new Rectangle(rectangle.X, rectangle.Y + span, rectangle.Width, rectangle.Height - span);
                break;
            case RectangleAlign.AboveRight:
                p1 = new PointF(rectangle.Right - cuspHemlineStart, rectangle.Y + cuspHeight);
                p2 = new PointF(rectangle.Right - cuspHemlineStart - cuspHemlineLength, rectangle.Y + cuspHeight);
                p3 = new PointF(rectangle.Right - cuspHemlineStart - cuspHemlineLength / 2, rectangle.Y);
                rect = new Rectangle(rectangle.X, rectangle.Y + span, rectangle.Width, rectangle.Height - span);
                break;
            case RectangleAlign.RightBottom:
                p1 = new PointF(rectangle.Right - cuspHeight, rectangle.Bottom - cuspHemlineStart);
                p2 = new PointF(rectangle.Right - cuspHeight, rectangle.Bottom - cuspHemlineStart - cuspHemlineLength);
                p3 = new PointF(rectangle.Right, rectangle.Bottom - cuspHemlineStart - cuspHemlineLength / 2);
                rect = new Rectangle(rectangle.X, rectangle.Y, rectangle.Width - span, rectangle.Height);
                break;
            case RectangleAlign.BelowRight:
                p1 = new PointF(rectangle.Right - cuspHemlineStart, rectangle.Bottom - cuspHeight);
                p2 = new PointF(rectangle.Right - cuspHemlineStart - cuspHemlineLength, rectangle.Bottom - cuspHeight);
                p3 = new PointF(rectangle.Right - cuspHemlineStart - cuspHemlineLength / 2, rectangle.Bottom);
                rect = new Rectangle(rectangle.X, rectangle.Y, rectangle.Width, rectangle.Height - span);
                break;
            case RectangleAlign.BelowLeft:
                p1 = new PointF(rectangle.X + cuspHemlineStart, rectangle.Bottom - cuspHeight);
                p2 = new PointF(rectangle.X + cuspHemlineStart + cuspHemlineLength, rectangle.Bottom - cuspHeight);
                p3 = new PointF(rectangle.X + cuspHemlineStart + cuspHemlineLength / 2, rectangle.Bottom);
                rect = new Rectangle(rectangle.X, rectangle.Y, rectangle.Width, rectangle.Height - span);
                break;
            case RectangleAlign.LeftBottom:
                p1 = new PointF(rectangle.X + cuspHeight, rectangle.Bottom - cuspHemlineStart);
                p2 = new PointF(rectangle.X + cuspHeight, rectangle.Bottom - cuspHemlineStart - cuspHemlineLength);
                p3 = new PointF(rectangle.X, rectangle.Bottom - cuspHemlineStart - cuspHemlineLength / 2);
                rect = new Rectangle(rectangle.X + span, rectangle.Y, rectangle.Width - span, rectangle.Height);
                break;
            case RectangleAlign.LeftTop:
                p1 = new PointF(rectangle.X + cuspHeight, rectangle.Y + cuspHemlineStart);
                p2 = new PointF(rectangle.X + cuspHeight, rectangle.Y + cuspHemlineStart + cuspHemlineLength);
                p3 = new PointF(rectangle.X, rectangle.Y + cuspHemlineStart + cuspHemlineLength / 2);
                rect = new Rectangle(rectangle.X + span, rectangle.Y, rectangle.Width - span, rectangle.Height);
                break;
            case RectangleAlign.RightTop:
            default:
                p1 = new PointF(rectangle.Right - cuspHeight, rectangle.Y + cuspHemlineStart);
                p2 = new PointF(rectangle.Right - cuspHeight, rectangle.Y + cuspHemlineStart + cuspHemlineLength);
                p3 = new PointF(rectangle.Right, rectangle.Y + cuspHemlineStart + cuspHemlineLength / 2);
                rect = new Rectangle(rectangle.X, rectangle.Y, rectangle.Width - span, rectangle.Height);
                break;
        }

        PointF[] ptsArray = new PointF[] { p1, p2, p3 };

        // 填充参数点所指定的多边形内部
        g.FillPolygon(bgbrush, ptsArray);
    }
    //填充
    g.FillPath(bgbrush, rect.GetRoundedRectPath(_radius));
}

/// <summary>
/// 根据普通矩形得到圆角矩形的路径 【根据矩形区域rect,计算呈现radius圆角的Graphics路径】
/// </summary>
/// <param name="rect">原始矩形</param>
/// <param name="radius">半径</param>
/// <returns>图形路径</returns>
public static GraphicsPath GetRoundedRectPath(this Rectangle rect, int radius)
{
    #region 正确绘制圆角矩形区域
    int R = radius*2;
    Rectangle arcRect = new Rectangle(rect.Location, new Size(R, R));
    GraphicsPath path = new GraphicsPath();

    if (radius <= 0)
    {
        path.AddRectangle(rect);
    }
    else
    {
        // 左上圆弧 左手坐标系,顺时针为正 从180开始,转90度
        path.AddArc(arcRect, 180, 90);
        // 右上圆弧
        arcRect.X = rect.Right - R;
        path.AddArc(arcRect, 270, 90);
        // 右下圆弧
        arcRect.Y = rect.Bottom - R;
        path.AddArc(arcRect, 0, 90);
        // 左下圆弧
        arcRect.X = rect.Left;
        path.AddArc(arcRect, 90, 90);
    }

    //path.CloseFigure();
    // 闭合路径中所有开放图形,并形成新图形
    path.CloseAllFigures();
    return path;
    #endregion
}

/// <summary>
/// 获取圆角矩形的路径
/// </summary>
/// <param name="rect">原始矩形</param>
/// <param name="radius">半径</param>
/// <returns>图形路径</returns>
public static GraphicsPath GetRoundedRectPath(int x, int y, int width, int height, int radius)
{
    Rectangle rect = new Rectangle(x, y, width, height);
    return rect.GetRoundedRectPath(radius);
}
测试尖角的显示位置
复制几个Panel,在Paint事件中分别处理尖角的位置
panel1.Paint += Panel1_Paint;
panel3.Paint += Panel1_Paint;
panel4.Paint += Panel1_Paint;
panel5.Paint += Panel1_Paint;
panel6.Paint += Panel1_Paint;
panel7.Paint += Panel1_Paint;
panel8.Paint += Panel1_Paint;
panel9.Paint += Panel1_Paint;
/// ......
private void Panel1_Paint(object sender, PaintEventArgs e)
{
    var panel = sender as Panel;
    var rectAlign = RectangleAlign.RightTop;
    switch (panel.Name)
    {
        case "panel3":
            rectAlign = RectangleAlign.AboveLeft;
            break;
        case "panel4":
            rectAlign = RectangleAlign.AboveRight;
            break;
        case "panel5":
            rectAlign = RectangleAlign.BelowLeft;
            break;
        case "panel6":
            rectAlign = RectangleAlign.BelowRight;
            break;
        case "panel7":
            rectAlign = RectangleAlign.LeftBottom;
            break;
        case "panel8":
            rectAlign = RectangleAlign.LeftTop;
            break;
        case "panel9":
            rectAlign = RectangleAlign.RightBottom;
            break;
        default:
            break;
    }

    var rect=e.Graphics.DrawRoundRectAndCusp(new Rectangle(0, 0, panel.Width, panel.Height), 18, Color.FromArgb(90, 143, 0), Color.FromArgb(41, 67, 0),true, rectAlign);

    e.Graphics.DrawText(rect, "这是一个Panel控件,非常适合显示消息", Color.White, panel.Font);
}
查看效果:

重绘控件后文本的处理
由于重新绘制导致文本也被覆盖的情况,有比较常见的两种处理方法:
- 重绘控件的同时,重绘文本文字
- 通过添加Label控件实现文本处理
同时重绘文本
同样将绘制文本的方法提取为扩展方法,借助StringFormat字符串格式对象实现文字的布局处理。
不推荐使用
Graphics.DrawString绘制按钮控件(Rectangle区域)内的文字,当然DrawString也有一定有时比如文字方向的处理。
/// <summary>
/// 绘制(控件区域)文本内容
/// </summary>
/// <param name="g"></param>
/// <param name="rect"></param>
/// <param name="text"></param>
/// <param name="color"></param>
/// <param name="font"></param>
/// <param name="_textAlign">文字布局,默认居中。实际测试并未真正的居中,垂直方向偏上,改为通过计算rect的中心位置实现,使用微软雅黑还好点,字体大小最好偶数</param>
/// <param name="rtl">是否RightToLeft 无效果,不推荐使用</param>
public static void DrawText(this Graphics g, Rectangle rect, string text, Color color, Font font, ContentAlignment _textAlign = ContentAlignment.MiddleCenter, bool rtl=false)
{
        var formatFlags = TextFormatFlags.HorizontalCenter | TextFormatFlags.VerticalCenter; // 默认居中
        switch (_textAlign)
        {
            case ContentAlignment.TopLeft:
                formatFlags = TextFormatFlags.Top | TextFormatFlags.Left;
                break;
            case ContentAlignment.TopCenter:
                formatFlags = TextFormatFlags.Top | TextFormatFlags.HorizontalCenter;
                break;
            case ContentAlignment.TopRight:
                formatFlags = TextFormatFlags.Top | TextFormatFlags.Right;
                break;
            case ContentAlignment.MiddleLeft:
                formatFlags = TextFormatFlags.VerticalCenter | TextFormatFlags.Left;
                break;
            case ContentAlignment.MiddleRight:
                formatFlags = TextFormatFlags.VerticalCenter | TextFormatFlags.Right;
                break;
            case ContentAlignment.BottomLeft:
                formatFlags = TextFormatFlags.Bottom | TextFormatFlags.Left;
                break;
            case ContentAlignment.BottomCenter:
                formatFlags = TextFormatFlags.Bottom | TextFormatFlags.HorizontalCenter;
                break;
            case ContentAlignment.BottomRight:
                formatFlags = TextFormatFlags.Bottom | TextFormatFlags.Right;
                break;
            case ContentAlignment.MiddleCenter:
            default:
                break;
        }
        if (rtl)
        {
            formatFlags |= TextFormatFlags.RightToLeft; // 无效果
        }
        TextRenderer.DrawText(g, text, font, rect, color, formatFlags);
}
要注意添加了小三角后的文字绘制区域问题,如果使用默认的全部预期有可能导致文字超出范围,且,布局也不是相对于绘制的主体。如下图对比的效果。
因此,可修改圆角绘制的函数,使其返回绘制后的主体区域。
private void Panel1_Paint(object sender, PaintEventArgs e)
{
    var panel = sender as Panel;
    var rect=e.Graphics.DrawRoundRectAndCusp(new Rectangle(0, 0, panel.Width, panel.Height), 18, Color.FromArgb(90, 143, 0), Color.FromArgb(41, 67, 0),true, rectAlign);

    //e.Graphics.DrawText(e.ClipRectangle, "这是一个Panel控件,非常适合显示消息", Color.White, panel.Font);
    // 使用合适的区域
    e.Graphics.DrawText(rect, "这是一个Panel控件,非常适合显示消息", Color.White, panel.Font);
}

通过添加Label控件实现对文本的处理【有尖角时需要额外处理】
label2.Text = "我是Label显示在圆角按钮上";
label2.Parent = button1;
label2.AutoSize = false;
label2.Dock = DockStyle.Fill;
label2.BackColor = Color.Transparent;
label2.TextAlign = ContentAlignment.MiddleCenter;
label2.ForeColor = Color.Wheat;

Paint事件中绘制圆角的优点
完全由用户绘制按钮区域实现圆角【之前文章介绍过】,可以发现,与直接在Paint事件中实现圆角,有着一定的锯齿,虽然不是很严重,但是还是Paint事件中实现的圆角看着相对好一些。
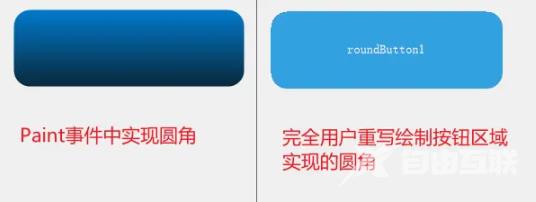
之前完全由用户绘制控件区域出现锯齿的问题,原因在于使用
new Region(graphicPath)构造函数创建的新Region对象,创建的Region无法实现抗锯齿,即使开始抗锯齿和高质量绘制(无法应用到最终的Region)。[唯一的]解决办法,是不创建新的Region,直接绘制无锯齿图形【无法对Region进行抗锯齿】。
窗体失去焦点时按钮外观边框问题
窗体失去焦点后,Button会显示出一个边框(即使已经设置BorderSize为0),只有在窗体失去焦点后,最后一个被激活过的Button(点击过的)才会出现。
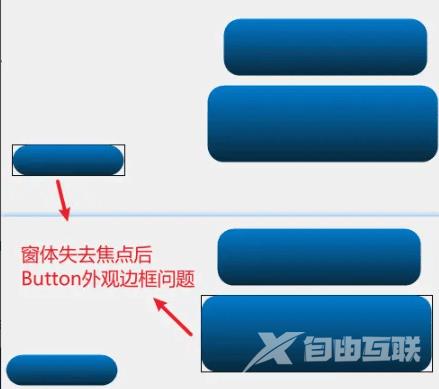
比较好的解决办法是在Button的Paint事件中执行Button.NotifyDefault(false)方法。
下面是几种解决方式:
- 通过继承Button控件,重写NotifyDefault方法实现。
class MyButton:Button
{
    public override void NotifyDefault(bool value)
    {
        base.NotifyDefault(false);
    }
}
- 设置FlatAppearance.BorderColor颜色与下层背景色一致
或者,还有一个取巧的解决办法,就是,设置FlatAppearance.BorderColor为Button按钮后面的背景色,这样就看不出来,类似没有的效果。如 button1.FlatAppearance.BorderColor = SystemColors.Control;。
- 在Button的Paint事件方法中调用
NotifyDefault(false)
或者,不是继承重写Button控件,直接在Button的Paint事件中,调用Button.NotifyDefault(false);方法。
private void Button1_Paint(object sender, PaintEventArgs e)
{
    var btn = (Button)sender;
    e.Graphics.DrawRoundRectAndCusp(new Rectangle(0, 0, btn.Width, btn.Height), 18, Color.FromArgb(0, 122, 204), Color.FromArgb(8, 39, 57));

    ((Button)sender).NotifyDefault(false); // 去除窗体失去焦点时最新激活的按钮边框外观样式
}
Paint事件中绘制控件的问题【不要使用(事件)参数e.ClipRectangle】
直接看下图演示,在发生控件大小、位置调整等需要重绘时,会发生控件错乱、显示不完整重叠等问题。
比如Panel事件中,原本的写法为:
var rect=e.Graphics.DrawRoundRectAndCusp(e.ClipRectangle, 18, Color.FromArgb(90, 143, 0), Color.FromArgb(41, 67, 0),true, rectAlign);
将其改为转换传递过来的控件参数为Panel对象,并通过其宽高获取其绘制区域:
var rect=e.Graphics.DrawRoundRectAndCusp(new Rectangle(0, 0, panel.Width, panel.Height), 18, Color.FromArgb(90, 143, 0), Color.FromArgb(41, 67, 0),true, rectAlign);
修改后错乱问题就不存在了:

到此这篇关于Winform控件优化Paint事件实现圆角组件及提取绘制圆角的扩展方法的文章就介绍到这了,更多相关Winform控件优化内容请搜索自由互联以前的文章或继续浏览下面的相关文章希望大家以后多多支持自由互联!