已经自学OpencvSharp一段时间了(目前工作用的是C#,就学了Opencvsharp了,vs2015,opencvsharp3),收获也有一些,现在就将我在学习过程中的收获分享出来吧。
图像处理,很常见的问题,但对于大多数时候而言,我们往往不需要去处理整张图片,而是只需要处理一部分,这就涉及到了ROI(Region of interest)的提取了。我目前提取ROI的方法是采用掩膜Mask的方法。具体的思路就是:在图像操作的时候,定义一张同等大小的空的Mask,也就是全部是0,然后将我们想要的ROI轮廓画在Mask上,并填充内部,就会得到新的Mask,这个新的Mask就只有在ROI区域非0,其余地方元素都是0,再把用Cv2.BoundingRect()将包含ROI区域的轮廓的最小矩形找出来,分别将原图与Mask这两幅图像的这个最小矩形部分提出来 ,最后再调用Cv2.BitwiseAnd()这个方法,通常情况而言,一副图像与自己本身进行与运算,输出的还是本身图像,带上掩膜Mask后,就只会输出图像在Mask非0区域部分(也就是我们所需要的ROI)的图像了,这样就实现了我们的ROI提取了。
接下来,就分享几种常见ROI区域提取吧。
部分代码如下:
主要使用的变量
         /// 放在yVars.ImgOptions中
   public struct ROIMatt
            {
                public static string Image;//原图
                public static bool IsSelectRegion = false;

                public static int step; //ROI区域移动步长
                public static int angel; // 旋转一次 angel±=step; 旋转角度

                public static yDirections direct = yDirections.NULL;
                public static yROIRegionType ROIType = yROIRegionType.Rectangle;

                // 矩形ROI
                // 矩形四个点坐标 都是相对于图像的坐标 而不是相对于picturebox的坐标
                // 矩形四个点相对位置 刚开始确定矩形时就这样 经过旋转后位置变 但相对位置还是这样
                //  1  2      // 按顺时针数的点   1-->2-->4-->3-->1-->2-->4-->3-->1
                //  3  4
                public static OpenCvSharp.Point rectFirstPoint = new OpenCvSharp.Point();
                public static OpenCvSharp.Point rectSecondPoint = new OpenCvSharp.Point();
                public static OpenCvSharp.Point rectThirdPoint = new OpenCvSharp.Point();
                public static OpenCvSharp.Point rectFourthPoint = new OpenCvSharp.Point();
                public static double rectWidth = 0;
                public static double rectHeight = 0;

                // 圆形ROI
                public static OpenCvSharp.Point cirCenter = new OpenCvSharp.Point(0.0,0.0); // 圆心
                public static int cirRadious = 0; // 半径
                // 椭圆ROI
                public static OpenCvSharp.Point elpCenter = new OpenCvSharp.Point(0.0,0.0); // 椭圆中心点
                public static double elpAngel = 0.0;//椭圆倾斜角度
                public static double elpLongAxis = 0.0; // 长轴
                public static double elpShortAxis = 0.0; // 短轴
            }
我的picturebox的SizeMode是StretchImage的,可能看起来跟想要的结果有点差异,但是实际上是一样的。
首先是最常见的矩形。
对于正矩形而言,我们可以直接定义出图像的ROI区域
public Mat(Mat m, Rect roi);
这样定义的图像就是原图m的指定区域了。但对于倾斜的矩阵,RotatedRect,而言,就得需要使用掩膜了,提取ROI的方法以及结果如下:
        public static void ImgMattingRect()
        {
            Mat pic = new Mat(yVars.ImgOptions.ROIMatt.Image);
            Mat mask = Mat.Zeros(pic.Size(), MatType.CV_8UC1);
            OpenCvSharp.Point2f[] coutours = new OpenCvSharp.Point2f[4];
            coutours[0] = yVars.ImgOptions.ROIMatt.rectFirstPoint;
            coutours[1] = yVars.ImgOptions.ROIMatt.rectSecondPoint;
            coutours[2] = yVars.ImgOptions.ROIMatt.rectFourthPoint;
            coutours[3] = yVars.ImgOptions.ROIMatt.rectThirdPoint;

            List<OpenCvSharp.Point> listt = new List<OpenCvSharp.Point>();
            for (int i = 0; i < coutours.Count(); i++)
            {
                listt.Add(new OpenCvSharp.Point(coutours[i].X, coutours[i].Y));
            }

            List<List<OpenCvSharp.Point>> pp = new List<List<OpenCvSharp.Point>>() { listt };

            Cv2.FillPoly(mask, pp, new Scalar(255, 255, 255));
            OpenCvSharp.Rect rect = Cv2.BoundingRect(coutours);
            Mat src = new Mat(pic, rect);
            Mat maskROI = new Mat(mask, rect);
            Mat picOut = new Mat();
            Cv2.BitwiseAnd(src, src, picOut, maskROI);
            Form1.Instance.pbxMattImage.Image = yImgConvert.MatToBitmap(picOut);

            yVars.ImgOptions.ROIMatt.rectFirstPoint = new OpenCvSharp.Point(0, 0);
            yVars.ImgOptions.ROIMatt.rectSecondPoint = new OpenCvSharp.Point(0, 0);
            yVars.ImgOptions.ROIMatt.rectThirdPoint = new OpenCvSharp.Point(0, 0);
            yVars.ImgOptions.ROIMatt.rectFourthPoint = new OpenCvSharp.Point(0, 0);
        }
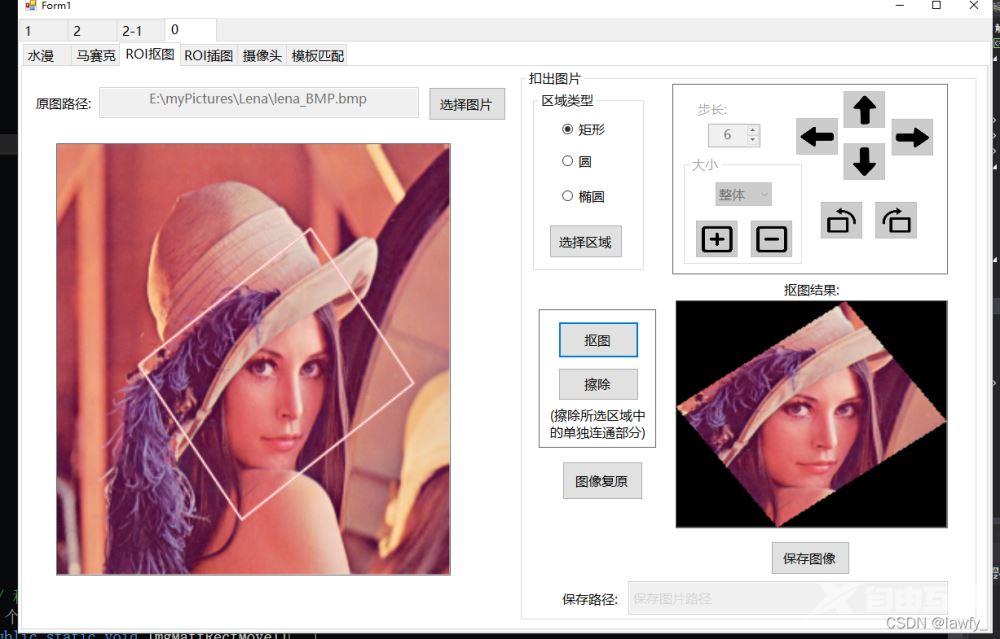
缩放平移和旋转就只要改变矩形的四个顶点坐标就行了。方法都一样就不赘述了。
圆形ROI区域,
方法如下:
        public static void ImgMattingCircle()
        {
            Mat mm = new Mat(yVars.ImgOptions.ROIMatt.Image);
            Mat mask = Mat.Zeros(mm.Size(), MatType.CV_8UC3);

            Cv2.Circle(mask, yVars.ImgOptions.ROIMatt.cirCenter, yVars.ImgOptions.ROIMatt.cirRadious, Scalar.Red, 1, LineTypes.AntiAlias);
            Cv2.FloodFill(mask, yVars.ImgOptions.ROIMatt.cirCenter, Scalar.Red);

            mask.ConvertTo(mask, MatType.CV_8UC1);

            int xx = yVars.ImgOptions.ROIMatt.cirCenter.X - yVars.ImgOptions.ROIMatt.cirRadious;
            int yy = yVars.ImgOptions.ROIMatt.cirCenter.Y - yVars.ImgOptions.ROIMatt.cirRadious;
            int rr = 2 * yVars.ImgOptions.ROIMatt.cirRadious;
            // 圆的外接正方形
            Rect rect = new Rect(new OpenCvSharp.Point(xx, yy), new OpenCvSharp.Size(rr, rr));

            Mat src = new Mat(mm, rect);
            Mat maskRoI = new Mat(mask, rect);

            Cv2.CvtColor(maskRoI, maskRoI, ColorConversionCodes.BGR2GRAY);

            Mat picOut = new Mat();
            Cv2.BitwiseAnd(src, src, picOut, maskRoI);

            Form1.Instance.pbxMattImage.Image = yImgConvert.MatToBitmap(picOut);

            yVars.ImgOptions.ROIMatt.cirCenter = new OpenCvSharp.Point(0, 0);
            yVars.ImgOptions.ROIMatt.cirRadious = 0;
        }
效果展示:
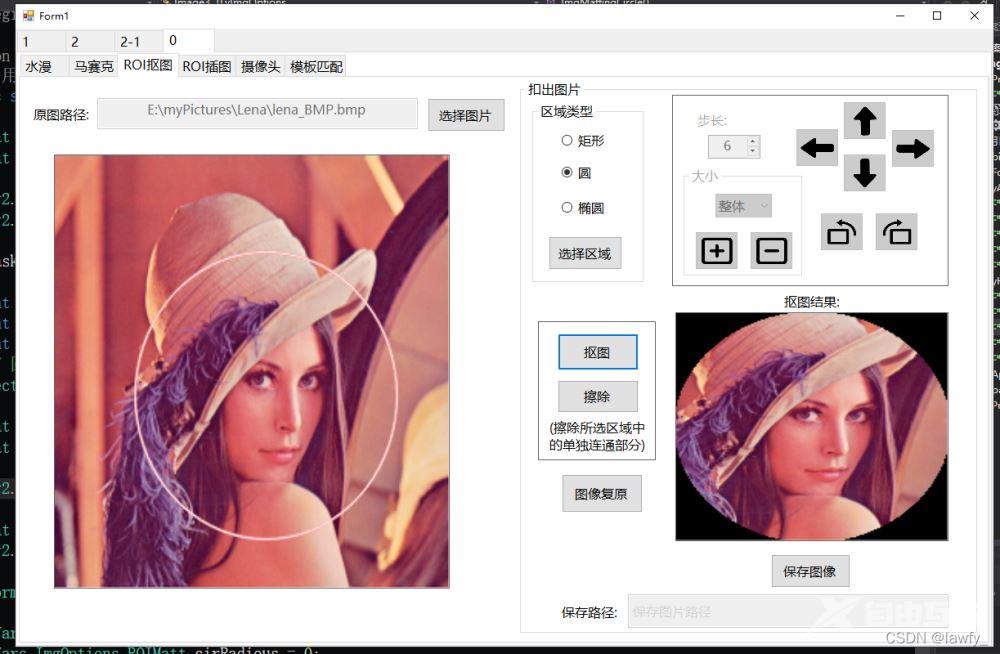
圆形ROI的移动时就只有圆心坐标变 半径不变,而缩放时只改变半径,圆心不变,注意移动时别超出图像界限就行。
椭圆ROI
在Opencvsharp中绘制椭圆有两种方式
        //
        // 摘要:
        //     Draws simple or thick elliptic arc or fills ellipse sector
        //
        // 参数:
        //   img:
        //     Image.
        //
        //   box:
        //     The enclosing box of the ellipse drawn
        //
        //   color:
        //     Ellipse color.
        //
        //   thickness:
        //     Thickness of the ellipse boundary. [By default this is 1]
        //
        //   lineType:
        //     Type of the ellipse boundary. [By default this is LineType.Link8]
        public static void Ellipse(InputOutputArray img, RotatedRect box, Scalar color, int thickness = 1, LineTypes lineType = LineTypes.Link8);
        //
        // 摘要:
        //     Draws simple or thick elliptic arc or fills ellipse sector
        //
        // 参数:
        //   img:
        //     Image.
        //
        //   center:
        //     Center of the ellipse.
        //
        //   axes:
        //     Length of the ellipse axes.
        //
        //   angle:
        //     Rotation angle.
        //
        //   startAngle:
        //     Starting angle of the elliptic arc.
        //
        //   endAngle:
        //     Ending angle of the elliptic arc.
        //
        //   color:
        //     Ellipse color.
        //
        //   thickness:
        //     Thickness of the ellipse arc. [By default this is 1]
        //
        //   lineType:
        //     Type of the ellipse boundary. [By default this is LineType.Link8]
        //
        //   shift:
        //     Number of fractional bits in the center coordinates and axes' values. [By default
        //     this is 0]
        public static void Ellipse(InputOutputArray img, Point center, Size axes, double angle, double startAngle, double endAngle, Scalar color, int thickness = 1, LineTypes lineType = LineTypes.Link8, int shift = 0);
我们采用第一种方式,即可以将椭圆转化成一个RotatedRect,只要在画RotatedRect的时候改成画椭圆即可,就可以回到第一种矩形的ROI提取上面了, 代码如下:
        public static void ImgMattingEllipse()
        {
            Mat mm = new Mat(yVars.ImgOptions.ROIMatt.Image);
            Mat mask = Mat.Zeros(mm.Size(), MatType.CV_8UC3);

            RotatedRect rorect = new RotatedRect(yVars.ImgOptions.ROIMatt.elpCenter, new Size2f(yVars.ImgOptions.ROIMatt.elpLongAxis, yVars.ImgOptions.ROIMatt.elpShortAxis), (float)yVars.ImgOptions.ROIMatt.elpAngel);
            Cv2.Ellipse(mask, rorect, Scalar.Red);

            Mat gray = new Mat();
            Cv2.CvtColor(mask, gray, ColorConversionCodes.BGR2GRAY);
            Cv2.Threshold(gray, gray, 100, 255, ThresholdTypes.Otsu);

            OpenCvSharp.Point[][] contours;
            HierarchyIndex[] hierarchly;
            Cv2.FindContours(gray, out contours, out hierarchly, RetrievalModes.Tree, ContourApproximationModes.ApproxSimple, new OpenCvSharp.Point(0, 0));

            Rect rect = Cv2.BoundingRect(contours[0]);

            Cv2.FloodFill(mask, yVars.ImgOptions.ROIMatt.elpCenter, Scalar.Red);

            mask.ConvertTo(mask, MatType.CV_8UC1);

            Mat src = new Mat(mm, rect);
            Mat maskRoI = new Mat(mask, rect);
            Cv2.CvtColor(maskRoI, maskRoI, ColorConversionCodes.BGR2GRAY);
            Mat picOut = new Mat();
            Cv2.BitwiseAnd(src, src, picOut, maskRoI);

            Form1.Instance.pbxMattImage.Image = yImgConvert.MatToBitmap(picOut);
        }
实验结果如下:
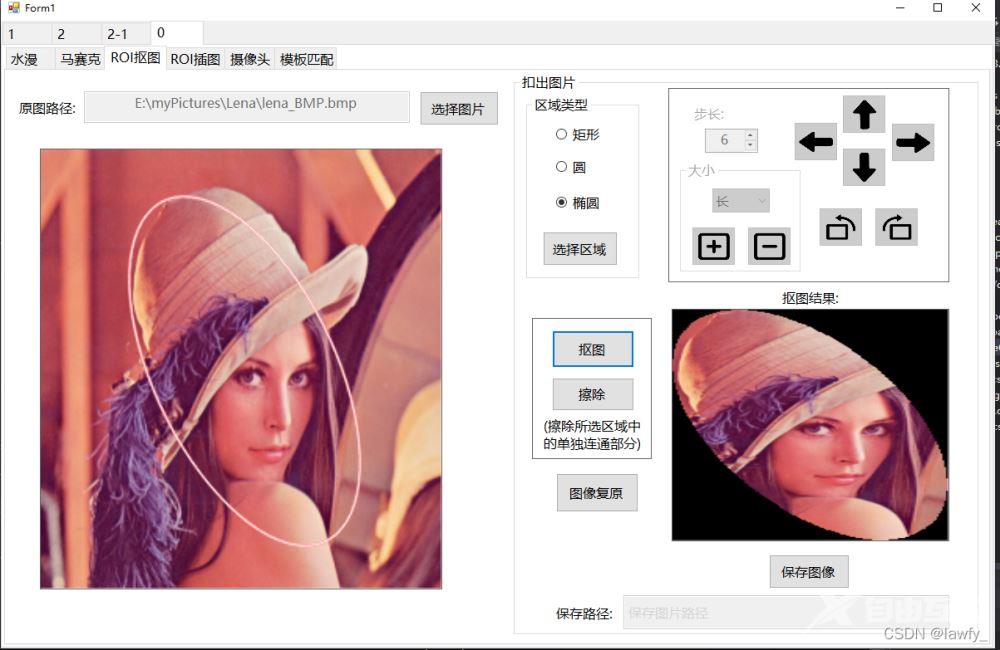
平移缩放旋转等操作就可以看成对RotatedRect的操作即可。
到此这篇关于c#中WinForm用OpencvSharp实现ROI区域提取的示例的文章就介绍到这了,更多相关c# ROI区域提取内容请搜索自由互联以前的文章或继续浏览下面的相关文章希望大家以后多多支持自由互联!