目录
- 一、安装vue
- 二、Vue模板案例
- 步骤
- 三、基础模板(记住)
- 四、vue的指令和插值
- 1、{{}}:插值表达式的语法
- 2、v-text:填充纯文本内容(data中的值)
- 3、v-html:填充html(data中的值)
- 4、v-pre:填充原始数据
- 5、v-bind:属性绑定
- 6、v-on:事件绑定
- 7、v-show:控制元素显示和隐藏的指令
- 8、v-model:数据的双向绑定
- 9、v-if、v-else-if、v-else:条件渲染
- 10、v-for:遍历对象、数组
Vue (读音 /vjuː/,类似于 view) 是一套用于构建用户界面的渐进式框架。与其它大型框架不同的是,Vue 被设计为可以自底向上逐层应用。Vue 的核心库只关注视图层,不仅易于上手,还便于与第三方库或既有项目整合。另一方面,当与现代化的工具链以及各种支持类库结合使用时,Vue 也完全能够为复杂的单页应用提供驱动。
一、安装vue
直接使用script标签引入
<script src="https://unpkg.com/vue@3/dist/vue.global.js"></script>
二、Vue模板案例
步骤
1、引入vue框架
2、定义1个盒子(根节点)
3、定义1个script标签3.1、定义js对象(根组件)
3.2、通过vue创建1个应用
3.3、将应用挂载到根节点(第二步中创建的盒子)
data():存放页面中显示数据的地方
<!DOCTYPE html>
<html>
	<head>
		<meta charset="UTF-8">
		<title></title>
		<!--1、引入vue框架-->
		<script src="https://unpkg.com/vue@3/dist/vue.global.js"></script>

	</head>
	<body>
		<!--2、定义1个盒子(根节点)-->
		<div id='app'>
			<h1>{{title}}</h1>
			<h1>{{name}}</h1>
		</div>

		<!--3、定义一个script标签-->
		<script>
			//3.1、定义js对象(根组件)
			const obj={
				//data():存放页面中存放数据的地方
				data(){
					return{
						title:'kobe',
						name:'cc'
					}
				}
			}

			//3.2、通过vue创建1个应用
			const app=Vue.createApp(obj)

			//3.3、将应用挂载到根节点(第二步中创建的盒子)
			app.mount('#app')

		</script>

	</body>
</html>
三、基础模板(记住)
<!DOCTYPE html>
<html>
	<head>
		<meta charset="UTF-8">
		<title></title>
		<!--1、引入vue框架-->
		<script src="https://unpkg.com/vue@3/dist/vue.global.js"></script>
	</head>
	<body>

		<div id='app'></div>

		<script>

			Vue.createApp({
				data(){
					return{

					}
				}
			}).mount('#app')

		</script>

	</body>
</html>
四、vue的指令和插值
1、{{}}:插值表达式的语法
{{}}:可以在html中引用data中定义的数据
<h1>{{name}}</h1>
2、v-text:填充纯文本内容(data中的值)
效果和innerText一样
<h1 v-text='name'></h1>
3、v-html:填充html(data中的值)
效果和innerHtml一样
<div v-html='desc'></div>
4、v-pre:填充原始数据
防止vue对标签进行渲染(标签中写的什么,就显示什么)
<div v-pre>显示两个花括号,中间为js:{{}}</div>
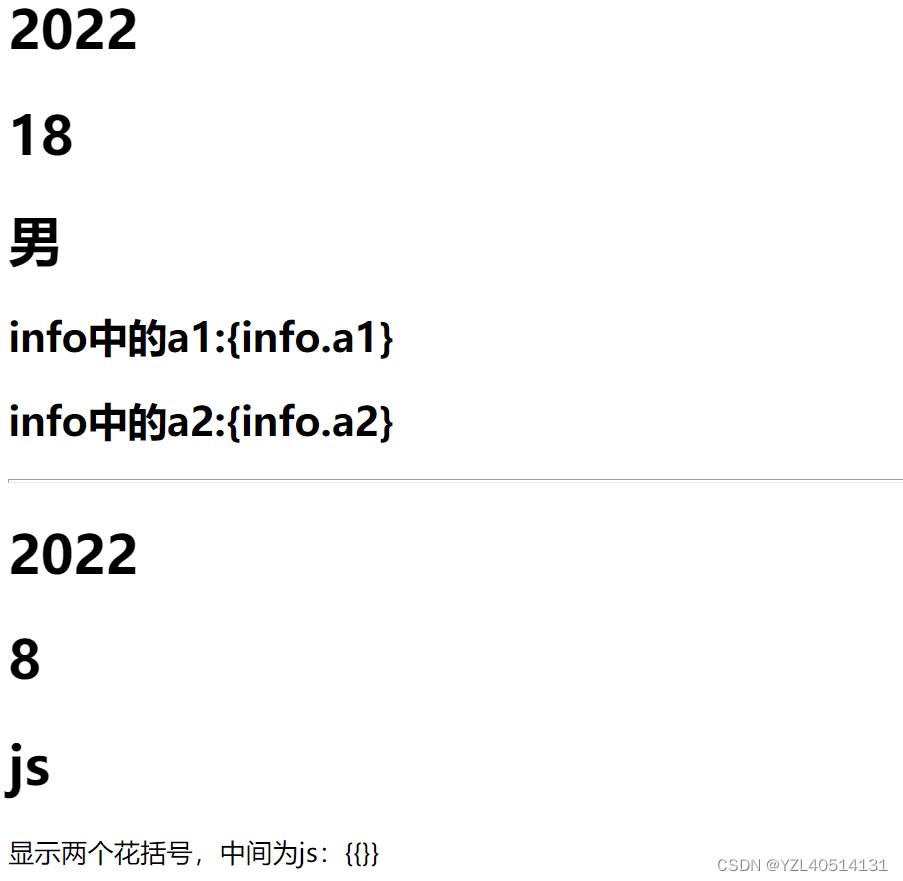
<!DOCTYPE html>
<html>
	<head>
		<meta charset="UTF-8">
		<title></title>
		<!--1、引入vue框架-->
		<script src="https://unpkg.com/vue@3/dist/vue.global.js"></script>
	</head>
	<body>

		<div id='app'>
			<h1>{{name}}</h1>
			<h1>{{age}}</h1>
			<h1>{{sex}}</h1>
			<h2>info中的a1:{info.a1}</h2>
			<h2>info中的a2:{info.a2}</h2>
			<hr>
			<h1 v-text='name'></h1>
			<h1 v-text='arr[0]'></h1>
			<div v-html='desc'></div>
			<div v-pre>显示两个花括号,中间为js:{{}}</div>
		</div>

		<script>
			//obj是vue的组件对象
			const obj={
				//data方法(返回的是vue组件对象的属性)——》页面上要显示的数据全部放到这里
				data(){
					return{
						name:'2022',
						age:18,
						sex:'男',
						info:{
							a1:'66',
							a2:'88'
						},
						desc:'<h1>js</h1>',
						arr:[8,24,23,24,25,66]
					}
				}
			}

			//3.2、通过vue创建1个应用
			const app=Vue.createApp(obj)

			//3.3、将应用挂载到根节点(第二步中创建的盒子)
			app.mount('#app')


		</script>

	</body>
</html>
效果展示:

5、v-bind:属性绑定
语法:
v-bind:属性=‘值’
简写 :属性=‘值’
<a v-bind:href="aInfo.addr" rel="external nofollow" rel="external nofollow" rel="external nofollow" rel="external nofollow" >{{aInfo.title}}</a>
简写
<a :href="aInfo.addr" rel="external nofollow" rel="external nofollow" rel="external nofollow" rel="external nofollow" >{{aInfo.title}}</a>
<!DOCTYPE html>
<html>
	<head>
		<meta charset="UTF-8">
		<title></title>
		<!--1、引入vue框架-->
		<script src="https://unpkg.com/vue@3/dist/vue.global.js"></script>
	</head>
	<body>

		<div id='app'>
			<a v-bind:href="aInfo.addr" rel="external nofollow"  rel="external nofollow"  rel="external nofollow"  rel="external nofollow"         >{{aInfo.title}}</a>
			<!--简写-->
			<a :href="aInfo.addr" rel="external nofollow"  rel="external nofollow"  rel="external nofollow"  rel="external nofollow"         >{{aInfo.title}}</a>
		</div>

		<script>

			Vue.createApp({
				data(){
					return{
						aInfo:{
							title:'百度',
							addr:'http://www.baidu.com'
						}
					}
				}
			}).mount('#app')


		</script>

	</body>
</html>
样式绑定
<!DOCTYPE html>
<html>
	<head>
		<meta charset="UTF-8">
		<title></title>
		<!--1、引入vue框架-->
		<script src="https://unpkg.com/vue@3/dist/vue.global.js"></script>

		<style>
			.js{
				width:200px;
				height:200px;
				background: red;
			}
		</style>
	</head>
	<body>

		<div id='app'>
			<!--样式绑定:class属性绑定-->
			<div :class='{js:isjs}'>js</div>
		</div>
		<hr />
			<!--样式绑定 style属性-->
		<div :style="s1">py</div>

		<script>

			Vue.createApp({
				data(){
					return{
						isjs:false,
						s1:{
							width:'300px',
							height:'200px',
							background:'red',
						}

					}
				}
			}).mount('#app')


		</script>

	</body>
</html>
6、v-on:事件绑定
语法:v-on:事件名称=‘执行的方法’
简写
@事件名=‘执行的方法’
<button v-on:click='switchShow'>切换显示</button>
简写<button @click='switchShow'>切换显示</button>
7、v-show:控制元素显示和隐藏的指令
控制元素显示隐藏的指令:
v-show 值为True则显示,值为false为隐藏
<div v-show='status' :style="{width:'200px',height:'200px',background:'red'}">py</div>
methods:定义页面操作过程中调用的函数(vue组件的方法)
注意点:不要直接把方法定义为箭头函数
例如
switchShow()
定义页面操作过程中调用的函数(vue组件的方法)
注意点:不要直接把方法定义为箭头函数
<!DOCTYPE html>
<html>
	<head>
		<meta charset="UTF-8">
		<title></title>
		<!--1、引入vue框架-->
		<script src="https://unpkg.com/vue@3/dist/vue.global.js"></script>
	</head>
	<body>

		<div id='app'>

			<button v-on:click='switchShow'>切换显示</button>
			<!--<button @click='switchShow'>切换显示</button>-->
			<!--控制元素显示隐藏的指令:v-show
				值为True则显示,值为false为隐藏
			-->
			<div v-show='status' :style="{width:'200px',height:'200px',background:'red'}">py</div>

		</div>

		<script>

			Vue.createApp({
				//定义页面上显示数据的(组件的属性)
				data(){
					return{
						status:true
					}
				},
				//定义页面操作过程中调用的函数(vue组件的方法)
				//注意点:不要直接把方法定义为箭头函数
				methods:{
					switchShow(){
						//在方法中可以通过this获取组件中的数据
						//方法中的this代表组件中的对象
						this.status=!this.status

					}
				}

			}).mount('#app')

		</script>

	</body>
</html>
8、v-model:数据的双向绑定
双向绑定只用于表单和组件
页面修改数据会变,数据改变,页面也会改
<!DOCTYPE html>
<html>
	<head>
		<meta charset="UTF-8">
		<title></title>
		<!--1、引入vue框架-->
		<script src="https://unpkg.com/vue@3/dist/vue.global.js"></script>
	</head>
	<body>
		<!--属性绑定是单向的-->
		<!--<div id='app'>
			<div>账号:<input type="text" :value='user'></div>
			<div>密码:<input type="password" :value='pwd'></div>
		</div>-->

		<!--双向绑定-->
		<div id='app'>
			<div>账号:<input type="text" v-model='user'></div>
			<div>密码:<input type="password" v-model='pwd'></div>
			<button @click='login'>登录</button>
		</div>

		<script>

			Vue.createApp({
				data(){
					return{
						user:"root",
						pwd:123456
					}
				},
				methods:{
					login(){
						//发送请求到后端,
						console.log('提交了登录')
						console.log(this.user,this.pwd)
					}
				}
			}).mount('#app')
		</script>

	</body>
</html>
9、v-if、v-else-if、v-else:条件渲染
通过条件来控制元素是否渲染到页面
v-if
v-else-if
v-else
<!DOCTYPE html>
<html>
	<head>
		<meta charset="UTF-8">
		<title></title>
		<!--1、引入vue框架-->
		<script src="https://unpkg.com/vue@3/dist/vue.global.js"></script>
	</head>
	<body>

		<div id='app'>
			<h1 v-if='item.result==="success"' style="color: green;">{{item}}</h1>
			<h1 v-else-if='item.result===fail' style="color: red;">{{item}}</h1>
			<h1 v-else>{{item}}</h1>
		</div>

		<script>

			Vue.createApp({
				data(){
					return{
						item:{
							case_id:1,
							title:'用例1',
							result:"success"
						},
					}
				}
			}).mount('#app')

		</script>

	</body>
</html>
10、v-for:遍历对象、数组
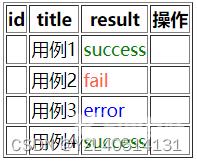
案例:根据不同的结果,展示不同文字颜色
<!DOCTYPE html>
<html>
	<head>
		<meta charset="UTF-8">
		<title></title>
		<!--1、引入vue框架-->
		<script src="https://unpkg.com/vue@3/dist/vue.global.js"></script>
	</head>
	<body>

		<div id='app'>
			<table border='1'>
				<!--表头-->
				<tr>
					<th>id</th>
					<th>title</th>
					<th>result</th>
					<th>操作</th>
				</tr>
				<!--表格-->
				<tr v-for='item in cases'>
					<td>{{item.id}}</td>
					<td>{{item.title}}</td>
					<!--条件渲染-->
					<td v-if='item.result==="success"' style="color: green;">{{item.result}}</td>
					<td v-else-if='item.result==="error"' style="color:blue;">{{item.result}}</td>
					<td v-else-if='item.result==="fail"' style="color:tomato;">{{item.result}}</td>
					<td v-else>{{item.result}}</td>
					<td></td>
				</tr>


			</table>

		</div>

		<script>

			Vue.createApp({
				data(){
					return{
						cases:[
							{
							case_id:1,
							title:'用例1',
							result:"success"
						},
						{
							case_id:2,
							title:'用例2',
							result:"fail"
						},
						{
							case_id:3,
							title:'用例3',
							result:"error"
						},
						{
							case_id:4,
							title:'用例4',
							result:"success"
						},

						]
					}
				}
			}).mount('#app')


		</script>

	</body>
</html>

到此这篇关于vue的指令和插值总结的文章就介绍到这了,更多相关vue指令和插值内容请搜索自由互联以前的文章或继续浏览下面的相关文章希望大家以后多多支持自由互联!
