目录 一、编辑框EditText 二、焦点变更监视器 三、文本变化监听器 一、编辑框EditText 编辑框用于接收键盘输入的文字,由文本视图派生而来,除了TextView已有的各种属性和方法,EditTex
目录
- 一、编辑框EditText
- 二、焦点变更监视器
- 三、文本变化监听器
一、编辑框EditText
编辑框用于接收键盘输入的文字,由文本视图派生而来,除了TextView已有的各种属性和方法,EditText还支持下列XML属性:
- inputType:指定输入的文本类型,输入类型的取值说明如下表,若同时使用多种文本类型,则可使用竖线“|”把多种文本类型拼接起来。
- maxLength:指定文本允许输入的最大长度。
- hint:指定提示文本的内容。
- textColorHint:指定提示文本的颜色。
例1:输入用户名和密码

    <EditText
        android:layout_width="match_parent"
        android:layout_height="wrap_content"
        android:inputType="text"
        android:maxLength="10"
        android:hint="请输入用户名"
        android:textColor="@color/black"
        android:textSize="17sp"/>
    <EditText
        android:layout_width="match_parent"
        android:layout_height="wrap_content"
        android:inputType="numberPassword"
        android:maxLength="10"
        android:hint="请输入密码"
        android:textColor="@color/black"
        android:textSize="17sp"/>
例2:自定义输入框样式:无边框和圆角边框


drawable下新建两个xml文件用于配置样式
第一个:选中时的样式
<shape xmlns:android="http://schemas.android.com/apk/res/android">
<!--指定形状内的填充颜色-->
    <solid android:color="#ffffff"/>
<!--    指定形状轮廓的粗细与颜色-->
    <stroke
        android:width="1dp"
        android:color="#0000ff"/>
<!--    指定形状四个圆角的半径-->
    <corners android:radius="5dp"/>
<!--    指定形状四个方向的间距-->
    <padding
        android:bottom="2dp"
        android:left="2dp"
        android:right="2dp"
        android:top="2dp"/>
</shape>
第二个:正常样式
<shape xmlns:android="http://schemas.android.com/apk/res/android">
    <!--指定形状内的填充颜色-->
    <solid android:color="#ffffff"/>
    <!--    指定形状轮廓的粗细与颜色-->
    <stroke
        android:width="1dp"
        android:color="#aaaaaa"/>
    <!--    指定形状四个圆角的半径-->
    <corners android:radius="5dp"/>
    <!--    指定形状四个方向的间距-->
    <padding
        android:bottom="2dp"
        android:left="2dp"
        android:right="2dp"
        android:top="2dp"/>
</shape>
再在drawable文件下新建一个xml文件用于配置选中时和未选中时的样式。
<selector xmlns:android="http://schemas.android.com/apk/res/android">
    <item android:drawable="@drawable/edit_focus"
        android:state_focused="true"/>
    <item android:drawable="@drawable/edit_normal"/>
</selector>
Activity的XML文件
    <EditText
        android:layout_width="match_parent"
        android:layout_height="wrap_content"
        android:background="@null"
        android:layout_marginTop="10dp"
        android:hint="无边框"
        android:inputType="text"/>
    <EditText
        android:layout_width="match_parent"
        android:layout_height="wrap_content"
        android:background="@drawable/edit_text"
        android:layout_marginTop="10dp"
        android:hint="圆角边框"
        android:inputType="text"/>
二、焦点变更监视器
调用编辑框对象的setOnFocusChangeListener方法,即可在光标切换时触发焦点变更事件。
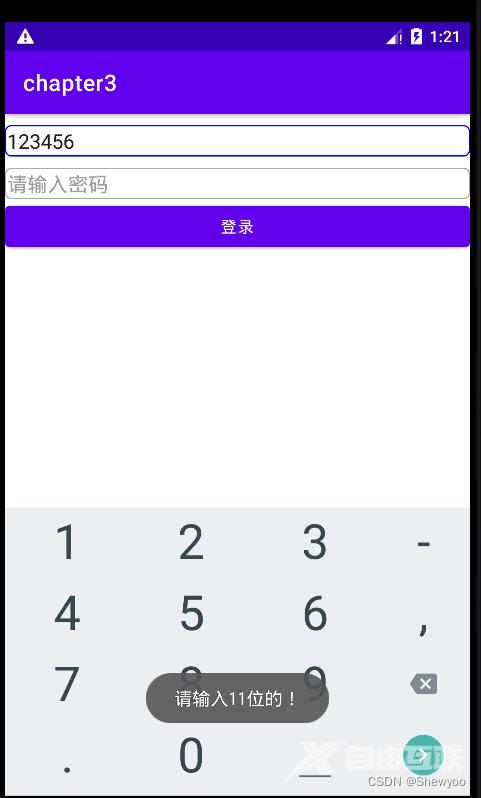
使用场景如:手机号码未输满11位,就点击密码框,此时校验不通过,一边弹出提示文字,一边把焦点拉回手机框。
例:当手机号码不足11位时点击密码框会出现提示。
注意:不可采取这样的方式:为密码框绑定点击事件,当点击密码框时检测是否通过。
原因:编辑框点击两次后才会触发点击事件,第一次点击只触发焦点变更事件,第二次点击才触发点击事件。
XML文件
<LinearLayout xmlns:android="http://schemas.android.com/apk/res/android"
    android:layout_width="match_parent"
    android:layout_height="match_parent"
    android:orientation="vertical">
    <EditText
        android:id="@+id/et_phone"
        android:layout_width="match_parent"
        android:layout_height="wrap_content"
        android:background="@drawable/edit_text"
        android:layout_marginTop="10dp"
        android:hint="请输入11位手机号码"
        android:inputType="number"
        android:maxLength="11"/>
    <EditText
        android:id="@+id/et_password"
        android:layout_width="match_parent"
        android:layout_height="wrap_content"
        android:background="@drawable/edit_text"
        android:layout_marginTop="10dp"
        android:hint="请输入密码"
        android:inputType="numberPassword"
        android:maxLength="11"/>
    <Button
        android:id="@+id/btn_login"
        android:layout_width="match_parent"
        android:layout_height="wrap_content"
        android:text="登录"/>
</LinearLayout>
java类
public class EditFocusActivity extends AppCompatActivity implements View.OnFocusChangeListener {
    private EditText et_phone;
    @Override
    protected void onCreate(Bundle savedInstanceState) {
        super.onCreate(savedInstanceState);
        setContentView(R.layout.activity_edit_focus);
        et_phone = findViewById(R.id.et_phone);
        EditText et_password = findViewById(R.id.et_password);
        et_password.setOnFocusChangeListener(this);
    }
    @Override
    public void onFocusChange(View view, boolean hasFocus) {
        if(hasFocus){
            String phone = et_phone.getText().toString();
            //如果手机号码不足11位或为空
            if(TextUtils.isEmpty(phone)||phone.length()<11){
                //手机号码编辑框请求焦点,把光标移回手机号码编辑框
                et_phone.requestFocus();
                Toast.makeText(this,"请输入11位的!",Toast.LENGTH_SHORT).show();
            }
        }
    }
}
三、文本变化监听器
调用编辑框对象的addTextChangedListener方法即可注册文本监听器。
文本监听器的接口名称为TextWatcher,该接口提供了3个监控方法,具体说明:
- beforeTextChanged:在文本改变之前触发。
- onTextChanged:在文本改变过程种触发。
- afterTextChanged:在文本改变后触发。
         mEtPassword.addTextChangedListener(new MyWatcher());
class MyWatcher implements TextWatcher {
         public void beforeTextChanged(CharSequence s, int start, int count,int after) {
         }
         public void onTextChanged(CharSequence s, int start, int before,int count) {
         }
         public void afterTextChanged(Editable edit) {
         }
     }
到此这篇关于Android编辑框EditText中的焦点变更与文本变化监视功能实现流程详解的文章就介绍到这了,更多相关Android编辑框EditText内容请搜索自由互联以前的文章或继续浏览下面的相关文章希望大家以后多多支持自由互联!