1、DNS服务器原理及主从DNS搭建
1.1 DNS基本概念
当前TCP/IP网络中的设备之间进行通信,是利用和依赖于IP地址实现的。但数字形式的IP地址是很难记忆的。当网络设备众多,想要记住每个设备的IP地址,可以说是"不可能完成的任务"。那么如何解决这一难题呢?我们可以给每个网络设备起一个友好的名称,如:www.mydomain.com 这种由文字组成的名称,显而易见要更容易记忆。但是计算机不会理解这种名称的,我们可以利用一种名字解析服务将名称转化成(解析)成IP地址。从而我们就可以利用名称来直接访问网络中设备了。除此之外还有一个重要功能,利用名称解析服务可以实现主机和IP的解耦,即:当主机IP变化时,只需要修改名称服务即可,用户仍可以通过原有的名称进行访问而不受影响。
实现此服务的方法是多样的。比如:本地名称解析配置文件hosts 和应用更为广泛的 DNS(Domain Name System)域名系统。DNS是应用层协议,是互联网的一项服务。它作为将域名和IP地址相互映射的一个分布式数据库,能够使人更方便地访问互联网,基于C/S架构,服务器端:53/udp, 53/tcp 。讲到互联网不得不提一个很重要的痛点,因为此项技术发源美国科技实验室,DNS的全球根服务器根域节点只有13个,其中:10个在美国,1个荷兰,1个瑞典,1个日本,这严重威胁着我国的互联网安全,虽然在IPV6发展过程和国力的增强,这种窘境得到一定的缓解,但我国的科技依然需要奋进。
ICANN(The Internet Corporation for Assigned Names and Numbers)互联网名称与数字地址分配机构,负责在全球范围内对互联网通用顶级域名(gTLD)以及国家和地区顶级域名(ccTLD)系统的管理、以及根服务器系统的管理。
1.2 DNS服务记录类型
类型 名字 描述 A记录 IPV4正向解析记录 通过域名解析到服务器的IPV4地址 AAAA FQDN正向解析记录 通过域名解析到服务器的IPv6地址 SOA记录 起始授权记录 全称Start Of Authority, 一个区域解析库有且仅能有一个SOA记录,必须位于解析库的第一条记录 CNAME记录 别名 Canonical Name 通过起别名也可指向此IP地址 PTR记录 反向解析记录 知道IP地址获取域名 MX记录 邮件交换记录 Mail eXchanger 邮件交换,指定处理发往收件人域名的邮件服务器 , NS记录 域名服务器记录 NS:Name Server,专用于标明当前区域的DNS服务器 TXT记录 标识和说明记录 一般做验证记录时会使用此项,如:SPF(反垃圾邮件)记录,https验证等,1.3 DNS服务的工作过程
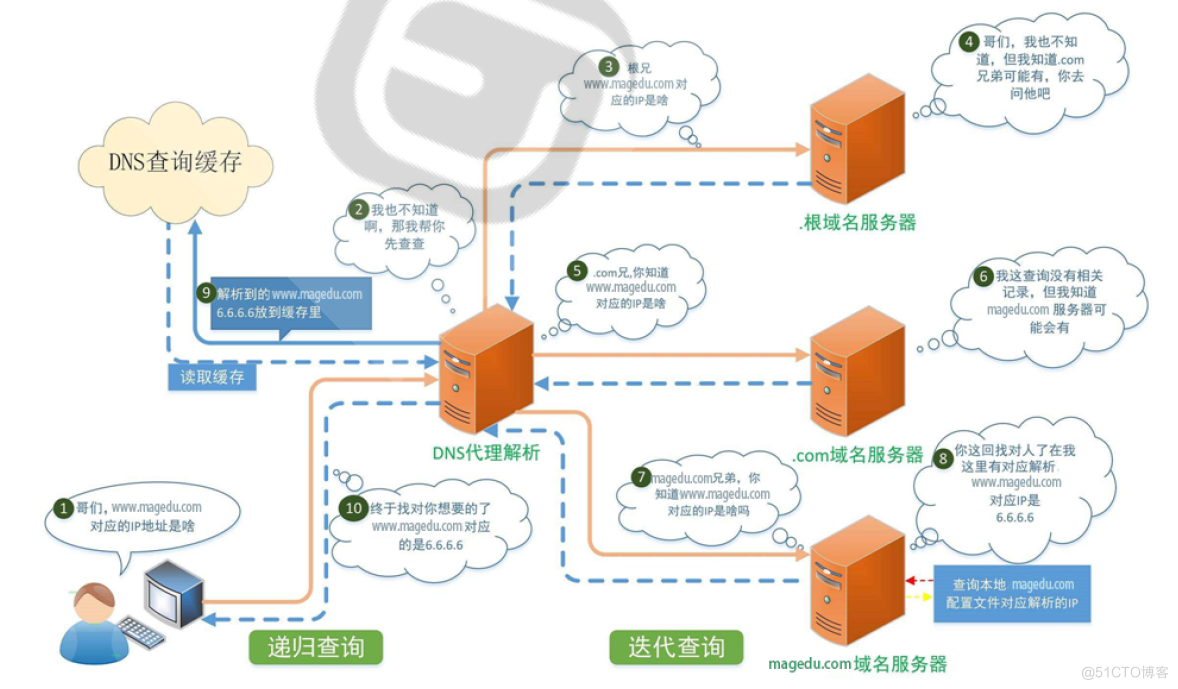
DNS客户机查询过程
Client -->hosts文件 --> Client DNS Service Local Cache --> DNS Server (recursion递归) --> DNS Server Cache -->DNS iteration(迭代) --> 根--> 顶级域名DNS-->二级域名DNS…
客户端机器发起DNS域名请求随后传送至DNS客户服务,以通过使用就地缓存的信息进行解析。如果可以解析,则查询将被应答,并且完成DNS查询过程。其中,本地缓存有以下两个来源:
-
本地的主机hosts文件,来自该文件的任何主机名到地址的映射都将预先加载到缓存中。
-
以前DNS查询应答的缓存记录。
如果查询不匹配缓存中的项目,则解析过程继续进行,按照上图中的表示完成后续查询,并最终获得有效的IP地址信息。
1.4 搭建主从DNS服务
实验目的:主从DNS搭建、转发、正反向解析等知识的实践。
1.4.1 前言
上个小章节回顾和学习了DNS服务器的相关原理及相关配置文件的编辑创建,接着来实践搭建DNS主从服务器,并实现智能DNS。
1.4.2 环境准备
主DNS服务端:Centos 8.4,192.168.250.18 从DNS服务端:Centos 8.4,192.168.250.28 web服务器:Centos 8.4,192.168.250.8 DNS客户端:Centos 8.4,192.168.250.681.4.3 部署并配置主DNS服务器
1.4.3.1 通过NTP同步时间
在上面的虚拟服务器上,通过 yum -y install bind 命令安装named服务,并通过安装ntpdate命令进行同步网络时间,确保主从服务器的时区和时间完全一致。
[root@CentOS84 ]# [root@CentOS84 ]#systemctl status chronyd.service ● chronyd.service - NTP client/server Loaded: loaded (/usr/lib/systemd/system/chronyd.service; disabled; vendor preset: enabled) Active: inactive (dead) Docs: man:chronyd(8) man:chrony.conf(5) [root@CentOS84 ]#systemctl enable --now chronyd.service Created symlink /etc/systemd/system/multi-user.target.wants/chronyd.service → /usr/lib/systemd/system/chronyd.service. [root@CentOS84 ]#systemctl status chronyd.service ● chronyd.service - NTP client/server Loaded: loaded (/usr/lib/systemd/system/chronyd.service; enabled; vendor preset: enabled) Active: active (running) since Fri 2022-01-21 21:22:40 CST; 4s ago Docs: man:chronyd(8) man:chrony.conf(5) Process: 68215 ExecStartPost=/usr/libexec/chrony-helper update-daemon (code=exited, status=0/SUCCESS) Process: 68211 ExecStart=/usr/sbin/chronyd $OPTIONS (code=exited, status=0/SUCCESS) Main PID: 68213 (chronyd) Tasks: 1 (limit: 23544) Memory: 764.0K CGroup: /system.slice/chronyd.service └─68213 /usr/sbin/chronyd Jan 21 21:22:40 CentOS84 systemd[1]: Starting NTP client/server... Jan 21 21:22:40 CentOS84 chronyd[68213]: chronyd version 3.5 starting (+CMDMON +NTP +REFCLOCK +RTC +PRIVDROP +SCFILTER +SIGND +ASYNCDNS +SECHASH +IPV6 +DEBUG) Jan 21 21:22:40 CentOS84 chronyd[68213]: Using right/UTC timezone to obtain leap second data Jan 21 21:22:40 CentOS84 systemd[1]: Started NTP client/server. [root@CentOS84 ]#date Fri Jan 21 13:43:44 CST 2022 [root@CentOS84 ]#1.4.3.2 主DNS服务器BIND配置
本节包括:正向解析、反向解析、主从配置的主DNS服务器部分(//先注释掉,确保调通主DNS再开启主从)。
# 安装bind及关联包 [root@CentOS84 ]#dnf -y install bind bind-utils # 修改named.conf [root@CentOS84 ]#ll /etc/named.conf -rw-r----- 1 root named 1705 Aug 25 07:20 /etc/named.conf [root@CentOS84 ]#cat /etc/named.conf // // named.conf // // Provided by Red Hat bind package to configure the ISC BIND named(8) DNS // server as a caching only nameserver (as a localhost DNS resolver only). // // See /usr/share/doc/bind*/sample/ for example named configuration files. // options { listen-on port 53 { 127.0.0.1; }; listen-on-v6 port 53 { ::1; }; directory "/var/named"; dump-file "/var/named/data/cache_dump.db"; statistics-file "/var/named/data/named_stats.txt"; memstatistics-file "/var/named/data/named_mem_stats.txt"; secroots-file "/var/named/data/named.secroots"; recursing-file "/var/named/data/named.recursing"; allow-query { localhost; }; /* - If you are building an AUTHORITATIVE DNS server, do NOT enable recursion. - If you are building a RECURSIVE (caching) DNS server, you need to enable recursion. - If your recursive DNS server has a public IP address, you MUST enable access control to limit queries to your legitimate users. Failing to do so will cause your server to become part of large scale DNS amplification attacks. Implementing BCP38 within your network would greatly reduce such attack surface */ recursion yes; dnssec-enable yes; dnssec-validation yes; managed-keys-directory "/var/named/dynamic"; pid-file "/run/named/named.pid"; session-keyfile "/run/named/session.key"; /* https://fedoraproject.org/wiki/Changes/CryptoPolicy */ include "/etc/crypto-policies/back-ends/bind.config"; }; logging { channel default_debug { file "data/named.run"; severity dynamic; }; }; zone "." IN { type hint; file "named.ca"; }; include "/etc/named.rfc1912.zones"; include "/etc/named.root.key"; [root@CentOS84 ]# #修改后的配置 [root@CentOS84 ]#cat /etc/named.conf // // named.conf // // Provided by Red Hat bind package to configure the ISC BIND named(8) DNS // server as a caching only nameserver (as a localhost DNS resolver only). // // See /usr/share/doc/bind*/sample/ for example named configuration files. // options { listen-on port 53 { localhost; }; #需要修改,监听本地IP // listen-on-v6 port 53 { ::1; }; #注释掉IPV6 directory "/var/named"; dump-file "/var/named/data/cache_dump.db"; statistics-file "/var/named/data/named_stats.txt"; memstatistics-file "/var/named/data/named_mem_stats.txt"; secroots-file "/var/named/data/named.secroots"; recursing-file "/var/named/data/named.recursing"; allow-query { any; }; #允许来自所有网段的的解析请求; allow-transfer { 192.168.250.28;}; #从DNS的服务器IP;在全局下定义,否则要在正向和反向都定义 notify yes; #启用通告,当主DNS区域文件发生变化后,通知从服务器同步; /* - If you are building an AUTHORITATIVE DNS server, do NOT enable recursion. - If you are building a RECURSIVE (caching) DNS server, you need to enable recursion. - If your recursive DNS server has a public IP address, you MUST enable access control to limit queries to your legitimate users. Failing to do so will cause your server to become part of large scale DNS amplification attacks. Implementing BCP38 within your network would greatly reduce such attack surface */ recursion yes; #开启递归查询 forward only; #启用转发DNS功能,对于本域无法解析的请求,做转发处理; forwarders { 114.114.114.114; }; # 转发的DNS服务器地址 dnssec-enable no; #关闭DNS安全扩展功能 dnssec-validation no; #关闭DNS安全验证; managed-keys-directory "/var/named/dynamic"; pid-file "/run/named/named.pid"; session-keyfile "/run/named/session.key"; /* https://fedoraproject.org/wiki/Changes/CryptoPolicy */ include "/etc/crypto-policies/back-ends/bind.config"; }; logging { channel default_debug { file "data/named.run"; severity dynamic; }; }; zone "." IN { type hint; file "named.ca"; }; #下面这两个文件格式需特别注意,可以从模板复制后修改 include "/etc/named.rfc1912.zones"; include "/etc/named.root.key"; [root@CentOS84 ]# # 修改/etc/named.rfc1912.zones [root@CentOS84 ]#cat /etc/named.rfc1912.zones // named.rfc1912.zones: // // Provided by Red Hat caching-nameserver package // // ISC BIND named zone configuration for zones recommended by // RFC 1912 section 4.1 : localhost TLDs and address zones // and https://tools.ietf.org/html/rfc6303 // (c)2007 R W Franks // // See /usr/share/doc/bind*/sample/ for example named configuration files. // // Note: empty-zones-enable yes; option is default. // If private ranges should be forwarded, add // disable-empty-zone "."; into options // # 定义并配置新域名 zone "shoneinfo.com" IN { type master; file "shoneinfo.com.zone"; allow-update { none; }; }; # 下面都是默认信息 zone "localhost" IN { type master; file "named.localhost"; allow-update { none; }; }; zone "1.0.0.0.0.0.0.0.0.0.0.0.0.0.0.0.0.0.0.0.0.0.0.0.0.0.0.0.0.0.0.0.ip6.arpa" IN { type master; file "named.loopback"; allow-update { none; }; }; zone "1.0.0.127.in-addr.arpa" IN { type master; file "named.loopback"; allow-update { none; }; }; zone "0.in-addr.arpa" IN { type master; file "named.empty"; allow-update { none; }; }; # 定义并配置新增域名的反向解析信息 zone "250.168.192.in-addr.arpa" IN { type master; file "192.168.250.zone"; allow-update { none; }; }; [root@CentOS84 ]# # 复制zone定义的模板,需要授权named用户,cp -p 是带权限的复制,否则就需要chgrp命令修改 [root@CentOS84 ]#cp -p /var/named/named.localhost /var/named/shoneinfo.com.zone [root@CentOS84 ]#chgrp named /var/named/shoneinfo.com.zone #配置正向解析 [root@CentOS84 ]#cat /var/named/shoneinfo.com.zone $TTL 1D @ IN SOA master admin.shoneinfo.com. ( 1 ; serial 1D ; refresh 1H ; retry 1W ; expire 3H ) ; minimum NS master NS slave master A 192.168.250.18 slave A 192.168.250.28 www A 192.168.0.8 #配置反向解析 [root@CentOS84 ]#cat /var/named/192.168.250.zone $TTL 1D @ IN SOA ns1 admin.shoneinfo.com. ( 0 ; serial 1D ; refresh 1H ; retry 1W ; expire 3H ) ; minimum NS ns1.shoneinfo.com. 18 PTR master.shoneinfo.com. 28 PTR slave.shoneinfo.com. 8 PTR www.shoneinfo.com 38 PTR ftp.shoneinfo.com # 词条信息是用来测试主从DNS同步的 [root@CentOS84 ]# # 配置文件的检查并启动服务,如果没错误可以正常启动,有错误根据日志信息进行排查 [root@CentOS84 ]#named-checkconf [root@CentOS84 ]#named-checkzone shoneinfo.com /var/named/shoneinfo.com.zone zone shoneinfo.com/IN: loaded serial 1 OK [root@CentOS84 ]#cd /var/named [root@CentOS84 ]#named-checkzone 250.168.192.in-addr.arpa 192.168.250.zone zone 250.168.192.in-addr.arpa/IN: loaded serial 0 OK [root@CentOS84 ]# [root@CentOS84 ]#systemctl start named [root@CentOS84 ]# #启动,并开机启动 [root@CentOS84 ]#systemctl enable --now named [root@CentOS84 ]#yum install httpd [root@CentOS84 ]#echo www.shoneinfo.com > /var/www/html/index.html [root@CentOS84 ]#systemctl enable --now httpd Created symlink /etc/systemd/system/multi-user.target.wants/httpd.service → /usr/lib/systemd/system/httpd.service. [root@CentOS84 ]# [root@CentOS84 ]#curl 192.168.250.8 www.shoneinfo.com [root@CentOS84 ]#1.4.3.3 实现WEB服务
[root@CentOS84 ]#hostname -I 192.168.250.8 [root@CentOS84 ]#yum install httpd # 制作首页 [root@CentOS84 ]#echo www.shoneinfo.com > /var/www/html/index.html [root@CentOS84 ]#systemctl enable --now httpd Created symlink /etc/systemd/system/multi-user.target.wants/httpd.service → /usr/lib/systemd/system/httpd.service. [root@CentOS84 ]# #本机测试 [root@CentOS84 ]#curl 192.168.250.8 www.shoneinfo.com [root@CentOS84 ]#1.4.3.4 验证主DNS
主要的DNS测试和管理工具:
- dig 命令 :dig只用于测试dns系统,不会查询hosts文件进行解析;
- host命令:host [-t type] name [SERVER] ;
- nslookup命令:nslookup 可以支持交互和非交互式两种方式执行;
- rndc 命令:利用rndc工具可以实现管理DNS功能;rndc 监听端口: 953/tcp。
1.4.4 部署并配置从DNS服务器
# 时间同步 [root@CentOS84 ]#yum -y install chrony [root@CentOS84 ]#systemctl enable --now chronyd.service [root@CentOS84 ]# # 安装BIND并配置 [root@CentOS84 ]#dnf -y install bind bind-utils [root@CentOS84 ]#vim /etc/named.conf [root@CentOS84 ]#cat /etc/named.conf // // named.conf // // Provided by Red Hat bind package to configure the ISC BIND named(8) DNS // server as a caching only nameserver (as a localhost DNS resolver only). // // See /usr/share/doc/bind*/sample/ for example named configuration files. // options { // listen-on port 53 { 127.0.0.1; }; # 注释掉或修改成 localhost // listen-on-v6 port 53 { ::1; }; directory "/var/named"; dump-file "/var/named/data/cache_dump.db"; statistics-file "/var/named/data/named_stats.txt"; memstatistics-file "/var/named/data/named_mem_stats.txt"; secroots-file "/var/named/data/named.secroots"; recursing-file "/var/named/data/named.recursing"; // allow-query { localhost; }; #注释掉或者修改为 allow-query { any; }; allow-transfer { none;}; # 从DNS下不再设有从了,设为none /* - If you are building an AUTHORITATIVE DNS server, do NOT enable recursion. - If you are building a RECURSIVE (caching) DNS server, you need to enable recursion. - If your recursive DNS server has a public IP address, you MUST enable access control to limit queries to your legitimate users. Failing to do so will cause your server to become part of large scale DNS amplification attacks. Implementing BCP38 within your network would greatly reduce such attack surface */ recursion yes; dnssec-enable yes; dnssec-validation yes; managed-keys-directory "/var/named/dynamic"; pid-file "/run/named/named.pid"; session-keyfile "/run/named/session.key"; /* https://fedoraproject.org/wiki/Changes/CryptoPolicy */ include "/etc/crypto-policies/back-ends/bind.config"; }; logging { channel default_debug { file "data/named.run"; severity dynamic; }; }; zone "." IN { type hint; file "named.ca"; }; include "/etc/named.rfc1912.zones"; include "/etc/named.root.key"; [root@CentOS84 ]# [root@CentOS84 ]#vim /etc/named.rfc1912.zones [root@CentOS84 ]#cat /etc/named.rfc1912.zones // named.rfc1912.zones: // // Provided by Red Hat caching-nameserver package // // ISC BIND named zone configuration for zones recommended by // RFC 1912 section 4.1 : localhost TLDs and address zones // and https://tools.ietf.org/html/rfc6303 // (c)2007 R W Franks // // See /usr/share/doc/bind*/sample/ for example named configuration files. // // Note: empty-zones-enable yes; option is default. // If private ranges should be forwarded, add // disable-empty-zone "."; into options # 下面为与主DNS对应的新域 zone "shoneinfo.com" IN { type slave; #此为关键项,定义此服务器为从DNS masters { 192.168.250.18;}; #此为关键项,定义从DNS的主 file "slaves/shoneinfo.com.slave"; #此为关键项,从DNS服务器自动会生成相关的文件 // allow-update { none; }; #这个必须注释掉,否则服务无法启动日志报错的 }; //zone "localhost.localdomain" IN { // type master; // file "named.localhost"; // allow-update { none; }; //}; zone "localhost" IN { type master; file "named.localhost"; allow-update { none; }; }; zone "1.0.0.0.0.0.0.0.0.0.0.0.0.0.0.0.0.0.0.0.0.0.0.0.0.0.0.0.0.0.0.0.ip6.arpa" IN { type master; file "named.loopback"; allow-update { none; }; }; zone "1.0.0.127.in-addr.arpa" IN { type master; file "named.loopback"; allow-update { none; }; }; zone "0.in-addr.arpa" IN { type master; file "named.empty"; allow-update { none; }; }; [root@CentOS84 ]# # 启动DNS服务,验证区域数据库shoneinfo.com.slave文件是否自动生成 [root@CentOS84 ]#systemctl start named [root@CentOS84 ]#ls /var/named/slaves shoneinfo.com.slave [root@CentOS84 ]#1.4.5 验证主从DNS服务器状态
# 主从DNS都正常工作状态,DNS客户机验证信息 [root@CentOS84 ]#dig www.shoneinfo.com ; <<>> DiG 9.11.26-RedHat-9.11.26-3.el8 <<>> www.shoneinfo.com ;; global options: +cmd ;; Got answer: ;; ->>HEADER<<- opcode: QUERY, status: NOERROR, id: 23869 ;; flags: qr aa rd ra; QUERY: 1, ANSWER: 1, AUTHORITY: 2, ADDITIONAL: 3 ;; OPT PSEUDOSECTION: ; EDNS: version: 0, flags:; udp: 1232 ; COOKIE: 8ffb36e8b96b7305ba78c33761ea88beaed67fae0dcea837 (good) ;; QUESTION SECTION: ;www.shoneinfo.com. IN A ;; ANSWER SECTION: www.shoneinfo.com. 86400 IN A 192.168.250.8 ;; AUTHORITY SECTION: shoneinfo.com. 86400 IN NS master.shoneinfo.com. shoneinfo.com. 86400 IN NS slave.shoneinfo.com. ;; ADDITIONAL SECTION: master.shoneinfo.com. 86400 IN A 192.168.250.18 slave.shoneinfo.com. 86400 IN A 192.168.250.28 ;; Query time: 1 msec ;; SERVER: 192.168.250.18#53(192.168.250.18) ;; WHEN: Fri Jan 21 18:19:42 CST 2022 ;; MSG SIZE rcvd: 163 [root@CentOS84 ]#curl www.shoneinfo.com www.shoneinfo.com [root@CentOS84 ]# ####################################################################################################### # 主从正常时候的正反向解析 [root@CentOS84 ]#dig -x 192.168.250.8 @192.168.250.18 ; <<>> DiG 9.11.26-RedHat-9.11.26-3.el8 <<>> -x 192.168.250.8 @192.168.250.18 ;; global options: +cmd ;; Got answer: ;; ->>HEADER<<- opcode: QUERY, status: NOERROR, id: 40717 ;; flags: qr aa rd ra; QUERY: 1, ANSWER: 1, AUTHORITY: 1, ADDITIONAL: 1 ;; OPT PSEUDOSECTION: ; EDNS: version: 0, flags:; udp: 1232 ; COOKIE: eefd9c453e4a06b424e8a1a061ea8a9c9c0a5212da973b14 (good) ;; QUESTION SECTION: ;8.250.168.192.in-addr.arpa. IN PTR ;; ANSWER SECTION: 8.250.168.192.in-addr.arpa. 86400 IN PTR www.shoneinfo.com.250.168.192.in-addr.arpa. ;; AUTHORITY SECTION: 250.168.192.in-addr.arpa. 86400 IN NS ns1.shoneinfo.com. ;; Query time: 1 msec ;; SERVER: 192.168.250.18#53(192.168.250.18) ;; WHEN: Fri Jan 21 18:27:40 CST 2022 ;; MSG SIZE rcvd: 146 [root@CentOS84 ]# [root@CentOS84 ]#dig -x 192.168.250.8 @192.168.250.28 ; <<>> DiG 9.11.26-RedHat-9.11.26-3.el8 <<>> -x 192.168.250.8 @192.168.250.28 ;; global options: +cmd ;; Got answer: ;; ->>HEADER<<- opcode: QUERY, status: NXDOMAIN, id: 36962 ;; flags: qr aa rd ra; QUERY: 1, ANSWER: 0, AUTHORITY: 1, ADDITIONAL: 1 ;; OPT PSEUDOSECTION: ; EDNS: version: 0, flags:; udp: 1232 ; COOKIE: c4a15996226c3eb6b73f31b761eaba2b4a2b1615b4029524 (good) ;; QUESTION SECTION: ;8.250.168.192.in-addr.arpa. IN PTR ;; AUTHORITY SECTION: 168.192.IN-ADDR.ARPA. 86400 IN SOA 168.192.IN-ADDR.ARPA. . 0 28800 7200 604800 86400 ;; Query time: 1 msec ;; SERVER: 192.168.250.28#53(192.168.250.28) ;; WHEN: Fri Jan 21 21:50:35 CST 2022 ;; MSG SIZE rcvd: 138 [root@CentOS84 ]# [root@CentOS84 ]#dig -t A 192.168.250.8 @192.168.250.18 ; <<>> DiG 9.11.26-RedHat-9.11.26-3.el8 <<>> -t A 192.168.250.8 @192.168.250.18 ;; global options: +cmd ;; Got answer: ;; ->>HEADER<<- opcode: QUERY, status: NXDOMAIN, id: 39466 ;; flags: qr rd ra; QUERY: 1, ANSWER: 0, AUTHORITY: 1, ADDITIONAL: 1 ;; OPT PSEUDOSECTION: ; EDNS: version: 0, flags:; udp: 1232 ; COOKIE: 28a4897688dbc70b54972c8161ea8aad42608e672ad5f359 (good) ;; QUESTION SECTION: ;192.168.250.8. IN A ;; AUTHORITY SECTION: . 3600 IN SOA a.root-servers.net. nstld.verisign-grs.com. 2022012100 1800 900 604800 86400 ;; Query time: 38 msec ;; SERVER: 192.168.250.18#53(192.168.250.18) ;; WHEN: Fri Jan 21 18:27:57 CST 2022 ;; MSG SIZE rcvd: 145 [root@CentOS84 ]#dig -t A 192.168.250.8 @192.168.250.28 ; <<>> DiG 9.11.26-RedHat-9.11.26-3.el8 <<>> -t A 192.168.250.8 @192.168.250.28 ;; global options: +cmd ;; Got answer: ;; ->>HEADER<<- opcode: QUERY, status: NXDOMAIN, id: 31496 ;; flags: qr rd ra ad; QUERY: 1, ANSWER: 0, AUTHORITY: 1, ADDITIONAL: 1 ;; OPT PSEUDOSECTION: ; EDNS: version: 0, flags:; udp: 1232 ; COOKIE: c20acbb131d2ec0848ca975661ea8ab118b96b25dd29748d (good) ;; QUESTION SECTION: ;192.168.250.8. IN A ;; AUTHORITY SECTION: . 10800 IN SOA a.root-servers.net. nstld.verisign-grs.com. 2022012100 1800 900 604800 86400 ;; Query time: 627 msec ;; SERVER: 192.168.250.28#53(192.168.250.28) ;; WHEN: Fri Jan 21 18:28:01 CST 2022 ;; MSG SIZE rcvd: 145 [root@CentOS84 ]# ####################################################################################################### #停止主DNS服务 [root@CentOS84 ]# [root@CentOS84 ]#systemctl stop named [root@CentOS84 ]# #DNS客户端验证信息 [root@CentOS84 ]#dig www.shoneinfo.com ; <<>> DiG 9.11.26-RedHat-9.11.26-3.el8 <<>> www.shoneinfo.com ;; global options: +cmd ;; Got answer: ;; ->>HEADER<<- opcode: QUERY, status: NOERROR, id: 10510 ;; flags: qr aa rd ra; QUERY: 1, ANSWER: 1, AUTHORITY: 2, ADDITIONAL: 3 ;; OPT PSEUDOSECTION: ; EDNS: version: 0, flags:; udp: 1232 ; COOKIE: eed948bad1f629f9ce57629e61ea88ed48f1345c34d50b96 (good) ;; QUESTION SECTION: ;www.shoneinfo.com. IN A ;; ANSWER SECTION: www.shoneinfo.com. 86400 IN A 192.168.250.8 ;; AUTHORITY SECTION: shoneinfo.com. 86400 IN NS master.shoneinfo.com. shoneinfo.com. 86400 IN NS slave.shoneinfo.com. ;; ADDITIONAL SECTION: master.shoneinfo.com. 86400 IN A 192.168.250.18 slave.shoneinfo.com. 86400 IN A 192.168.250.28 ;; Query time: 1 msec ;; SERVER: 192.168.250.28#53(192.168.250.28) ;; WHEN: Fri Jan 21 18:20:29 CST 2022 ;; MSG SIZE rcvd: 163 [root@CentOS84 ]#curl www.shoneinfo.com www.shoneinfo.com [root@CentOS84 ]# ####################################################################################################### # 验证主配置变化,同步到从服务器 增加正向和反向记录,以验证 [root@CentOS84 ]#cat /var/named/192.168.250.zone 38 PTR ftp.shoneinfo.com [root@CentOS84 ]#cat shoneinfo.com.zone ftp A 192.168.250.38 [root@CentOS84 ]# [root@CentOS84 ]#dig ftp.shoneinfo.com ; <<>> DiG 9.11.26-RedHat-9.11.26-3.el8 <<>> ftp.shoneinfo.com ;; global options: +cmd ;; Got answer: ;; ->>HEADER<<- opcode: QUERY, status: NXDOMAIN, id: 63952 ;; flags: qr aa rd ra; QUERY: 1, ANSWER: 0, AUTHORITY: 1, ADDITIONAL: 1 ;; OPT PSEUDOSECTION: ; EDNS: version: 0, flags:; udp: 1232 ; COOKIE: 4fd692d1b45e502314f4c03f61eac3485eff816da1df0fa4 (good) ;; QUESTION SECTION: ;ftp.shoneinfo.com. IN A ;; AUTHORITY SECTION: shoneinfo.com. 10800 IN SOA master.shoneinfo.com. admin.shoneinfo.com. 1 86400 3600 604800 10800 ;; Query time: 1 msec ;; SERVER: 192.168.250.18#53(192.168.250.18) ;; WHEN: Fri Jan 21 22:29:28 CST 2022 ;; MSG SIZE rcvd: 123 # 停掉主DNS服务 [root@CentOS84 ]#systemctl stop named # 在主DNS增加得记录被同步到从DNS [root@CentOS84 ]#dig ftp.shoneinfo.com ; <<>> DiG 9.11.26-RedHat-9.11.26-3.el8 <<>> ftp.shoneinfo.com ;; global options: +cmd ;; Got answer: ;; ->>HEADER<<- opcode: QUERY, status: NXDOMAIN, id: 42458 ;; flags: qr aa rd ra; QUERY: 1, ANSWER: 0, AUTHORITY: 1, ADDITIONAL: 1 ;; OPT PSEUDOSECTION: ; EDNS: version: 0, flags:; udp: 1232 ; COOKIE: 72da7c8a9145819d6421151461eac36944b57b775b47f2f4 (good) ;; QUESTION SECTION: ;ftp.shoneinfo.com. IN A ;; AUTHORITY SECTION: shoneinfo.com. 10800 IN SOA master.shoneinfo.com. admin.shoneinfo.com. 1 86400 3600 604800 10800 ;; Query time: 1 msec ;; SERVER: 192.168.250.28#53(192.168.250.28) ;; WHEN: Fri Jan 21 22:30:01 CST 2022 ;; MSG SIZE rcvd: 123 [root@CentOS84 ]# ####################################################################################################### #测试转发 [root@CentOS84 ]#cat /etc/resolv.conf # Generated by NetworkManager nameserver 192.168.250.18 nameserver 192.168.250.28 [root@CentOS84 ]#hostname -I 192.168.250.68 [root@CentOS84 ]# [root@CentOS84 ]#ping www.163.com PING z163picipv6.v.bsgslb.cn (180.97.232.125) 56(84) bytes of data. 64 bytes from 180.97.232.125 (180.97.232.125): icmp_seq=1 ttl=54 time=7.20 ms 64 bytes from 180.97.232.125 (180.97.232.125): icmp_seq=2 ttl=54 time=7.33 ms 64 bytes from 180.97.232.125 (180.97.232.125): icmp_seq=3 ttl=54 time=7.30 ms 64 bytes from 180.97.232.125 (180.97.232.125): icmp_seq=4 ttl=54 time=7.33 ms ^C --- z163picipv6.v.bsgslb.cn ping statistics --- 4 packets transmitted, 4 received, 0% packet loss, time 3005ms rtt min/avg/max/mdev = 7.202/7.291/7.334/0.117 ms [root@CentOS84 ]#参考资料: Centos 7搭建DNS主从服务器并实现智能DNS - 简书 可以参考下,但是用的版本比较低
2、搭建并实现智能DNS
Centos 7搭建DNS主从服务器并实现智能DNS - 简书 可以参考下,但是用的版本比较低
2.1 环境准备
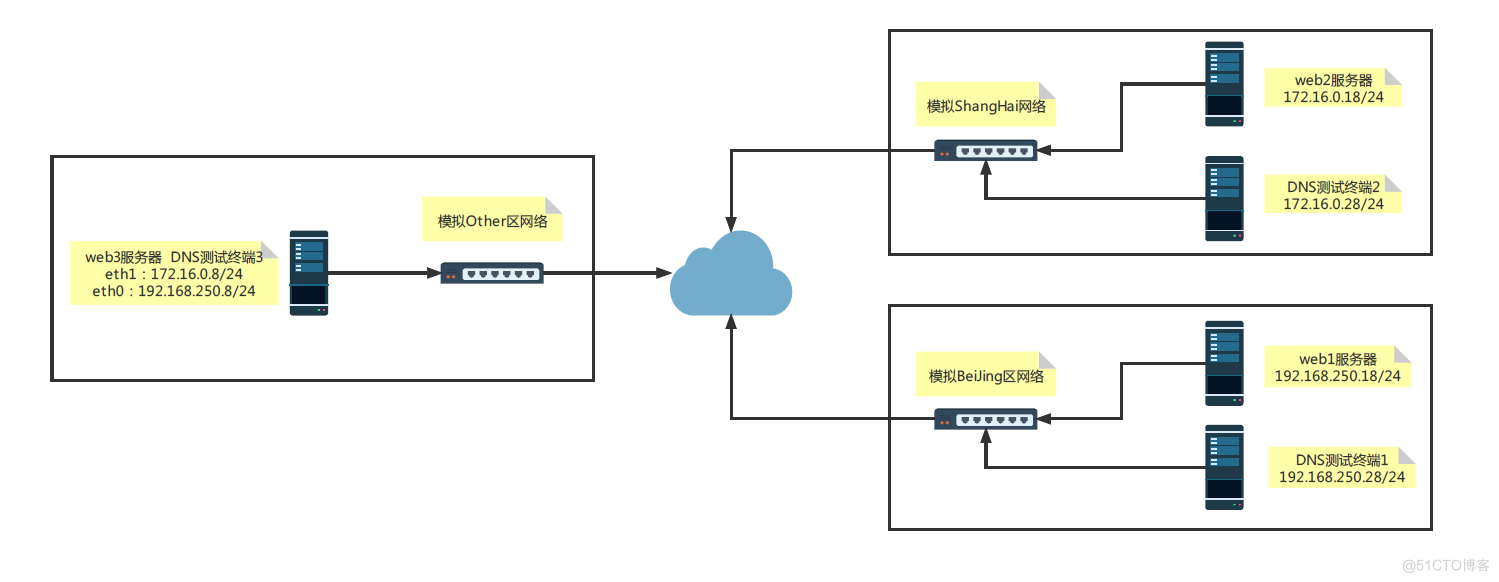
准备五台虚拟机器 CentOS8.4 在ESXI67+VCSA67的集群环境下完成此实验
# 模拟的三个地区北京、上海、和其他,最理想状态是在三个区域之间配置一个路由器,可以更真实,限于虚拟化环境,只能用DNS服务器双网卡模拟 DNS服务器和web3服务器1:172.16.0.8/24,192.168.250.8/24 web服务器2:172.16.0.18/24 web服务器1:192.168.250.18/24 DNS客户端2:172.16.0.28/24 DNS客户端1:192.168.250.28/242.2 实现过程
2.2.1 DNS服务器网卡配置及时间同步
[root@CentOS84 ]#nmcli connection NAME UUID TYPE DEVICE eth0 73df0eff-a623-acec-5c7e-627bb30f85d2 ethernet eth0 eth1 1f162eb7-8128-c2ab-afbb-c099cbc4b75f ethernet eth1 virbr0 73461e59-9b28-4e0b-8172-607b21d12ff8 bridge virbr0 [root@CentOS84 ]#ll /etc/sysconfig/network-scripts/ total 8 -rw-r--r-- 1 root root 351 Jan 22 01:14 ifcfg-Profile_1 -rw-r--r-- 1 root root 351 Jan 22 06:49 ifcfg-Profile_2 [root@CentOS84 ]#ip a 2: eth0: <BROADCAST,MULTICAST,UP,LOWER_UP> mtu 1500 qdisc mq state UP group default qlen 1000 link/ether 00:50:56:a3:9e:ee brd ff:ff:ff:ff:ff:ff inet 192.168.250.8/24 brd 192.168.250.255 scope global noprefixroute eth0 3: eth1: <BROADCAST,MULTICAST,UP,LOWER_UP> mtu 1500 qdisc mq state UP group default qlen 1000 link/ether 00:50:56:a3:e5:0c brd ff:ff:ff:ff:ff:ff inet 172.16.0.8/24 brd 172.16.0.255 scope global noprefixroute eth1 [root@CentOS84 ]# [root@CentOS84 ]#systemctl enable --now chronyd.service2.2.2 DNS服务器配置View
[root@CentOS84 ]#cat /etc/named.conf // // named.conf // // Provided by Red Hat bind package to configure the ISC BIND named(8) DNS // server as a caching only nameserver (as a localhost DNS resolver only). // // See /usr/share/doc/bind*/sample/ for example named configuration files. // # 加上区域的ACL:把一个或多个地址归并为一个集合,并通过一个统一的名称调用。只能先定义后使用,因此一般定义在配置文件中,处于options的前面。 acl beijingnet { 192.168.250.0/24; }; acl shanghainet { 172.16.0.0/24; }; acl othernet { any; }; options { // listen-on port 53 { 127.0.0.1; }; #注释掉这行,否则就要修改any或者DNS的IP地址 // listen-on-v6 port 53 { ::1; }; #注释掉这行,否则就要修改 directory "/var/named"; dump-file "/var/named/data/cache_dump.db"; statistics-file "/var/named/data/named_stats.txt"; memstatistics-file "/var/named/data/named_mem_stats.txt"; secroots-file "/var/named/data/named.secroots"; recursing-file "/var/named/data/named.recursing"; // allow-query { localhost; }; #注释掉这行,否则就要修改成any /* - If you are building an AUTHORITATIVE DNS server, do NOT enable recursion. - If you are building a RECURSIVE (caching) DNS server, you need to enable recursion. - If your recursive DNS server has a public IP address, you MUST enable access control to limit queries to your legitimate users. Failing to do so will cause your server to become part of large scale DNS amplification attacks. Implementing BCP38 within your network would greatly reduce such attack surface */ recursion yes; dnssec-enable yes; dnssec-validation yes; managed-keys-directory "/var/named/dynamic"; pid-file "/run/named/named.pid"; session-keyfile "/run/named/session.key"; /* https://fedoraproject.org/wiki/Changes/CryptoPolicy */ include "/etc/crypto-policies/back-ends/bind.config"; }; logging { channel default_debug { file "data/named.run"; severity dynamic; }; }; # 特别注意下面这段要注释掉,因在rfc1912文件中都有定义,实验过程中开始未注释掉,启动named报错,查看日志得以配错了的。 //zone "." IN { // type hint; // file "named.ca"; //}; # 创建view view beijingview { match-clients { beijingnet;}; include "/etc/named.rfc1912.zones.bj"; }; view shanghaiview { match-clients { shanghainet;}; include "/etc/named.rfc1912.zones.sh"; }; view otherview { match-clients { othernet;}; include "/etc/named.rfc1912.zones.other"; }; //include "/etc/named.rfc1912.zones"; # 注释掉,在view每段代码内已经包含 include "/etc/named.root.key"; [root@CentOS84 ]#2.2.3 配置区域文件
[root@CentOS84 ]#cat /etc/named.rfc1912.zones.bj zone "." IN { type hint; file "named.ca"; }; zone "shoneinfo.com" { type master; file "shoneinfo.com.zone.bj"; }; [root@CentOS84 ]# [root@CentOS84 ]#cat /etc/named.rfc1912.zones.sh zone "." IN { type hint; file "named.ca"; }; zone "shoneinfo.com" { type master; file "shoneinfo.com.zone.sh"; }; [root@CentOS84 ]# [root@CentOS84 ]#cat /etc/named.rfc1912.zones.other zone "." IN { type hint; file "named.ca"; }; zone "shoneinfo.com" { type master; file "shoneinfo.com.zone.other"; }; [root@CentOS84 ]# [root@CentOS84 ]#chgrp named /etc/named.rfc1912.zones.sh [root@CentOS84 ]#chgrp named /etc/named.rfc1912.zones.other [root@CentOS84 ]#chgrp named /etc/named.rfc1912.zones.bj [root@CentOS84 ]# [root@CentOS84 ]#ll /etc/nam* -rw-r----- 1 root named 2154 Jan 21 23:27 /etc/named.conf -rw-r----- 1 root named 1029 Aug 25 07:20 /etc/named.rfc1912.zones -rw-r--r-- 1 root named 131 Jan 21 23:34 /etc/named.rfc1912.zones.bj -rw-r--r-- 1 root named 133 Jan 21 23:38 /etc/named.rfc1912.zones.other -rw-r--r-- 1 root named 130 Jan 21 23:36 /etc/named.rfc1912.zones.sh -rw-r--r-- 1 root named 1070 Aug 25 07:20 /etc/named.root.key /etc/named: total 0 [root@CentOS84 ]#2.2.4 创建区域数据库文件
[root@CentOS84 ]#cat shoneinfo.com.zone.bj $TTL 1D @ IN SOA master admin.shoneinfo.com. ( 20220121 ; serial 1D ; refresh 1H ; retry 1W ; expire 3H ) ; minimum NS master master A 192.168.250.8 websrv A 192.168.250.18 www CNAME websrv [root@CentOS84 ]# [root@CentOS84 ]#cat shoneinfo.com.zone.sh $TTL 1D @ IN SOA master admin.shoneinfo.com. ( 20220121 ; serial 1D ; refresh 1H ; retry 1W ; expire 3H ) ; minimum NS master master A 192.168.250.8 websrv A 172.16.0.18 www CNAME websrv [root@CentOS84 ]# [root@CentOS84 ]#cat shoneinfo.com.zone.other $TTL 1D @ IN SOA master admin.shoneinfo.com. ( 20220121 ; serial 1D ; refresh 1H ; retry 1W ; expire 3H ) ; minimum NS master master A 192.168.250.8 websrv A 127.0.0.1 www CNAME websrv [root@CentOS84 ]# [root@CentOS84 ]#ll total 28 drwxrwx--- 2 named named 6 Aug 25 07:20 data drwxrwx--- 2 named named 6 Aug 25 07:20 dynamic -rw-r----- 1 root named 2253 Aug 25 07:20 named.ca -rw-r----- 1 root named 152 Aug 25 07:20 named.empty -rw-r----- 1 root named 152 Aug 25 07:20 named.localhost -rw-r----- 1 root named 168 Aug 25 07:20 named.loopback -rw-r----- 1 root root 230 Jan 21 23:54 shoneinfo.com.zone.bj -rw-r----- 1 root root 227 Jan 21 23:59 shoneinfo.com.zone.other -rw-r----- 1 root root 227 Jan 21 23:57 shoneinfo.com.zone.sh drwxrwx--- 2 named named 6 Aug 25 07:20 slaves [root@CentOS84 ]#chgrp named /var/named/shoneinfo.com.zone.other [root@CentOS84 ]#chgrp named /var/named/shoneinfo.com.zone.sh [root@CentOS84 ]#chgrp named /var/named/shoneinfo.com.zone.bj [root@CentOS84 ]#ll total 28 drwxrwx--- 2 named named 6 Aug 25 07:20 data drwxrwx--- 2 named named 6 Aug 25 07:20 dynamic -rw-r----- 1 root named 2253 Aug 25 07:20 named.ca -rw-r----- 1 root named 152 Aug 25 07:20 named.empty -rw-r----- 1 root named 152 Aug 25 07:20 named.localhost -rw-r----- 1 root named 168 Aug 25 07:20 named.loopback -rw-r----- 1 root named 230 Jan 21 23:54 shoneinfo.com.zone.bj -rw-r----- 1 root named 227 Jan 21 23:59 shoneinfo.com.zone.other -rw-r----- 1 root named 227 Jan 21 23:57 shoneinfo.com.zone.sh drwxrwx--- 2 named named 6 Aug 25 07:20 slaves [root@CentOS84 ]#2.2.5 三个区域测试用WEB服务器准备
# 都安装上httpd [root@CentOS84 ]#yum install -y httpd # 配置好web页面 [root@CentOS84 ]#echo www.shoneinfo.com in NJ > /var/www/html/index.html [root@CentOS84 ]#hostname -I 192.168.250.18 [root@CentOS84 ]# [root@CentOS84 ]#echo www.shoneinfo.com in sh > /var/www/html/index.html [root@CentOS84 ]#hostname -I 172.16.0.18 [root@CentOS84 ]# [root@CentOS84 ]#echo www.shoneinfo.com in Other > /var/www/html/index.html [root@CentOS84 ]#hostname -I 192.168.250.8 172.16.0.8 [root@CentOS84 ]# # 立刻启动并开启启动httpd [root@CentOS84 ]#systemctl enable --now httpd Created symlink /etc/systemd/system/multi-user.target.wants/httpd.service → /usr/lib/systemd/system/httpd.service. [root@CentOS84 ]#2.3 测试验证
# DNS测试终端客户机1,测试验证 [root@CentOS84 ]#hostname -I 192.168.250.28 [root@CentOS84 ]#cat /etc/resolv.conf # Generated by NetworkManager nameserver 192.168.250.8 [root@CentOS84 ]#curl www.shoneinfo.com www.shoneinfo.com in BJ [root@CentOS84 ]#ping www.shoneinfo.com PING websrv.shoneinfo.com (192.168.250.18) 56(84) bytes of data. 64 bytes from 192.168.250.18 (192.168.250.18): icmp_seq=1 ttl=64 time=0.434 ms 64 bytes from 192.168.250.18 (192.168.250.18): icmp_seq=2 ttl=64 time=0.330 ms --- websrv.shoneinfo.com ping statistics --- 2 packets transmitted, 2 received, 0% packet loss, time 2041ms rtt min/avg/max/mdev = 0.271/0.345/0.434/0.067 ms # DNS测试终端客户机2,测试验证 [root@CentOS84 ]#hostname -I 172.16.0.28 [root@CentOS84 ]#cat /etc/resolv.conf # Generated by NetworkManager nameserver 172.16.0.8 [root@CentOS84 ]#curl www.shoneinfo.com www.shoneinfo.com in sh [root@CentOS84 ]#nslookup > server 172.16.0.8 Default server: 172.16.0.8 Address: 172.16.0.8#53 > www.shoneinfo.com Server: 172.16.0.8 Address: 172.16.0.8#53 www.shoneinfo.com canonical name = websrv.shoneinfo.com. Name: websrv.shoneinfo.com Address: 172.16.0.18 > [root@CentOS84 ]# [root@CentOS84 ]#ping www.shoneinfo.com PING websrv.shoneinfo.com (172.16.0.18) 56(84) bytes of data. 64 bytes from 172.16.0.18 (172.16.0.18): icmp_seq=1 ttl=64 time=0.381 ms 64 bytes from 172.16.0.18 (172.16.0.18): icmp_seq=2 ttl=64 time=0.405 ms --- websrv.shoneinfo.com ping statistics --- 2 packets transmitted, 2 received, 0% packet loss, time 1001ms rtt min/avg/max/mdev = 0.381/0.393/0.405/0.012 ms [root@CentOS84 ]# # DNS测试终端客户机3,测试验证 [root@CentOS84 ]#hostname -I 192.168.250.8 172.16.0.8 [root@CentOS84 ]#cat /etc/resolv.conf # Generated by NetworkManager nameserver 127.0.0.1 [root@CentOS84 ]#curl www.shoneinfo.com www.shoneinfo.com in Other [root@CentOS84 ]#ping www.shoneinfo.com PING websrv.shoneinfo.com (127.0.0.1) 56(84) bytes of data. 64 bytes from localhost (127.0.0.1): icmp_seq=1 ttl=64 time=0.044 ms 64 bytes from localhost (127.0.0.1): icmp_seq=2 ttl=64 time=0.046 ms --- websrv.shoneinfo.com ping statistics --- 2 packets transmitted, 2 received, 0% packet loss, time 5113ms rtt min/avg/max/mdev = 0.044/0.047/0.051/0.009 ms [root@CentOS84 ]#3、使用iptable开放指定服务端口
实践目标:使用iptable实现放行ssh,telnet, ftp, http80,其他端口服务全部拒绝
3.1 环境准备
需要两台主机 服务端:192.168.250.8 客户端:192.168.250.183.2 实现步骤
3.2.1 在服务器安装相应服务软件包
# 安装ssh,telnet, ftp, http80 服务软件包并启动服务 [root@CentOS84 ]#yum -y install httpd [root@CentOS84 ]#systemctl enable --now httpd [root@CentOS84 ]#yum install vsftpd [root@CentOS84 ]#systemctl enable --now vsftpd [root@CentOS84 ]#yum install telnet-server [root@CentOS84 ]#systemctl enable telnet.socket # 监听端口情况 [root@CentOS84 ]#ss -ltn State Recv-Q Send-Q Local Address:Port Peer Address:Port Process LISTEN 0 128 0.0.0.0:111 0.0.0.0:* LISTEN 0 32 192.168.122.1:53 0.0.0.0:* LISTEN 0 128 0.0.0.0:22 0.0.0.0:* LISTEN 0 5 127.0.0.1:631 0.0.0.0:* LISTEN 0 128 [::]:111 [::]:* LISTEN 0 511 *:80 *:* LISTEN 0 32 *:21 *:* LISTEN 0 128 [::]:22 [::]:* LISTEN 0 5 [::1]:631 [::]:* LISTEN 0 128 *:23 *:*3.2.2 配置iptable
# 定义iptables 规则 [root@CentOS84 ]#iptables -I INPUT -p tcp -m multiport --dports 21,22,23,80 -j ACCEPT [root@CentOS84 ]#iptables -A INPUT -j DROP # 查看规则表 [root@CentOS84 ]#iptables -vnL --line-numbers Chain INPUT (policy ACCEPT 0 packets, 0 bytes) num pkts bytes target prot opt in out source destination 1 319 29384 ACCEPT tcp -- * * 0.0.0.0/0 0.0.0.0/0 multiport dports 21,22,23,80 2 1317 210K DROP all -- * * 0.0.0.0/0 0.0.0.0/0 # 规则在INPUT chain内的定义的,第一条允许指定的端口;第二条定义拒绝其他端口 Chain FORWARD (policy ACCEPT 0 packets, 0 bytes) num pkts bytes target prot opt in out source destination Chain OUTPUT (policy ACCEPT 0 packets, 0 bytes) num pkts bytes target prot opt in out source destination Chain LIBVIRT_INP (0 references) num pkts bytes target prot opt in out source destination Chain LIBVIRT_OUT (0 references) num pkts bytes target prot opt in out source destination Chain LIBVIRT_FWO (0 references) num pkts bytes target prot opt in out source destination Chain LIBVIRT_FWI (0 references) num pkts bytes target prot opt in out source destination Chain LIBVIRT_FWX (0 references) num pkts bytes target prot opt in out source destination [root@CentOS84 ]#3.2.3 验证测试
# 在客户机上IP192.168.250.18上按照放通的端口测试正常 [root@CentOS84 ]# [root@CentOS84 ]#curl 192.168.250.8 My Site www [root@CentOS84 ]# [root@CentOS84 ]#ssh 192.168.250.8 root@192.168.250.8's password: Activate the web console with: systemctl enable --now cockpit.socket Last login: Sat Jan 22 11:08:41 2022 from 192.168.250.254 [root@CentOS84 ]#hostname -I 192.168.250.8 192.168.122.1 [root@CentOS84 ]# [root@CentOS84 ]#telnet 192.168.250.8 Trying 192.168.250.8... Connected to 192.168.250.8. Escape character is '^]'. ^] Kernel 4.18.0-305.3.1.el8.x86_64 on an x86_64 CentOS84 login: root Password: Last login: Sat Jan 22 10:06:59 from 192.168.250.254 [root@CentOS84 ]# [root@CentOS84 ]#hostname -I 192.168.250.8 192.168.122.1 [root@CentOS84 ]#ftp 192.168.250.8 Connected to 192.168.250.8 (192.168.250.8). 220 (vsFTPd 3.0.3) ftp> ftp> quit 221 Goodbye. # 关闭掉相应得端口允许策略,相应的服务都不能被远程登录4、NAT原理总结
4.1 概述
NAT ( Network Address Translation ) 中文意思是"网络地址转换",它是一个IETF(Internet Engineering Task Force, Internet工程任务组) 标准,允许一个整体机构以一个公用IP(Internet Protocol)地址出现在Internet上。顾名思义,它是一种把内部私有网络地址(IP地址)翻译成合法网络IP地址的技术。NAT 可以让那些使用私有地址的内部网络连接到Internet或其它IP网络上。NAT路由器在将内部网络的数据包发送到公用网络时,在IP包的报头把私有地址转换成合法的IP地址。
RFC1918规定了三块专有的地址,作为私有的内部组网使用:
A类:10.0.0.0—10.255.255.255 10.0.0.0/8 B类:172.16.0.0—172.31.255.255 172.16.0.0/12 C类:192.168.0.0—192.168.255.255 192.168.0.0/16 这三块私有地址本身是可路由的,只是公网上的路由器不会转发这三块私有地址的流量;当一个公司内部配置了这些私有地址后,内部的计算机在和外网通信时,公司的边界路由会通过NAT或者PAT技术,将内部的私有地址转换成外网IP,外部看到的源地址是公司边界路由转换过的公网IP地址,这在某种意义上也增加了内部网络的安全性。
Basic NAT是一种把一组IP地址映射成另一组IP地址的方法,映射的过程在IP中继设备上完成,对用户完全透明。NAPT则要复杂一些,它把许多(不能太多)IP地址连同TCP/UDP端口号映射到单独一个IP地址和端口号上。无论是Basic NAT还是NAPT都提供一种把内部的私有地址转换成在公网上可用的全球唯一IP地址的方法。
4.2 分类

4.3 NAT类型及工作原理
静态 NAT ( Static NAT )( 一对一 ): 将内部网络的私有IP地址转换为公有IP地址,IP地址对是一对一的,是一直不变的。

动态地址 NAT ( Pooled NAT )(多对多): 将内部网络的私有 IP 地址转换为公用 IP 地址时,IP 地址是不确定,随机的。所有被授权访问 Internet 的私有 IP 地址可随机转换为任何指定合法的 IP 地址。也就是说,只要指定哪些内部地址可以进行转换,以及用哪些合法地址作为外部地址时,就可以进行动态 NAT 转换。动态 NAT 是在路由器上配置一个外网 IP 地址池,当内部有计算机需要和外部通信时,就从地址池里动态的取出一个外网 IP,并将他们的对应关系绑定到 NAT 表中,通信结束后,这个外网 IP 才被释放,可供其他内部 IP 地址转换使用,这个 DHCP 租约 IP 有相似之处。当 ISP 提供的合法 IP 地址略少于网络内部的计算机数量时。可以采用动态转换的方式。

网络地址端口转换 NAPT(Network Address Port Translation)(Port-Level NAT)( 多对一 ): 改变外出数据包的源端口并进行端口转换,采用端口多路复用方式。内部网络的所有主机均可共享一个合法外部 IP 地址实现对 Internet 的访问,可以最大限度地节约 IP 地址资源。同时,也可以隐藏网络内部的所有主机,有效避免来自 Internet的攻#击。因此,目前网络中应用最多的就是 PAT 规则。这是最常用的 NAT 技术,也是 IPv4 能够维持到今天的最重要的原因之一,它提供了一种多对一的方式,对多个内网 IP 地址,边界路由可以给他们分配一个外网 IP,利用这个外网 IP 的不同端口和外部进行通信。NAPT 与 动态NAT 不同,它将内部连接映射到外部网络中的一个单独的 IP 地址上,同时在该地址上加上一个由 NAT 设备选定的端口号。

NAPT 是使用最普遍的一种转换方式,它又包含两种转换方式:SNAT和DNAT。
- 源NAT(Source NAT,SNAT):修改数据包的源地址。源NAT改变第一个数据包的来源地址,它永远会在数据包发送到网络之前完成,数据包伪装就是一具SNAT的例子。
- 目的NAT(Destination NAT,DNAT):修改数据包的目的地址。Destination NAT刚好与SNAT相反,它是改变第一个数据懈的目的地地址,如平衡负载、端口转发和透明代理就是属于DNAT。
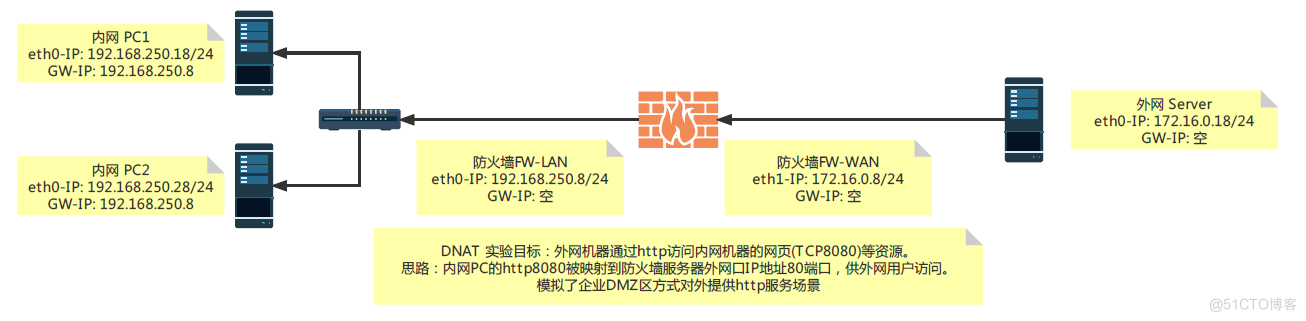
5、iptables实现SNAT和DNAT,并对规则持久保存
5.1 iptables实现SNAT,并持久保存规则

5.1.1 外网Server构建web服务
[root@CentOS84 ]#ip a 1: lo: <LOOPBACK,UP,LOWER_UP> mtu 65536 qdisc noqueue state UNKNOWN group default qlen 1000 link/loopback 00:00:00:00:00:00 brd 00:00:00:00:00:00 inet 127.0.0.1/8 scope host lo valid_lft forever preferred_lft forever inet6 ::1/128 scope host valid_lft forever preferred_lft forever 2: eth0: <BROADCAST,MULTICAST,UP,LOWER_UP> mtu 1500 qdisc mq state UP group default qlen 1000 link/ether 00:50:56:a3:c9:76 brd ff:ff:ff:ff:ff:ff inet 172.16.0.18/24 brd 172.16.0.255 scope global noprefixroute eth0 valid_lft forever preferred_lft forever inet6 fe80::59ea:6f55:504f:eed/64 scope link dadfailed tentative noprefixroute valid_lft forever preferred_lft forever inet6 fe80::16f5:3422:5aff:e6b/64 scope link dadfailed tentative noprefixroute valid_lft forever preferred_lft forever inet6 fe80::ffc1:2238:ac0c:2737/64 scope link dadfailed tentative noprefixroute valid_lft forever preferred_lft forever 3: virbr0: <NO-CARRIER,BROADCAST,MULTICAST,UP> mtu 1500 qdisc noqueue state DOWN group default qlen 1000 link/ether 52:54:00:25:fa:2f brd ff:ff:ff:ff:ff:ff inet 192.168.122.1/24 brd 192.168.122.255 scope global virbr0 valid_lft forever preferred_lft forever 4: virbr0-nic: <BROADCAST,MULTICAST> mtu 1500 qdisc fq_codel master virbr0 state DOWN group default qlen 1000 link/ether 52:54:00:25:fa:2f brd ff:ff:ff:ff:ff:ff # 确保此服务器IP172.16.0.18/24 与互联网相通,并已经优化 [root@CentOS84 ]#ping www.163.com -c2 PING z163picipv6.v.bsgslb.cn (180.97.232.124) 56(84) bytes of data. 64 bytes from 180.97.232.124 (180.97.232.124): icmp_seq=1 ttl=54 time=7.37 ms 64 bytes from 180.97.232.124 (180.97.232.124): icmp_seq=2 ttl=54 time=7.44 ms --- z163picipv6.v.bsgslb.cn ping statistics --- 2 packets transmitted, 2 received, 0% packet loss, time 1001ms rtt min/avg/max/mdev = 7.367/7.402/7.438/0.093 ms #安装Nginx, [root@CentOS84 ]# [root@CentOS84 ]#yum -y install nginx [root@CentOS84 ]# [root@CentOS84 ]#systemctl enable --now nginx [root@CentOS84 ]# [root@CentOS84 ]#ss -tln State Recv-Q Send-Q Local Address:Port Peer Address:Port Process LISTEN 0 128 0.0.0.0:111 0.0.0.0:* LISTEN 0 511 0.0.0.0:80 0.0.0.0:* LISTEN 0 32 192.168.122.1:53 0.0.0.0:* LISTEN 0 128 0.0.0.0:22 0.0.0.0:* LISTEN 0 5 127.0.0.1:631 0.0.0.0:* LISTEN 0 128 [::]:111 [::]:* LISTEN 0 511 [::]:80 [::]:* LISTEN 0 128 [::]:22 [::]:* LISTEN 0 5 [::1]:631 [::]:* [root@CentOS84 ]# #修改Nginx的默认页面,并在本机测试 [root@CentOS84 ]#curl 172.16.0.18 <h1> Welcome To IP172.16.0.18 Web <h1> <h1> NAT IS SUCCESSFUL!<h1> [root@CentOS84 ]# # 查询并记录路由,默认路由是指向上网网关,并没指向本次试验的172.16.0.8 [root@CentOS84 ]#ip route default via 172.16.0.254 dev eth0 proto static metric 100 172.16.0.0/24 dev eth0 proto kernel scope link src 172.16.0.18 metric 100 192.168.122.0/24 dev virbr0 proto kernel scope link src 192.168.122.1 linkdown [root@CentOS84 ]#5.1.2 防火墙FW角色的服务器部署
5.1.2.1 iptables的基础环境准备
# 查看防火墙FW角色虚拟机的网卡配置情况,新增一块网卡并设定好相应的IP地址等 [root@CentOS84 ]#nmcli connection NAME UUID TYPE DEVICE eth0 73df0eff-a623-acec-5c7e-627bb30f85d2 ethernet eth0 virbr0 82584afa-316d-496a-9f39-4194ffc929f5 bridge virbr0 [root@CentOS84 ]#ip a 1: lo: <LOOPBACK,UP,LOWER_UP> mtu 65536 qdisc noqueue state UNKNOWN group default qlen 1000 link/loopback 00:00:00:00:00:00 brd 00:00:00:00:00:00 inet 127.0.0.1/8 scope host lo valid_lft forever preferred_lft forever inet6 ::1/128 scope host valid_lft forever preferred_lft forever 2: eth0: <BROADCAST,MULTICAST,UP,LOWER_UP> mtu 1500 qdisc mq state UP group default qlen 1000 link/ether 00:50:56:a3:9e:ee brd ff:ff:ff:ff:ff:ff inet 192.168.250.8/24 brd 192.168.250.255 scope global noprefixroute eth0 valid_lft forever preferred_lft forever inet6 fe80::59ea:6f55:504f:eed/64 scope link dadfailed tentative noprefixroute valid_lft forever preferred_lft forever inet6 fe80::16f5:3422:5aff:e6b/64 scope link dadfailed tentative noprefixroute valid_lft forever preferred_lft forever inet6 fe80::ffc1:2238:ac0c:2737/64 scope link noprefixroute valid_lft forever preferred_lft forever 3: virbr0: <NO-CARRIER,BROADCAST,MULTICAST,UP> mtu 1500 qdisc noqueue state DOWN group default qlen 1000 link/ether 52:54:00:25:fa:2f brd ff:ff:ff:ff:ff:ff inet 192.168.122.1/24 brd 192.168.122.255 scope global virbr0 valid_lft forever preferred_lft forever 4: virbr0-nic: <BROADCAST,MULTICAST> mtu 1500 qdisc fq_codel master virbr0 state DOWN group default qlen 1000 link/ether 52:54:00:25:fa:2f brd ff:ff:ff:ff:ff:ff [root@CentOS84 ]# # 在VMWARE的VCSA6.7的管理页面内配置虚拟机,增加一块网卡并设定好相应的VMNET段,确保通信正常 [root@CentOS84 ]# [root@CentOS84 ]#ip a 1: lo: <LOOPBACK,UP,LOWER_UP> mtu 65536 qdisc noqueue state UNKNOWN group default qlen 1000 link/loopback 00:00:00:00:00:00 brd 00:00:00:00:00:00 inet 127.0.0.1/8 scope host lo valid_lft forever preferred_lft forever inet6 ::1/128 scope host valid_lft forever preferred_lft forever 2: eth0: <BROADCAST,MULTICAST,UP,LOWER_UP> mtu 1500 qdisc mq state UP group default qlen 1000 link/ether 00:50:56:a3:9e:ee brd ff:ff:ff:ff:ff:ff inet 192.168.250.8/24 brd 192.168.250.255 scope global noprefixroute eth0 valid_lft forever preferred_lft forever inet6 fe80::59ea:6f55:504f:eed/64 scope link dadfailed tentative noprefixroute valid_lft forever preferred_lft forever inet6 fe80::16f5:3422:5aff:e6b/64 scope link dadfailed tentative noprefixroute valid_lft forever preferred_lft forever inet6 fe80::ffc1:2238:ac0c:2737/64 scope link noprefixroute valid_lft forever preferred_lft forever 3: virbr0: <NO-CARRIER,BROADCAST,MULTICAST,UP> mtu 1500 qdisc noqueue state DOWN group default qlen 1000 link/ether 52:54:00:25:fa:2f brd ff:ff:ff:ff:ff:ff inet 192.168.122.1/24 brd 192.168.122.255 scope global virbr0 valid_lft forever preferred_lft forever 4: virbr0-nic: <BROADCAST,MULTICAST> mtu 1500 qdisc fq_codel master virbr0 state DOWN group default qlen 1000 link/ether 52:54:00:25:fa:2f brd ff:ff:ff:ff:ff:ff 5: eth1: <BROADCAST,MULTICAST,UP,LOWER_UP> mtu 1500 qdisc mq state UP group default qlen 1000 link/ether 00:50:56:a3:16:31 brd ff:ff:ff:ff:ff:ff # 查看并配置好网卡的配置文件 [root@CentOS84 ]#ll /etc/sysconfig/network-scripts/ total 8 -rw-r--r-- 1 root root 340 Jan 21 13:09 ifcfg-Profile_1 [root@CentOS84 ]# [root@CentOS84 ]#cat /etc/sysconfig/network-scripts/ifcfg-Profile_1 DEVICE=eth0 TYPE=Ethernet PROXY_METHOD=none BROWSER_ONLY=no BOOTPROTO=none IPADDR=192.168.250.8 PREFIX=24 GATEWAY=192.168.250.254 DNS1=61.177.7.1 DEFROUTE=yes IPV4_FAILURE_FATAL=no IPV6INIT=yes IPV6_AUTOCONF=yes IPV6_DEFROUTE=yes IPV6_FAILURE_FATAL=no IPV6_ADDR_GEN_MODE=stable-privacy NAME="eth0" #UUID=b5e0e3e5-7738-403f-9912-cf32e0f90a75 ONBOOT=yes [root@CentOS84 ]# [root@CentOS84 ]#cp /etc/sysconfig/network-scripts/ifcfg-Profile_1 /etc/sysconfig/network-scripts/ifcfg-Profile_2 #修改新增加网卡的配置文件 [root@CentOS84 ]#vim /etc/sysconfig/network-scripts/ifcfg-Profile_2 [root@CentOS84 ]# [root@CentOS84 ]#cat /etc/sysconfig/network-scripts/ifcfg-Profile_2 DEVICE=eth1 TYPE=Ethernet PROXY_METHOD=none BROWSER_ONLY=no BOOTPROTO=none IPADDR=172.16.0.8 PREFIX=24 #GATEWAY=192.168.250.254 DNS1=61.177.7.1 DEFROUTE=yes IPV4_FAILURE_FATAL=no IPV6INIT=yes IPV6_AUTOCONF=yes IPV6_DEFROUTE=yes IPV6_FAILURE_FATAL=no IPV6_ADDR_GEN_MODE=stable-privacy NAME="eth1" ONBOOT=yes [root@CentOS84 ]# [root@CentOS84 ]#reboot5.1.2.2 iptables的基础环境准备
# iptables的基础环境准备 [root@CentOS84 ]# [root@CentOS84 ]#systemctl disable --now firewalld. service Failed to disable unit: Unit file firewalld..service does not exist. [root@CentOS84 ]#rpm -qi iptables Name : iptables Version : 1.8.4 Release : 17.el8 Architecture: x86_64 Install Date: Wed 17 Nov 2021 08:10:38 PM CST Group : Unspecified Size : 1989969 License : GPLv2 and Artistic 2.0 and ISC Signature : RSA/SHA256, Fri 29 Jan 2021 06:10:36 AM CST, Key ID 05b555b38483c65d Source RPM : iptables-1.8.4-17.el8.src.rpm Build Date : Fri 29 Jan 2021 01:05:26 AM CST Build Host : x86-01.mbox.centos.org Relocations : (not relocatable) Packager : CentOS Buildsys <bugs@centos.org> Vendor : CentOS URL : http://www.netfilter.org/projects/iptables Summary : Tools for managing Linux kernel packet filtering capabilities Description : The iptables utility controls the network packet filtering code in the Linux kernel. If you need to set up firewalls and/or IP masquerading, you should either install nftables or this package. Note: This package contains the nftables-based variants of iptables and ip6tables, which are drop-in replacements of the legacy tools. [root@CentOS84 ]#iptables --version iptables v1.8.4 (nf_tables) [root@CentOS84 ]#ll /usr/sbin/iptables lrwxrwxrwx. 1 root root 17 Jan 29 2021 /usr/sbin/iptables -> xtables-nft-multi [root@CentOS84 ]#rpm -ql iptables-services package iptables-services is not installed [root@CentOS84 ]#dnf -y install iptables-services Last metadata expiration check: 4:55:21 ago on Fri 21 Jan 2022 09:33:01 AM CST. Dependencies resolved. ============================================================================================================================ Package Architecture Version Repository Size ============================================================================================================================ Installing: iptables-services x86_64 1.8.4-20.el8 BaseOS 63 k Upgrading: iptables x86_64 1.8.4-20.el8 BaseOS 585 k iptables-ebtables x86_64 1.8.4-20.el8 BaseOS 72 k iptables-libs x86_64 1.8.4-20.el8 BaseOS 107 k Transaction Summary ============================================================================================================================ Install 1 Package Upgrade 3 Packages Total download size: 827 k Downloading Packages: (1/4): iptables-ebtables-1.8.4-20.el8.x86_64.rpm 368 kB/s | 72 kB 00:00 (2/4): iptables-1.8.4-20.el8.x86_64.rpm 2.2 MB/s | 585 kB 00:00 (3/4): iptables-services-1.8.4-20.el8.x86_64.rpm 235 kB/s | 63 kB 00:00 (4/4): iptables-libs-1.8.4-20.el8.x86_64.rpm 1.5 MB/s | 107 kB 00:00 ---------------------------------------------------------------------------------------------------------------------------- Total 2.9 MB/s | 827 kB 00:00 Running transaction check Transaction check succeeded. Running transaction test Transaction test succeeded. Running transaction Preparing : 1/1 Running scriptlet: iptables-libs-1.8.4-20.el8.x86_64 1/1 Upgrading : iptables-libs-1.8.4-20.el8.x86_64 1/7 Running scriptlet: iptables-1.8.4-20.el8.x86_64 2/7 Upgrading : iptables-1.8.4-20.el8.x86_64 2/7 Running scriptlet: iptables-1.8.4-20.el8.x86_64 2/7 Installing : iptables-services-1.8.4-20.el8.x86_64 3/7 Running scriptlet: iptables-services-1.8.4-20.el8.x86_64 3/7 Upgrading : iptables-ebtables-1.8.4-20.el8.x86_64 4/7 Running scriptlet: iptables-ebtables-1.8.4-20.el8.x86_64 4/7 Running scriptlet: iptables-ebtables-1.8.4-17.el8.x86_64 5/7 Cleanup : iptables-ebtables-1.8.4-17.el8.x86_64 5/7 Running scriptlet: iptables-ebtables-1.8.4-17.el8.x86_64 5/7 Cleanup : iptables-1.8.4-17.el8.x86_64 6/7 Running scriptlet: iptables-1.8.4-17.el8.x86_64 6/7 Cleanup : iptables-libs-1.8.4-17.el8.x86_64 7/7 Running scriptlet: iptables-libs-1.8.4-17.el8.x86_64 7/7 Verifying : iptables-services-1.8.4-20.el8.x86_64 1/7 Verifying : iptables-1.8.4-20.el8.x86_64 2/7 Verifying : iptables-1.8.4-17.el8.x86_64 3/7 Verifying : iptables-ebtables-1.8.4-20.el8.x86_64 4/7 Verifying : iptables-ebtables-1.8.4-17.el8.x86_64 5/7 Verifying : iptables-libs-1.8.4-20.el8.x86_64 6/7 Verifying : iptables-libs-1.8.4-17.el8.x86_64 7/7 Installed products updated. Upgraded: iptables-1.8.4-20.el8.x86_64 iptables-ebtables-1.8.4-20.el8.x86_64 iptables-libs-1.8.4-20.el8.x86_64 Installed: iptables-services-1.8.4-20.el8.x86_64 Complete! [root@CentOS84 ]#rpm -ql iptables-services /etc/sysconfig/ip6tables /etc/sysconfig/iptables /usr/lib/systemd/system/ip6tables.service /usr/lib/systemd/system/iptables.service /usr/libexec/initscripts/legacy-actions/ip6tables /usr/libexec/initscripts/legacy-actions/ip6tables/panic /usr/libexec/initscripts/legacy-actions/ip6tables/save /usr/libexec/initscripts/legacy-actions/iptables /usr/libexec/initscripts/legacy-actions/iptables/panic /usr/libexec/initscripts/legacy-actions/iptables/save /usr/libexec/iptables /usr/libexec/iptables/ip6tables.init /usr/libexec/iptables/iptables.init [root@CentOS84 ]#5.1.2.3 启用并验证路由转发
[root@CentOS84 ]#cat /etc/sysctl.conf # Controls source route verification net.ipv4.conf.default.rp_filter = 1 net.ipv4.ip_nonlocal_bind = 1 net.ipv4.ip_forward = 1 # Do not accept source routing net.ipv4.conf.default.accept_source_route = 0 # Controls the System Request debugging functionality of the kernel kernel.sysrq = 0 # Controls whether core dumps will append the PID to the core filename. # Useful for debugging multi-threaded applications. kernel.core_uses_pid = 1 # Controls the use of TCP syncookies net.ipv4.tcp_syncookies = 1 # Disable netfilter on bridges. net.bridge.bridge-nf-call-ip6tables = 0 net.bridge.bridge-nf-call-iptables = 0 net.bridge.bridge-nf-call-arptables = 0 # Controls the default maxmimum size of a mesage queue kernel.msgmnb = 65536 # # Controls the maximum size of a message, in bytes kernel.msgmax = 65536 # Controls the maximum shared segment size, in bytes kernel.shmmax = 68719476736 # # Controls the maximum number of shared memory segments, in pages kernel.shmall = 4294967296 # TCP kernel paramater net.ipv4.tcp_mem = 786432 1048576 1572864 net.ipv4.tcp_rmem = 4096 87380 4194304 net.ipv4.tcp_wmem = 4096 16384 4194304 net.ipv4.tcp_window_scaling = 1 net.ipv4.tcp_sack = 1 # socket buffer net.core.wmem_default = 8388608 net.core.rmem_default = 8388608 net.core.rmem_max = 16777216 net.core.wmem_max = 16777216 net.core.netdev_max_backlog = 262144 net.core.somaxconn = 20480 net.core.optmem_max = 81920 # TCP conn net.ipv4.tcp_max_syn_backlog = 262144 net.ipv4.tcp_syn_retries = 3 net.ipv4.tcp_retries1 = 3 net.ipv4.tcp_retries2 = 15 # tcp conn reuse net.ipv4.tcp_tw_reuse = 1 net.ipv4.tcp_tw_recycle = 0 net.ipv4.tcp_fin_timeout = 30 net.ipv4.tcp_timestamps = 0 net.ipv4.tcp_max_tw_buckets = 20000 net.ipv4.tcp_max_orphans = 3276800 net.ipv4.tcp_synack_retries = 1 net.ipv4.tcp_syncookies = 1 # keepalive conn net.ipv4.tcp_keepalive_time = 300 net.ipv4.tcp_keepalive_intvl = 30 net.ipv4.tcp_keepalive_probes = 3 net.ipv4.ip_local_port_range = 10001 65000 # swap vm.overcommit_memory = 0 vm.swappiness = 10 #net.ipv4.conf.eth1.rp_filter = 0 #net.ipv4.conf.lo.arp_ignore = 1 #net.ipv4.conf.lo.arp_announce = 2 #net.ipv4.conf.all.arp_ignore = 1 #net.ipv4.conf.all.arp_announce = 2 [root@CentOS84 ]# [root@CentOS84 ]#sysctl -p net.ipv4.conf.default.rp_filter = 1 net.ipv4.ip_nonlocal_bind = 1 net.ipv4.ip_forward = 1 net.ipv4.conf.default.accept_source_route = 0 kernel.sysrq = 0 kernel.core_uses_pid = 1 net.ipv4.tcp_syncookies = 1 sysctl: cannot stat /proc/sys/net/bridge/bridge-nf-call-ip6tables: No such file or directory sysctl: cannot stat /proc/sys/net/bridge/bridge-nf-call-iptables: No such file or directory sysctl: cannot stat /proc/sys/net/bridge/bridge-nf-call-arptables: No such file or directory kernel.msgmnb = 65536 kernel.msgmax = 65536 kernel.shmmax = 68719476736 kernel.shmall = 4294967296 net.ipv4.tcp_mem = 786432 1048576 1572864 net.ipv4.tcp_rmem = 4096 87380 4194304 net.ipv4.tcp_wmem = 4096 16384 4194304 net.ipv4.tcp_window_scaling = 1 net.ipv4.tcp_sack = 1 net.core.wmem_default = 8388608 net.core.rmem_default = 8388608 net.core.rmem_max = 16777216 net.core.wmem_max = 16777216 net.core.netdev_max_backlog = 262144 net.core.somaxconn = 20480 net.core.optmem_max = 81920 net.ipv4.tcp_max_syn_backlog = 262144 net.ipv4.tcp_syn_retries = 3 net.ipv4.tcp_retries1 = 3 net.ipv4.tcp_retries2 = 15 net.ipv4.tcp_tw_reuse = 1 sysctl: cannot stat /proc/sys/net/ipv4/tcp_tw_recycle: No such file or directory net.ipv4.tcp_fin_timeout = 30 net.ipv4.tcp_timestamps = 0 net.ipv4.tcp_max_tw_buckets = 20000 net.ipv4.tcp_max_orphans = 3276800 net.ipv4.tcp_synack_retries = 1 net..tcp_syncookies = 1 net.ipv4.tcp_keepalive_time = 300 net.ipv4.tcp_keepalive_intvl = 30 net.ipv4.tcp_keepalive_probes = 3 net.ipv4.ip_local_port_range = 10001 65000 vm.overcommit_memory = 0 vm.swappiness = 10 [root@CentOS84 ]#5.1.2.4 iptables的SNAT规则的配置
# 查看nat iptables规则 [root@CentOS84 ]#iptables -vnL -t nat Chain PREROUTING (policy ACCEPT 2 packets, 528 bytes) pkts bytes target prot opt in out source destination Chain INPUT (policy ACCEPT 1 packets, 264 bytes) pkts bytes target prot opt in out source destination # POSTROUTING 此链内的信息是本此探究的重点内容 Chain POSTROUTING (policy ACCEPT 0 packets, 0 bytes) pkts bytes target prot opt in out source destination 0 0 LIBVIRT_PRT all -- * * 0.0.0.0/0 0.0.0.0/0 Chain OUTPUT (policy ACCEPT 0 packets, 0 bytes) pkts bytes target prot opt in out source destination Chain LIBVIRT_PRT (1 references) # 注释:这段内容是VMWARE ESX和VCSA6.7虚拟化默认的配置信息,无需额外关注此部分信息 pkts bytes target prot opt in out source destination 0 0 RETURN all -- * * 192.168.122.0/24 224.0.0.0/24 0 0 RETURN all -- * * 192.168.122.0/24 255.255.255.255 0 0 MASQUERADE tcp -- * * 192.168.122.0/24 !192.168.122.0/24 masq ports: 1024-65535 0 0 MASQUERADE udp -- * * 192.168.122.0/24 !192.168.122.0/24 masq ports: 1024-65535 0 0 MASQUERADE all -- * * 192.168.122.0/24 !192.168.122.0/24 [root@CentOS84 ]# #创建iptables的NAT规则 [root@CentOS84 ]#iptables -t nat -A POSTROUTING -s 192.168.250.0/24 -j SNAT --to-source 172.16.0.8 [root@CentOS84 ]# [root@CentOS84 ]#iptables -vnL -t nat Chain PREROUTING (policy ACCEPT 10 packets, 2280 bytes) pkts bytes target prot opt in out source destination Chain INPUT (policy ACCEPT 4 packets, 1056 bytes) pkts bytes target prot opt in out source destination # POSTROUTING 本项下新建了一个SNAT规则 Chain POSTROUTING (policy ACCEPT 2 packets, 168 bytes) pkts bytes target prot opt in out source destination 2 168 LIBVIRT_PRT all -- * * 0.0.0.0/0 0.0.0.0/0 0 0 SNAT all -- * * 192.168.250.0/24 0.0.0.0/0 to:172.16.0.8 Chain OUTPUT (policy ACCEPT 0 packets, 0 bytes) pkts bytes target prot opt in out source destination Chain LIBVIRT_PRT (1 references) pkts bytes target prot opt in out source destination 0 0 RETURN all -- * * 192.168.122.0/24 224.0.0.0/24 0 0 RETURN all -- * * 192.168.122.0/24 255.255.255.255 0 0 MASQUERADE tcp -- * * 192.168.122.0/24 !192.168.122.0/24 masq ports: 1024-65535 0 0 MASQUERADE udp -- * * 192.168.122.0/24 !192.168.122.0/24 masq ports: 1024-65535 0 0 MASQUERADE all -- * * 192.168.122.0/24 !192.168.122.0/24 [root@CentOS84 ]# # --line-numbers 选项可以让我们看到规则在各自链内的编号,可用于删除相应的iptables规则 [root@CentOS84 ]#iptables -vnL -t nat --line-numbers Chain PREROUTING (policy ACCEPT 103 packets, 11672 bytes) num pkts bytes target prot opt in out source destination Chain INPUT (policy ACCEPT 29 packets, 4152 bytes) num pkts bytes target prot opt in out source destination # 在POSTROUTING链内,第2条是本次新建的SNAT规则 Chain POSTROUTING (policy ACCEPT 2 packets, 168 bytes) num pkts bytes target prot opt in out source destination 1 4 304 LIBVIRT_PRT all -- * * 0.0.0.0/0 0.0.0.0/0 2 2 136 SNAT all -- * * 192.168.250.0/24 0.0.0.0/0 to:172.16.0.8 Chain OUTPUT (policy ACCEPT 0 packets, 0 bytes) num pkts bytes target prot opt in out source destination Chain LIBVIRT_PRT (1 references) num pkts bytes target prot opt in out source destination 1 0 0 RETURN all -- * * 192.168.122.0/24 224.0.0.0/24 2 0 0 RETURN all -- * * 192.168.122.0/24 255.255.255.255 3 0 0 MASQUERADE tcp -- * * 192.168.122.0/24 !192.168.122.0/24 masq ports: 1024-65535 4 0 0 MASQUERADE udp -- * * 192.168.122.0/24 !192.168.122.0/24 masq ports: 1024-65535 5 0 0 MASQUERADE all -- * * 192.168.122.0/24 !192.168.122.0/245.1.3 验证SNAT
# 内网机的IP及路由 [root@CentOS84 ]#ip a ................ 2: eth0: <BROADCAST,MULTICAST,UP,LOWER_UP> mtu 1500 qdisc mq state UP group default qlen 1000 link/ether 00:50:56:a3:e8:6b brd ff:ff:ff:ff:ff:ff inet 192.168.250.18/24 brd 192.168.250.255 scope global noprefixroute eth0 ................ [root@CentOS84 ]#ip route default via 192.168.250.8 dev eth0 proto static metric 100 #指向防火墙服务器的内口地址 192.168.250.0/24 dev eth0 proto kernel scope link src 192.168.250.18 metric 100 [root@CentOS84 ]# # 在防火墙服务器上,查看到转换状态信息 [root@CentOS84 ]#cat /proc/net/nf_conntrack ................. ipv4 2 tcp 6 116 TIME_WAIT src=192.168.250.18 dst=172.16.0.18 sport=28261 dport=80 src=172.16.0.18 dst=172.16.0.8 sport=80 dport=28261 [ASSURED] mark=0 zone=0 use=2 ................. # 在内网IP192.168.250.18 上测试SNAT后内网可以访问外网 [root@CentOS84 ]#ping 172.16.0.18 -c2 PING 172.16.0.18 (172.16.0.18) 56(84) bytes of data. 64 bytes from 172.16.0.18: icmp_seq=1 ttl=63 time=0.644 ms 64 bytes from 172.16.0.18: icmp_seq=2 ttl=63 time=0.430 ms 2 packets transmitted, 2 received, 0% packet loss, time 1024ms rtt min/avg/max/mdev = 0.430/0.537/0.644/0.107 ms [root@CentOS84 ]#curl 172.16.0.18 <h1> Welcome To IP172.16.0.18 Web <h1> <h1> NAT IS SUCCESSFUL!<h1> [root@CentOS84 ]# # 在外网IP172.16.0.18上不能访问内网 [root@CentOS84 ]#ip a ................... 2: eth0: <BROADCAST,MULTICAST,UP,LOWER_UP> mtu 1500 qdisc mq state UP group default qlen 1000 link/ether 00:50:56:a3:c9:76 brd ff:ff:ff:ff:ff:ff inet 172.16.0.18/24 brd 172.16.0.255 scope global noprefixroute eth0 valid_lft forever preferred_lft forever ................... [root@CentOS84 ]#ip route default via 172.16.0.254 dev eth0 proto static metric 100 172.16.0.0/24 dev eth0 proto kernel scope link src 172.16.0.18 metric 100 [root@CentOS84 ]# [root@CentOS84 ]#ping 192.168.250.18 PING 192.168.250.18 (192.168.250.18) 56(84) bytes of data. ^C --- 192.168.250.18 ping statistics --- 34 packets transmitted, 0 received, 100% packet loss, time 33777ms [root@CentOS84 ]# # 防火墙服务器上关闭SNAT规则后,内网无法访问外网,外网也无法访问内网 [root@CentOS84 ]#iptables -vnL -t nat --line-numbers Chain PREROUTING (policy ACCEPT 1265 packets, 394K bytes) num pkts bytes target prot opt in out source destination Chain INPUT (policy ACCEPT 422 packets, 136K bytes) num pkts bytes target prot opt in out source destination Chain POSTROUTING (policy ACCEPT 6 packets, 472 bytes) num pkts bytes target prot opt in out source destination 1 93 24843 LIBVIRT_PRT all -- * * 0.0.0.0/0 0.0.0.0/0 2 84 24151 SNAT all -- * * 192.168.250.0/24 0.0.0.0/0 to:172.16.0.8 Chain OUTPUT (policy ACCEPT 69 packets, 23208 bytes) num pkts bytes target prot opt in out source destination Chain LIBVIRT_PRT (1 references) num pkts bytes target prot opt in out source destination 1 0 0 RETURN all -- * * 192.168.122.0/24 224.0.0.0/24 2 0 0 RETURN all -- * * 192.168.122.0/24 255.255.255.255 3 0 0 MASQUERADE tcp -- * * 192.168.122.0/24 !192.168.122.0/24 masq ports: 1024-65535 4 0 0 MASQUERADE udp -- * * 192.168.122.0/24 !192.168.122.0/24 masq ports: 1024-65535 5 0 0 MASQUERADE all -- * * 192.168.122.0/24 !192.168.122.0/24 [root@CentOS84 ]#iptables -t nat -D POSTROUTING 2 [root@CentOS84 ]# [root@CentOS84 ]#ping 172.16.0.18 PING 172.16.0.18 (172.16.0.18) 56(84) bytes of data. ^C --- 172.16.0.18 ping statistics --- 6 packets transmitted, 0 received, 100% packet loss, time 5132ms [root@CentOS84 ]#curl 172.16.0.18 curl: (7) Failed to connect to 172.16.0.18 port 80: Connection timed out [root@CentOS84 ]#5.1.4 实现iptables规则永久保存
本次我们采用iptables-services实现iptables规则永久保存
# iptables-services 软件包已经安装 [root@CentOS84 ]#rpm -ql iptables-services /etc/sysconfig/ip6tables /etc/sysconfig/iptables /usr/lib/systemd/system/ip6tables.service /usr/lib/systemd/system/iptables.service /usr/libexec/initscripts/legacy-actions/ip6tables /usr/libexec/initscripts/legacy-actions/ip6tables/panic /usr/libexec/initscripts/legacy-actions/ip6tables/save /usr/libexec/initscripts/legacy-actions/iptables /usr/libexec/initscripts/legacy-actions/iptables/panic /usr/libexec/initscripts/legacy-actions/iptables/save /usr/libexec/iptables /usr/libexec/iptables/ip6tables.init /usr/libexec/iptables/iptables.init #默认配置 [root@CentOS84 ]#cat /usr/lib/systemd/system/iptables.service [Unit] Description=IPv4 firewall with iptables AssertPathExists=/etc/sysconfig/iptables Before=network-pre.target Wants=network-pre.target [Service] Type=oneshot RemainAfterExit=yes ExecStart=/usr/libexec/iptables/iptables.init start ExecReload=/usr/libexec/iptables/iptables.init reload ExecStop=/usr/libexec/iptables/iptables.init stop Environment=BOOTUP=serial Environment=CONSOLETYPE=serial StandardOutput=syslog StandardError=syslog [Install] WantedBy=multi-user.target #备份默认配置 [root@CentOS84 ]#cp /etc/sysconfig/iptables{,.bak} [root@CentOS84 ]#ll /etc/sysconfig/ total 144 -rw-r--r--. 1 root root 112 Nov 17 20:21 anaconda -rw-r--r--. 1 root root 403 May 11 2019 atd -rw-r--r--. 1 root root 46 Mar 2 2021 chronyd drwxr-xr-x. 2 root root 6 Feb 19 2021 console -rw-r--r--. 1 root root 150 Jun 2 2021 cpupower -rw-r--r--. 1 root root 110 Nov 9 2019 crond -rw-------. 1 root root 417 Aug 25 07:13 ebtables-config -rw-r--r--. 1 root root 73 Feb 4 2021 firewalld lrwxrwxrwx. 1 root root 15 Mar 3 2021 grub -> ../default/grub -rw------- 1 root root 635 Aug 25 07:13 ip6tables -rw-------. 1 root root 2134 Aug 25 07:13 ip6tables-config -rw------- 1 root root 550 Aug 25 07:13 iptables -rw------- 1 root root 550 Jan 21 21:20 iptables.bak -rw-------. 1 root root 2116 Aug 25 07:13 iptables-config -rw-r--r--. 1 root root 903 Feb 2 2021 irqbalance -rw-r--r--. 1 root root 2478 Feb 26 2021 kdump -rw-r--r--. 1 root root 185 Nov 17 20:21 kernel -rw-r--r--. 1 root root 168 May 21 2021 ksm -rw-r--r--. 1 root root 823 Nov 27 2019 libvirtd -rw-r--r--. 1 root root 310 May 11 2019 man-db drwxr-xr-x. 2 root root 6 Feb 19 2021 modules -rw-r--r--. 1 root root 22 Nov 17 20:21 network drwxr-xr-x. 2 root root 52 Jan 21 20:31 network-scripts -rw-------. 1 root root 364 Mar 11 2021 nftables.conf -rw-r--r--. 1 root root 911 May 21 2021 qemu-ga -rw-r--r--. 1 root root 186 Apr 27 2020 radvd -rw-r--r--. 1 root root 2915 Jan 14 2021 raid-check -rw-r--r--. 1 root root 73 Dec 2 2020 rpcbind -rw-r--r--. 1 root root 196 Dec 10 2020 rsyslog -rw-r--r--. 1 root root 0 Jan 12 2021 run-parts -rw-r--r--. 1 root root 428 Feb 10 2021 samba -rw-r--r--. 1 root root 429 May 16 2020 saslauthd lrwxrwxrwx. 1 root root 17 Nov 17 20:10 selinux -> ../selinux/config -rw-r--r--. 1 root root 186 May 16 2020 smartmontools -rw-r-----. 1 root root 591 Apr 27 2020 sshd -rw-r--r--. 1 root root 161 Nov 17 20:21 sshd-permitrootlogin -rw-r--r-- 1 root root 1015 Sep 18 03:10 sysstat -rw-r--r-- 1 root root 6430 Apr 6 2018 sysstat.ioconf -rw-r--r--. 1 root root 55 Nov 27 2019 virtlockd -rw-r--r--. 1 root root 53 Nov 27 2019 virtlogd -rw-r--r--. 1 root root 258 Mar 2 2021 wpa_supplicant [root@CentOS84 ]#cat /etc/sysconfig/iptables.bak # sample configuration for iptables service # you can edit this manually or use system-config-firewall # please do not ask us to add additional ports/services to this default configuration *filter :INPUT ACCEPT [0:0] :FORWARD ACCEPT [0:0] :OUTPUT ACCEPT [0:0] -A INPUT -m state --state RELATED,ESTABLISHED -j ACCEPT -A INPUT -p icmp -j ACCEPT -A INPUT -i lo -j ACCEPT -A INPUT -p tcp -m state --state NEW -m tcp --dport 22 -j ACCEPT -A INPUT -j REJECT --reject-with icmp-host-prohibited -A FORWARD -j REJECT --reject-with icmp-host-prohibited COMMIT #将测试运行好的iptables写入iptables文件 [root@CentOS84 ]#iptables-save > /etc/sysconfig/iptables #设定开机启动 [root@CentOS84 ]#systemctl enable iptables.service Created symlink /etc/systemd/system/multi-user.target.wants/iptables.service → /usr/lib/systemd/system/iptables.service. [root@CentOS84 ]#reboot # 重启机器后,查看配置被正确引导 [root@CentOS84 ]#iptables -vnL -t nat --line-numbers Chain PREROUTING (policy ACCEPT 23 packets, 5304 bytes) num pkts bytes target prot opt in out source destination Chain INPUT (policy ACCEPT 14 packets, 3310 bytes) num pkts bytes target prot opt in out source destination Chain POSTROUTING (policy ACCEPT 12 packets, 839 bytes) num pkts bytes target prot opt in out source destination 1 15 1171 LIBVIRT_PRT all -- * * 0.0.0.0/0 0.0.0.0/0 2 3 332 SNAT all -- * * 192.168.250.0/24 0.0.0.0/0 to:172.16.0.8 Chain OUTPUT (policy ACCEPT 15 packets, 1171 bytes) num pkts bytes target prot opt in out source destination Chain LIBVIRT_PRT (1 references) num pkts bytes target prot opt in out source destination 1 2 164 RETURN all -- * * 192.168.122.0/24 224.0.0.0/24 2 0 0 RETURN all -- * * 192.168.122.0/24 255.255.255.255 3 0 0 MASQUERADE tcp -- * * 192.168.122.0/24 !192.168.122.0/24 masq ports: 1024-65535 4 0 0 MASQUERADE udp -- * * 192.168.122.0/24 !192.168.122.0/24 masq ports: 1024-65535 5 0 0 MASQUERADE all -- * * 192.168.122.0/24 !192.168.122.0/24 6 0 0 RETURN all -- * * 192.168.122.0/24 224.0.0.0/24 7 0 0 RETURN all -- * * 192.168.122.0/24 255.255.255.255 8 0 0 MASQUERADE tcp -- * * 192.168.122.0/24 !192.168.122.0/24 masq ports: 1024-65535 9 0 0 MASQUERADE udp -- * * 192.168.122.0/24 !192.168.122.0/24 masq ports: 1024-65535 10 0 0 MASQUERADE all -- * * 192.168.122.0/24 !192.168.122.0/24 [root@CentOS84 ]#5.2 iptables实现DNAT,并持久保存规则
实现了上面的SNAT,本实验相对简单很多,很多知识和基础环境可以借用上面的,简单记录过程。