分布式事务理论:分布式事务 分布式事务解决方案之2PC(两阶段提交) 2PC即两阶段提交协议,是将整个事务流程分为两个阶段,准备阶段(Prepare phase)、提交阶段(commit phase),2是指两
分布式事务理论:分布式事务
分布式事务解决方案之2PC(两阶段提交)
2PC即两阶段提交协议,是将整个事务流程分为两个阶段,准备阶段(Prepare phase)、提交阶段(commit phase),2是指两个阶段,P是指准备阶段,C是指提交阶段。
整个事务过程由事务管理器和参与者组成,事务管理器负责决策整个分布式事务的提交和回滚,事务参与者负责自己本地事务的提交和回滚。
在计算机中部分关系数据库如Oracle、MySQL支持两阶段提交协议,如下图:
-
1、准备阶段(Prepare phase):事务管理器给每个参与者发送Prepare消息,每个数据库参与者在本地执行事务,并写本地的Undo/Redo日志,此时事务没有提交。(Undo日志是记录修改前的数据,用于数据库回滚,Redo日志是记录修改后的数据,用于提交事务后写入数据文件)
-
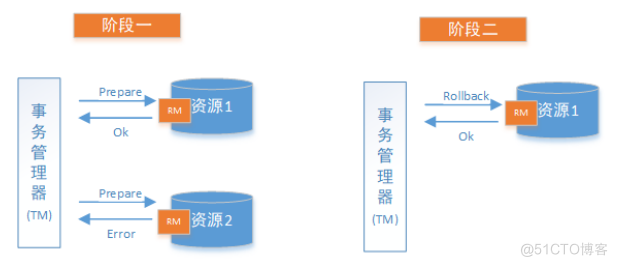
2、提交阶段(commit phase):如果事务管理器收到了参与者的执行失败或者超时消息时,直接给每个参与者发送回滚(Rollback)消息;否则,发送提交(Commit)消息;参与者根据事务管理器的指令执行提交或者回滚操作,并释放事务处理过程中使用的锁资源。注意:必须在最后阶段释放锁资源。
下图展示了2PC的两个阶段,分成功和失败两个情况说明:
成功情况:
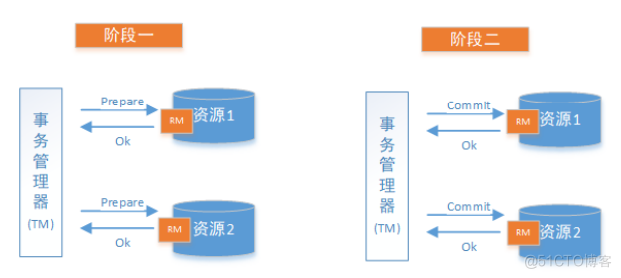
失败情况:
解决方案
XA方案
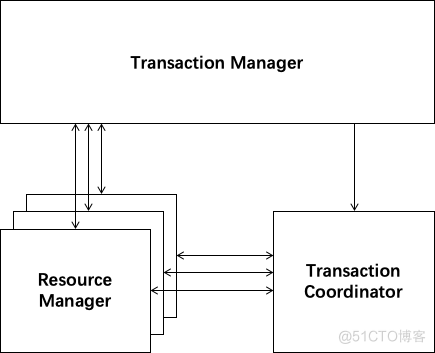
2PC的传统方案是在数据库层面实现的,如Oracle、MySQL都支持2PC协议,为了统一标准减少行业内不必要的对接成本,需要制定标准化的处理模型及接口标准,国际开放标准组织Open Group定义了分布式事务处理模型DTP(Distributed Transaction Processing Reference Model)。
为了让大家更明确XA方案的内容程,下面新用户注册送积分为例来说明:
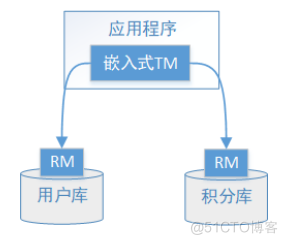
执行流程如下:
- 1、应用程序(AP)持有用户库和积分库两个数据源。
- 2、应用程序(AP)通过TM通知用户库RM新增用户,同时通知积分库RM为该用户新增积分,RM此时并未提交事务,此时用户和积分资源锁定。
- 3、TM收到执行回复,只要有一方失败则分别向其他RM发起回滚事务,回滚完毕,资源锁释放。
- 4、TM收到执行回复,全部成功,此时向所有RM发起提交事务,提交完毕,资源锁释放。
DTP模型定义如下角色:
- AP(Application Program):即应用程序,可以理解为使用DTP分布式事务的程序。
- RM(Resource Manager):即资源管理器,可以理解为事务的参与者,一般情况下是指一个数据库实例,通过资源管理器对该数据库进行控制,资源管理器控制着分支事务。
- TM(Transaction Manager):事务管理器,负责协调和管理事务,事务管理器控制着全局事务,管理事务生命周期,并协调各个RM。全局事务是指分布式事务处理环境中,需要操作多个数据库共同完成一个工作,这个工作即是一个全局事务。
- DTP模型定义TM和RM之间通讯的接口规范叫XA,简单理解为数据库提供的2PC接口协议,基于数据库的XA协议来实现2PC又称为XA方案。
以上三个角色之间的交互方式如下:
- 1)TM向AP提供 应用程序编程接口,AP通过TM提交及回滚事务。
- 2)TM交易中间件通过XA接口来通知RM数据库事务的开始、结束以及提交、回滚等。
总结:
整个2PC的事务流程涉及到三个角色AP、RM、TM。AP指的是使用2PC分布式事务的应用程序;RM指的是资源管理器,它控制着分支事务;TM指的是事务管理器,它控制着整个全局事务。
应用落地方案是:atomikos + druid的DruidXADataSource
需要引入maven依赖:
<dependency>
<groupId>com.alibaba</groupId>
<artifactId>druid-spring-boot-starter</artifactId>
<version>1.1.10</version>
</dependency>
<dependency>
<groupId>org.springframework.boot</groupId>
<artifactId>spring-boot-starter-jta-atomikos</artifactId>
</dependency>
XA方案的问题:
- 1、需要本地数据库支持XA协议。
- 2、资源锁需要等到两个阶段结束才释放,性能较差。
Seata方案
Seata是由阿里中间件团队发起的开源项目 Fescar,后更名为Seata,它是一个是开源的分布式事务框架。
传统2PC的问题在Seata中得到了解决,它通过对本地关系数据库的分支事务的协调来驱动完成全局事务,是工作在应用层的中间件。主要优点是性能较好,且不长时间占用连接资源,它以高效并且对业务0侵入的方式解决微服务场景下面临的分布式事务问题,它目前提供AT模式、XA模式、Saga模式和TCC模式的分布式事务解决方案。
Seata的设计思想如下:
Seata的设计目标其一是对业务无侵入,因此从业务无侵入的2PC方案着手,在传统2PC的基础上演进,并解决2PC方案面临的问题。
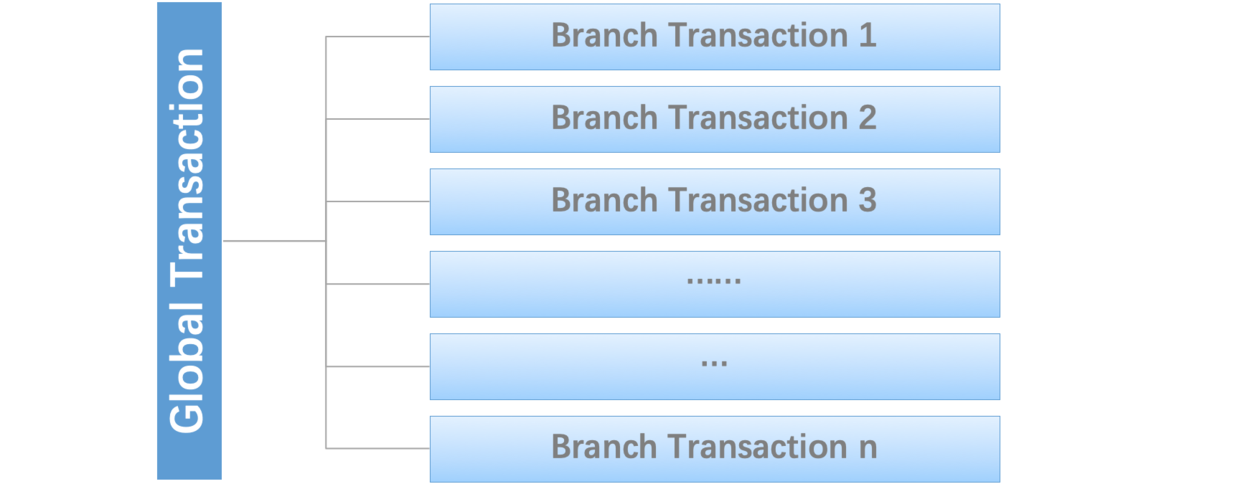
Seata把一个分布式事务理解成一个包含了若干分支事务的全局事务。全局事务的职责是协调其下管辖的分支事务达成一致,要么一起成功提交,要么一起失败回滚。此外,通常分支事务本身就是一个关系数据库的本地事务。
下图是全局事务与分支事务的关系图:
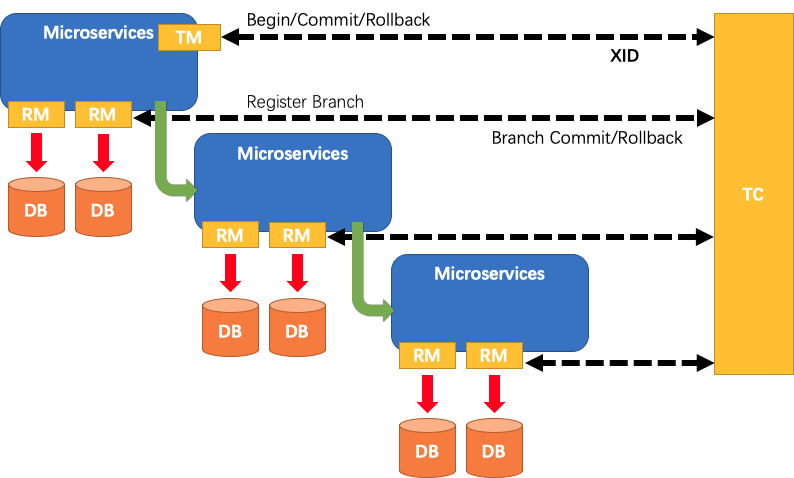
Seata有3个基本组成部分:
-
Transaction Coordinator (TC): 事务协调器,它是独立的中间件,需要独立部署运行,它维护全局事务的运行状态,接收TM指令发起全局事务的提交与回滚,负责与RM通信协调各各分支事务的提交或回滚。
-
Transaction Manager (TM): 事务管理器,TM需要嵌入应用程序中工作,它负责开启一个全局事务,并最终向TC发起全局提交或全局回滚的指令。
-
Resource Manager (RM): 控制分支事务,负责分支注册、状态汇报,并接收事务协调器TC的指令,驱动分支(本地)事务的提交和回滚。
Seata管理的分布式事务的典型生命周期:
- 1、TM要求TC开始一项新的全局事务,TC生成代表全局事务的XID。
- 2、XID通过微服务的调用链传播。
- 3、RM将本地事务注册为XID到TC的相应全局事务的分支。
- 4、TM要求TC提交或回退XID的相应全局事务。
- 5、TC驱动XID对应的全局事务下的所有分支事务以完成分支提交或回滚。
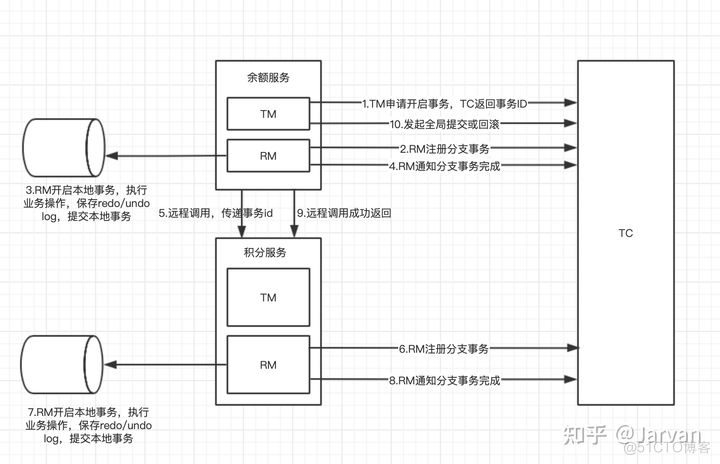
Seata实现2PC与传统2PC的差别:
-
架构层次方面,传统2PC方案的 RM 实际上是在数据库层,RM 本质上就是数据库自身,通过 XA 协议实现,而Seata的 RM 是以jar包的形式作为中间件层部署在应用程序这一侧的。
-
两阶段提交方面,传统2PC无论第二阶段的决议是commit还是rollback,事务性资源的锁都要保持到Phase2完成才释放。而Seata的做法是在Phase1 就将本地事务提交,这样就可以省去Phase2持锁的时间,整体提高效率。
Seata实现2PC事务
微服务版本:
Seata-Server:1.3.0
Nacos-Server:1.3.1
SpringBoot:2.2.10.RELEASE
spring-cloud-dependencies:Hoxton.SR8
spring-cloud-alibaba-dependencies:2.2.1.RELEASE
业务说明
本示例通过Seata中间件实现分布式事务,模拟三个账户的转账交易过程。
两个账户在三个不同的银行(张三在bank1、李四在bank2),bank1和bank2是两个个微服务。交易过程是,张三给李四转账指定金额。
上述交易步骤,要么一起成功,要么一起失败,必须是一个整体性的事务。
Nacos服务(参考:Spring Cloud Alibaba Nacos作为服务注册发现组件)
下载Nacos服务端压缩包:https://github.com/alibaba/nacos/releases
Seata服务端(TC)部署
下载Seata服务端压缩包:https://github.com/seata/seata/releases
Seata配置
- 1、修改conf目录中 flie.conf 文件,修改事务日志存储模式为 db 及数据库连接信息,且新增service模块,如下:
transport {
# tcp udt unix-domain-socket
type = "TCP"
#NIO NATIVE
server = "NIO"
#enable heartbeat
heartbeat = true
# the client batch send request enable
enableClientBatchSendRequest = false
#thread factory for netty
threadFactory {
bossThreadPrefix = "NettyBoss"
workerThreadPrefix = "NettyServerNIOWorker"
serverExecutorThreadPrefix = "NettyServerBizHandler"
shareBossWorker = false
clientSelectorThreadPrefix = "NettyClientSelector"
clientSelectorThreadSize = 1
clientWorkerThreadPrefix = "NettyClientWorkerThread"
# netty boss thread size,will not be used for UDT
bossThreadSize = 1
#auto default pin or 8
workerThreadSize = "default"
}
shutdown {
# when destroy server, wait seconds
wait = 3
}
serialization = "seata"
compressor = "none"
}
#这里手动加入service模块
service {
#transaction service group mapping
#修改,可不改,my_test_tx_group随便起名字。
vgroup_mapping.seata_bank1_group = "default"
vgroup_mapping.seata_bank2_group = "default"
#only support when registry.type=file, please don't set multiple addresses
# 此服务的地址
default.grouplist = "127.0.0.1:8091"
#disable seata
disableGlobalTransaction = false
}
## transaction log store, only used in server side
store {
## store mode: file、db
mode = "db"
## file store property
file {
## store location dir
dir = "sessionStore"
# branch session size , if exceeded first try compress lockkey, still exceeded throws exceptions
maxBranchSessionSize = 16384
# globe session size , if exceeded throws exceptions
maxGlobalSessionSize = 512
# file buffer size , if exceeded allocate new buffer
fileWriteBufferCacheSize = 16384
# when recover batch read size
sessionReloadReadSize = 100
# async, sync
flushDiskMode = async
}
## database store property
db {
## the implement of javax.sql.DataSource, such as DruidDataSource(druid)/BasicDataSource(dbcp) etc.
datasource = "druid"
## mysql/oracle/postgresql/h2/oceanbase etc.
dbType = "mysql"
driverClassName = "com.mysql.jdbc.Driver"
url = "jdbc:mysql://127.0.0.1:3306/seata"
user = "root"
password = "yibo"
minConn = 5
maxConn = 30
globalTable = "global_table"
branchTable = "branch_table"
lockTable = "lock_table"
queryLimit = 100
}
}
## server configuration, only used in server side
server {
recovery {
#schedule committing retry period in milliseconds
committingRetryPeriod = 1000
#schedule asyn committing retry period in milliseconds
asynCommittingRetryPeriod = 1000
#schedule rollbacking retry period in milliseconds
rollbackingRetryPeriod = 1000
#schedule timeout retry period in milliseconds
timeoutRetryPeriod = 1000
}
undo {
logSaveDays = 7
#schedule delete expired undo_log in milliseconds
logDeletePeriod = 86400000
}
#check auth
enableCheckAuth = true
#unit ms,s,m,h,d represents milliseconds, seconds, minutes, hours, days, default permanent
maxCommitRetryTimeout = "-1"
maxRollbackRetryTimeout = "-1"
rollbackRetryTimeoutUnlockEnable = false
}
## metrics configuration, only used in server side
metrics {
enabled = false
registryType = "compact"
# multi exporters use comma divided
exporterList = "prometheus"
exporterPrometheusPort = 9898
}
由于我们使用了db模式存储事务日志,所以我们需要创建一个seata数据库,Seata数据库表初始化脚本:https://github.com/seata/seata/tree/1.4.0/script/server/db
- 2、修改注册中心和配置中心,使用nacos作为注册中心和配置中心,即修改 conf目录中 registry.conf 文件,如下:
registry {
# file 、nacos 、eureka、redis、zk、consul、etcd3、sofa
type = "nacos"
nacos {
application = "seata-server"
serverAddr = "127.0.0.1:8848"
group = "SEATA_GROUP"
namespace = ""
cluster = "default"
username = ""
password = ""
}
eureka {
serviceUrl = "http://localhost:8761/eureka"
application = "default"
weight = "1"
}
redis {
serverAddr = "localhost:6379"
db = 0
password = ""
cluster = "default"
timeout = 0
}
zk {
cluster = "default"
serverAddr = "127.0.0.1:2181"
sessionTimeout = 6000
connectTimeout = 2000
username = ""
password = ""
}
consul {
cluster = "default"
serverAddr = "127.0.0.1:8500"
}
etcd3 {
cluster = "default"
serverAddr = "http://localhost:2379"
}
sofa {
serverAddr = "127.0.0.1:9603"
application = "default"
region = "DEFAULT_ZONE"
datacenter = "DefaultDataCenter"
cluster = "default"
group = "SEATA_GROUP"
addressWaitTime = "3000"
}
file {
name = "file.conf"
}
}
config {
# file、nacos 、apollo、zk、consul、etcd3
type = "nacos"
nacos {
serverAddr = "127.0.0.1:8848"
namespace = ""
group = "SEATA_GROUP"
username = ""
password = ""
}
consul {
serverAddr = "127.0.0.1:8500"
}
apollo {
appId = "seata-server"
apolloMeta = "http://192.168.1.204:8801"
namespace = "application"
}
zk {
serverAddr = "127.0.0.1:2181"
sessionTimeout = 6000
connectTimeout = 2000
username = ""
password = ""
}
etcd3 {
serverAddr = "http://localhost:2379"
}
file {
name = "file.conf"
}
}
- 3、配置config.txt
官网seata-server-0.9.0的conf目录下有该文件,seata-server-1.0.0及以后版本的conf目录下没有nacos-config.txt文件,从seata-1.3.0源码中找到config.txt文件,文件位置:seata-1.3.0/script/config-center,或者从https://github.com/seata/seata/tree/1.3.0/script/config-center下载,修改store.db相关内容和service.vgroupMapping相关内容,如下:
transport.type=TCP
transport.server=NIO
transport.heartbeat=true
transport.enableClientBatchSendRequest=false
transport.threadFactory.bossThreadPrefix=NettyBoss
transport.threadFactory.workerThreadPrefix=NettyServerNIOWorker
transport.threadFactory.serverExecutorThreadPrefix=NettyServerBizHandler
transport.threadFactory.shareBossWorker=false
transport.threadFactory.clientSelectorThreadPrefix=NettyClientSelector
transport.threadFactory.clientSelectorThreadSize=1
transport.threadFactory.clientWorkerThreadPrefix=NettyClientWorkerThread
transport.threadFactory.bossThreadSize=1
transport.threadFactory.workerThreadSize=default
transport.shutdown.wait=3
# 修改为自己的服务组名,各个微服务之间使用不同的服务组名
service.vgroupMapping.seata_bank1_group=default
service.vgroupMapping.seata_bank2_group=default
service.default.grouplist=127.0.0.1:8091
service.enableDegrade=false
service.disableGlobalTransaction=false
client.rm.asyncCommitBufferLimit=10000
client.rm.lock.retryInterval=10
client.rm.lock.retryTimes=30
client.rm.lock.retryPolicyBranchRollbackOnConflict=true
client.rm.reportRetryCount=5
client.rm.tableMetaCheckEnable=false
client.rm.sqlParserType=druid
client.rm.reportSuccessEnable=false
client.rm.sagaBranchRegisterEnable=false
client.tm.commitRetryCount=5
client.tm.rollbackRetryCount=5
client.tm.degradeCheck=false
client.tm.degradeCheckAllowTimes=10
client.tm.degradeCheckPeriod=2000
store.mode=file
store.file.dir=file_store/data
store.file.maxBranchSessionSize=16384
store.file.maxGlobalSessionSize=512
store.file.fileWriteBufferCacheSize=16384
store.file.flushDiskMode=async
store.file.sessionReloadReadSize=100
store.db.datasource=druid
store.db.dbType=mysql
store.db.driverClassName=com.mysql.jdbc.Driver
store.db.url=jdbc:mysql://127.0.0.1:3306/seata?useUnicode=true
store.db.user=root
store.db.password=yibo
store.db.minConn=5
store.db.maxConn=30
store.db.globalTable=global_table
store.db.branchTable=branch_table
store.db.queryLimit=100
store.db.lockTable=lock_table
store.db.maxWait=5000
store.redis.host=127.0.0.1
store.redis.port=6379
store.redis.maxConn=10
store.redis.minConn=1
store.redis.database=0
store.redis.password=null
store.redis.queryLimit=100
server.recovery.committingRetryPeriod=1000
server.recovery.asynCommittingRetryPeriod=1000
server.recovery.rollbackingRetryPeriod=1000
server.recovery.timeoutRetryPeriod=1000
server.maxCommitRetryTimeout=-1
server.maxRollbackRetryTimeout=-1
server.rollbackRetryTimeoutUnlockEnable=false
client.undo.dataValidation=true
client.undo.logSerialization=jackson
client.undo.onlyCareUpdateColumns=true
server.undo.logSaveDays=7
server.undo.logDeletePeriod=86400000
client.undo.logTable=undo_log
client.log.exceptionRate=100
transport.serialization=seata
transport.compressor=none
metrics.enabled=false
metrics.registryType=compact
metrics.exporterList=prometheus
metrics.exporterPrometheusPort=9898
并将config.txt文件放到Seata-Server的conf文件夹的同级目录里面
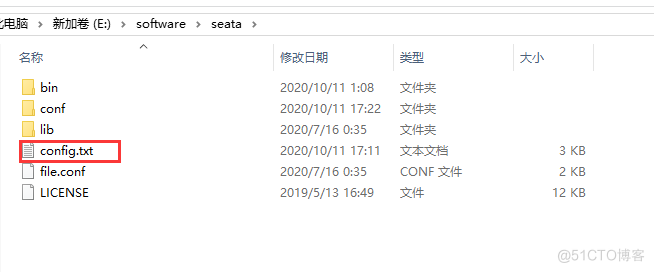
- 4、新增nacos-config.sh文件
- 从seata-1.3.0源码中找到nacos-config.sh文件,文件位置:seata-1.3.0/script/config-server/nacos/nacos-config.sh
- 从https://github.com/seata/seata/tree/1.3.0/script/config-center/nacos下载
文件内容如下:
#!/usr/bin/env bash
# Copyright 1999-2019 Seata.io Group.
#
# Licensed under the Apache License, Version 2.0 (the "License");
# you may not use this file except in compliance with the License.
# You may obtain a copy of the License at、
#
# http://www.apache.org/licenses/LICENSE-2.0
#
# Unless required by applicable law or agreed to in writing, software
# distributed under the License is distributed on an "AS IS" BASIS,
# WITHOUT WARRANTIES OR CONDITIONS OF ANY KIND, either express or implied.
# See the License for the specific language governing permissions and
# limitations under the License.
while getopts ":h:p:g:t:u:w:" opt
do
case $opt in
h)
host=$OPTARG
;;
p)
port=$OPTARG
;;
g)
group=$OPTARG
;;
t)
tenant=$OPTARG
;;
u)
username=$OPTARG
;;
w)
password=$OPTARG
;;
?)
echo " USAGE OPTION: $0 [-h host] [-p port] [-g group] [-t tenant] [-u username] [-w password] "
exit 1
;;
esac
done
if [[ -z ${host} ]]; then
host=localhost
fi
if [[ -z ${port} ]]; then
port=8848
fi
if [[ -z ${group} ]]; then
group="SEATA_GROUP"
fi
if [[ -z ${tenant} ]]; then
tenant=""
fi
if [[ -z ${username} ]]; then
username=""
fi
if [[ -z ${password} ]]; then
password=""
fi
nacosAddr=$host:$port
contentType="content-type:application/json;charset=UTF-8"
echo "set nacosAddr=$nacosAddr"
echo "set group=$group"
failCount=0
tempLog=$(mktemp -u)
function addConfig() {
curl -X POST -H "${contentType}" "http://$nacosAddr/nacos/v1/cs/configs?dataId=$1&group=$group&content=$2&tenant=$tenant&username=$username&password=$password" >"${tempLog}" 2>/dev/null
if [[ -z $(cat "${tempLog}") ]]; then
echo " Please check the cluster status. "
exit 1
fi
if [[ $(cat "${tempLog}") =~ "true" ]]; then
echo "Set $1=$2 successfully "
else
echo "Set $1=$2 failure "
(( failCount++ ))
fi
}
count=0
for line in $(cat $(dirname "$PWD")/config.txt | sed s/[[:space:]]//g); do
(( count++ ))
key=${line%%=*}
value=${line#*=}
addConfig "${key}" "${value}"
done
echo "========================================================================="
echo " Complete initialization parameters, total-count:$count , failure-count:$failCount "
echo "========================================================================="
if [[ ${failCount} -eq 0 ]]; then
echo " Init nacos config finished, please start seata-server. "
else
echo " init nacos config fail. "
fi
注意:config.txt文件必须在nacos-config.sh的上级目录,即nacos-config.sh放在conf目录中
- 5、使用nacos-config.sh同步配置到nacos
在Windows系统中,在Seata-Server的conf目录中采用Git Bash执行
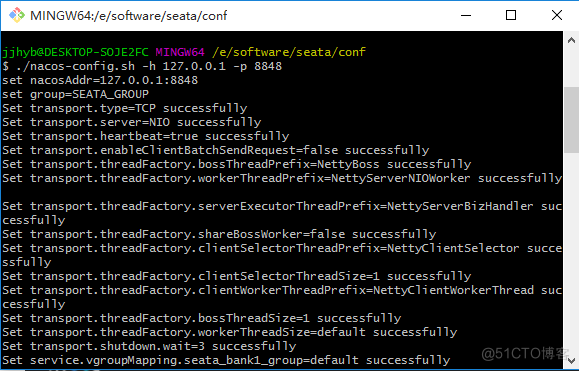
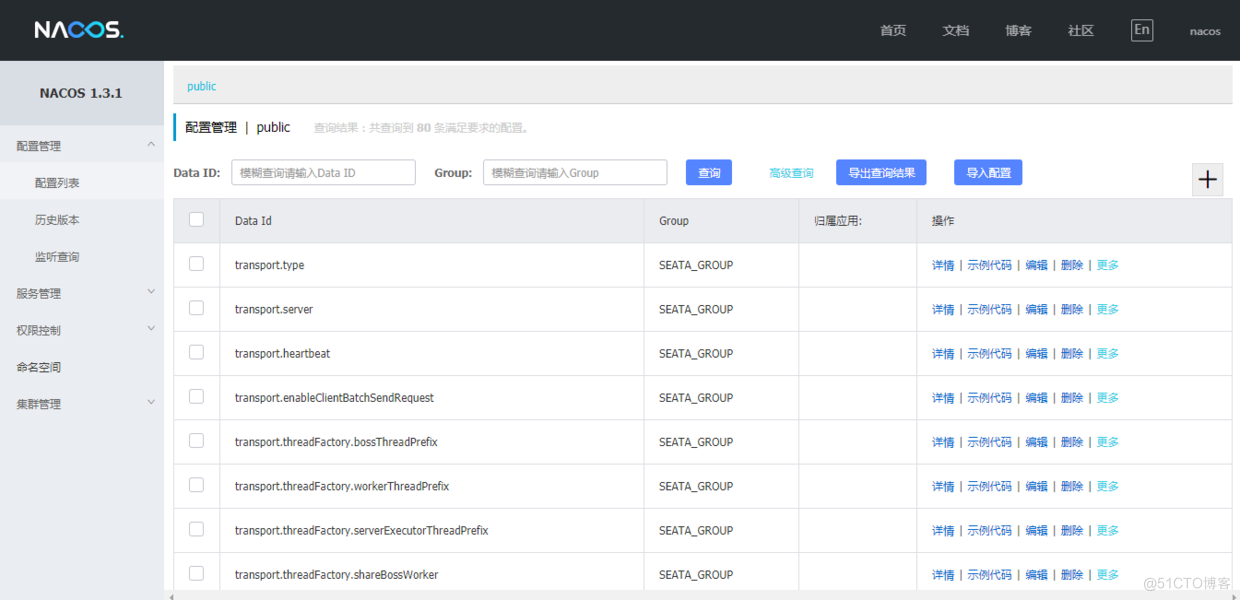
执行完成后nacos会新增seata配置,如下图:
高可用部署 Seata 服务端 - HA Cluster
# 实际使用 -Xmx512m -Xms512m -Xmn256m 也没发现什么问题
sh seata-server512.sh -h 127.0.0.1 -p 8091 -m db
-h: 注册到注册中心的ip , 虽然是可选,但建议带上
-p: Server rpc 监听端口
-m: 全局事务会话信息存储模式,file、db,优先读取启动参数
-n: Server node,多个Server时,需区分各自节点,用于生成不同区间的transactionId,以免冲突
-e: 多环境配置
sh seata-server.sh -p 8091 -h 192.168.1.11 -m db -n 1
sh seata-server.sh -p 8091 -h 192.168.1.12 -m db -n 2
# 注意要设置 -n: Server node ,多个Server时,需区分各自节点,用于生成不同区间的transactionId,以免冲突
windows单机演示:
seata-server.bat -p 8091 -h 127.0.0.1 -m db -n 1
seata-server.bat -p 18091 -h 127.0.0.1 -m db -n 2
seata-server.bat -p 8091 -h 127.0.0.1 -m file -n 1
seata-server.bat -p 8092 -h 127.0.0.1 -m file -n 2
登录nacos , 查看 seata 命名空间下的 服务列表,会发现有两个名称为 serverAddr 的服务

至此 seata-server 集群已经搭建完成,但是 setata rm 和 tm 客户端如何使用这个集群呢?
-
Client端配置:在Spring Boot项目,使用的是 seata-spring-boot-starter 依赖,可以从源码的 script --> client -->spring 目录下 复制 seata 配置,但是这个配置默认是使用 file 类型的注册中心
- file 类型下, 项目会通过 seata.service.grouplist.default=127.0.0.1:8091 配置的内容连接 seata-server , 即使不配置 seata.service.grouplist.default ,仍然会用 127.0.0.1:8091 尝试连接 seata-server
- 官网说 grouplist 只有在 file 类型才会被程序读取,其他类型的注册中心不会读取
- 由于spring-boot本身配置文件语法的要求,这个地方需要将file.conf中的default.grouplist写成grouplist.default, 效果是一样的.
-
为了让 setata rm 和 tm 客户端连接seata-server集群,需要利用注册中心的注册发现机制,让注册中心找到seata-server集群的IP;
各微服务配置
<parent>
<groupId>org.springframework.boot</groupId>
<artifactId>spring-boot-starter-parent</artifactId>
<version>2.2.10.RELEASE</version>
<relativePath/>
</parent>
<properties>
<project.build.sourceEncoding>UTF-8</project.build.sourceEncoding>
<project.reporting.outputEncoding>UTF-8</project.reporting.outputEncoding>
<java.version>1.8</java.version>
</properties>
<dependencies>
<dependency>
<groupId>org.springframework.boot</groupId>
<artifactId>spring-boot-starter-web</artifactId>
</dependency>
<dependency>
<groupId>com.alibaba.cloud</groupId>
<artifactId>spring-cloud-starter-alibaba-nacos-discovery</artifactId>
<exclusions>
<exclusion>
<groupId>com.alibaba.nacos</groupId>
<artifactId>nacos-client</artifactId>
</exclusion>
</exclusions>
</dependency>
<dependency>
<groupId>com.alibaba.nacos</groupId>
<artifactId>nacos-client</artifactId>
<version>1.3.1</version>
</dependency>
<dependency>
<groupId>com.alibaba.cloud</groupId>
<artifactId>spring-cloud-alibaba-seata</artifactId>
<version>2.2.0.RELEASE</version>
<exclusions>
<exclusion>
<groupId>io.seata</groupId>
<artifactId>seata-all</artifactId>
</exclusion>
<exclusion>
<groupId>io.seata</groupId>
<artifactId>seata-spring-boot-starter</artifactId>
</exclusion>
</exclusions>
</dependency>
<dependency>
<groupId>io.seata</groupId>
<artifactId>seata-spring-boot-starter</artifactId>
<version>1.3.0</version>
</dependency>
<dependency>
<groupId>org.springframework.cloud</groupId>
<artifactId>spring-cloud-starter-openfeign</artifactId>
</dependency>
<dependency>
<groupId>tk.mybatis</groupId>
<artifactId>mapper-spring-boot-starter</artifactId>
<version>2.1.5</version>
</dependency>
<dependency>
<groupId>mysql</groupId>
<artifactId>mysql-connector-java</artifactId>
<version>8.0.18</version>
</dependency>
<dependency>
<groupId>org.projectlombok</groupId>
<artifactId>lombok</artifactId>
<version>1.18.12</version>
<scope>provided</scope>
</dependency>
</dependencies>
<dependencyManagement>
<dependencies>
<dependency>
<groupId>org.springframework.cloud</groupId>
<artifactId>spring-cloud-dependencies</artifactId>
<version>Hoxton.SR8</version>
<type>pom</type>
<scope>import</scope>
</dependency>
<dependency>
<groupId>com.alibaba.cloud</groupId>
<artifactId>spring-cloud-alibaba-dependencies</artifactId>
<version>2.2.1.RELEASE</version>
<type>pom</type>
<scope>import</scope>
</dependency>
</dependencies>
</dependencyManagement>
<build>
<plugins>
<plugin>
<groupId>org.springframework.boot</groupId>
<artifactId>spring-boot-maven-plugin</artifactId>
</plugin>
<plugin>
<groupId>org.mybatis.generator</groupId>
<artifactId>mybatis-generator-maven-plugin</artifactId>
<version>1.3.6</version>
<configuration>
<configurationFile>
${basedir}/src/main/resources/generator/generatorConfig.xml
</configurationFile>
<overwrite>true</overwrite>
<verbose>true</verbose>
</configuration>
<dependencies>
<dependency>
<groupId>mysql</groupId>
<artifactId>mysql-connector-java</artifactId>
<version>8.0.18</version>
</dependency>
<dependency>
<groupId>tk.mybatis</groupId>
<artifactId>mapper</artifactId>
<version>4.1.5</version>
</dependency>
</dependencies>
</plugin>
</plugins>
</build>
spring.application.name=seata-bank1
server.port=8084
spring.cloud.nacos.discovery.server-addr=127.0.0.1:8848
spring.cloud.nacos.discovery.group=SEATA_GROUP
seata.enabled=true
#这里的名字与file.conf中vgroup_mapping.my_test_tx_group = "default"相同
seata.tx-service-group=seata_bank1_group
seata.application-id=${spring.application.name}
#这里的名字与file.conf中vgroup_mapping.my_test_tx_group = "default"相同
seata.service.vgroup-mapping.seata_bank1_group=default
#这里的名字与file.conf中default.grouplist = "127.0.0.1:8091"相同
seata.service.grouplist.default=127.0.0.1:8091
seata.enable-auto-data-source-proxy=true
seata.config.type=nacos
#这里的名字就是registry.conf中 nacos的group名字
seata.config.nacos.group=SEATA_GROUP
#这里的地址就是你的nacos的地址,可以更换为线上
seata.config.nacos.server-addr=127.0.0.1:8848
seata.registry.type=nacos
seata.registry.nacos.application=seata-server
#这里的地址就是你的nacos的地址,可以更换为线上
seata.registry.nacos.server-addr=127.0.0.1:8848
#这里的名字就是registry.conf中 nacos的group名字
seata.registry.nacos.group=SEATA_GROUP
seata.registry.nacos.cluster=default
@MapperScan("com.yibo.seata.mapper")//扫描mybatis的指定包下的接口
@SpringBootApplication
@EnableFeignClients
@EnableDiscoveryClient
public class Seata1Application {
public static void main(String[] args) {
SpringApplication.run(Seata1Application.class,args);
}
}
业务逻辑实现
@RestController
@RequestMapping("/bank1")
public class Bank1Controller {
@Autowired
private AccountService accountService;
@GetMapping("/transfer/{amount}")
public String transfer(@PathVariable("amount") Long amount){
accountService.updateAccountBalance("1",amount);
return "bank1"+amount;
}
}
- 2、Service实现,@GlobalTransactional注解用以开启全局事务,@Transactional注解用于分支事务
@Service
@Slf4j
public class AccountServiceImpl implements AccountService {
@Autowired
private AccountInfoMapper accountInfoMapper;
@Autowired
private Bank2Client bank2Client;
@Transactional
@GlobalTransactional//开启全局事务
public void updateAccountBalance(String accountNo, Long amount) {
log.info("bank1 service begin,XID:{}", RootContext.getXID());
//扣减张三的金额
accountInfoMapper.updateAccountBalance(accountNo,amount *-1);
//调用李四微服务,转账
String transfer = bank2Client.transfer(amount);
if("fallback".equals(transfer)){
//调用李四微服务异常
throw new RuntimeException("调用李四微服务异常");
}
if(amount == 2){
//人为制造异常
throw new RuntimeException("bank1 make exception..");
}
}
}
- 3、Bank2Client接口的FeignClient
@FeignClient(value="seata-bank2")
public interface Bank2Client {
//远程调用微服务
@GetMapping("/bank2/transfer/{amount}")
public String transfer(@PathVariable("amount")Long amount);
}
其他微服务按此配置即可。
github源码地址:https://github.com/jjhyb/distributed-transaction
参考:
https://github.com/seata/seata
http://classinstance.cn/detail/73.html
http://seata.io/en-us/docs/ops/deploy-server.html
https://www.cnblogs.com/h--d/p/12994365.html
https://developer.aliyun.com/article/768872
https://www.freesion.com/article/5542273585/
https://blog.csdn.net/u013058742/article/details/104063203
https://blog.csdn.net/sinat_38670641/article/details/108237920
https://blog.csdn.net/justfamily/article/details/105333621


