作者:京东科技 牛至伟
近半年有幸参与了一个创新项目,由于没有任何历史包袱,所以选择了Vue3技术栈,总体来说感受如下:
• setup语法糖<script setup lang="ts">摆脱了书写声明式的代码,用起来很流畅,提升不少效率
• 可以通过Composition API(组合式API)封装可复用逻辑,将UI和逻辑分离,提高复用性,view层代码展示更清晰
• 和Vue3更搭配的状态管理库Pinia,少去了很多配置,使用起来更便捷
• 构建工具Vite,基于ESM和Rollup,省去本地开发时的编译步骤,但是build打包时还是会编译(考虑到兼容性)
• 必备VSCode插件Volar,支持Vue3内置API的TS类型推断,但是不兼容Vue2,如果需要在Vue2和Vue3项目中切换,比较麻烦
当然也遇到一些问题,最典型的就是响应式相关的问题
响应式篇
本篇主要借助watch函数,理解ref、reactive等响应式数据/状态,有兴趣的同学可以查看Vue3源代码部分加深理解,
watch数据源可以是ref (包括计算属性)、响应式对象、getter 函数、或多个数据源组成的数组
import { ref, reactive, watch, nextTick } from 'vue'//定义4种响应式数据/状态//1、ref值为基本类型const simplePerson = ref('张三') //2、ref值为引用类型,等价于:person.value = reactive({ name: '张三' })const person = ref({ name: '张三'})//3、ref值包含嵌套的引用类型,等价于:complexPerson.value = reactive({ name: '张三', info: { age: 18 } })const complexPerson = ref({ name: '张三', info: { age: 18 } })//4、reactiveconst reactivePerson = reactive({ name: '张三', info: { age: 18 } })//改变属性,观察以下不同情景下的监听结果nextTick(() => { simplePerson.value = '李四' person.value.name = '李四' complexPerson.value.info.age = 20 reactivePerson.info.age = 22})//情景一:数据源为RefImplwatch(simplePerson, (newVal) => { console.log(newVal) //输出:李四})//情景二:数据源为'张三'watch(simplePerson.value, (newVal) => { console.log(newVal) //非法数据源,监听不到且控制台告警 })//情景三:数据源为RefImpl,但是.value才是响应式对象,所以要加deepwatch(person, (newVal) => { console.log(newVal) //输出:{name: '李四'}},{ deep: true //必须设置,否则监听不到内部变化}) //情景四:数据源为响应式对象watch(person.value, (newVal) => { console.log(newVal) //输出:{name: '李四'}})//情景五:数据源为'张三'watch(person.value.name, (newVal) => { console.log(newVal) //非法数据源,监听不到且控制台告警 })//情景六:数据源为getter函数,返回基本类型watch( () => person.value.name, (newVal) => { console.log(newVal) //输出:李四 })//情景七:数据源为响应式对象(在Vue3中状态都是默认深层响应式的)watch(complexPerson.value.info, (newVal, oldVal) => { console.log(newVal) //输出:Proxy {age: 20} console.log(newVal === oldVal) //输出:true}) //情景八:数据源为getter函数,返回响应式对象watch( () => complexPerson.value.info, (newVal) => { console.log(newVal) //除非设置deep: true或info属性被整体替换,否则监听不到 })//情景九:数据源为响应式对象watch(reactivePerson, (newVal) => { console.log(newVal) //不设置deep: true也可以监听到 })总结:
Props篇
设置默认值
type Props = { placeholder?: string modelValue: string multiple?: boolean}const props = withDefaults(defineProps<Props>(), { placeholder: '请选择', multiple: false,})双向绑定(多个值)
• 自定义组件
//FieldSelector.vuetype Props = { businessTableUuid: string businessTableFieldUuid?: string}const props = defineProps<Props>()const emits = defineEmits([ 'update:businessTableUuid', 'update:businessTableFieldUuid',])const businessTableUuid = ref('')const businessTableFieldUuid = ref('')// props.businessTableUuid、props.businessTableFieldUuid转为本地状态,此处省略//表切换const tableChange = (businessTableUuid: string) => { emits('update:businessTableUuid', businessTableUuid) emits('update:businessTableFieldUuid', '') businessTableFieldUuid.value = ''}//字段切换const fieldChange = (businessTableFieldUuid: string) => { emits('update:businessTableFieldUuid', businessTableFieldUuid)}• 使用组件
<template> <FieldSelector v-model:business-table-uuid="stringFilter.businessTableUuid" v-model:business-table-field-uuid="stringFilter.businessTableFieldUuid" /></template><script setup lang="ts">import { reactive } from 'vue'const stringFilter = reactive({ businessTableUuid: '', businessTableFieldUuid: ''})</script>单向数据流
逻辑/UI解耦篇
利用Vue3的Composition/组合式API,将某种逻辑涉及到的状态,以及修改状态的方法封装成一个自定义hook,将组件中的逻辑解耦,这样即使UI有不同的形态或者调整,只要逻辑不变,就可以复用逻辑。下面是本项目中涉及的一个真实案例-逻辑树组件,UI有2种形态且可以相互转化。
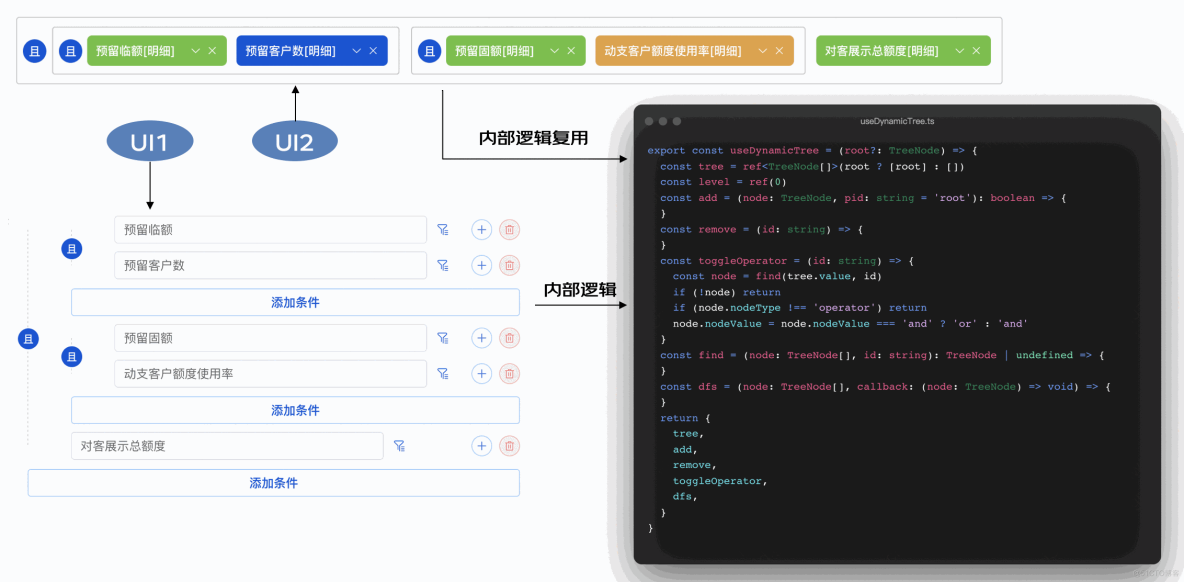
• hooks部分的代码:useDynamicTree.ts
import { ref } from 'vue'import { nanoid } from 'nanoid'export type TreeNode = { id?: string pid: string nodeUuid?: string partentUuid?: string nodeType: string nodeValue?: any logicValue?: any children: TreeNode[] level?: number}export const useDynamicTree = (root?: TreeNode) => { const tree = ref<TreeNode[]>(root ? [root] : []) const level = ref(0) //添加节点 const add = (node: TreeNode, pid: string = 'root'): boolean => { //添加根节点 if (pid === '') { tree.value = [node] return true } level.value = 0 const pNode = find(tree.value, pid) if (!pNode) return false //嵌套关系不能超过3层 if (pNode.level && pNode.level > 2) return false if (!node.id) { node.id = nanoid() } if (pNode.nodeType === 'operator') { pNode.children.push(node) } else { //如果父节点不是关系节点,则构建新的关系节点 const current = JSON.parse(JSON.stringify(pNode)) current.pid = pid current.id = nanoid() Object.assign(pNode, { nodeType: 'operator', nodeValue: 'and', // 重置回显信息 logicValue: undefined, nodeUuid: undefined, parentUuid: undefined, children: [current, node], }) } return true } //删除节点 const remove = (id: string) => { const node = find(tree.value, id) if (!node) return //根节点处理 if (node.pid === '') { tree.value = [] return } const pNode = find(tree.value, node.pid) if (!pNode) return const index = pNode.children.findIndex((item) => item.id === id) if (index === -1) return pNode.children.splice(index, 1) if (pNode.children.length === 1) { //如果只剩下一个节点,则替换父节点(关系节点) const [one] = pNode.children Object.assign( pNode, { ...one, }, { pid: pNode.pid, }, ) if (pNode.pid === '') { pNode.id = 'root' } } } //切换逻辑关系:且/或 const toggleOperator = (id: string) => { const node = find(tree.value, id) if (!node) return if (node.nodeType !== 'operator') return node.nodeValue = node.nodeValue === 'and' ? 'or' : 'and' } //查找节点 const find = (node: TreeNode[], id: string): TreeNode | undefined => { // console.log(node, id) for (let i = 0; i < node.length; i++) { if (node[i].id === id) { Object.assign(node[i], { level: level.value, }) return node[i] } if (node[i].children?.length > 0) { level.value += 1 const result = find(node[i].children, id) if (result) { return result } level.value -= 1 } } return undefined } //提供遍历节点方法,支持回调 const dfs = (node: TreeNode[], callback: (node: TreeNode) => void) => { for (let i = 0; i < node.length; i++) { callback(node[i]) if (node[i].children?.length > 0) { dfs(node[i].children, callback) } } } return { tree, add, remove, toggleOperator, dfs, }}• 在不同组件中使用(UI1/UI2组件为递归组件,内部实现不再展开)
//组件1<template> <UI1 :logic="logic" :on-add="handleAdd" :on-remove="handleRemove" :toggle-operator="toggleOperator" </UI1></template><script setup lang="ts"> import { useDynamicTree } from '@/hooks/useDynamicTree' const { add, remove, toggleOperator, tree: logic, dfs } = useDynamicTree() const handleAdd = () => { //添加条件 } const handleRemove = () => { //删除条件 } const toggleOperator = () => { //切换逻辑关系:且、或 }</script>//组件2 <template> <UI2 :logic="logic" :on-add="handleAdd" :on-remove="handleRemove" :toggle-operator="toggleOperator" </UI2> </template> <script setup lang="ts"> import { useDynamicTree } from '@/hooks/useDynamicTree' const { add, remove, toggleOperator, tree: logic, dfs } = useDynamicTree() const handleAdd = () => { //添加条件 } const handleRemove = () => { //删除条件 } const toggleOperator = () => { //切换逻辑关系:且、或 } </script>Pinia状态管理篇
将复杂逻辑的状态以及修改状态的方法提升到store内部管理,可以避免props的层层传递,减少props复杂度,状态管理更清晰
• 定义一个store(非声明式):User.ts
import { computed, reactive } from 'vue'import { defineStore } from 'pinia'type UserInfo = { userName: string realName: string headImg: string organizationFullName: string}export const useUserStore = defineStore('user', () => { const userInfo = reactive<UserInfo>({ userName: '', realName: '', headImg: '', organizationFullName: '' }) const fullName = computed(() => { return `${userInfo.userName}[${userInfo.realName}]` }) const setUserInfo = (info: UserInfo) => { Object.assgin(userInfo, {...info}) } return { userInfo, fullName, setUserInfo }})• 在组件中使用
<template> <div class="welcome" font-JDLangZheng> <el-space> <el-avatar :size="60" :src="userInfo.headImg ? userInfo.headImg : avatar"> </el-avatar> <div> <p>你好,{{ userInfo.realName }},欢迎回来</p> <p style="font-size: 14px">{{ userInfo.organizationFullName }}</p> </div> </el-space> </div></template><script setup lang="ts"> import { useUserStore } from '@/stores/user' import avatar from '@/assets/avatar.png' const { userInfo } = useUserStore()</script>