前言
配置文件想必大家都很熟悉,无论什么架构都离不开配置,虽然spring boot已经大大简化了配置,但服务环境也好几个,管理配置起来还是很麻烦,并且每次改完配置都需要重启服务,nacos config出现就解决了这些问题,它把配置统一放到服务进行管理,客户端这边进行有需要的获取,可以实时对配置进行修改和发布
如何使用Nacos Config
<parent> <groupId>org.springframework.boot</groupId> <artifactId>spring-boot-starter-parent</artifactId> <version>2.3.12.RELEASE</version> <relativePath/> <!-- lookup parent from repository --> </parent> <dependencies> <dependency> <groupId>org.springframework.boot</groupId> <artifactId>spring-boot-starter-web</artifactId> </dependency> <dependency> <groupId>com.alibaba.cloud</groupId> <artifactId>spring-cloud-starter-alibaba-nacos-config</artifactId> </dependency> </dependencies> <dependencyManagement> <dependencies> <dependency> <groupId>com.alibaba.cloud</groupId> <artifactId>spring-cloud-alibaba-dependencies</artifactId> <version>2.2.6.RELEASE</version> <type>pom</type> <scope>import</scope> </dependency> </dependencies> </dependencyManagement>Nacos Config的使用方式:Nacos Config配置中心
spring boot启动容器如何加载nacos config配置文件
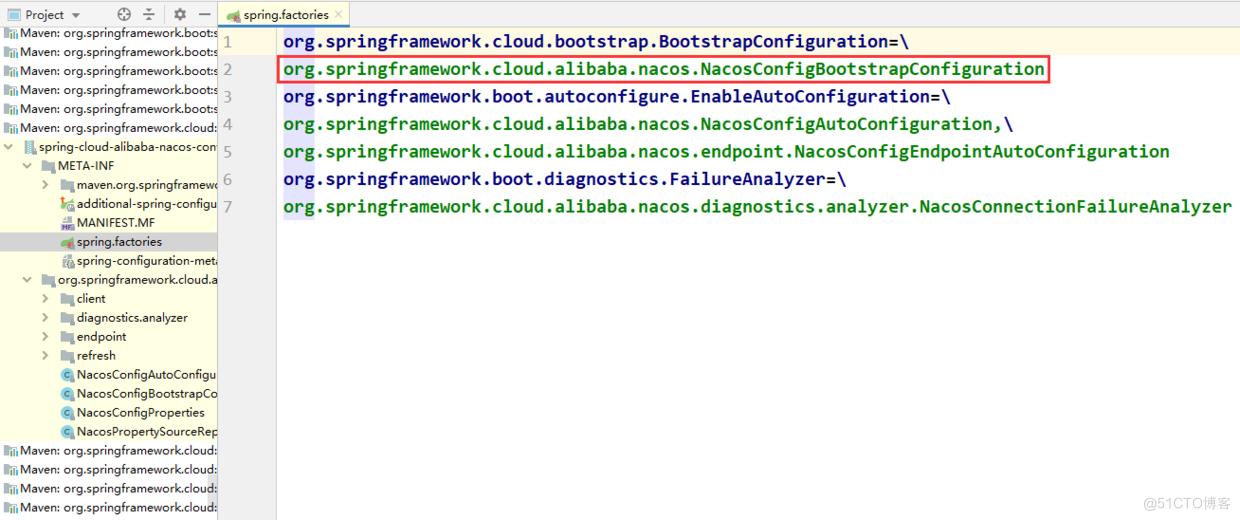

这个配置作用是spring在启动之间准备上下文时会启用这个配置来导入nacos相关配置文件,为后续容器启动做准备。
@Configuration(proxyBeanMethods = false) @ConditionalOnProperty(name = "spring.cloud.nacos.config.enabled", matchIfMissing = true) public class NacosConfigBootstrapConfiguration { public NacosConfigBootstrapConfiguration() { } @Bean @ConditionalOnMissingBean // 读取nacos相关配置 public NacosConfigProperties nacosConfigProperties() { return new NacosConfigProperties(); } @Bean @ConditionalOnMissingBean //实例化NacosConfigManager,创建ConfigService,ConfigService是配置读取更新的核心类 public NacosConfigManager nacosConfigManager(NacosConfigProperties nacosConfigProperties) { return new NacosConfigManager(nacosConfigProperties); } @Bean //spring初始化时会调用NacosPropertySourceLocator.locate方法, //nacos通过此方法加载nacos-server配置 public NacosPropertySourceLocator nacosPropertySourceLocator(NacosConfigManager nacosConfigManager) { return new NacosPropertySourceLocator(nacosConfigManager); } }-
NacosConfigProperties:对应我们上面在bootstrap.properties中对应的配置信息
-
NacosConfigManager:持有NacosConfigProperties和ConfigService,ConfigService用来查询发布配置的相关接口。
-
NacosPropertySourceLocator:它实现了PropertySourceLocator ,spring boot启动时调用PropertySourceLocator.locate(env)用来加载配置信息,下面来看相关源码:
至此我们在nacos上配置的properties和yaml文件都载入到spring配置文件中来了,后面可通过context.Environment.getProperty(propertyName)来获取相关配置信息
配置如何随spring boot加载进来我们说完了,接来下来看修改完配置后如何实时刷新
nacos config动态刷新
当nacos config更新后,根据配置中的refresh属性来判断是否刷新配置,配置如下
spring.cloud.nacos.config.ext-config[0].refresh=true首先spring.factories 配置了EnableAutoConfiguration=NacosConfigAutoConfiguration,NacosConfigAutoConfiguration配置类会注入一个NacosContextRefresher,它首先监听了ApplicationReadyEvent,然后注册一个nacos listener用来监听nacos config配置修改后发布一个spring refreshEvent用来刷新配置和应用
public class NacosContextRefresher implements ApplicationListener<ApplicationReadyEvent>, ApplicationContextAware { private final NacosRefreshHistory nacosRefreshHistory; private ApplicationContext applicationContext; private final ConfigService configService; private Map<String, Listener> listenerMap = new ConcurrentHashMap<>(16); @Override public void onApplicationEvent(ApplicationReadyEvent event) { // 只注册一次 if (this.ready.compareAndSet(false, true)) { this.registerNacosListenersForApplications(); } } private void registerNacosListenersForApplications() { if (isRefreshEnabled()) { for (NacosPropertySource propertySource : NacosPropertySourceRepository .getAll()) { // 对应刚才所说的配置 需要配置文件是否需要刷新 if (!propertySource.isRefreshable()) { continue; } String dataId = propertySource.getDataId(); // 注册nacos监听器 registerNacosListener(propertySource.getGroup(), dataId); } } } private void registerNacosListener(final String groupKey, final String dataKey) { String key = NacosPropertySourceRepository.getMapKey(dataKey, groupKey); Listener listener = listenerMap.computeIfAbsent(key, lst -> new AbstractSharedListener() { @Override public void innerReceive(String dataId, String group, String configInfo) { refreshCountIncrement(); // 添加刷新记录 nacosRefreshHistory.addRefreshRecord(dataId, group, configInfo); // todo feature: support single refresh for listening // 发布一个spring refreshEvent事件 对应监听器为RefreshEventListener 该监听器会完成配置的更新应用 applicationContext.publishEvent( new RefreshEvent(this, null, "Refresh Nacos config")); if (log.isDebugEnabled()) { log.debug(String.format( "Refresh Nacos config group=%s,dataId=%s,configInfo=%s", group, dataId, configInfo)); } } }); try { configService.addListener(dataKey, groupKey, listener); } catch (NacosException e) { log.warn(String.format( "register fail for nacos listener ,dataId=[%s],group=[%s]", dataKey, groupKey), e); } } }我们说完了nacos config动态刷新,那么肯定有对应的动态监听,nacos config会监听nacos server上配置的更新状态
nacos config动态监听
一般来说客户端和服务端数据交互无非就两种方式
- pull:客户端主动从服务器拉取数据
- push: 由服务端主动向客户端推送数据
这两种模式优缺点各不一样,pull模式需要考虑的是什么时候向服务端拉取数据,可能会存在数据延迟问题,而push模式需要客户端和服务端维护一个长连接,如果客户端较多会给服务端造成压力,但它的实时性会更好。
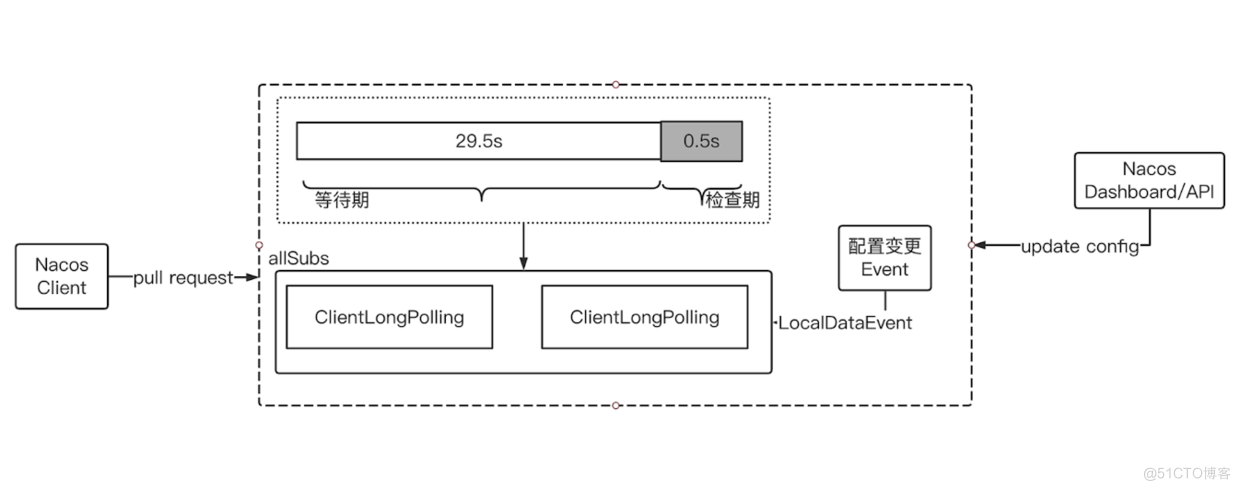
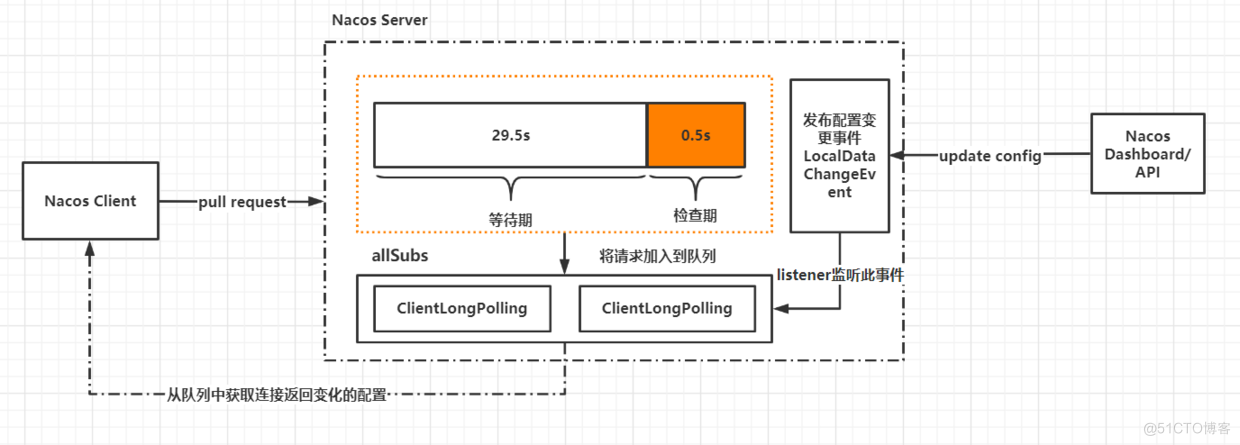
nacos采用的是pull模式,但它作了优化,可以看做是pull+push,客户端会轮询向服务端发出一个长连接请求,这个长连接最多30s就会超时,服务端收到客户端的请求会先判断当前是否有配置更新,有则立即返回。
如果没有服务端会将这个请求拿住“hold”29.5s加入队列,最后0.5s再检测配置文件无论有没有更新都进行正常返回,但等待的29.5s期间有配置更新可以提前结束并返回,下面会在源码中讲解具体怎么处理的
Nacos Config动态刷新机制
nacos config 动态刷新流程图
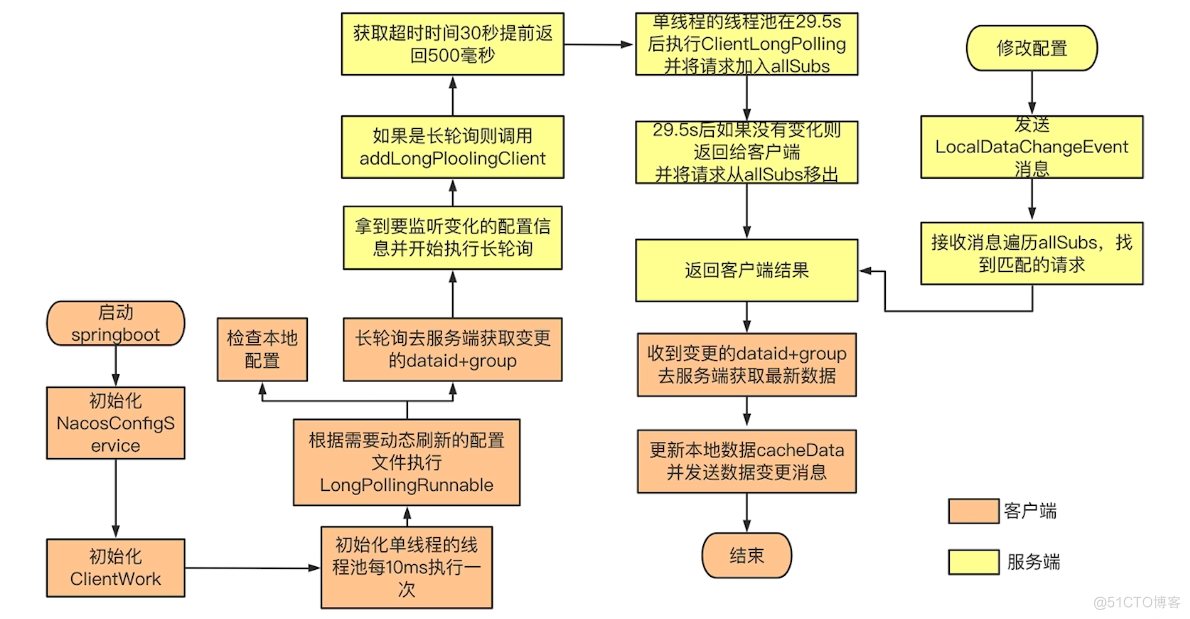
nacos client处理
动态监听的发起是在ConfigService的实现类NacosConfigService的构造方法中,它是对外nacos config api接口,在之前加载配置文件和NacosContextRefresher构造方法中都会获取或创建
@Order(0) public class NacosPropertySourceLocator implements PropertySourceLocator { public NacosPropertySourceLocator(NacosConfigManager nacosConfigManager) { this.nacosConfigManager = nacosConfigManager; this.nacosConfigProperties = nacosConfigManager.getNacosConfigProperties(); } public PropertySource<?> locate(Environment env) { this.nacosConfigProperties.setEnvironment(env); ConfigService configService = this.nacosConfigManager.getConfigService(); //......省略其他 } } public class NacosContextRefresher implements ApplicationListener<ApplicationReadyEvent>, ApplicationContextAware { public NacosContextRefresher(NacosConfigManager nacosConfigManager, NacosRefreshHistory refreshHistory) { this.nacosConfigProperties = nacosConfigManager.getNacosConfigProperties(); this.nacosRefreshHistory = refreshHistory; this.configService = nacosConfigManager.getConfigService(); this.isRefreshEnabled = this.nacosConfigProperties.isRefreshEnabled(); } }这里都会先判断是否已经创建了ConfigServer,没有则实例化一个NacosConfigService,来看它的构造函数
/***************************************** NacosConfigService *****************************************/ public class NacosConfigService implements ConfigService { /** * http agent. */ private final HttpAgent agent; /** * long polling. */ private final ClientWorker worker; public NacosConfigService(Properties properties) throws NacosException { ValidatorUtils.checkInitParam(properties); String encodeTmp = properties.getProperty(PropertyKeyConst.ENCODE); if (StringUtils.isBlank(encodeTmp)) { this.encode = Constants.ENCODE; } else { this.encode = encodeTmp.trim(); } initNamespace(properties); this.configFilterChainManager = new ConfigFilterChainManager(properties); // 用来向nacos server发起请求的代理,这里用到了装饰模式 this.agent = new MetricsHttpAgent(new ServerHttpAgent(properties)); this.agent.start(); // 客户端的一个工作类,agent作为它的构造传参 可猜想到里面肯定会做一些远程调用 this.worker = new ClientWorker(this.agent, this.configFilterChainManager, properties); } } /***************************************** ClientWorker *****************************************/ public class ClientWorker implements Closeable { public ClientWorker(final HttpAgent agent, final ConfigFilterChainManager configFilterChainManager, final Properties properties) { this.agent = agent; this.configFilterChainManager = configFilterChainManager; // Initialize the timeout parameter init(properties); // 这个线程池只有一个核心线程 用来执行checkConfigInfo()方法 this.executor = Executors.newScheduledThreadPool(1, new ThreadFactory() { @Override public Thread newThread(Runnable r) { Thread t = new Thread(r); t.setName("com.alibaba.nacos.client.Worker." + agent.getName()); t.setDaemon(true); return t; } }); // 其它需要执行线程的地方都交给这个线程池来处理 this.executorService = Executors.newScheduledThreadPool(Runtime.getRuntime().availableProcessors(), new ThreadFactory() { @Override public Thread newThread(Runnable r) { Thread t = new Thread(r); t.setName("com.alibaba.nacos.client.Worker.longPolling." + agent.getName()); t.setDaemon(true); return t; } }); // 执行一个调用checkConfigInfo()方法的周期性任务,每10ms执行一次,首次执行延迟1ms后执行 this.executor.scheduleWithFixedDelay(new Runnable() { @Override public void run() { try { checkConfigInfo(); } catch (Throwable e) { LOGGER.error("[" + agent.getName() + "] [sub-check] rotate check error", e); } } }, 1L, 10L, TimeUnit.MILLISECONDS); } }NacosConfigService构造方法主要创建一个agent,它是用来向nacos server发出请求的,然后又创建了一个clientwoker,它的构造方法创建了两个线程池,第一个线程池只有一个核心线程,它会执行一个周期性任务只用来调用checkConfigInfo()方法,第二个线程是后续由需要执行线程的地方都交给它来执行,下面重点来看checkConfigInfo()方法:
public class ClientWorker implements Closeable { /** * groupKey -> cacheData. */ private final ConcurrentHashMap<String, CacheData> cacheMap = new ConcurrentHashMap<String, CacheData>(); public void checkConfigInfo() { // 分任务 int listenerSize = cacheMap.size(); // 向上取整为批数 int longingTaskCount = (int) Math.ceil(listenerSize / ParamUtil.getPerTaskConfigSize()); if (longingTaskCount > currentLongingTaskCount) { for (int i = (int) currentLongingTaskCount; i < longingTaskCount; i++) { // The task list is no order.So it maybe has issues when changing. executorService.execute(new LongPollingRunnable(i)); } currentLongingTaskCount = longingTaskCount; } } }cacheMap:缓存着需要刷新的配置,它是在调用ConfigService 添加监听器方式时会放入,可以自定义监听配置刷新。
// 添加一个config监听器,用来监听dataId为ErrorCode,group为DEFAULT_GROUP的config configService.addListener("ErrorCode","DEFAULT_GROUP",new Listener() { @Override public Executor getExecutor() { return null; } @Override public void receiveConfigInfo(String s) { //当配置更新时会调用监听器该方法 Map<String, Map<String, String>> map = JSON.parseObject(s, Map.class); // 根据自己的业务需要来处理 } });ClientWorker内部类LongPollingRunnable ,长轮询客户端核心逻辑
这里采用了一个策略:将cacheMap中的数量以3000分一个组,分别创建一个LongPollingRunnable用来监听配置更新,这个LongPollingRunnable就是我们之前所说的长连接任务,来看这个长连接任务:
public class ClientWorker implements Closeable { class LongPollingRunnable implements Runnable { private final int taskId; public LongPollingRunnable(int taskId) { this.taskId = taskId; } @Override public void run() { List<CacheData> cacheDatas = new ArrayList<CacheData>(); List<String> inInitializingCacheList = new ArrayList<String>(); try { // check failover config for (CacheData cacheData : cacheMap.values()) { //挑选出taskId和当前Task一样的配置 if (cacheData.getTaskId() == taskId) { cacheDatas.add(cacheData); try { // 1、检查本地配置 checkLocalConfig(cacheData); if (cacheData.isUseLocalConfigInfo()) { cacheData.checkListenerMd5(); } } catch (Exception e) { LOGGER.error("get local config info error", e); } } } // 2、向nacos server发出一个长连接 30s超时,返回nacos server有更新过的dataIds List<String> changedGroupKeys = checkUpdateDataIds(cacheDatas, inInitializingCacheList); if (!CollectionUtils.isEmpty(changedGroupKeys)) { LOGGER.info("get changedGroupKeys:" + changedGroupKeys); } for (String groupKey : changedGroupKeys) { String[] key = GroupKey.parseKey(groupKey); String dataId = key[0]; String group = key[1]; String tenant = null; if (key.length == 3) { tenant = key[2]; } try { // 3、向nacos server请求获取config最新内容 //更新有变化的配置,并备份快照到本地 ConfigResponse response = getServerConfig(dataId, group, tenant, 3000L); CacheData cache = cacheMap.get(GroupKey.getKeyTenant(dataId, group, tenant)); cache.setContent(response.getContent()); cache.setEncryptedDataKey(response.getEncryptedDataKey()); if (null != response.getConfigType()) { cache.setType(response.getConfigType()); } LOGGER.info("[{}] [data-received] dataId={}, group={}, tenant={}, md5={}, content={}, type={}", agent.getName(), dataId, group, tenant, cache.getMd5(), ContentUtils.truncateContent(response.getContent()), response.getConfigType()); } catch (NacosException ioe) { String message = String .format("[%s] [get-update] get changed config exception. dataId=%s, group=%s, tenant=%s", agent.getName(), dataId, group, tenant); LOGGER.error(message, ioe); } } // 4、对有变化的config调用对应监听器去处理 for (CacheData cacheData : cacheDatas) { if (!cacheData.isInitializing() || inInitializingCacheList .contains(GroupKey.getKeyTenant(cacheData.dataId, cacheData.group, cacheData.tenant))) { cacheData.checkListenerMd5(); cacheData.setInitializing(false); } } inInitializingCacheList.clear(); //启动新的长轮询线程 executorService.execute(this); } catch (Throwable e) { // If the rotation training task is abnormal, the next execution time of the task will be punished LOGGER.error("longPolling error : ", e); // 发生异常延迟执行 executorService.schedule(this, taskPenaltyTime, TimeUnit.MILLISECONDS); } } } }这个长轮询主要做了4个步骤:
-
1、检查本地配置,如果存在本地配置,并且与缓存中的本地配置版本不一样,把本地配置内容更新到缓存,并触发事件,这块源码比较简单,跟到源码一读便知。
-
2、向nacos server发出一个长连接,30s超时,nacos server会返回有变化的dataIds。
-
3、根据变化的dataId,从服务端拉取最新的配置内容然后更新到缓存中。
-
4、对有变化的配置 触发事件监听器来处理。
讲完了nacos client处理流程,再来看服务端这边怎么处理这个长连接的
nacos server处理
服务端长连接接口是/config/listener,对应源码包为config
/****************************************** ConfigController ******************************************/ @PostMapping("/listener") @Secured(action = ActionTypes.READ, parser = ConfigResourceParser.class) public void listener(HttpServletRequest request, HttpServletResponse response) throws ServletException, IOException { request.setAttribute("org.apache.catalina.ASYNC_SUPPORTED", true); String probeModify = request.getParameter("Listening-Configs"); if (StringUtils.isBlank(probeModify)) { throw new IllegalArgumentException("invalid probeModify"); } probeModify = URLDecoder.decode(probeModify, Constants.ENCODE); // 需要检查更新的config信息 Map<String, String> clientMd5Map; try { clientMd5Map = MD5Util.getClientMd5Map(probeModify); } catch (Throwable e) { throw new IllegalArgumentException("invalid probeModify"); } // 长连接处理 inner.doPollingConfig(request, response, clientMd5Map, probeModify.length()); } /****************************************** ConfigServletInner ******************************************/ public String doPollingConfig(HttpServletRequest request, HttpServletResponse response, Map<String, String> clientMd5Map, int probeRequestSize) throws IOException { // 判断是否支持长轮询 if (LongPollingService.isSupportLongPolling(request)) { // 长轮询处理 longPollingService.addLongPollingClient(request, response, clientMd5Map, probeRequestSize); return HttpServletResponse.SC_OK + ""; } // 不支持长轮询,直接与当前配置作比较,返回有变更的配置 List<String> changedGroups = MD5Util.compareMd5(request, response, clientMd5Map); // Compatible with short polling result. String oldResult = MD5Util.compareMd5OldResult(changedGroups); String newResult = MD5Util.compareMd5ResultString(changedGroups); /* * 省略 * 会响应变更的配置信息 */ return HttpServletResponse.SC_OK + ""; } /****************************************** LongPollingService ******************************************/ public void addLongPollingClient(HttpServletRequest req, HttpServletResponse rsp, Map<String, String> clientMd5Map, int probeRequestSize) { String str = req.getHeader(LongPollingService.LONG_POLLING_HEADER); String noHangUpFlag = req.getHeader(LongPollingService.LONG_POLLING_NO_HANG_UP_HEADER); String appName = req.getHeader(RequestUtil.CLIENT_APPNAME_HEADER); String tag = req.getHeader("Vipserver-Tag"); // 服务端这边最多处理时长29.5s,需要留0.5s来返回,以免客户端那边超时 int delayTime = SwitchService.getSwitchInteger(SwitchService.FIXED_DELAY_TIME, 500); // Add delay time for LoadBalance, and one response is returned 500 ms in advance to avoid client timeout. long timeout = Math.max(10000, Long.parseLong(str) - delayTime); if (isFixedPolling()) { timeout = Math.max(10000, getFixedPollingInterval()); // Do nothing but set fix polling timeout. } else { // 不支持长轮询 本地对比返回 long start = System.currentTimeMillis(); List<String> changedGroups = MD5Util.compareMd5(req, rsp, clientMd5Map); if (changedGroups.size() > 0) { generateResponse(req, rsp, changedGroups); // log.... return; } else if (noHangUpFlag != null && noHangUpFlag.equalsIgnoreCase(TRUE_STR)) { // log.... return; } } String ip = RequestUtil.getRemoteIp(req); // 将http响应交给异步线程,返回一个异步响应上下文, 当配置更新后可以主动调用及时返回,不用非等待29.5s final AsyncContext asyncContext = req.startAsync(); // AsyncContext.setTimeout() is incorrect, Control by oneself asyncContext.setTimeout(0L); // 执行客户端长连接任务, ConfigExecutor.executeLongPolling( new ClientLongPolling(asyncContext, clientMd5Map, ip, probeRequestSize, timeout, appName, tag)); } /****************************************** ClientLongPolling ******************************************/ class ClientLongPolling implements Runnable { @Override public void run() { // 提交一个任务,延迟29.5s执行 asyncTimeoutFuture = ConfigExecutor.scheduleLongPolling(new Runnable() { @Override public void run() { try { getRetainIps().put(ClientLongPolling.this.ip, System.currentTimeMillis()); // Delete subsciber's relations. allSubs.remove(ClientLongPolling.this); if (isFixedPolling()) { // 检查变更配置 并相应 List<String> changedGroups = MD5Util .compareMd5((HttpServletRequest) asyncContext.getRequest(), (HttpServletResponse) asyncContext.getResponse(), clientMd5Map); if (changedGroups.size() > 0) { sendResponse(changedGroups); } else { sendResponse(null); } } else { sendResponse(null); } } catch (Throwable t) { LogUtil.DEFAULT_LOG.error("long polling error:" + t.getMessage(), t.getCause()); } } }, timeoutTime, TimeUnit.MILLISECONDS); allSubs.add(this); } } final Queue<ClientLongPolling> allSubs上面大部分地方都比较好懂,主要解释下ClientLongPolling作用,它首先会提交一个任务,无论配置有没有更新,最终都会进行响应,延迟29.5s执行,然后会把自己添加到一个队列中,之前说过,服务端这边配置有更新后,会找出正在等待配置更新的长连接任务,提前结束这个任务并返回,来看这一步是怎么处理的:
public LongPollingService() { allSubs = new ConcurrentLinkedQueue<ClientLongPolling>(); ConfigExecutor.scheduleLongPolling(new StatTask(), 0L, 10L, TimeUnit.SECONDS); // Register LocalDataChangeEvent to NotifyCenter. NotifyCenter.registerToPublisher(LocalDataChangeEvent.class, NotifyCenter.ringBufferSize); // Register A Subscriber to subscribe LocalDataChangeEvent. NotifyCenter.registerSubscriber(new Subscriber() { @Override public void onEvent(Event event) { if (isFixedPolling()) { // Ignore. } else { //监听本地数据变更的事件 if (event instanceof LocalDataChangeEvent) { LocalDataChangeEvent evt = (LocalDataChangeEvent) event; //执行一个数据变更的任务 ConfigExecutor.executeLongPolling(new DataChangeTask(evt.groupKey, evt.isBeta, evt.betaIps)); } } } //订阅LocalDataChangeEvent事件 @Override public Class<? extends Event> subscribeType() { return LocalDataChangeEvent.class; } }); } class DataChangeTask implements Runnable { @Override public void run() { try { ConfigCacheService.getContentBetaMd5(groupKey); // 找出等在该配置的长连接,然后进行提前返回 for (Iterator<ClientLongPolling> iter = allSubs.iterator(); iter.hasNext(); ) { ClientLongPolling clientSub = iter.next(); //遍历allSubs队列中的groupKey和当前groupKey是否匹配,如果匹配则找到该客户端请求,响应给客户端 if (clientSub.clientMd5Map.containsKey(groupKey)) { // If published tag is not in the beta list, then it skipped. // 如果Beta发布且不在Beta列表,直接跳过 if (isBeta && !CollectionUtils.contains(betaIps, clientSub.ip)) { continue; } // If published tag is not in the tag list, then it skipped. // 如果tag发布且不在tag列表,直接跳过 if (StringUtils.isNotBlank(tag) && !tag.equals(clientSub.tag)) { continue; } getRetainIps().put(clientSub.ip, System.currentTimeMillis()); //删除订阅关系 iter.remove(); // Delete subscribers' relationships. clientSub.sendResponse(Arrays.asList(groupKey)); } } } catch (Throwable t) { LogUtil.DEFAULT_LOG.error("data change error: {}", ExceptionUtil.getStackTrace(t)); } } }- Subscriber类,此为消息监听机制
LongPollingService构造函数中,会注册一个订阅,用来监听LocalDataChangeEvent,当发生该事件时,会执行一个数据变更任务,这个任务就是找出等在配置的长连接,提前返回,达到配置变更实时更新的效果。
我们在nacos控制台修改一个配置文件进行发布,会调用ConfigController.publishConfig接口, 在数据持久化之后会调用ConfigChangePublisher.notifyConfigChange发布一个事件,但这个接口发布的是ConfigDataChangeEvent事件。
但是这个事件似乎不是我们所关心的事件,原因是这里发布的事件是ConfigDataChangeEvent,而LongPollingService感兴趣的事件是LocalDataChangeEvent。
后来发现,在Nacos中有一个DumpService,它会定时把变更后的数据dump到磁盘上,DumpService在spring启动之后,会调用init方法启动几个dump任务。然后在任务执行结束之后,会触发一个LocalDataChangeEvent 的事件。
在ConfigCacheService中,只要涉及到config配置信息的修改的,都会发布LocalDataChangeEvent事件。
public class ConfigCacheService { /** * Update md5 value. * * @param groupKey groupKey string value. * @param md5 md5 string value. * @param lastModifiedTs lastModifiedTs long value. */ public static void updateMd5(String groupKey, String md5, long lastModifiedTs) { CacheItem cache = makeSure(groupKey); if (cache.md5 == null || !cache.md5.equals(md5)) { cache.md5 = md5; cache.lastModifiedTs = lastModifiedTs; // 发布LocalDataChangeEvent事件 NotifyCenter.publishEvent(new LocalDataChangeEvent(groupKey)); } } /** * Update Beta md5 value. * * @param groupKey groupKey string value. * @param md5 md5 string value. * @param ips4Beta ips4Beta List. * @param lastModifiedTs lastModifiedTs long value. */ public static void updateBetaMd5(String groupKey, String md5, List<String> ips4Beta, long lastModifiedTs) { CacheItem cache = makeSure(groupKey); if (cache.md54Beta == null || !cache.md54Beta.equals(md5)) { cache.isBeta = true; cache.md54Beta = md5; cache.lastModifiedTs4Beta = lastModifiedTs; cache.ips4Beta = ips4Beta; // 发布LocalDataChangeEvent事件 NotifyCenter.publishEvent(new LocalDataChangeEvent(groupKey, true, ips4Beta)); } } /** * Update tag md5 value. * * @param groupKey groupKey string value. * @param tag tag string value. * @param md5 md5 string value. * @param lastModifiedTs lastModifiedTs long value. */ public static void updateTagMd5(String groupKey, String tag, String md5, long lastModifiedTs) { CacheItem cache = makeSure(groupKey); if (cache.tagMd5 == null) { Map<String, String> tagMd5Tmp = new HashMap<String, String>(1); tagMd5Tmp.put(tag, md5); cache.tagMd5 = tagMd5Tmp; if (cache.tagLastModifiedTs == null) { Map<String, Long> tagLastModifiedTsTmp = new HashMap<String, Long>(1); tagLastModifiedTsTmp.put(tag, lastModifiedTs); cache.tagLastModifiedTs = tagLastModifiedTsTmp; } else { cache.tagLastModifiedTs.put(tag, lastModifiedTs); } // 发布LocalDataChangeEvent事件 NotifyCenter.publishEvent(new LocalDataChangeEvent(groupKey, false, null, tag)); return; } if (cache.tagMd5.get(tag) == null || !cache.tagMd5.get(tag).equals(md5)) { cache.tagMd5.put(tag, md5); cache.tagLastModifiedTs.put(tag, lastModifiedTs); // 发布LocalDataChangeEvent事件 NotifyCenter.publishEvent(new LocalDataChangeEvent(groupKey, false, null, tag)); } } }至此nacos config动态监听、刷新就串联起来了,nacos的相关源码都比较好理解,跟着源码追进去就一目了然了。
总结
-
客户端发起长轮训请求。
-
服务端收到请求以后,先比较服务端缓存中的数据是否相同,如果不同,则直接返回。
-
如果相同,则通过schedule延迟29.5s之后再执行比较。
-
为了保证当服务端在29.5s之内发生数据变化能够及时通知给客户端,服务端采用事件订阅的方式来监听服务端本地数据变化的事件,一旦收到事件,则触发DataChangeTask的通知,并且遍历allStubs队列中的ClientLongPolling,把结果写回到客户端,就完成了一次数据的推送。
-
如果 DataChangeTask 任务完成了数据的 “推送” 之后,ClientLongPolling 中的调度任务又开始执行了怎么办呢? 很简单,只要在进行 “推送” 操作之前,先将原来等待执行的调度任务取消掉就可以了,这样就防止了推送操作写完响应数据之后,调度任务又去写响应数据,这时肯定会报错的。所以,在ClientLongPolling方法中,最开始的一个步骤就是删除订阅事件 所以总的来说,Nacos采用推+拉的形式,来解决最开始关于长轮训时间间隔的问题。当然,30s这个时间是可以设置的,而之所以定30s,应该是一个经验值。
参考: https://www.cnblogs.com/zzz-blogs/p/14249126.html
https://blog.csdn.net/qw852328952/article/details/112142451
https://blog.csdn.net/xingxinggua9620/article/details/113563116