前言
最近工作上有个需求,动态生成一张图片,具体来说就是基于模版图片动态添加文字和图片(文字内容不同,图片数目不同),其中文字大小不全一样,且对位置有所要求。
本文将剖析多个技术方案来实现水印生成,并最终抉择出最优方案。
技术分析
基于模版图片动态添加文字和图片,需要先调研一下有哪些技术方案,可能添加文字和图片的技术不同。
Graphics2D
利用 JDK 自带的 Graphics2D ,该类扩展 Graphics 类,以提供对几何形状、坐标转换、颜色管理和文本布局更为复杂的控制。它是用于在 Java(tm) 平台上呈现二维形状、文本和图像的基础类。
Thumbnailator
使用第三方 Jar 包 Thumbnailator:使用第三方 Jar 包还是比较简单的,在 Thumbnailator 中已有相应的API了,只需阅读官方的文档即可实现。
GraphicsMagick与Im4Java
ImageMagick 是一个免费的创建、编辑、合成图片的开源软件。它可以读取、转换、写入多种格式的图片。图片切割、颜色替换、各种效果的应用,图片的旋转、组合,文本,直线,多边形,椭圆,曲线,附加到图片伸展旋转。
ImageMagick 是个图片处理工具,可以安装在绝大多数的平台上使用,Linux、Mac、Windows 都没有问题。GraphicsMagick 是在ImageMagick 基础上的另一个项目,大大提高了图片处理的性能,在 Linux 平台上,可以使用命令行的形式处理图片。
开源社区针对 ImageMagick 开发了两款 Java API,分别是 JMagick 和 Im4Java,两者的区别如下:
- JMagick 是一个开源API,利用 JNI(Java Native Interface)技术实现了对 ImageMagick API 的 Java 访问接口,因此也将比纯 Java 实现的图片操作函数在速度上要快。JMagick 只实现了 ImageMagicAPI 的一部分功能,它的发行遵循LGPL协议。
- Im4java 是 ImageMagick 的另一个 Java 开源接口。与 JMagick 不同之处在于 Im4java 只是生成与ImageMagick相对应的命令行,然后将生成的命令行传至选中的 ImageCommand(使用java.lang.ProcessBuilder.start()实现)来执行相应的操作。它支持大部分ImageMagick 命令,可以针对不同组的图片多次复用同一个命令行。
Im4java 支持 GraphicsMagick,GraphicsMagick 是 ImageMagick 的分支。相对 ImageMagick ,GraphicsMagick 更稳定,消耗资源更少。最重要的是不依赖 dll 环境,且性能更好,所以我们选择使用 Im4java,想要使用该 API,那么本机上就需要安装 GraphicsMagick。
本人尝试在 Mac 上安装 GraphicsMagick,,这里补充一点个人安装时的经验。
Mac 可以使用 brew 命令:
brew install libpngbrew install libjpeg#通过 brew 安装 GraphicsMagick(libpng 等依赖包会一并下载)brew install graphicsmagick
查看 GraphicsMagick 的版本以及安装路径:
% gm -versionGraphicsMagick 1.3.38 2022-03-26 Q16 http://www.GraphicsMagick.org/......Configured using the command: ./configure '--prefix=/usr/local/Cellar/graphicsmagick/1.3.38_1' '--disable-dependency-tracking' '--disable-openmp' '--disable-static' '--enable-shared' '--with-modules' '--with-quantum-depth=16' '--without-lzma' '--without-x' '--without-gslib' '--with-gs-font-dir=/usr/local/share/ghostscript/fonts' '--without-wmf' 'CC=clang' 'CXX=clang++' 'PKG_CONFIG_PATH=/usr/local/opt/libpng/lib/pkgconfig:/usr/local/opt/freetype/lib/pkgconfig:/usr/local/opt/jpeg-turbo/lib/pkgconfig:/usr/local/opt/jasper/lib/pkgconfig:/usr/local/opt/libtiff/lib/pkgconfig:/usr/local/opt/little-cms2/lib/pkgconfig:/usr/local/opt/webp/lib/pkgconfig' 'PKG_CONFIG_LIBDIR=/usr/lib/pkgconfig:/usr/local/Homebrew/Library/Homebrew/os/mac/pkgconfig/11'.....
测试效果
% gm identify /Users/xxxx/Downloads/certificate_blank.jpg/Users/xxx/Downloads/certificate_blank.jpg JPEG 453x640+0+0 DirectClass 8-bit 64.1Ki 0.000u 0m:0.000003s
技术方案
Graphics2D
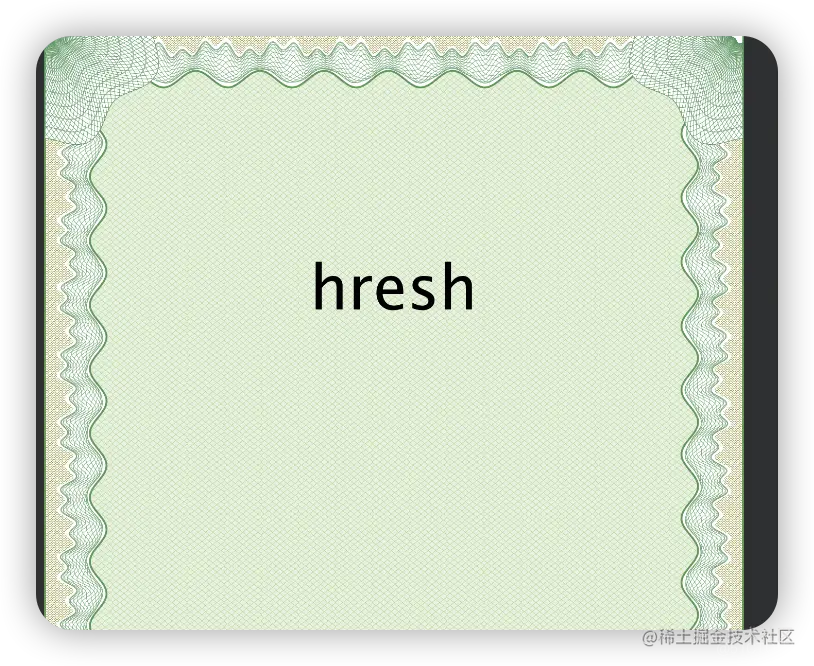
文字水印
public class Graphics2DUtil { private static final String FONT_FAMILY = "楷体"; private static final String CERTIFICATE_BASE_PATH = "/src/main/resources/static/certificate-blank.png"; private static final String WATERMARK_IMAGE_PATH = "/src/main/resources/static/icon.png"; public static void graphics2DDrawTest(String srcImgPath, String outPath) { try { BufferedImage targetImg = ImageIO.read(new File(srcImgPath)); int imgWidth = targetImg.getWidth(); int imgHeight = targetImg.getHeight(); BufferedImage bufferedImage = new BufferedImage(imgWidth, imgHeight, BufferedImage.TYPE_INT_BGR); Graphics2D g = bufferedImage.createGraphics(); g.drawImage(targetImg, 0, 0, imgWidth, imgHeight, null); g.setColor(Color.BLACK); // 第一行文本字体大小为120,居中显示 Font userNameFont = new Font(FONT_FAMILY, Font.PLAIN, 120); g.setFont(userNameFont); String userName = "hresh"; int[] userNameSize = getContentSize(userNameFont, userName); int userNameLeftMargin = (imgWidth - userNameSize[0]) / 2; int userNameTopMargin = 400 + userNameSize[1]; g.drawString(userName, userNameLeftMargin, userNameTopMargin); g.dispose(); FileOutputStream outImgStream = new FileOutputStream(outPath); ImageIO.write(bufferedImage, "png", outImgStream); g.dispose(); } catch (IOException e) { e.getStackTrace(); } } /** * 获取文本的长度,字体大小不同,长度也不同 * * @param font * @param content * @return */ public static int[] getContentSize(Font font, String content) { int[] contentSize = new int[2]; FontRenderContext frc = new FontRenderContext(new AffineTransform(), true, true); Rectangle rec = font.getStringBounds(content, frc).getBounds(); contentSize[0] = (int) rec.getWidth(); contentSize[1] = (int) rec.getHeight(); return contentSize; } public static void main(String[] args) throws IOException { String projectPath = System.getProperty("user.dir"); String srcImgPath = projectPath + CERTIFICATE_BASE_PATH; String outPath = projectPath + "/src/main/resources/static/out/image_by_graphics2D.png"; graphics2DDrawTest(srcImgPath, outPath); }}
执行效果如下:
上述代码中的 getContentSize()方法,根据 Font 和文本内容获取文本的宽度和高度,进一步可以知道文本中每个字符的宽高,如果文本需要换行,离不开字符的宽高数据。除了上述获取文本宽高的实现方式,还有一种实现方式,不过不推荐使用。
FontMetrics fm = sun.font.FontDesignMetrics.getMetrics(font);int width = fm.stringWidth(content);int height = fm.getHeight();
因为 sun.font.FontDesignMetrics 在未来的版本可能会被删除掉,本人目前还是使用 JDK8。
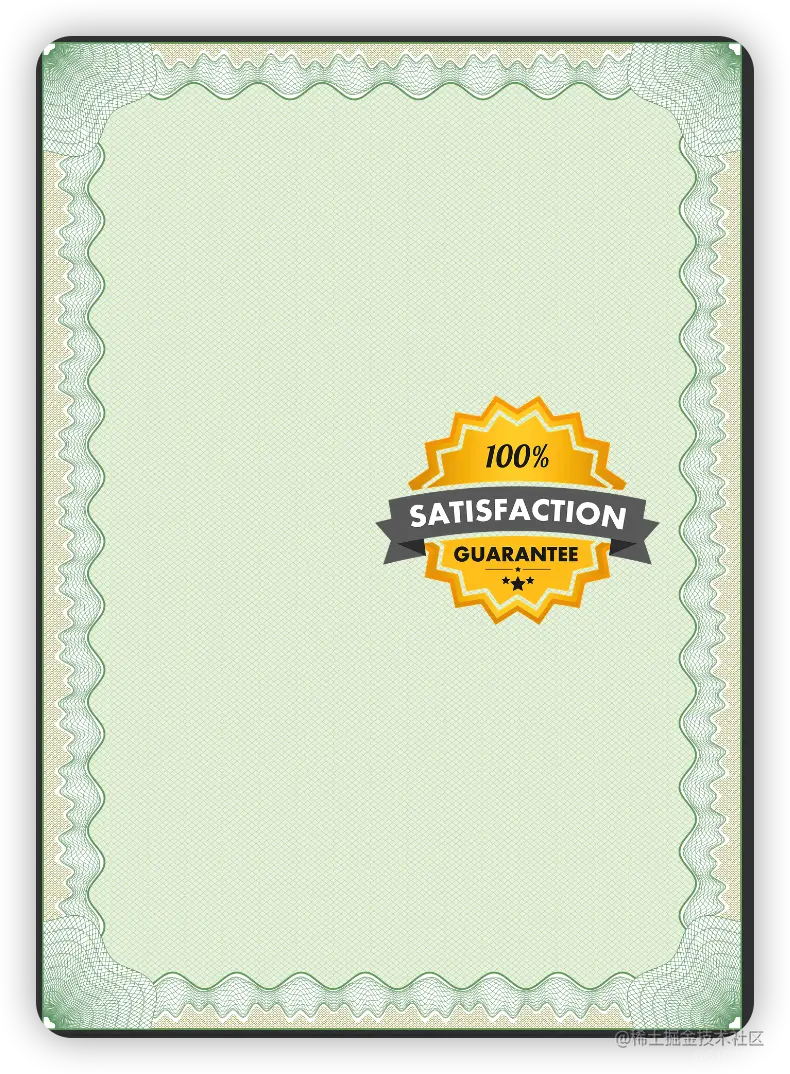
图片水印
public static void graphics2DDrawTest(String srcImgPath, String waterImgPath, String outPath) { FileOutputStream outputStream = null; try { BufferedImage targetImg = ImageIO.read(new File(srcImgPath)); int imgWidth = targetImg.getWidth(); int imgHeight = targetImg.getHeight(); BufferedImage bufferedImage = new BufferedImage(imgWidth, imgHeight, BufferedImage.TYPE_INT_BGR); Graphics2D g = bufferedImage.createGraphics(); g.drawImage(targetImg, 0, 0, imgWidth, imgHeight, null); g.setColor(Color.BLACK); BufferedImage icon = ImageIO.read(new File(waterImgPath)); g.drawImage(icon, 350, 600, icon.getWidth(), icon.getHeight(), null); FileOutputStream outImgStream = new FileOutputStream(outPath); ImageIO.write(bufferedImage, "png", outImgStream); g.dispose(); } catch (IOException e) { e.getStackTrace(); } finally { try { if (outputStream != null) { outputStream.flush(); outputStream.close(); } } catch (Exception e) { e.getStackTrace(); } } }
执行效果如下:

Thumbnailator
图片水印
Thumbnailator 不支持文字水印,只能测试一下图片水印的效果。
public class ThumbnailsUtil { private static final String CERTIFICATE_BASE_PATH = "/src/main/resources/static/certificate-blank.png"; private static final String WATERMARK_IMAGE_PATH = "/src/main/resources/static/icon.png"; public static void addImgWaterMark(String srcImagePath, String waterImgPath, String outPath) throws IOException { // 原始图片信息 BufferedImage targetImg = ImageIO.read(new File(srcImagePath)); // 水印图片 BufferedImage watermarkImage = ImageIO.read(new File(waterImgPath)); int height = targetImg.getHeight(); int width = targetImg.getWidth(); System.out.println("width:" + width + "; height:" + height); // 可以自定义坐标位置 int x = 600; int y = 600; Coordinate coordinate = new Coordinate(x, y); Thumbnails.of(targetImg).size(width, height)// .watermark(Positions.CENTER, watermarkImage, 1f) // 0.5f表示透明度,最大值为1 .watermark(coordinate, watermarkImage, 1f) // 0.5f表示透明度,最大值为1 .outputQuality(1) // 图片质量,最大值为1 .toFile(new File(outPath)); } public static void main(String[] args) throws IOException { String projectPath = System.getProperty("user.dir"); String srcImgPath = projectPath + CERTIFICATE_BASE_PATH; String waterImgPath = projectPath + WATERMARK_IMAGE_PATH; String outPath = projectPath + "/src/main/resources/static/out/img_water_image_by_thumbnails.png"; addImgWaterMark(srcImgPath, waterImgPath, outPath); }}
执行效果如下:
GraphicsMagick与Im4Java
文字水印
GraphicsMagick 生成文字水印的命令如下:
gm convert -font ${fontType} -fill ${color} -pointsize ${fontSize} -draw "text ${dx},${dy} '${textContent}'" ${sourceImgPath} ${distImgPath}
参数含义如下:
- fontType:字体类型;
- color:字体颜色;
- fontSize:字体大小;
- dx:水印x轴位置
- dy:水印y轴位置
- textContent:水印内容
- sourceImgPath:源文件路径
- distImgPath:目标文件路径
我们先尝试使用命令来生成文字水印,看看能否成功。
gm convert -font /System/Library/Fonts/Supplemental/Songti.ttc -fill red -pointsize 50 -draw "text 400,500 '你好'" certificate-blank.png test.png
结果如下,可以正常输出中文水印。

接下来我们试试在代码中使用 ImageMagick 来生成文字水印:
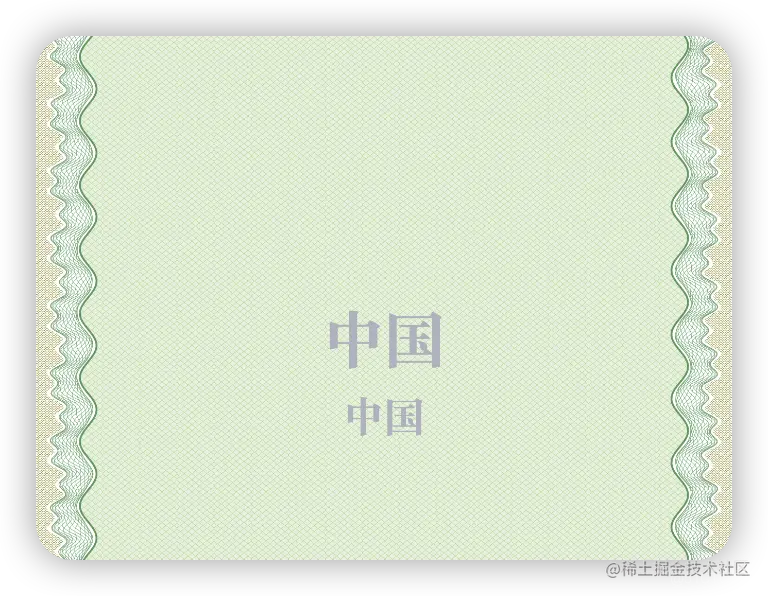
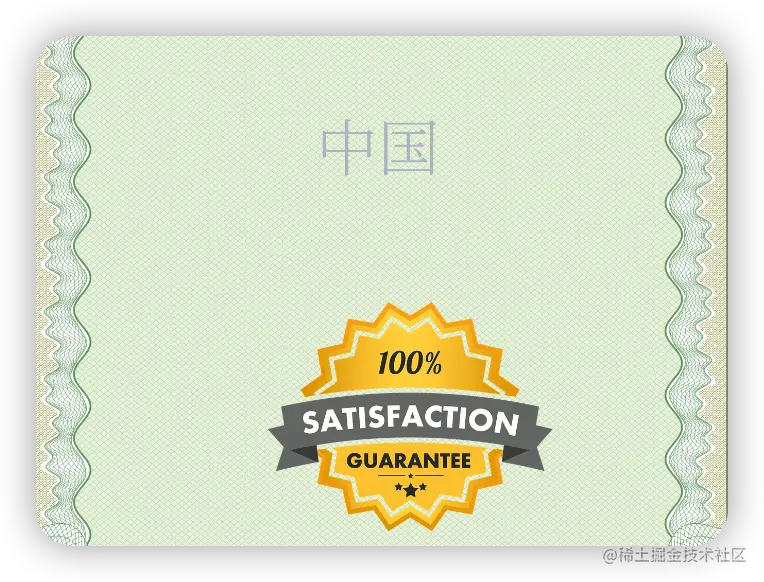
public class Im4JavaUtil { private static final int[] ICON_LEFT_MARGINS = new int[]{552, 467, 395}; private static final String FONT_FAMILY = "楷体"; private static final String CERTIFICATE_BASE_PATH = "/src/main/resources/static/certificate-blank.png"; private static final String WATERMARK_IMAGE_PATH = "/src/main/resources/static/icon.png"; // 是否使用 GraphicsMagick private static final boolean IS_USE_GRAPHICS_MAGICK = true; // 本机上graphicsmagick的安装位置 private static final String GRAPHICS_MAGICK_PATH = "/usr/local/Cellar/graphicsmagick/1.3.38_1/bin"; /** * 命令类型 */ private enum CommandType { convert("转换处理"), identify("图片信息"), textWaterMark("文字水印"), imageWaterMark("图片水印"); private String name; CommandType(String name) { this.name = name; } } private static ImageCommand getImageCommand(CommandType command) { ImageCommand cmd = null; switch (command) { case convert: case textWaterMark: cmd = new ConvertCmd(IS_USE_GRAPHICS_MAGICK); break; case identify: cmd = new IdentifyCmd(IS_USE_GRAPHICS_MAGICK); break; case imageWaterMark: cmd = new CompositeCmd(IS_USE_GRAPHICS_MAGICK); break; } cmd.setSearchPath(GRAPHICS_MAGICK_PATH); return cmd; } public static void addTextWatermark(String srcImagePath, String destImagePath, String content) throws Exception { GMOperation op = new GMOperation(); op.font("/System/Library/Fonts/Supplemental/Songti.ttc"); // 文字方位-居中 op.gravity("center"); op.pointsize(120).fill("#BCBFC8").draw("text 0,0 '" + content + "'").quality(90.0); // 原图 op.addImage(); // 目标 op.addImage(); ImageCommand cmd = getImageCommand(CommandType.textWaterMark); cmd.run(op, srcImagePath, destImagePath); } public static void main(String[] args) throws Exception { String projectPath = System.getProperty("user.dir"); String srcImgPath = projectPath + CERTIFICATE_BASE_PATH; String outPath = projectPath + "/src/main/resources/static/out/text_water_image_by_im4.png"; String content = "中国"; addTextWatermark(srcImgPath, outPath, content); }}
上述代码看起来比较简单,需要注意的是 op.draw()方法中的内容,尤其是单引号,一定不能漏掉,如果不加单引号,中文文字水印会乱码。
图片水印
gm composite -gravity ${gravity} -dissolve ${dissolve} -geometry +${dx}+${dy} ${waterImgPath} ${sourceImgPath} ${distImgPath}
参数含义如下:
- gravity:水印相对位置,
- dissolve:水印透明度
- dx:水印距离右边缘的距离
- dy:水印距离下边缘的距离
- waterImgPath:水印图片路径
- sourceImgPath:源图片路径
- distImgPath:目标图片路径
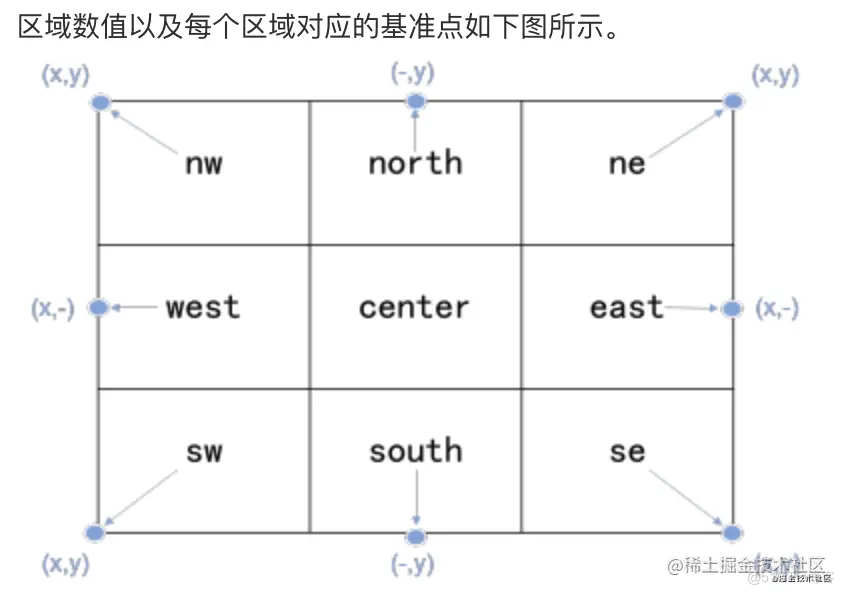
关于 gravity 属性,值范围如下:
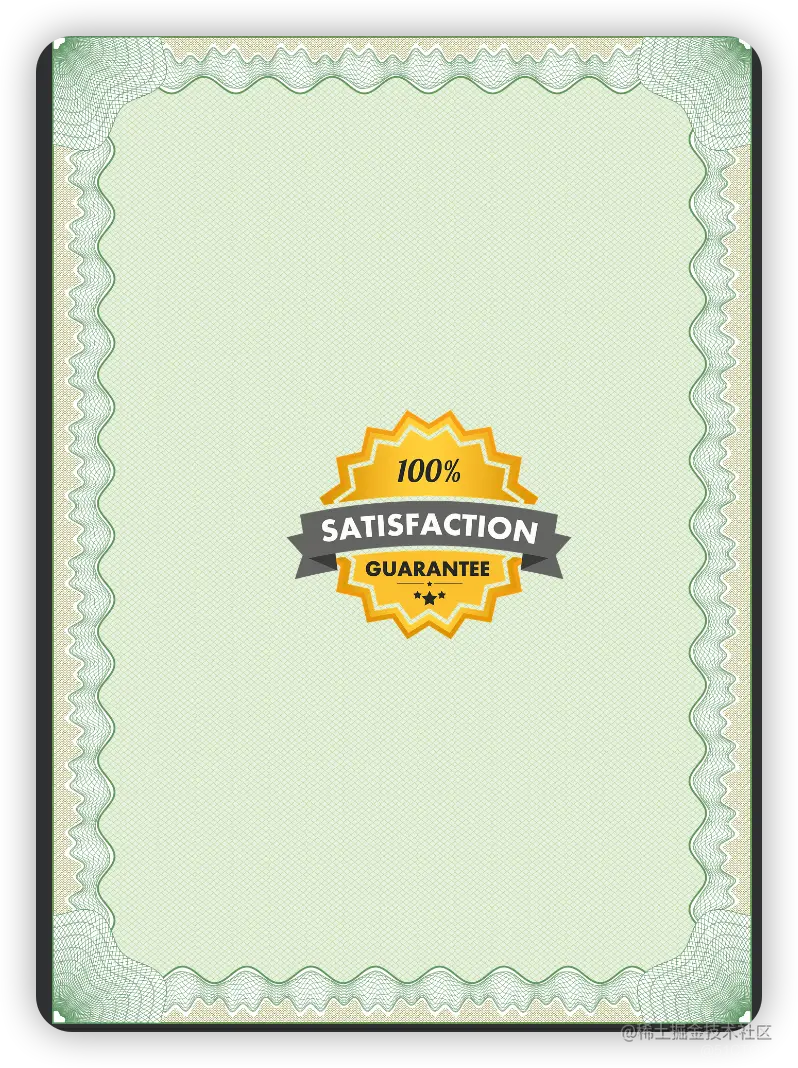
测试一下
gm composite -gravity Center -dissolve 90 -geometry +50+$50 /Users/xxx/IdeaProjects/java_deep_learning/src/main/resources/static/icon.png /Users/xxx/IdeaProjects/java_deep_learning/src/main/resources/static/certificate-blank.png /Users/xxx/IdeaProjects/java_deep_learning/src/main/resources/static/out/img_water_image.png
生成的图片如下所示:
我们最后还是用代码来试一下效果:
public static void addImgWatermark(String srcImagePath, String destImagePath, String waterImgPath) throws Exception { // 原始图片信息 BufferedImage targetImg = ImageIO.read(new File(srcImagePath)); // 水印图片 BufferedImage watermarkImage = ImageIO.read(new File(waterImgPath)); int w = targetImg.getWidth(); int h = targetImg.getHeight(); IMOperation op = new IMOperation(); // 水印图片位置 op.geometry(watermarkImage.getWidth(null), watermarkImage.getHeight(null), w - watermarkImage.getWidth(null) - 300, h - watermarkImage.getHeight(null) - 100); // 水印透明度 op.dissolve(90); // 水印 op.addImage(waterImgPath); // 原图 op.addImage(srcImagePath); // 目标 op.addImage(destImagePath); ImageCommand cmd = getImageCommand(CommandType.imageWaterMark); cmd.run(op);}
执行效果如下:
问题记录
1、代码中使用 ImageMagick 字体加载异常
org.im4java.core.CommandException: /usr/local/Cellar/graphicsmagick/1.3.38_1/bin/gm convert: Unable to read font (/usr/local/share/ghostscript/fonts/n019003l.pfb) [No such file or directory].
原因:使用 Homebrew 安装了 ImageMagick,缺少 ghostscript。
解决方案:
brew install ghostscript
如果您使用的是 Ubuntu 或在带有 Ubuntu 的 docker 中删除并重新安装 ghostscript 包将解决您的问题。
apt remove ghostscriptapt install ghostscript
技术实现
上面展示了三种技术的简单实现,可以直观的看到,Graphics2D 和 Im4Java 能够实现文字和图片水印,但 Im4Java 需要额外安装 GraphicsMagick,不管是 Windows 还是 Mac,又或者是 Linux 上,都可以事先安装 GraphicsMagick,那么我们姑且认为 Im4Java 也满足基本需要。
回头看看我们的需求:文字水印可能会有多行,且字体大小和样式可能存在不同,图片水印可能有多个,这些条件无疑增加了实现难度。
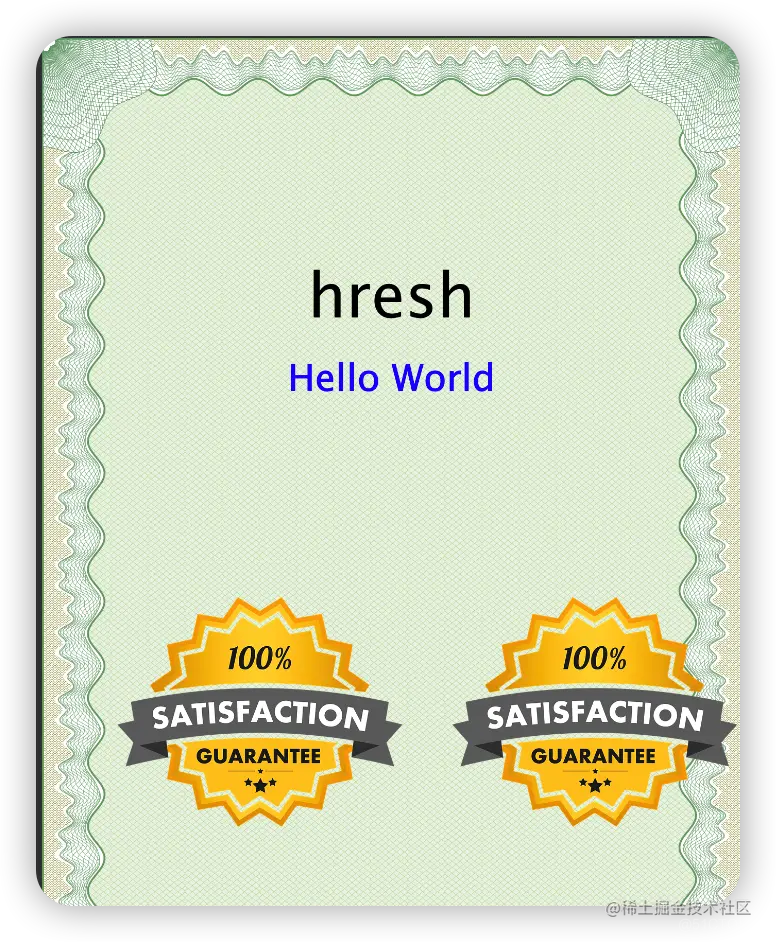
Graphics2D
public class Graphics2DUtil { private static final int[] ICON_LEFT_MARGINS = new int[]{400, 100}; private static final String FONT_FAMILY = "楷体"; private static final String CERTIFICATE_BASE_PATH = "/src/main/resources/static/certificate-blank.png"; private static final String WATERMARK_IMAGE_PATH = "/src/main/resources/static/icon.png"; public static void graphics2DDrawTest(String srcImgPath, String waterImgPath, String outPath, String[] iconNums) { try { BufferedImage targetImg = ImageIO.read(new File(srcImgPath)); int imgWidth = targetImg.getWidth(); int imgHeight = targetImg.getHeight(); BufferedImage bufferedImage = new BufferedImage(imgWidth, imgHeight, BufferedImage.TYPE_INT_BGR); Graphics2D g = bufferedImage.createGraphics(); g.drawImage(targetImg, 0, 0, imgWidth, imgHeight, null); g.setColor(Color.BLACK); // 第一行文本字体大小为120,居中显示 Font userNameFont = new Font(FONT_FAMILY, Font.PLAIN, 120); g.setFont(userNameFont); String userName = "hresh"; int[] userNameSize = getContentSize(userNameFont, userName); int userNameLeftMargin = (imgWidth - userNameSize[0]) / 2; int userNameTopMargin = 400 + userNameSize[1]; g.drawString(userName, userNameLeftMargin, userNameTopMargin); g.dispose(); // 第二行文本的字体不一样,居中显示 g = (Graphics2D) bufferedImage.getGraphics(); Font secondFont = new Font(FONT_FAMILY, Font.PLAIN, 72); g.setFont(secondFont); g.setColor(Color.BLUE); String content = "Hello World"; int[] contentSize = getContentSize(secondFont, content); int contentLeftMargin = (imgWidth - contentSize[0]) / 2; int contentTopMargin = 600 + contentSize[1]; g.drawString(content, contentLeftMargin, contentTopMargin); int imgLeftMargin = ICON_LEFT_MARGINS[iconNums.length - 1]; int imgTopMargin = 1000; BufferedImage image = ImageIO.read(new File(waterImgPath)); int[] imgSize = getImgSize(image); for (int i = 0; i < iconNums.length; i++) { if (i > 0) { imgLeftMargin = imgLeftMargin + imgSize[0] + 10; } BufferedImage icon = ImageIO.read(new File(waterImgPath)); g.drawImage(icon, imgLeftMargin, imgTopMargin, icon.getWidth(), icon.getHeight(), null); } BufferedImage icon = ImageIO.read(new File(waterImgPath)); g.drawImage(icon, 350, 600, icon.getWidth(), icon.getHeight(), null); FileOutputStream outImgStream = new FileOutputStream(outPath); ImageIO.write(bufferedImage, "png", outImgStream); g.dispose(); } catch (IOException e) { e.getStackTrace(); } } /** * 获取文本的长度,字体大小不同,长度也不同 * * @param font * @param content * @return */ public static int[] getContentSize(Font font, String content) { int[] contentSize = new int[2]; FontRenderContext frc = new FontRenderContext(new AffineTransform(), true, true); Rectangle rec = font.getStringBounds(content, frc).getBounds(); contentSize[0] = (int) rec.getWidth(); contentSize[1] = (int) rec.getHeight(); return contentSize; } /** * 获取图片的宽和高 * * @param img * @return */ public static int[] getImgSize(BufferedImage img) { int[] imgSize = new int[2]; imgSize[0] = img.getWidth(null); // 得到源图宽 imgSize[1] = img.getHeight(null); // 得到源图高 return imgSize; } public static void main(String[] args) throws IOException { String projectPath = System.getProperty("user.dir"); String srcImgPath = projectPath + CERTIFICATE_BASE_PATH; String waterImgPath = projectPath + WATERMARK_IMAGE_PATH; String outPath = projectPath + "/src/main/resources/static/out/image_by_graphics2D.png"; // 假设图片水印背景图不一样,1对应1.png,2对应2.png String[] iconNums = new String[]{"1", "2"}; graphics2DDrawTest(srcImgPath, waterImgPath, outPath, iconNums); }}
执行效果如下:
从结果上来看,Graphics2D 可以满足我们的需求,如果文本内容过长,需要换行,又该如何做呢?
private static final int TEXT_AREA_WIDTH = 1150;private static final int TEXT_AREA_LEFT_MARGIN = 100;private static final int TEXT_AREA_RIGHT_MARGIN = 100;private static void drawTextWithFontStyleLineFeed(Graphics2D g, String userName, int imgWidth) { int userNameFontSize = 110; Font userNameFont = new Font(FONT_FAMILY, Font.PLAIN, userNameFontSize); int[] userNameSize = getContentSize(userNameFont, userName); if (userNameSize[0] > TEXT_AREA_WIDTH) { userNameFontSize = 80; userNameFont = new Font(FONT_FAMILY, Font.PLAIN, userNameFontSize); } if (Objects.equals(userNameFontSize, 80)) { g.setFont(userNameFont); userNameSize = getContentSize(userNameFont, userName); int userNameWidth = userNameSize[0]; int wordWidth = userNameWidth / userName.length(); int wordNum = TEXT_AREA_WIDTH / wordWidth; String userNameFirst = userName.substring(0, wordNum); String userNameSec = userName.substring(wordNum); int userNameFirstWidth = wordWidth * wordNum; int userNameFirstLeftMargin = (imgWidth - userNameFirstWidth - TEXT_AREA_LEFT_MARGIN - TEXT_AREA_RIGHT_MARGIN) / 2 + TEXT_AREA_LEFT_MARGIN; int userNameFirstTopMargin = 700; g.drawString(userNameFirst, userNameFirstLeftMargin, userNameFirstTopMargin); int userNameSectWidth = wordWidth * (userName.length() - wordNum); int userNameSecLeftMargin = (imgWidth - userNameSectWidth - TEXT_AREA_LEFT_MARGIN - TEXT_AREA_RIGHT_MARGIN) / 2 + TEXT_AREA_LEFT_MARGIN; int userNameSecTopMargin = 700 + userNameSize[1] + 70; g.drawString(userNameSec, userNameSecLeftMargin, userNameSecTopMargin); } else { g.setFont(userNameFont); userNameSize = getContentSize(userNameFont, userName); int userNameLeftMargin = (imgWidth - userNameSize[0] - TEXT_AREA_LEFT_MARGIN - TEXT_AREA_RIGHT_MARGIN) / 2 + TEXT_AREA_LEFT_MARGIN; int userNameTopMargin = 363 * 3 + userNameSize[1] - 10; g.drawString(userName, userNameLeftMargin, userNameTopMargin); g.dispose(); }}
用 drawUserNameWithFontStyleLineFeed()方法来替代 graphics2DDrawTest()方法中关于添加文字水印的代码,执行效果如下所示:
至此,关于 Graphics2D 的技术实现细节基本搞定了,也非常符合我们的要求。
Im4Java
首先是文字水印字体大小不同的问题,我们尝试修改代码来解决该问题。
public static void addTextWatermark(String srcImagePath, String destImagePath, String content) throws Exception { GMOperation op = new GMOperation(); op.font("/System/Library/Fonts/Supplemental/Songti.ttc"); // 文字方位-居中 op.gravity("center"); op.pointsize(120).fill("#BCBFC8").draw("text 0,0 '" + content + "'").quality(90.0); op.gravity("center"); op.pointsize(80).fill("#BCBFC8").draw("text 0,150 '" + content + "'").quality(90.0); // 原图 op.addImage(); // 目标 op.addImage(); ImageCommand cmd = getImageCommand(CommandType.textWaterMark); cmd.run(op, srcImagePath, destImagePath);}
执行效果如下:
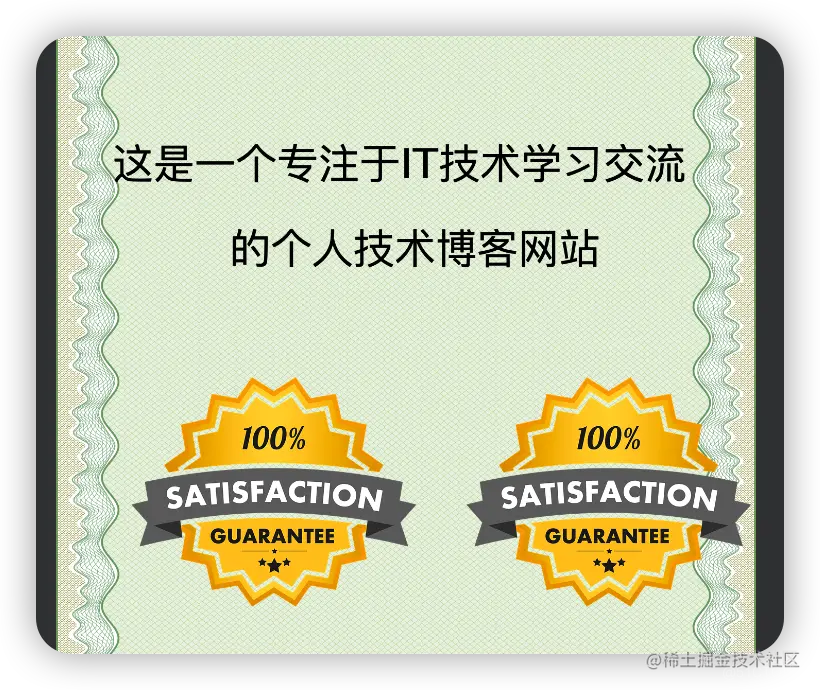
接着是文本换行问题,实现起来还算简单。
private static final String FONT_FAMILY_PATH = "/src/main/resources/static/SourceHanSerif-Light.ttc";public static void addTextWatermark(String srcImagePath, String destImagePath, String content) throws Exception { GMOperation op = new GMOperation(); String projectPath = System.getProperty("user.dir"); op.font(projectPath + FONT_FAMILY_PATH); String text = "这是一个专注于IT技术学习交流的个人技术博客网站"; BufferedImage targetImg = ImageIO.read(new File(srcImagePath)); int imgWidth = targetImg.getWidth(); drawTextWithFontStyleLineFeed(op, text, imgWidth); // 原图 op.addImage(); // 目标 op.addImage(); ImageCommand cmd = getImageCommand(CommandType.textWaterMark); cmd.run(op, srcImagePath, destImagePath); } private static final int TEXT_AREA_WIDTH = 1150; private static final int TEXT_AREA_LEFT_MARGIN = 100; private static final int TEXT_AREA_RIGHT_MARGIN = 100; private static void drawTextWithFontStyleLineFeed(GMOperation op, String text, int imgWidth) { float textFontSize = 110f; int[] textSize = getContentSize(text, textFontSize); if (textSize[0] > TEXT_AREA_WIDTH) { textFontSize = 80f; textSize = getContentSize(text, textFontSize); } if (Objects.equals(textFontSize, 80f)) { int textWidth = textSize[0]; int wordWidth = textWidth / text.length(); int wordNum = TEXT_AREA_WIDTH / wordWidth; String textFirst = text.substring(0, wordNum); String textSec = text.substring(wordNum); int textFirstWidth = wordWidth * wordNum; int textFirstLeftMargin = (imgWidth - textFirstWidth - TEXT_AREA_LEFT_MARGIN - TEXT_AREA_RIGHT_MARGIN) / 2 + TEXT_AREA_LEFT_MARGIN; int textFirstTopMargin = 50; op.gravity("west"); op.pointsize(80).fill("#000000") .draw("text " + textFirstLeftMargin + "," + textFirstTopMargin + " '" + textFirst + "'") .quality(90.0); int textSectWidth = wordWidth * (text.length() - wordNum); int textSecLeftMargin = (imgWidth - textSectWidth - TEXT_AREA_LEFT_MARGIN - TEXT_AREA_RIGHT_MARGIN) / 2 + TEXT_AREA_LEFT_MARGIN; int textSecTopMargin = 50 + textSize[1] + 10; op.gravity("west"); op.pointsize(80).fill("#000000") .draw("text " + textSecLeftMargin + "," + textSecTopMargin + " '" + textSec + "'") .quality(90.0); } } private static Font getFont(float fontSize) { try { InputStream resourceAsStream = new ClassPathResource("static/SourceHanSerif-Light.ttc").getInputStream(); Font font = Font.createFont(Font.TRUETYPE_FONT, resourceAsStream); return font.deriveFont(fontSize); } catch (Exception e) { log.error(e.getMessage()); } return new Font(FONT_FAMILY, Font.PLAIN, 120); } public static int[] getContentSize(String content, float fontSize) { Font font = getFont(fontSize); int[] contentSize = new int[2]; FontRenderContext frc = new FontRenderContext(new AffineTransform(), true, true); Rectangle rec = font.getStringBounds(content, frc).getBounds(); contentSize[0] = (int) rec.getWidth(); contentSize[1] = (int) rec.getHeight(); return contentSize; }
执行效果如下:
还有多个图片水印的问题,勉强可以实现,但想要实现动态化比较繁琐。
public static void addImgWatermark2(String srcImagePath, String destImagePath, String waterImgPath) throws Exception { String projectPath = System.getProperty("user.dir"); // 原始图片信息 BufferedImage targetImg = ImageIO.read(new File(srcImagePath)); // 水印图片 BufferedImage watermarkImage = ImageIO.read(new File(waterImgPath)); int w = targetImg.getWidth(); int h = targetImg.getHeight(); int watermarkImageWidth = watermarkImage.getWidth(null); int watermarkImageHeight = watermarkImage.getHeight(null); IMOperation op2 = new IMOperation(); // 水印图片位置 op2.geometry(watermarkImageWidth, watermarkImageHeight, w - watermarkImageWidth - 600, h - watermarkImageHeight - 300); // 水印透明度 op2.dissolve(90); // 水印 op2.addImage(waterImgPath); // 原图 op2.addImage(srcImagePath); // 目标 String outPath = projectPath + "/src/main/resources/static/out/img_water_image22_by_im4.png"; op2.addImage(outPath); ImageCommand cmd = getImageCommand(CommandType.imageWaterMark); cmd.run(op2); IMOperation op = new IMOperation(); // 水印图片位置 op.geometry(watermarkImageWidth, watermarkImageHeight, w - watermarkImageWidth, h - watermarkImageHeight - 300); // 水印透明度 op.dissolve(90); // 水印 op.addImage(waterImgPath); // 原图 op.addImage(outPath); // 目标 op.addImage(destImagePath); cmd.run(op);}
执行效果如下:

最后同时生成文字水印和图片水印
public static void addImgWatermark(String srcImagePath, String destImagePath, String waterImgPath) throws Exception { IMOperation op = new IMOperation(); String projectPath = System.getProperty("user.dir"); op.font(projectPath + FONT_FAMILY_PATH); op.gravity("center"); String content = "中国"; op.pointsize(120).fill("#BCBFC8").draw("text 0,0 '" + content + "'").quality(90.0); // 原图 op.addImage(); // 目标 op.addImage(); ImageCommand cmd = getImageCommand(CommandType.textWaterMark); cmd.run(op, srcImagePath, destImagePath); // 原始图片信息 BufferedImage targetImg = ImageIO.read(new File(destImagePath)); // 水印图片 BufferedImage watermarkImage = ImageIO.read(new File(waterImgPath)); int w = targetImg.getWidth(); int h = targetImg.getHeight(); int watermarkImageWidth = watermarkImage.getWidth(null); int watermarkImageHeight = watermarkImage.getHeight(null); IMOperation op2 = new IMOperation(); // 水印图片位置 op2.geometry(watermarkImageWidth, watermarkImageHeight, w - watermarkImageWidth - 300, h - watermarkImageHeight - 100); // 水印透明度 op2.dissolve(90); // 水印 op2.addImage(waterImgPath); // 原图 op2.addImage(destImagePath); // 目标 String outPath = projectPath + "/src/main/resources/static/out/img_water_image22_by_im4.png"; op2.addImage(outPath); ImageCommand cmd2 = getImageCommand(CommandType.imageWaterMark); cmd2.run(op2);}
执行效果如下:
勉强能实现功能,但代码看起来太费劲了。
小结
GraphicsMagick 与 Im4Java 结合使用功能非常不错,除了添加文字水印和图片水印外,还可以旋转图片,压缩、裁剪等等操作。
关于图片处理也可以考虑 Thumbnailator,同样具备图片压缩、裁剪等功能。
Graphics2D 针对图片也可以实现压缩、裁剪等功能。
综上所述,Graphics2D 可以在一张背景图上同时添加文字和图片水印,以及文字可以按需求设置字体大小和样式,还可以同时添加多个图片水印。我们最终选择 Graphics2D 作为实现文字水印和图片水印的技术方案。
扩展
上面敲定了技术方案,但在实际应用中,还会遇到一些意想不到的问题,这里简单总结一些我经历过的问题,希望对大家有所帮助。
Docker发布镜像报错
比如说使用 Jenkins 发布镜像出现如下错误信息:
NoClassDefFoundError: Could not initialize class sun.awt.X11FontManager
问题原因:这种一般是出现在 docker 部署,且使用了精简版的 linux 基础镜像, 精简到把字体都阉割掉了,可以查看项目中的 Dockerfile 文件,比如说:
FROM openjdk:8u265-jdk-slim
使用的是 openjdk 的 docker 'slim images',则该镜像就不包含包 'fontconfig' 和 'libfreetype6'。
如果你的项目有字体相关操作,比如导出 excel,就会报上述异常。
解决办法:
1、换个东西全一点的镜像;
2、在构建镜像时安装字体,dockerfile增加命令:
RUN apt-get update; apt-get install -y fontconfig libfreetype6
国际化问题
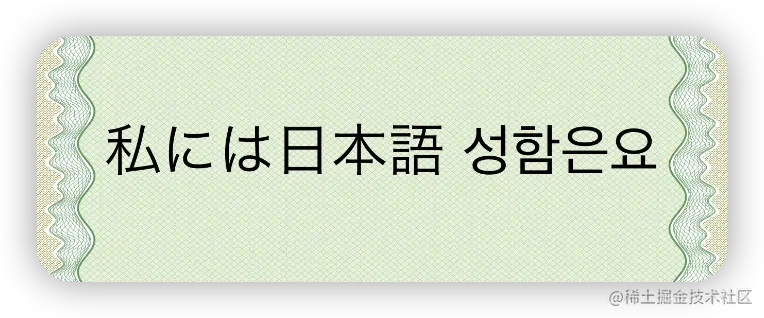
我们想要在图片上添加文字水印,就要考虑乱码的原因,不止英文,还有中日韩,以及欧洲的各种语言。
回头看看我们写的代码,它支持中日韩,当然也支持英文。
private static final String FONT_FAMILY = "楷体";Font userNameFont = new Font(FONT_FAMILY, Font.PLAIN, userNameFontSize);
示例如下:
我们既然选择使用 Graphics2D 来渲染文本,就要了解 Java 应用程序有哪些方式来选择字体。
- 使用逻辑字体名称:Java 2 平台定义了每个实现必须支持的五个逻辑字体名称:Serif、SansSerif、Monospaced、Dialog 和 DialogInput。这些逻辑字体名称以与实现相关的方式映射到物理字体。通常,一个逻辑字体名称映射到几种物理字体,以涵盖大范围的字符。
- 使用物理字体名称:Java 2 平台提供的 API 允许应用程序确定哪些字体可用于给定的运行时以及这些字体可以处理哪些字符,并使用它们的真实名称(例如,“Times Roman”或“赫尔维蒂卡”)。应用程序可以让用户选择字体或以编程方式确定要使用的字体。
- 使用 Lucida 字体:Sun 的 Java 2 运行时环境包含这个物理字体系列,它也被许可用于 Java 2 平台的其他实现。这些字体是物理字体,但不依赖于主机操作系统。
- 使用捆绑的物理字体:应用程序可以捆绑 TrueType 字体并使用该 Font.createFont 方法实例化它们。
针对四种方式,根据个人理解列举相关示例代码:
1、使用逻辑字体名称
Font userNameFont = new Font("Serif", Font.PLAIN, 120);// Font对象java.awt.Font[family=Serif,name=Serif,style=plain,size=120]
2、使用物理字体名称
Font userNameFont = new Font("楷体", Font.PLAIN, 120);// Font对象java.awt.Font[family=Dialog,name=楷体,style=plain,size=120]
3、使用 Lucida 字体
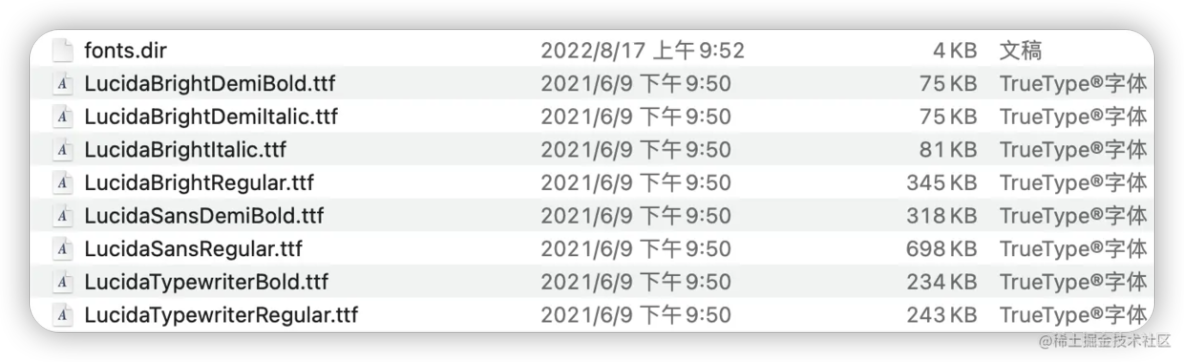
查看本机 JDK 安装目录,在 /jre/lib/fonts 目录下有 Lucida 字体。
4、使用捆绑的物理字体
private static Font getFont(float fontSize) { try { InputStream resourceAsStream = new ClassPathResource("static/SourceHanSerif-Light.ttc") .getInputStream(); Font font = Font.createFont(Font.TRUETYPE_FONT, resourceAsStream); return font.deriveFont(fontSize); } catch (Exception e) { log.error(e.getMessage()); } return new Font(FONT_FAMILY, Font.PLAIN, 120);}
上述四种方法各有优势,区别如下所示:
- 使用逻辑字体名称:
- 优点:保证这些字体名称可以在任何地方使用,并且它们至少可以使用主机操作系统本地化的语言(通常是更大范围的语言)进行文本渲染。
- 缺点:用于呈现文本的物理字体因不同的实现、主机操作系统和语言环境而异,因此应用程序无法在任何地方实现相同的外观。此外,映射机制有时会限制可以呈现的字符范围。后者曾经是 1.5 之前的 J2RE 版本的一个大问题:例如,日文文本只能在日文本地化的主机操作系统上呈现,即使安装了日文字体,也不能在其他本地化系统上呈现。对于使用 2D 字体渲染的应用程序,此问题在 J2RE 1.5.0 版中更为罕见,因为映射机制现在通常可以识别并使用所有支持的书写系统的字体(如果已安装)。
- 使用物理字体名称:
- 优点:这种方法让应用程序可以充分利用所有可用字体,以实现不同的文本外观和最大的语言覆盖率。
- 缺点:这种方法很难编程。
- 使用 Lucida 字体:
- 优点:使用这些字体的应用程序可以在这些字体可用的地方实现相同的外观。此外,这些字体涵盖多种语言(尤其是欧洲和中东),因此您可以为支持的语言创建完全多语言的应用程序。
- 缺点:这些字体可能并非在所有 Java 2 运行时环境中都可用。此外,它们目前不涵盖完整的 Unicode 字符集;特别是不支持中文、日文和韩文。
- 使用捆绑的物理字体:
- 优点:使用这些字体的应用程序可以在任何地方实现相同的外观,并且可以完全控制它们支持的语言。
- 缺点:捆绑的字体可能会很大,特别是如果它们支持中文、日文和韩文。需要解决许可问题。
上面废话太多,咱简单总结一下:
使用逻辑字体名称,依赖于本机上安装的字体,比如说 Windows、Mac、Linux 三种不同的系统一旦安装的物理字体不一致,那么还可能存在乱码问题。使用物理字体名称本质上和逻辑字体面临一样的问题。Lucida 字体都说了不支持中日韩语言,所以不做考虑。而使用捆绑的物理字体使用起来比较费劲,针对多种语言,可能需要捆绑的字体各不相同。
实际应用时该如何选择,这个要根据实际需要进行分析,如果不需要考虑国际化问题,那就简单了。恰好自己遇到了国际化问题,本人的处理方法是结合使用物理字体名称和捆绑物理字体,使用物理字体名称来应对大多数语言,针对乱码的语言可以特殊处理,即将项目中字体资源加载到当前运行环境中。
下面举例演示如何处理中日韩三种语言乱码的情况,首先得找到一个应对中日韩乱码的字体,这里使用的是思源宋体——SourceHanSerif-Light.ttc,接着需要根据文本内容来判断对应什么语言,如果是中日韩语言,才需要使用思源宋体。
private boolean isContainChinese(String text) { Pattern p = Pattern .compile("[\u4E00-\u9FA5|!|,|。|(|)|《|》|“|”|?|:|;|【|】]"); Matcher m = p.matcher(text); return m.find();}private boolean isJapanese(String text) { try { return text.getBytes("shift-jis").length >= (2 * text.length()); } catch (UnsupportedEncodingException e) { return false; }}private boolean checkKoreaChar(String text) { char[] chars = text.toCharArray(); for (char ch : chars) { if ((ch > 0x3130 && ch < 0x318F) || (ch >= 0xAC00 && ch <= 0xD7A3)) { return true; } } return false;}// 在resource目录下上传字体资源文件private Font getFont(String text, float fontSize) { try { String fontPath = ""; if (isJapanese(text) || isContainChinese(text) || checkKoreaChar(text)) { fontPath = "/static/fonts/SourceHanSerif-Light.ttc"; }else{ return new Font("CeraPro", Font.PLAIN, fontSize); } // 此种写法适用于SpringBoot框架 InputStream resourceAsStream = this.getClass().getResourceAsStream(fontPath); // 通用写法如下: //InputStream resourceAsStream = new ClassPathResource("static/SourceHanSerif-Light.ttc") // .getInputStream(); Font font = Font.createFont(Font.TRUETYPE_FONT, resourceAsStream); return font.deriveFont(fontSize); } catch (Exception e) { log.error(e.getMessage()); } return new Font("CeraPro", Font.PLAIN, fontSize);}
总结
工作上遇到技术问题时,最好先做好技术调研工作,尽量全面,不要找到一种就认为完事大吉了,我们还要考虑业务需求,将各种技术难点列举出来,看看该方案是否都能解决。
回头看看自己解决文字水印和图片水印的过程,当时自己只找到前两种技术方案,没有注意到 Im4Java,所以直接就选用了 Graphics2D 作为技术选型。恰好它能满足添加文字水印中遇到的字体样式问题,以及文本换行问题,所以一路还算顺利,没有返工操作。但这只是侥幸,如果当时我还注意到了 Im4Java,那么我会一开始去尝试 Im4Java。