本文实例为大家分享了Vue.js开发网页时钟的具体代码,供大家参考,具体内容如下 本次实例的重点是父子通信,这也是学习Vue.js的重点部分和难点部分,能掌握好父子通信是对后期的
本文实例为大家分享了Vue.js开发网页时钟的具体代码,供大家参考,具体内容如下
本次实例的重点是父子通信,这也是学习Vue.js的重点部分和难点部分,能掌握好父子通信是对后期的Vue学习是一个很大的帮助,而且如果不跨过这个难点部分,是无法进行后期的学习的。
父子通信很好用,但是很难理解而且写着写着还很容易出现错误
父子通信的重点知识
1、子组件通过props属性监听从父组件中传过来的值(值)
2、子组件通过$emit('方法名‘)来向父组件发出请求(方法)
3、学习vue必须要知道属性只要绑定好后就是动态的模式(我个人理解),就只需要接收和请求就行了,不需要做其他的监听操作
话不多说,上代码
一、页面部分
1、 创建模板
2、通过父子通信来对子组件的部分属性进行监听
<!DOCTYPE html>
<html lang="en">
<head>
    <meta charset="UTF-8">
    <title>Time</title>
    <link href="../css/index_css.css" rel="stylesheet">//采用外部连接的格式
</head>

<body>

<div id="content" class="content">
    <div id="over" @click="show()" :style="o_style">{{o_style.value}}</div>
    <clock :cur_time="current_time" @get_hour="getHours()" @get_minute="getMinutes()" @get_second="getSeconds()"
         :hour_s="hour_style" :minute_s="minute_style" :second_s="second_style" :com_s="o_style">
    </clock>
</div>


//模板部分
<template id="time_template">
    <div class="root">
            <span :style="{color:com_s.isNight==true?'white':'black'}">12</span>
            <span :style="{color:com_s.isNight==true?'white':'black'}">3</span>
            <span :style="{color:com_s.isNight==true?'white':'black'}">6</span>
            <span :style="{color:com_s.isNight==true?'white':'black'}">9</span>
            <span class="over-point"></span>
            <div id="hour" :style="hour_s"></div>
            <div id="minute" :style="minute_s"></div>
            <div id="second" :style="second_s"></div>
            <div id="show_time">{{cur_time.hour}}:{{cur_time.minute}}:{{cur_time.second}}</div>
    </div>
</template>

<script src="../external_lib/vue.js"></script>//这里是vue.js包的导入
<script src="../js/index_js.js"></script>//采用外部连接的格式
<script src="../js/pageControl.js"></script>//采用外部连接的格式
</body>
</html>
二、CSS部分
*{
    margin:0px;
    padding:0px;
}
body{
    display: flex;
    justify-content: center;
    align-items: center;
    align-content: center;
    background:skyblue;
    overflow: hidden;
}
#content{
    position:relative;
    width:100%;
    height:100vh;
    display:flex ;
    justify-content: center;
    align-content: center;
    align-items: center;
}
.root{
    width:500px;
    height:500px;
    border-radius: 50%;
    border:2px solid grey;
    position:relative;
    top:50px;
    background: url("../img/day.jpg") -170px;
    background-size:cover;
    overflow: hidden;
    box-shadow: 0px 0px 15px gray;
}

.root>span,.root>div{
    position:absolute;
    font-size:20px;/*内部的每一个文字的大小*/
}
span:first-child{
    left:240px;/*十二这个数字的x偏移量=(500/2)-(20/2)*/
    top:10px;
    z-index:10;
}
span:nth-child(2){
    left:480px;/*3的x偏移量=(500-10)*/
    top:240px;/*(500/2)-(20/2)*/
    z-index:10;
}
span:nth-child(3){
    left:250px;/*6*/
    top:470px;
    z-index:10;
}
span:nth-child(4){
    left:10px;/*9*/
    top:240px;
    z-index:10;
}
span:nth-child(5){/*时钟中间的骨架*/
    left:225px;/*(500/2)-(50/2)*/
    top:225px;/*(500/2)-(50/2)*/
    display: inline-block;
    width:50px;
    height:50px;
    line-height:50px;
    text-align: center;
    font-weight:bolder;
    border-radius: 50%;
    background:cadetblue;
    box-shadow: 0px 0px 18px #5f9ea0,inset 0px 0px 10px #4faee0;
    z-index:12;
}
#hour{
    width:20px;
    height:120px;
    border-radius:12px;
    background:white;
    top:136px;
    left:242px;
    opacity:88%;
    box-shadow: 0 0 18px whitesmoke;
    z-index:11;
}
#minute{
    width:15px;
    height:160px;
    border-radius:12px;
    background:dodgerblue;
    top:90px;
    left:243px;
    opacity: 0.85;
    box-shadow: 0 0 18px deepskyblue;
    z-index:11;
}
#second{
    width:10px;
    height:200px;
    border-radius:12px;
    background:gray;
    top:50px;
    left:250px;
    opacity:0.8;
    box-shadow: 0 0 18px snow;
    z-index:11;
}
#show_time{
    width:100px;
    height:50px;
    background:black;
    opacity:0.6;
    left:200px;
    top:300px;
    color:white;
    text-align: center;
    line-height:50px;
    z-index:10;
}
#over{
    position:absolute;
    width:100%;
    height:100vh;
    color:white;
    background:black;
    opacity: 0.8;
    transition:1s;
    z-index:10;
}
三、JS部分(重点部分)
父子通信
/**子组件
 * 子组件的时针、分针、秒针都是通过父组件传过来的值来设置它的偏移量
 */
let clock={
    template:'#time_template',
    data(){
        return{
            interval:'',//定时器对象
        }
    },
    props:{//监听从父组件中传过来的对象
        cur_time: '',
        com_s:{},
        hour_s:{},
        minute_s:{},
        second_s:{},
    },
    methods:{
            display(){
                this.interval=setInterval((e)=>{
                    this.setHours();
                    this.setMinutes();
                    this.setSeconds();
                },1000);
            },
            setHours(){
                this.$emit('get_hour');
            },
            setMinutes(){
                this.$emit('get_minute');
            },
            setSeconds(){
                this.$emit('get_second');
            },
    },
    created(){//让方法在一开始就自动调用,一般适用于有定时器的方法
        this.display();
    }
};

/**
 * 父组件
 */
let fatherComponent=new Vue({
    el:'#content',
    data:{
        date:new Date(),
        current_time:{//表示当前时间的对象
            hour:'',
            minute:'',
            second:'',
        },
        //需要传给子组件的对象
        hour_style: {},
        minute_style:{},
        second_style:{},
        //页面样式的初始化属性
        o_style:{
           left:'97%',
            isNight:false,//监听是白天还是黑夜,默认是白天
            value:'N-M',
        },
    },
    //通过子组件向父组件发起请求的方法
    methods:{
        getHours(){
            this.date=new Date();
            this.current_time.hour=this.date.getHours()>=10?this.date.getHours():'0'+this.date.getHours();
            let hour=this.date.getHours()%12+(this.date.getMinutes()+(this.date.getSeconds()/60)/60);
            this.hour_style={
                transformOrigin:'bottom center',
                transform:'rotate('+this.date.getHours()*30+'deg)',
            }
        },
        getMinutes(){
            this.date=new Date();
            this.current_time.minute=this.date.getMinutes()>=10?this.date.getMinutes():'0'+this.date.getMinutes();
            let m=this.date.getMinutes();
            this.minute_style={
                transformOrigin:'bottom center',
                transform:'rotate('+(m*6)+'deg)',//分为六十等分,每份为一分钟
            }
        },
        getSeconds(){
            this.date=new Date();
            this.current_time.second=this.date.getSeconds()>=10?this.date.getSeconds():'0'+this.date.getSeconds();
            this.second_style={
                transformOrigin:'bottom center',
                transform:'rotate('+this.date.getSeconds()*6+'deg)',//将圆分为六十份,每份为一秒钟。
            }
        },
        //对页面对象的属性进行修改
        show(){
            if(this.o_style.isNight){
                this.o_style.left='97%';
                this.o_style.isNight=false;
                this.o_style.value='N-M'
            }else{
                this.o_style.left='0%';
                this.o_style.isNight=true;
                this.o_style.value='D-M'
            }
        }
    },
    //在父组件内声明子组件,这是必须的
    components:{
        clock
    }
});
四、效果图
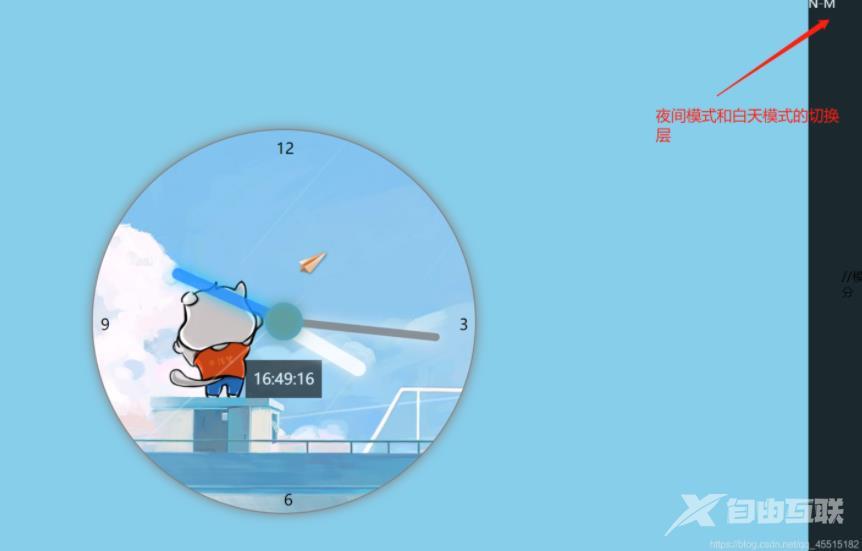
白天模式:
在白天模式中,单击N-M层就能变成夜间模式

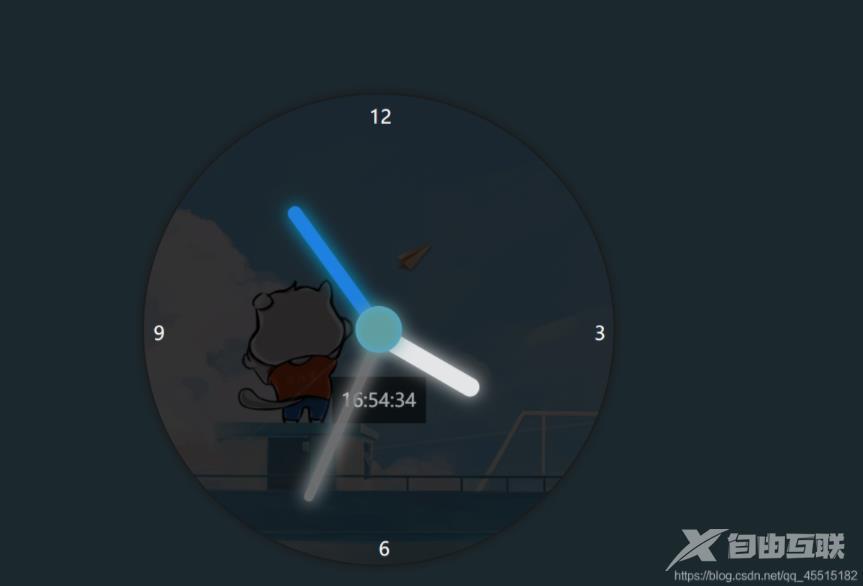
夜晚模式:
在夜晚模式中单击任何地方都可以变回白天模式
夜晚模式中每个指针都是发光的

以上就是本文的全部内容,希望对大家的学习有所帮助,也希望大家多多支持易盾网络。
