本文实例为大家分享了vue实现签到日历效果的具体代码,供大家参考,具体内容如下 先看看我们的效果图: 一、页面部分: template div class="test-page" div class="top" div class="bu
本文实例为大家分享了vue实现签到日历效果的具体代码,供大家参考,具体内容如下
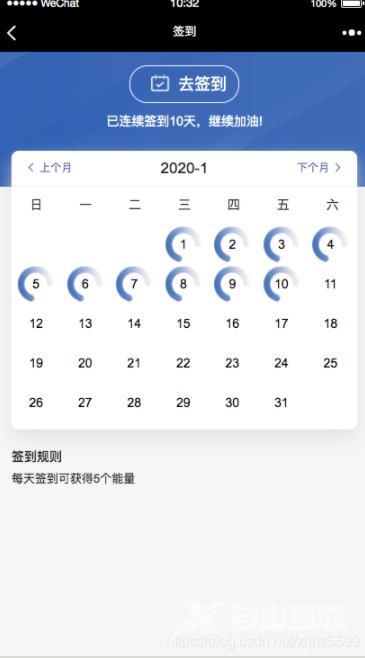
先看看我们的效果图:
一、页面部分:
<template>
  <div class="test-page">
    <div class="top">
      <div class="button" v-if="!sign" @click="Sign">
        <i class="calendar-icon"></i>
        <div>去签到</div>
      </div>
      <div class="button" v-if="sign">
        <i class="calendar-icon"></i>
        <div>已签到</div>
      </div>
      <div>已连续签到{{day}}天,继续加油!</div>
    </div>

    <div class="content">
      <!-- 年份 月份 -->
      <ul class="month bottom-line">
        <!--点击会触发pickpre函数,重新刷新当前日期 -->
        <li class="arrow" @click="pickPre(currentYear,currentMonth)"><van-icon name="arrow-left"/> 上个月</li>
        <li class="year-month">
          <span>{{ currentYear }}-{{ currentMonth }}</span>
        </li>
        <li class="arrow" @click="pickNext(currentYear,currentMonth)">下个月 <van-icon name="arrow"/></li>
      </ul>

      <!-- 星期 -->
      <ul class="weekdays">
        <li>日</li>
        <li>一</li>
        <li>二</li>
        <li>三</li>
        <li>四</li>
        <li>五</li>
        <li>六</li>
      </ul>

      <!-- 日期 -->
      <ul class="days bottom-line">
        <li  v-for="day in days">
          <!--本月已签到日期-->
          <span v-if="day.isSign && day.day.getMonth()+1 === currentMonth" class="cli">
            <img src="/static/images/calendar-sign-icon.png">
            {{ day.day.getDate() }}
          </span>
          <!--本月未签到日期-->
          <span v-if="!day.isSign && day.day.getMonth()+1 === currentMonth" class="cli">{{ day.day.getDate() }}</span>
        </li>
      </ul>
    </div>

    <div class="role">
      <div class="role-title">签到规则</div>
      <div class="role-content" v-html="role ? role : '暂无内容'"></div>
    </div>
  </div>
</template>

<script>
import index from './index';
export default index;
</script>

<style lang="less" scoped>
@import './index';
</style>
二、js部分:
import { Cell, CellGroup, Field, Popup, Button, Icon } from 'vant';

export default {
  components: {
    [Cell.name]: Cell,
    [CellGroup.name]: CellGroup,
    [Field.name]: Field,
    [Popup.name]: Popup,
    [Button.name]: Button,
    [Icon.name]: Icon
  },
  data() {
    return {
      currentDay: 1, // 当前天
      currentMonth: 1, // 当前月
      currentYear: 1970,
      currentWeek: 1, // 一号所在的星期
      days: [], // 当月所有天数
      content: {},
      arrDate: [], // 当月签到日期
      num: 0,
      day: 10,
      sign: false,
      role: '<p>每天签到可获得5个能量</p>'
    };
  },
  created() {
    this.getSign();
  },
  methods: {
    /**
     * 获取签到日期
     */
    getSign() {
      // 接口未完成,模拟数据
      const sign_days = [
        { day: 5 }, { day: 1 }, { day: 2 }, { day: 3 }, { day: 4 }, { day: 6 }, { day: 7 }, { day: 8 }, { day: 9 }, { day: 10 }
      ];
      for (const i in sign_days) {
        this.arrDate.push(sign_days[i].day);
      }
      this.initData(null);
    },
    initData(cur) {
      let date;
      if (cur) { // 切换日期
        date = new Date(cur);
      } else {
        var now = new Date();
        var d = new Date(this.formatDate(now.getFullYear(), now.getMonth() + 1, 1));
        d.setDate(35);// 设置天数为35天
        date = new Date(this.formatDate(d.getFullYear(), d.getMonth(), 1));
      }
      this.currentDay = date.getDate(); // 今日日期 几号
      this.currentYear = date.getFullYear(); // 当前年份
      this.currentMonth = date.getMonth() + 1; // 当前月份

      this.currentWeek = date.getDay(); // 0,1...6 星期
      const str = this.formatDate(this.currentYear, this.currentMonth, this.currentDay); // 2020-01-01
      this.days.length = 0; // 初始化日期
      // 如果今天是周日,放在第一行第7个位置,前面6个 这里默认显示一周,如果需要显示一个月,则第二个循环为 i<= 35- this.currentWeek
      for (var i = this.currentWeek; i > 0; i--) {
        const d = new Date(str);
        d.setDate(d.getDate() - i);
        var dayobject = {}; // 用一个对象包装Date对象  以便为以后预定功能添加属性
        dayobject.day = d;
        this.days.push(dayobject); // 将日期放入data 中的days数组 供页面渲染使用
      }
      // 其他周 // 设置天数为35天,周日设置在第一位,循环从36开始
      this.num = 0;
      for (var j = 0; j <= 36 - this.currentWeek; j++) {
        const d = new Date(str);
        d.setDate(d.getDate() + j);
        const dddd = d.getDate();
        if (dddd === 1) {
          this.num++;
        }
        if (this.num === 2) {
          return;
        }
        const dayobject = { day: d, isSign: this.isVerDate(dddd) };
        this.days.push(dayobject);
      }
    },
    /**
     * 判断该日期是否有签到
     * @param v
     * @returns {boolean}
     */
    isVerDate(v) {
      return this.arrDate.includes(v);
    },
    /**
     * 上一月
     * @param year
     * @param month
     */
    pickPre(year, month) {
      const d = new Date(this.formatDate(year, month, 1));
      d.setDate(0);
      this.initData(this.formatDate(d.getFullYear(), d.getMonth() + 1, 1));
    },
    /**
     * 下一月
     * @param year
     * @param month
     */
    pickNext(year, month) {
      const d = new Date(this.formatDate(year, month, 1));
      d.setDate(35);
      this.initData(this.formatDate(d.getFullYear(), d.getMonth() + 1, 1));
    },
    // 返回 类似 2020-01-01 格式的字符串
    formatDate(year, month, day) {
      month < 10 && (month = '0' + month);
      day < 10 && (day = '0' + day);
      const data = year + '-' + month + '-' + day;
      return data;
    },
    /**
     * 点击签到
     * @param index
     */
    Sign() {
      const now = new Date();
      this.arrDate.push(now.getDate());
      this.initData();
      this.sign = true;
      // 接口待完成,虚拟提示
      this.$fn.success('签到成功');
    }
  }
};
三、CSS部分:
.test-page {
  .top {
    background: url('/static/images/user-bg-img.jpg') no-repeat 0 0;
    background-size: 100% 100%;
    overflow: hidden;
    color: #ffffff;
    padding: 15px;
    height: 120px;
    text-align: center;
    .button {
      display: flex;
      justify-content: center;
      border: 1px solid #ffffff;
      border-radius: 20px;
      color: #ffffff;
      font-size: 18px;
      width: 120px;
      margin: 0 auto 10px;
      height: 40px;
      line-height: 40px;
      .calendar-icon {
        display: block;
        width: 40px;
        height: 40px;
        background: url(/static/images/calendar-icon.png) no-repeat -6px -4px;
        background-size: 114px 45px;
      }
    }
    .button:active {
      background-color: #5283c4;
      opacity: 0.8;
    }
  }

  .content {
    margin: 0 15px;
    border-radius: 8px;
    overflow: hidden;
    margin-top: -40px;
    box-shadow: rgba(225,225,225,0.7) 0  10px 20px 0;
  }
  .month {
    background: #ffffff;
    margin: 0;
    padding: 10px 15px;
    display: flex;
    justify-content: space-between;
    li {
      text-transform: uppercase;
      letter-spacing: 0;
    }
    .arrow {
      color: #5283c4;
      font-size: 12px;
      i {
        font-size: 13px;
        top: 2px;
      }
    }
    .year-month { font-size: 17px; }
  }

  .weekdays { /*头部星期*/
    margin: 0;
    padding: 10px 0;
    background-color: #ffffff;
    display: flex;
    flex-wrap: wrap;
    justify-content: space-around;
    li {
      display: inline-block;
      text-align: center;
    }
  }

  .days { /*日期*/
    padding: 0 0 10px;
    background: #FFFFFF;
    margin: 0;
    display: flex;
    flex-wrap: wrap;
    align-items: center;
    justify-content: flex-start;

    li {
      list-style-type: none;
      width: 14.2%;
      padding: 1%;
      box-sizing: border-box;
      height: 40px;
      margin-bottom: 4px;
      text-align: center;
      color: #000;
      .cli {
        position: relative;
        width: 100%;
        height: 40px;
        display: flex;
        align-items: center;
        justify-content: center;
        img {/*签到的日期*/
          height: 40px;
          position: absolute;
        }
      }
    }
  }

  .role {
    padding: 20px 15px;
    .role-title {
      margin-bottom: 5px;
      font-weight: bold;
    }
    .role-content {
      font-size: 13px;
      color: #333333;
    }
  }
}
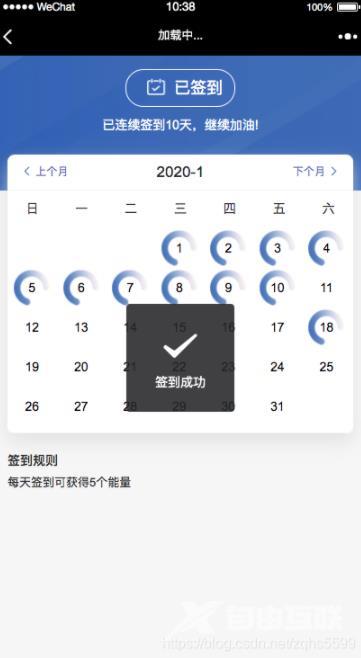
签到效果:

以上就是本文的全部内容,希望对大家的学习有所帮助,也希望大家多多支持易盾网络。