Elasticsearch 集群工作原理 单机节点 ES 存在单点问题,可以实现Elasticsearch多机的集群 ES 节点分类 Elasticsearch 集群的每个节点的角色有所不同,但都会保存集群状态Cluster State的相关的数据信
Elasticsearch 集群工作原理
单机节点 ES 存在单点问题,可以实现Elasticsearch多机的集群
- ES 节点分类
- Elasticsearch 集群的每个节点的角色有所不同,但都会保存集群状态Cluster State的相关的数据信息
- 节点信息:每个节点名称和地址
- 索引信息:所有索引的名称,配置,数据等
- ES的节点有下面几种
- Master 节点
ES集群中只有一个 Master 节点,用于控制和管理整个集群的操作
Master 节点负责增删索引,增删节点,分片shard的重新分配
Master 主要维护Cluster State,包括节点名称,节点连接地址,索引名称和配置信 息等
Master 接受集群状态的变化并推送给所有其它节点,集群中各节点都有一份完整的集群状态信息,
都由master node负责维护
Master 节点不需要涉及到文档级别的变更和搜索等操作
协调创建索引请求或查询请求,将请求分发到相关的node上。
当Cluster State有新数据产生后, Master 会将数据同步给其他 Node 节点
Master节点通过超过一半的节点投票选举产生的
可以设置node.master: true 指定为是否参与Master节点选举, 在配置文件中添加即可调整后加入主机是否参与选举
- Data 节点
存储数据的节点即为 data 节点
当创建索引后,索引的数据会存储至某个数据节点
Data 节点消耗内存和磁盘IO的性能比较大
配置node.data: true, 就是Data节点,默认为 true,即默认所有节点都是 Data 节点类型
- Coordinating 节点(协调) - 主机专用于转发请求,极少用
处理请求的节点即为 coordinating 节点,该节点类型为所有节点的默认角色,不能取消coordinating 节点主要将请求路由到正确的节点处理。比如创建索引的请求会由 coordinating 路由到 master 节点处理
当配置 node.master:false、node.data:false 则只充当 Coordinating 节点
Coordinating 节点在 Cerebro 等插件中数据页面不会显示出来
- Master-eligible 初始化时有资格选举Master的节点
集群初始化时有权利参于选举Master角色的节点
只在集群第一次初始化时进行设置有效,后续配置无效
由 cluster.initial_master_nodes 配置节点地址
- 以上节点通常是一个主机身兼数职
- ES 集群选举
ES集群的选举是由master-eligble(有资格充当的master节点)发起

当该节点发现当前节点不是master,并且该节点通过ZenDiscovery模块ping其他节点,如果发现超过mininum_master_nodes个节点无法连接master时,就会发起新的选举

选举时,优先选举ClusterStateVersion最大的Node节点,如果ClusterStateVersion相同,则选举ID最小的Node

ClusterStateVersion是集群的状态版本号,每一次集群选举ClusterStateVersion都会更新,因此最大的ClusterStateVersion是与原有集群数据最接近或者是相同的,这样就尽可能的避免数据丢失。

Node的ID是在第一次服务启动时随机生成的,直接选用最小ID的Node,主要是为了选举的稳定性,尽量少出现选举不出来的问题。

每个集群中只有一个Master节点

每个集群中损坏的节点不能超过集群一半以上,否则集群将无法提供服务
Elasticsearch集群搭建及配置说明
- 准备三台机器,提前做好linux性能优化(参照单机部署篇)
192.168.11.200 es-node1.mooreyxia.org
192.168.11.201 es-node2.mooreyxia.org
192.168.11.202 es-node3.mooreyxia.org

[root@es-node1-3 ~]#vim /etc/security/limits.conf
* soft core unlimited
* hard core unlimited
* soft nproc 1000000    --调大打开进程数
* hard nproc 1000000
* soft nofile 1000000   --调大打开文件数
* hard nofile 1000000
* soft memlock 32000    --调大进程锁
* hard memlock 32000
* soft msgqueue 8192000 --调大消息队列
* hard msgqueue 8192000
- 每台机器都执行包安装并关闭密码验证,建立elasticsearch自定义数据目录
#以单台机器为例,其他机器配置都一样,注意集群节点名称不要重复了
[root@es-node1 ~]#wget https://mirrors.tuna.tsinghua.edu.cn/elasticstack/8.x/apt/pool/main/e/elasticsearch/elasticsearch-8.6.1-amd64.deb;dpkg -i elasticsearch-8.6.1-amd64.deb

[root@es-node1 ~]#sed -i 's/xpack.security.enabled: true/xpack.security.enabled: false/' /etc/elasticsearch/elasticsearch.yml

[root@es-node1 ~]#mkdir -p /data/es-data
[root@es-node1 ~]#mkdir -p /data/es-logs

#目录权限更改
#在各个ES服务器创建数据和日志目录并修改目录权限为elasticsearch
[root@es-node1 ~]# chown -R elasticsearch.elasticsearch /data/
- 配置集群(含配置详细说明)
#以一个节点为例,其他节点配置相同,注意每个节点要确保此名称唯一
[root@es-node1 ~]#vim /etc/elasticsearch/elasticsearch.yml
[root@es-node1 ~]#grep -Ev '^$|#' /etc/elasticsearch/elasticsearch.yml
cluster.name: es-cluster #ELK集群名称
node.name: es-node1 #当前节点在集群内的节点名称,同一集群中每个节点要确保此名称唯一
path.data: /data/es-data    #ES 数据保存目录,包安装默认路径:/var/lib/elasticsearch/
path.logs: /data/es-logs    #ES 日志保存目录,包安装默认路径:/var/llog/elasticsearch/
bootstrap.memory_lock: true #服务启动的时候立即分配(锁定)足够的内存,防止数据写入swap,提高启动速度,但是true会导致启动失
败,需要优化
network.host: 0.0.0.0   #指定该节点监听IP,如果绑定了错误的IP,可将此修改为指定IP
discovery.seed_hosts: ["192.168.11.200","192.168.11.201","192.168.11.202"]  #发现集群的node节点列表,可以添加部分或全部节点IP
cluster.initial_master_nodes: ["192.168.11.200","192.168.11.201","192.168.11.202"]  #集群初始化时指定希望哪些节点可以被选举为 master,只在初始化时使用,新加节点到已有集群时此项可不配置
action.destructive_requires_name: true  #设置是否可以通过正则表达式或者_all匹配索引库进行删除或者关闭索引库,默认true表示必须需要明确指定索引库名称,不能使用正则表达式和_all,生产环境建议设置为 true,防止误删索引库。
xpack.security.enabled: false
xpack.security.enrollment.enabled: true
xpack.security.http.ssl:
  enabled: true
  keystore.path: certs/http.p12
xpack.security.transport.ssl:
  enabled: true
  verification_mode: certificate
  keystore.path: certs/transport.p12
  truststore.path: certs/transport.p12
http.host: 0.0.0.0

#配置项详细说明
[root@es-node1 ~]# grep "^[a-Z]" /etc/elasticsearch/elasticsearch.yml
#ELK集群名称,单节点无需配置,同一个集群内每个节点的此项必须相同,新加集群的节点此项和其它节点相
同即可加入集群,而无需再验证
cluster.name: ELK-Cluster
#当前节点在集群内的节点名称,同一集群中每个节点要确保此名称唯一
node.name: es-node1
#ES 数据保存目录,包安装默认路径:/var/lib/elasticsearch/
path.data: /data/es-data
#ES 日志保存目录,包安装默认路径:/var/llog/elasticsearch/
path.logs: /data/es-logs
#服务启动的时候立即分配(锁定)足够的内存,防止数据写入swap,提高启动速度,但是true会导致启动失
败,需要优化
bootstrap.memory_lock: true
#指定该节点监听IP,如果绑定了错误的IP,可将此修改为指定IP
network.host: 0.0.0.0
#监听端口
http.port: 9200
#发现集群的node节点列表,可以添加部分或全部节点IP
#在新增节点到已有集群时,此处需指定至少一个已经在集群中的节点地址
discovery.seed_hosts: ["10.0.0.101","10.0.0.102","10.0.0.103"]
#集群初始化时指定希望哪些节点可以被选举为 master,只在初始化时使用,新加节点到已有集群时此项可不
配置
cluster.initial_master_nodes: ["10.0.0.101","10.0.0.102","10.0.0.103"]
#一个集群中的 N 个节点启动后,才允许进行数据恢复处理,默认是1,一般设为为所有节点的一半以上,防止
出现脑裂现象
#当集群无法启动时,可以将之修改为1,或者将下面行注释掉,实现快速恢复启动
gateway.recover_after_nodes: 2
#设置是否可以通过正则表达式或者_all匹配索引库进行删除或者关闭索引库,默认true表示必须需要明确指
定索引库名称,不能使用正则表达式和_all,生产环境建议设置为 true,防止误删索引库。
action.destructive_requires_name: true
#如果不参与主节点选举设为false,默认值为true
node.master: false
#存储数据,默认值为true,此值为false则不存储数据而成为一个路由节点
#如果将原有的true改为false,需要先执行/usr/share/elasticsearch/bin/elasticsearch-node
repurpose 清理数据
node.data: true
#7.x以后版本下面指令已废弃,在2.x 5.x 6.x 版本中用于配置节点发现列表
discovery.zen.ping.unicast.hosts: ["10.0.0.101", "10.0.0.102","10.0.0.103"]
#8.X版后默认即开启Xpack功能,可以修改为false禁用
xpack. security. enabled : true
#开启跨域访问支持,默认为false
http.cors.enabled: true
# 跨域访问允许的域名地址,(允许所有域名)以上使用正则
http.cors.allow-origin: "*"

#节点2
[root@es-node2 ~]#grep -Ev '^$|#' /etc/elasticsearch/elasticsearch.yml
cluster.name: es-cluster
node.name: es-node2
path.data: /data/es-data
path.logs: /data/es-logs
bootstrap.memory_lock: true
network.host: 0.0.0.0
discovery.seed_hosts: ["192.168.11.200","192.168.11.201","192.168.11.202"]
cluster.initial_master_nodes: ["192.168.11.200","192.168.11.201","192.168.11.202"]
action.destructive_requires_name: true
xpack.security.enabled: false
xpack.security.enrollment.enabled: true
xpack.security.http.ssl:
  enabled: true
  keystore.path: certs/http.p12
xpack.security.transport.ssl:
  enabled: true
  verification_mode: certificate
  keystore.path: certs/transport.p12
  truststore.path: certs/transport.p12
http.host: 0.0.0.0

#节点3
[root@es-node3 ~]#grep -Ev '^$|#' /etc/elasticsearch/elasticsearch.yml
cluster.name: es-cluster
node.name: es-node3
path.data: /data/es-data
path.logs: /data/es-logs
bootstrap.memory_lock: true
network.host: 0.0.0.0
discovery.seed_hosts: ["192.168.11.200","192.168.11.201","192.168.11.202"]
cluster.initial_master_nodes: ["192.168.11.200","192.168.11.201","192.168.11.202"]
action.destructive_requires_name: true
xpack.security.enabled: false
xpack.security.enrollment.enabled: true
xpack.security.http.ssl:
  enabled: true
  keystore.path: certs/http.p12
xpack.security.transport.ssl:
  enabled: true
  verification_mode: certificate
  keystore.path: certs/transport.p12
  truststore.path: certs/transport.p12
http.host: 0.0.0.0
- 优化 ELK 资源配置
- 开启 bootstrap.memory_lock 优化,新版开启不会报错,下面是旧版报错的解决方案
#开启bootstrap.memory_lock: true可以优化性能,但会导致无法启动的错误解决方法
[root@node1 ~]#vim /lib/systemd/system/elasticsearch.service
[Service]
#加下面一行
LimitMEMLOCK=infinity
[root@node1 ~]#systemctl daemon-reload
[root@node1 ~]#systemctl restart elasticsearch.service
[root@node1 ~]#systemctl is-active elasticsearch.service
active
- 内存优化 - 几乎所有的JAVA应用程序都可以按照以下建议对内存进行优化
- 推荐使用宿主机物理内存的一半,ES的heap内存最大不超过30G,26G是比较安全的
#官方文档:
https://www.elastic.co/guide/en/elasticsearch/reference/current/importantsettings.
html#heap-size-settings

#内存优化建议:
为了保证性能,每个ES节点的JVM内存设置具体要根据 node 要存储的数据量来估算,建议符合下面约定
    在内存和数据量有一个建议的比例:对于一般日志类文件,1G 内存能存储48G~96GB数据
    JVM 堆内存最大不要超过30GB
    单个分片控制在30-50GB,太大查询会比较慢,索引恢复和更新时间越长;分片太小,会导致索引碎片化越严重,性能也会下降
案例:指定heap内存最小和最大内存限制
[root@es-node1 ~]# vim /etc/elasticsearch/jvm.options
-Xms30g
-Xmx30g
#每天产生1TB左右的数据量的服务器配置,还需要定期清理磁盘
16C 64G 6T硬盘 共3台服务器
案例:修改elasticsearch配置文件中的内存限制
[root@es-node1 ~]# vim /usr/lib/systemd/system/elasticsearch.service
LimitNOFILE=1000000 #修改最大打开的文件数,默认值为65535
LimitNPROC=65535 #修改打开最大的进程数,默认值为4096
LimitMEMLOCK=infinity #无限制使用内存,以前旧版需要修改,否则无法启动服务,当前版本无需修改
内存锁定的配置参数:
https://discuss.elastic.co/t/memory-lock-not-working/70576
- 启动 Elasticsearch 服务并验证
#所有节点配置完毕,启动服务
[root@es-node1 ~]#systemctl enable --now elasticsearch
[root@es-node2 ~]#systemctl enable --now elasticsearch
[root@es-node3 ~]#systemctl enable --now elasticsearch

#测试
[root@es-node1 ~]#curl http://192.168.11.200:9200
{
  "name" : "es-node1",
  "cluster_name" : "es-cluster",
  "cluster_uuid" : "K0Ot8jy7TAGjhrNXt7y1SA",
  "version" : {
    "number" : "8.6.1",
    "build_flavor" : "default",
    "build_type" : "deb",
    "build_hash" : "180c9830da956993e59e2cd70eb32b5e383ea42c",
    "build_date" : "2023-01-24T21:35:11.506992272Z",
    "build_snapshot" : false,
    "lucene_version" : "9.4.2",
    "minimum_wire_compatibility_version" : "7.17.0",
    "minimum_index_compatibility_version" : "7.0.0"
  },
  "tagline" : "You Know, for Search"
}
[root@es-node1 ~]#curl http://192.168.11.201:9200
{
  "name" : "es-node2",
  "cluster_name" : "es-cluster",
  "cluster_uuid" : "K0Ot8jy7TAGjhrNXt7y1SA",
  "version" : {
    "number" : "8.6.1",
    "build_flavor" : "default",
    "build_type" : "deb",
    "build_hash" : "180c9830da956993e59e2cd70eb32b5e383ea42c",
    "build_date" : "2023-01-24T21:35:11.506992272Z",
    "build_snapshot" : false,
    "lucene_version" : "9.4.2",
    "minimum_wire_compatibility_version" : "7.17.0",
    "minimum_index_compatibility_version" : "7.0.0"
  },
  "tagline" : "You Know, for Search"
}
[root@es-node1 ~]#curl http://192.168.11.202:9200
{
  "name" : "es-node3",
  "cluster_name" : "es-cluster",
  "cluster_uuid" : "K0Ot8jy7TAGjhrNXt7y1SA",
  "version" : {
    "number" : "8.6.1",
    "build_flavor" : "default",
    "build_type" : "deb",
    "build_hash" : "180c9830da956993e59e2cd70eb32b5e383ea42c",
    "build_date" : "2023-01-24T21:35:11.506992272Z",
    "build_snapshot" : false,
    "lucene_version" : "9.4.2",
    "minimum_wire_compatibility_version" : "7.17.0",
    "minimum_index_compatibility_version" : "7.0.0"
  },
  "tagline" : "You Know, for Search"
}

[root@es-node1 ~]#grep -Ev '^$|#' /usr/lib/systemd/system/elasticsearch.service
[Unit]
Description=Elasticsearch
Documentation=https://www.elastic.co
Wants=network-online.target
After=network-online.target
[Service]
Type=notify
NotifyAccess=all
RuntimeDirectory=elasticsearch
PrivateTmp=true
Environment=ES_HOME=/usr/share/elasticsearch
Environment=ES_PATH_CONF=/etc/elasticsearch
Environment=PID_DIR=/var/run/elasticsearch
Environment=ES_SD_NOTIFY=true
EnvironmentFile=-/etc/default/elasticsearch
WorkingDirectory=/usr/share/elasticsearch
User=elasticsearch
Group=elasticsearch
ExecStart=/usr/share/elasticsearch/bin/systemd-entrypoint -p ${PID_DIR}/elasticsearch.pid --quiet
StandardOutput=journal
StandardError=inherit
LimitNOFILE=65535
LimitNPROC=4096
LimitAS=infinity
LimitFSIZE=infinity
TimeoutStopSec=0
KillSignal=SIGTERM
KillMode=process
SendSIGKILL=no
SuccessExitStatus=143
TimeoutStartSec=75
LimitMEMLOCK=infinity
[Install]
WantedBy=multi-user.target

#默认以elasticsearch 用户启动
[root@es-node1 ~]#id elasticsearch
uid=111(elasticsearch) gid=113(elasticsearch) groups=113(elasticsearch)
[root@es-node2 ~]#id elasticsearch
uid=111(elasticsearch) gid=113(elasticsearch) groups=113(elasticsearch)
[root@es-node3 ~]#id elasticsearch
uid=111(elasticsearch) gid=113(elasticsearch) groups=113(elasticsearch)

[root@es-node1 ~]#ps aux|grep elasticsearch
elastic+    5020  0.9  2.3 2599692 93288 ?       Ssl  09:04   0:03 /usr/share/elasticsearch/jdk/bin/java -Xms4m -Xmx64m -XX:+UseSerialGC -Dcli.name=server -Dcli.script=/usr/share/elasticsearch/bin/elasticsearch -Dcli.libs=lib/tools/server-cli -Des.path.home=/usr/share/elasticsearch -Des.path.conf=/etc/elasticsearch -Des.distribution.type=deb -cp /usr/share/elasticsearch/lib/*:/usr/share/elasticsearch/lib/cli-launcher/* org.elasticsearch.launcher.CliToolLauncher -p /var/run/elasticsearch/elasticsearch.pid --quiet
elastic+    5079 10.9 18.8 2985744 758728 ?      SLl  09:05   0:43 /usr/share/elasticsearch/jdk/bin/java -Des.networkaddress.cache.ttl=60 -Des.networkaddress.cache.negative.ttl=10 -Djava.security.manager=allow -XX:+AlwaysPreTouch -Xss1m -Djava.awt.headless=true -Dfile.encoding=UTF-8 -Djna.nosys=true -XX:-OmitStackTraceInFastThrow -Dio.netty.noUnsafe=true -Dio.netty.noKeySetOptimization=true -Dio.netty.recycler.maxCapacityPerThread=0 -Dlog4j.shutdownHookEnabled=false -Dlog4j2.disable.jmx=true -Dlog4j2.formatMsgNoLookups=true -Djava.locale.providers=SPI,COMPAT --add-opens=java.base/java.io=ALL-UNNAMED -Xms256m -Xmx256m -XX:+UseG1GC -Djava.io.tmpdir=/tmp/elasticsearch-18192750069789530377 -XX:+HeapDumpOnOutOfMemoryError -XX:+ExitOnOutOfMemoryError -XX:HeapDumpPath=/var/lib/elasticsearch -XX:ErrorFile=/var/log/elasticsearch/hs_err_pid%p.log -Xlog:gc*,gc+age=trace,safepoint:file=/var/log/elasticsearch/gc.log:utctime,pid,tags:filecount=32,filesize=64m -XX:MaxDirectMemorySize=134217728 -XX:G1HeapRegionSize=4m -XX:InitiatingHeapOccupancyPercent=30 -XX:G1ReservePercent=15 -Des.distribution.type=deb --module-path /usr/share/elasticsearch/lib --add-modules=jdk.net -m org.elasticsearch.server/org.elasticsearch.bootstrap.Elasticsearch
elastic+    5100  0.0  0.1 107900  6508 ?        Sl   09:05   0:00 /usr/share/elasticsearch/modules/x-pack-ml/platform/linux-x86_64/bin/controller
root        5155  0.0  0.0   4020  2040 pts/0    R+   09:11   0:00 grep --color=auto elasticsearch

[root@es-node1 ~]#tail -f /data/es-logs/es-cluster.log
[2023-02-24T09:05:42,190][INFO ][o.e.i.g.DatabaseNodeService] [es-node1] successfully loaded geoip database file [GeoLite2-Country.mmdb]
[2023-02-24T09:05:42,326][INFO ][o.e.i.g.DatabaseNodeService] [es-node1] successfully loaded geoip database file [GeoLite2-ASN.mmdb]
[2023-02-24T09:05:43,782][INFO ][o.e.i.g.DatabaseNodeService] [es-node1] successfully loaded geoip database file [GeoLite2-City.mmdb]
[2023-02-24T09:05:51,738][INFO ][o.e.c.s.ClusterApplierService] [es-node1] added {{es-node3}{b-U49iWvRBiX39TuRPvScA}{BH41qollR8-vFoXfRyVg2g}{es-node3}{192.168.11.202}{192.168.11.202:9300}{cdfhilmrstw}}, term: 11, version: 70, reason: ApplyCommitRequest{term=11, version=70, sourceNode={es-node2}{K4IXWxAySZqMEH_wvT4JFg}{XPlZxSv_TeeCp7yFWx6NXQ}{es-node2}{192.168.11.201}{192.168.11.201:9300}{cdfhilmrstw}{ml.max_jvm_size=2059403264, ml.allocated_processors_double=2.0, xpack.installed=true, ml.machine_memory=4114579456, ml.allocated_processors=2}}

#9200提供json数据,9300是集群服务器间数据同步端口
[root@es-node1 ~]#ss -ntlp|grep java
LISTEN 0      4096               *:9200             *:*    users:(("java",pid=5079,fd=439))
LISTEN 0      4096               *:9300             *:*    users:(("java",pid=5079,fd=411))
Elasticsearch索引和数据访问
在 Elasticsearch 中,提供了功能十分丰富、多种表现形式的查询 DSL(Domain Specific Language)语言DSL 查询使用 JSON 格式的请求体与 Elasticsearch 交互,可以实现各种各样的增删改查等功能
#API
https://www.elastic.co/guide/en/elasticsearch/reference/current/query-dsl-matchquery.html
https://nasuyun.com/docs/api/
案例:实现简单的增删改查
#查看支持的指令
[root@es-node1 ~]#curl http://127.0.0.1:9200/_cat
=^.^=
/_cat/allocation
/_cat/shards
/_cat/shards/{index}
/_cat/master
/_cat/nodes
/_cat/tasks
/_cat/indices
/_cat/indices/{index}
/_cat/segments
/_cat/segments/{index}
/_cat/count
/_cat/count/{index}
/_cat/recovery
/_cat/recovery/{index}
/_cat/health
/_cat/pending_tasks
/_cat/aliases
/_cat/aliases/{alias}
/_cat/thread_pool
/_cat/thread_pool/{thread_pools}
/_cat/plugins
/_cat/fielddata
/_cat/fielddata/{fields}
/_cat/nodeattrs
/_cat/repositories
/_cat/snapshots/{repository}
/_cat/templates
/_cat/component_templates/_cat/transforms
/_cat/transforms/{transform_id}
/_cat/ml/anomaly_detectors
/_cat/ml/anomaly_detectors/{job_id}
/_cat/ml/trained_models
/_cat/ml/trained_models/{model_id}
/_cat/ml/datafeeds
/_cat/ml/datafeeds/{datafeed_id}
/_cat/ml/data_frame/analytics
/_cat/ml/data_frame/analytics/{id}

#查看es集群状态
[root@es-node1 ~]#curl http://127.0.0.1:9200/_cat/health
1677241767 12:29:27 es-cluster green 3 3 2 1 0 0 0 0 - 100.0%
[root@es-node1 ~]#curl 'http://127.0.0.1:9200/_cat/health?v'
epoch      timestamp cluster    status node.total node.data shards pri relo init unassign pending_tasks max_task_wait_time active_shards_percent
1677241774 12:29:34  es-cluster green           3         3      2   1    0    0        0             0                  -                100.0%

#查看集群分健康性,获取到的是一个json格式的返回值,那就可以通过python等工具对其中的信息进行分析
#注意:status 字段为green才是正常状态
[root@es-node1 ~]#curl http://127.0.0.1:9200/_cluster/health?pretty=true
{
  "cluster_name" : "es-cluster",
  "status" : "green",
  "timed_out" : false,
  "number_of_nodes" : 3,
  "number_of_data_nodes" : 3,
  "active_primary_shards" : 1,
  "active_shards" : 2,
  "relocating_shards" : 0,
  "initializing_shards" : 0,
  "unassigned_shards" : 0,
  "delayed_unassigned_shards" : 0,
  "number_of_pending_tasks" : 0,
  "number_of_in_flight_fetch" : 0,
  "task_max_waiting_in_queue_millis" : 0,
  "active_shards_percent_as_number" : 100.0
}

#查看所有的节点信息
[root@es-node1 ~]#curl 'http://192.168.11.200:9200/_cat/nodes?v'
ip             heap.percent ram.percent cpu load_1m load_5m load_15m node.role   master name
192.168.11.201            6          96   0    0.06    0.02     0.00 cdfhilmrstw *      es-node2
192.168.11.200           77          74   0    0.00    0.00     0.00 cdfhilmrstw -      es-node1
192.168.11.202           39          96   0    0.00    0.00     0.00 cdfhilmrstw -      es-node3

#列出所有的索引 以及每个索引的相关信息
[root@es-node1 ~]#curl 'http://127.0.0.1:9200/_cat/indices?v'
health status index uuid pri rep docs.count docs.deleted store.size pri.store.size

#创建索引index1,简单输出
[root@node1 ~]#curl -XPUT '192.168.11.200:9200/index1'
{"acknowledged":true,"shards_acknowledged":true,"index":"index1"}

#创建索引index2,格式化输出
[root@es-node1 ~]#curl -XPUT '192.168.11.200:9200/index2?pretty'
{
  "acknowledged" : true,
  "shards_acknowledged" : true,
  "index" : "index2"
}

#查看索引
[root@es-node1 ~]#curl '192.168.11.200:9200/index1?pretty'
{
  "index1" : {
    "aliases" : { },
    "mappings" : { },
    "settings" : {
      "index" : {
        "routing" : {
          "allocation" : {
            "include" : {
              "_tier_preference" : "data_content"
            }
          }
        },
        "number_of_shards" : "1",
        "provided_name" : "index1",
        "creation_date" : "1677241961027",
        "number_of_replicas" : "1",
        "uuid" : "OHTqHU0eT2-ti-_PsWguqw",
        "version" : {
          "created" : "8060199"
        }
      }
    }
  }
}

#查看所有索引
ot@es-node1 ~]#curcurl 'http://192.168.11.200:9200/_cat/indices?v'
health status index  uuid                   pri rep docs.count docs.deleted store.size pri.store.size
green  open   index1 OHTqHU0eT2-ti-_PsWguqw   1   1          0            0       450b           225b
green  open   index2 qhLz0uWxR1yJZgQUuSxLhA   1   1          0            0       450b           225b

#创建文档时不指定_id,会自动生成
[root@es-node1 ~]#curl -XPOST http://192.168.11.200:9200/index1/_doc/ -H 'Content-Type:application/json' -d '{"name":"SRE", "author": "mooreyxia", "version":"1.0"}'
{"_index":"index1","_id":"o2V0g4YBZAPHIqmfnRWw","_version":1,"result":"created","_shards":{"total":2,"successful":2,"failed":0},"_seq_no":0,"_primary_term":1}

#创建文档时指定_id为3
[root@es-node1 ~]#curl -XPOST 'http://192.168.11.200:9200/index1/_doc/3?pretty' -H 'Content-Type: application/json' -d '{"name":"golang", "author": "mooreyxia1","version": "1.0"}'
{
  "_index" : "index1",
  "_id" : "3",
  "_version" : 1,
  "result" : "created",
  "_shards" : {
    "total" : 2,
    "successful" : 2,
    "failed" : 0
  },
  "_seq_no" : 1,
  "_primary_term" : 1
}

#数据存放的磁盘位置
[root@es-node1 ~]#tree /data/es-data/ -d
/data/es-data/
├── _state
├── indices
│   ├── OHTqHU0eT2-ti-_PsWguqw
│   │   ├── 0
│   │   │   ├── _state
│   │   │   ├── index
│   │   │   └── translog
│   │   └── _state
│   └── bsKQiHSyT1iyGLmNfmCS1A
│       ├── 0
│       │   ├── _state
│       │   ├── index
│       │   └── translog
│       └── _state
└── snapshot_cache

15 directories

#查询索引的中所有文档
[root@es-node1 ~]#curl 'http://192.168.11.200:9200/index1/_search?pretty'
{
  "took" : 1078,
  "timed_out" : false,
  "_shards" : {
    "total" : 1,
    "successful" : 1,
    "skipped" : 0,
    "failed" : 0
  },
  "hits" : {
    "total" : {
      "value" : 2,
      "relation" : "eq"
    },
    "max_score" : 1.0,
    "hits" : [
      {
        "_index" : "index1",
        "_id" : "o2V0g4YBZAPHIqmfnRWw",
        "_score" : 1.0,
        "_source" : {
          "name" : "SRE",
          "author" : "mooreyxia",
          "version" : "1.0"
        }
      },
      {
        "_index" : "index1",
        "_id" : "3",
        "_score" : 1.0,
        "_source" : {
          "name" : "golang",
          "author" : "mooreyxia1",
          "version" : "1.0"
        }
      }
    ]
  }
}

#指定ID查询
[root@es-node1 ~]#curl 'http://localhost:9200/index1/_doc/3?pretty'
{
  "_index" : "index1",
  "_id" : "3",
  "_version" : 1,
  "_seq_no" : 1,
  "_primary_term" : 1,
  "found" : true,
  "_source" : {
    "name" : "golang",
    "author" : "mooreyxia1",
    "version" : "1.0"
  }
}

#按条件进行查询
[root@es-node1 ~]#curl 'http://192.168.11.200:9200/index1/_search?q=name:SRE&pretty'
{
  "took" : 169,
  "timed_out" : false,
  "_shards" : {
    "total" : 1,
    "successful" : 1,
    "skipped" : 0,
    "failed" : 0
  },
  "hits" : {
    "total" : {
      "value" : 1,
      "relation" : "eq"
    },
    "max_score" : 0.6931471,
    "hits" : [
      {
        "_index" : "index1",
        "_id" : "o2V0g4YBZAPHIqmfnRWw",
        "_score" : 0.6931471,
        "_source" : {
          "name" : "SRE",
          "author" : "mooreyxia",
          "version" : "1.0"
        }
      }
    ]
  }
}

#更新文档
[root@es-node1 ~]#curl -XPOST 'http://192.168.11.200:9200/index1/_doc/3' -H 'Content-Type: application/json' -d '{"version": "2.0","name":"golang","author": "mooreyxia_v2.0"}'
{"_index":"index1","_id":"3","_version":2,"result":"updated","_shards":{"total":2,"successful":2,"failed":0},"_seq_no":2,"_primary_term":1}

[root@es-node1 ~]#curl 'http://localhost:9200/index1/_doc/3?pretty'
{
  "_index" : "index1",
  "_id" : "3",
  "_version" : 2,
  "_seq_no" : 2,
  "_primary_term" : 1,
  "found" : true,
  "_source" : {
    "version" : "2.0",
    "name" : "golang",
    "author" : "mooreyxia_v2.0"
  }
}

#删除文档
[root@es-node1 ~]#curl -XDELETE 'http://192.168.11.200:9200/index1/_doc/3'
{"_index":"index1","_id":"3","_version":3,"result":"deleted","_shards":{"total":2,"successful":2,"failed":0},"_seq_no":3,"_primary_term":1}
 ----确认已删除----
[root@es-node1 ~]#curl 'http://192.168.11.200:9200/index1/_doc/3?pretty'
{
  "_index" : "index1",
  "_id" : "3",
  "found" : false
}

#删除指定索引
[root@es-node1 ~]#curl -XDELETE http://192.168.11.200:9200/index1
{"acknowledged":true}
---查看索引是否删除---
[root@es-node1 ~]#curl 'http://192.168.11.200:9200/_cat/indices?pretty'
green open index2 qhLz0uWxR1yJZgQUuSxLhA 1 1 0 0 450b 225b
Elasticsearch 插件
现在生产常用的插件有两个,分别是Head 插件和Cerebro 插件
这里介绍Cerebro 插件的使用
github链接:
https://github.com/lmenezes/cerebro
- 包安装Cerebro 插件
- 注意:安装cerebro内存建议大于3G以上
#依赖JDK
[root@Cerebro ~]#apt update && apt -y install openjdk-11-jdk
#下载包,官方提供了DEB和RPM包
[root@Cerebro ~]#wget https://github.com/lmenezes/cerebro/releases/download/v0.9.4/cerebro_0.9.4_all.deb
#安装
[root@Cerebro ~]#dpkg -i cerebro_0.9.4_all.deb
Selecting previously unselected package cerebro.
(Reading database ... 73187 files and directories currently installed.)
Preparing to unpack cerebro_0.9.4_all.deb ...
Unpacking cerebro (0.9.4) ...
Setting up cerebro (0.9.4) ...
Creating system group: cerebro
Creating system user: cerebro in cerebro with cerebro daemon-user and shell /bin/false
Created symlink /etc/systemd/system/multi-user.target.wants/cerebro.service → /lib/systemd/system/cerebro.service.
#修改配置文件
[root@Cerebro ~]#vim /etc/cerebro/application.conf
data.path: "/var/lib/cerebro/cerebro.db" #取消此行注释
#data.path = "./cerebro.db" #注释此行
#自动生成数据存放目录
[root@Cerebro ~]#ll -d /var/lib/cerebro
drwxr-xr-x 2 cerebro cerebro 4096 Feb 24 13:54 /var/lib/cerebro/
[root@Cerebro ~]#tree /var/lib/cerebro
/var/lib/cerebro
└── cerebro.db

0 directories, 1 file
#启动Cerebro
[root@Cerebro ~]#systemctl restart cerebro.service
#默认监听9000端口
[root@Cerebro ~]#ss -ntlp|grep 9000
LISTEN 0      100                *:9000             *:*    users:(("java",pid=3636,fd=127))
#主机做DNS解析
[root@Cerebro ~]#cat /etc/hosts
...

192.168.11.203 cerebro.mooreyxia.org
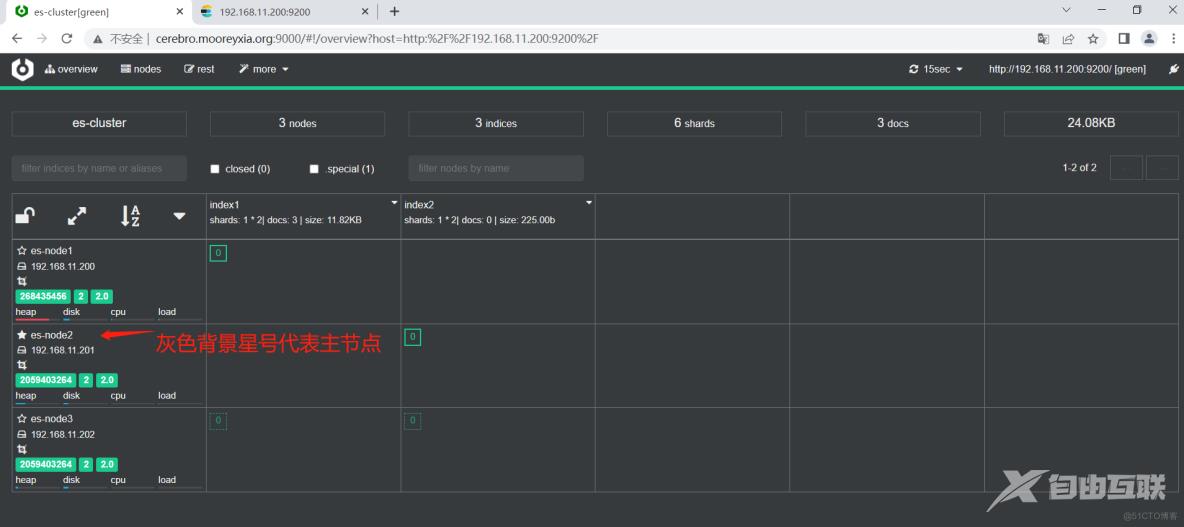
- 浏览器访问cerebro.mooreyxia.org

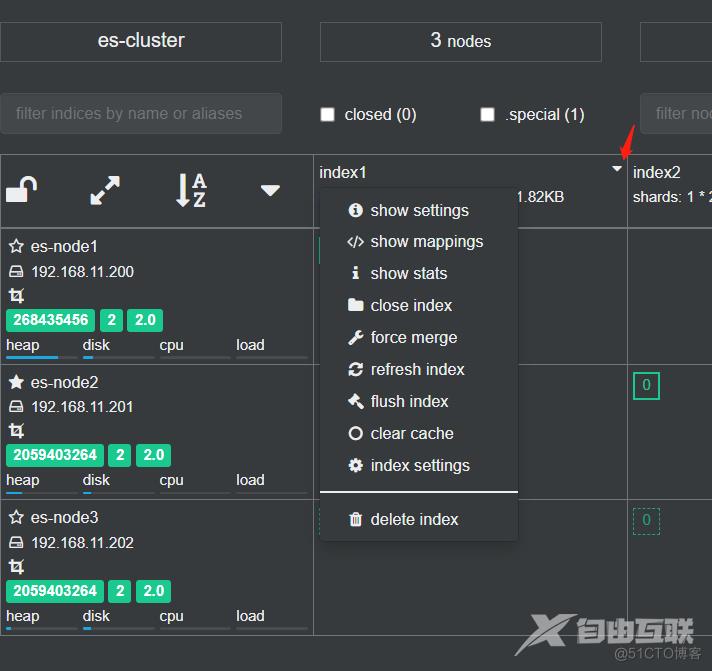
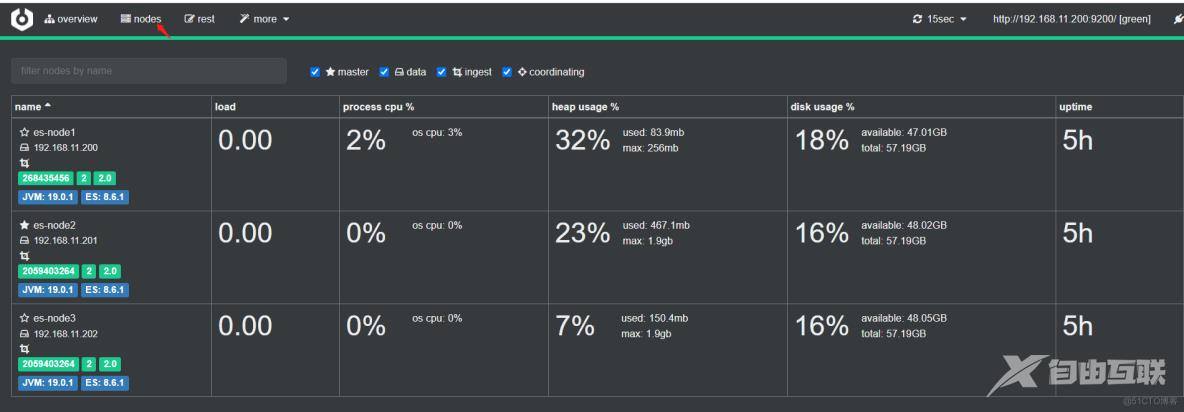
可以更为直观的对数据进行查询更改
ES 集群分片 Shard 和副本 Replication
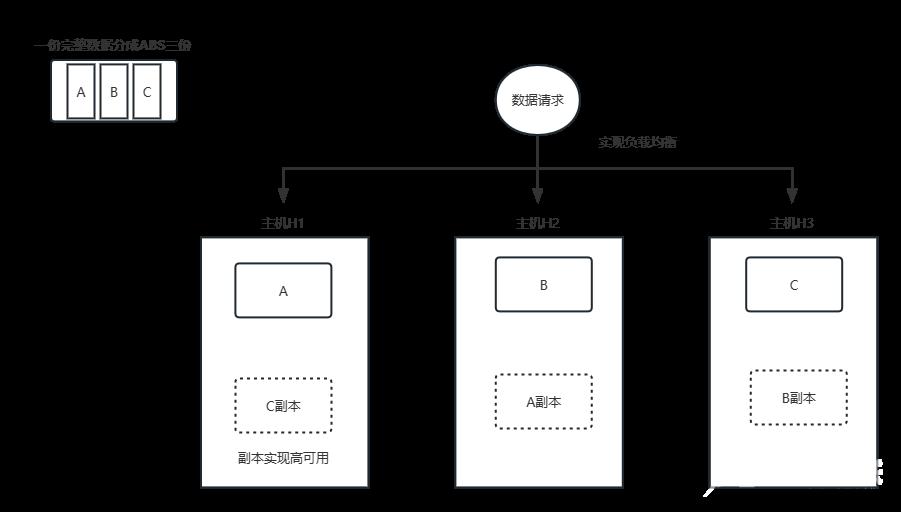
- 原理图形说明(类似于kafaka的数据切片进行多副本保存)
- 分片 Shard
ES 中存储的数据可能会很大,有时会达到PB级别,单节点的容量和性能可以无法满足,基于容量和性能等原因,可以将一个索引数据分割成多个小的分片,再将每个分片分布至不同的节点,从而实现数据的分布存储,实现性能和容量的水平扩展,在读取时,可以实现多节点的并行读取,提升性能。

如果一个分片的主机宕机,也不影响其它节点分片的读取

横向扩展即增加服务器,当有新的Node节点加入到集群中时,集群会动态的重新进行均匀分配和负载。例如原来有两个Node节点,每个节点上有3个分片,即共6个分片,如果再添加一个node节点到集群中,集群会动态的将此6个分片分配到这三个节点上,最终每个节点上有两个分片。
- 副本 Replication
将一个索引分成多个数据分片,仍然存在数据的单点问题,可以对每一个分片进行复制生成副本,即备份,实现数据的高可用

ES的分片分为主分片(primary shard)和副本分片(复制replica shard),而且通常分布在不同节点

主分片实现数据读写,副本分片只支持读

在索引中的每个分片只有一个主分片,而对应的副本分片可以有多个,一个副本本质上就是一个主分片的备份

每个分片的主分片在创建索引时自动指定且后续不能人为更改
案例:实现集群故障转移、数据分片重新划分
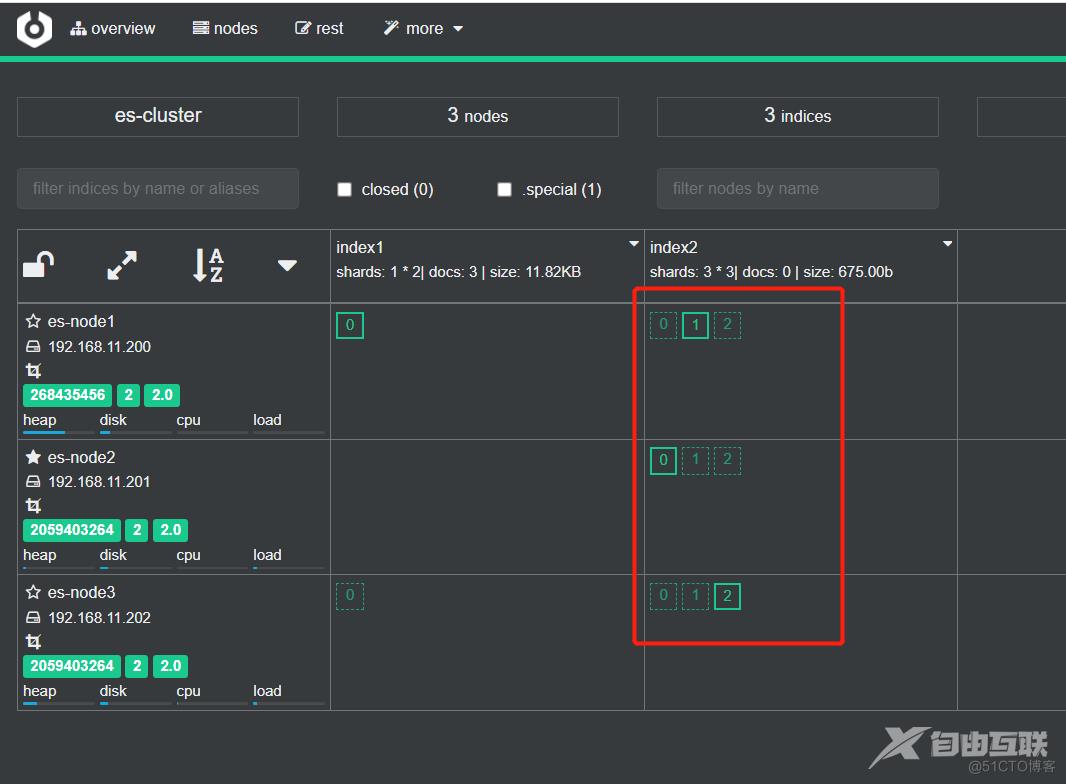
#创建3个分片和2个副本的索引
[root@es-node1 ~]#curl -XPUT '192.168.11.200:9200/index2' -H 'Content-Type: application/json' -d '
{
        "settings": {
                "index": {
                        "number_of_shards": 3,
                        "number_of_replicas": 2
                }
        }
}'
{"acknowledged":true,"shards_acknowledged":true,"index":"index2"}
下面图中实线方块是分片,虚线方块是副本(Elasticsearch实现自动的均匀分布)
接下来下线一台主机,测试故障转移
#故障发生前
[root@es-node1 ~]#curl http://127.0.0.1:9200/_cluster/health?pretty=true
{
  "cluster_name" : "es-cluster",
  "status" : "green",   --> 绿色表示正常
  "timed_out" : false,
  "number_of_nodes" : 3,
  "number_of_data_nodes" : 3,
  "active_primary_shards" : 5,
  "active_shards" : 13,
  "relocating_shards" : 0,
  "initializing_shards" : 0,
  "unassigned_shards" : 0,
  "delayed_unassigned_shards" : 0,
  "number_of_pending_tasks" : 0,
  "number_of_in_flight_fetch" : 0,
  "task_max_waiting_in_queue_millis" : 0,
  "active_shards_percent_as_number" : 100.0
}

#下线一台主机
[root@es-node2 ~]#systemctl stop elasticsearch
#查看状态发生变化
[root@es-node1 ~]#curl http://127.0.0.1:9200/_cluster/health?pretty=true
{
  "cluster_name" : "es-cluster",
  "status" : "yellow",  --> 黄色表示正常
  "timed_out" : false,
  "number_of_nodes" : 2,
  "number_of_data_nodes" : 2,
  "active_primary_shards" : 5,
  "active_shards" : 9,
  "relocating_shards" : 0,
  "initializing_shards" : 0,
  "unassigned_shards" : 4,
  "delayed_unassigned_shards" : 4,
  "number_of_pending_tasks" : 0,
  "number_of_in_flight_fetch" : 0,
  "task_max_waiting_in_queue_millis" : 0,
  "active_shards_percent_as_number" : 69.23076923076923
}
Cerebro监控发生变化
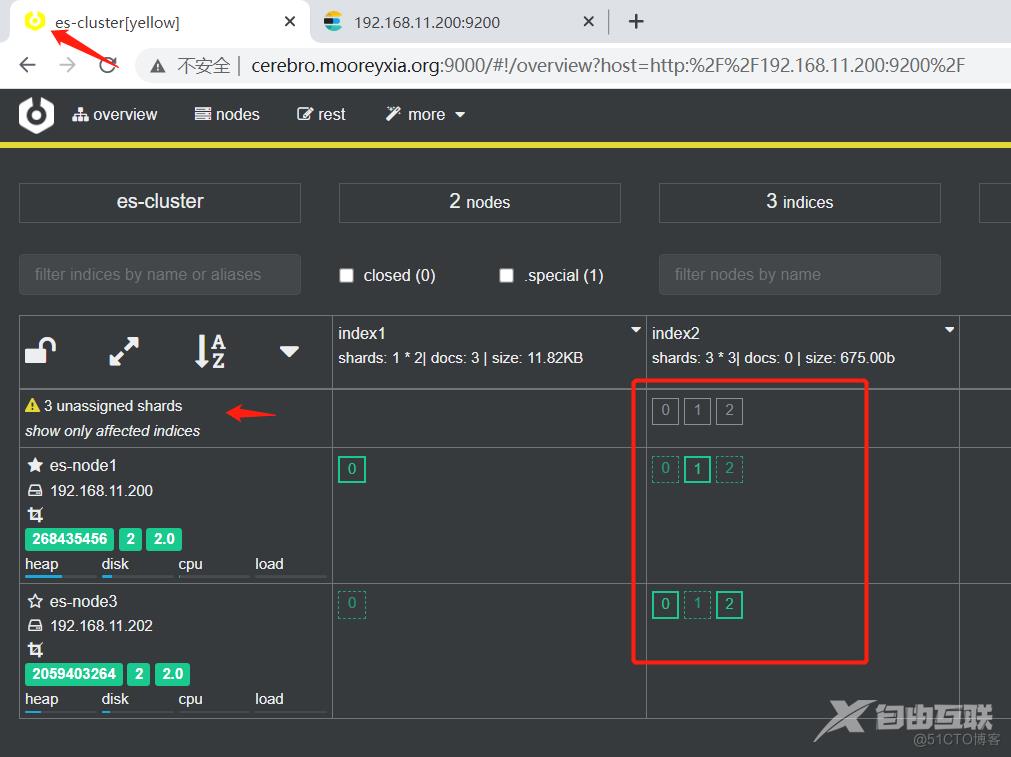
可以看到以下情况
- 重新选举
当前Master节点 node2 节点宕机,同时也导致 node3 的原有的P0和R1和R2分片丢失
node1 和 node3 发现 Master节点 node2 无法响应
过一段时间后会重新发起 master 选举
比如这次选择 node1 为 新 master 节点;此时集群状态变为 Red 状态
其实无论选举出的新Master节点是哪个节点,都不影响后续的分片的重新分布结果
- 主分片调整
新的Master节点 node1 发现在原来在node2上的主分片 P0 丢失
将 node3 上的 R0 提升为主分片
此时所有的主分片都正常分配,但0和2分片没有副本分片
集群状态变为 Yellow状态
- 副本分片调整
node1 将 P0 和 P2 主分片重新生成新的副本分片 R0、R1,此时集群状态变为 Green
#恢复节点,由于JAVA程序任务比较繁重,启动较慢,查询状态需要稍微等一会
[root@es-node2 ~]#systemctl start elasticsearch
[root@es-node2 ~]#curl http://127.0.0.1:9200/_cluster/health?pretty=true
{
  "cluster_name" : "es-cluster",
  "status" : "green",
  "timed_out" : false,
  "number_of_nodes" : 3,
  "number_of_data_nodes" : 3,
  "active_primary_shards" : 5,
  "active_shards" : 13,
  "relocating_shards" : 0,
  "initializing_shards" : 0,
  "unassigned_shards" : 0,
  "delayed_unassigned_shards" : 0,
  "number_of_pending_tasks" : 0,
  "number_of_in_flight_fetch" : 0,
  "task_max_waiting_in_queue_millis" : 0,
  "active_shards_percent_as_number" : 100.0
}
Cerebro监控发生变化
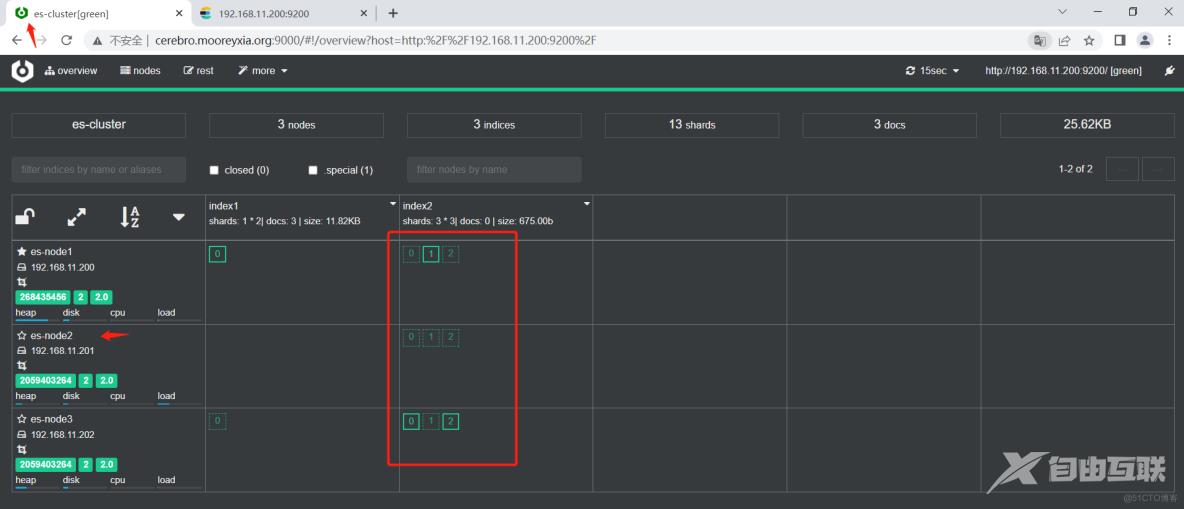
- 后续修复好node2节点后,Master 不会重新选举,但会自动将各个分片尽可能做均匀分配
#注意它是尽可能去均分,有的节点上存在副本的情况下会优先提升为主分片
保证主分片尽可能分布在每个节点上
副本分片也尽可能分布不同的节点上
重新分配的过程需要一段时间才能完成
我是moore,大家一起加油!!!
