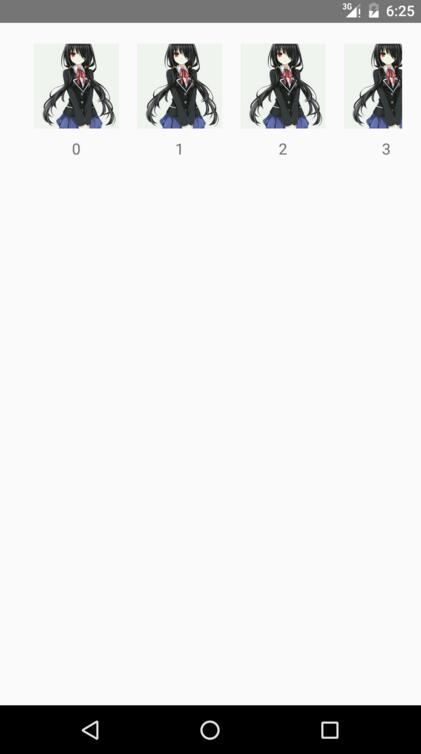
本文实例为大家分享了RecyclerView实现横向GridView效果展示的具体代码,供大家参考,具体内容如下 要使用RecyclerView,首先要在build.gradle文件中添加依赖compile 'com.android.support:appcompat-v7:
本文实例为大家分享了RecyclerView实现横向GridView效果展示的具体代码,供大家参考,具体内容如下
要使用RecyclerView,首先要在build.gradle文件中添加依赖compile 'com.android.support:appcompat-v7:24.1.0'
效果图

布局如下
<?xml version="1.0" encoding="utf-8"?>
<RelativeLayout
 xmlns:android="http://schemas.android.com/apk/res/android"
 xmlns:tools="http://schemas.android.com/tools"
 android:layout_width="match_parent"
 android:layout_height="match_parent"
 tools:context="com.dxx.recycleviewtestdemo.MainActivity">
 <android.support.v7.widget.RecyclerView
  android:id="@+id/rv"
  android:layout_width="match_parent"
  android:layout_height="200dp"
  android:layout_margin="20dp"/>
</RelativeLayout>
使用方法:
package com.dxx.recycleviewtestdemo;

import android.os.Bundle;
import android.support.v7.app.AppCompatActivity;
import android.support.v7.widget.LinearLayoutManager;
import android.support.v7.widget.RecyclerView;

public class MainActivity extends AppCompatActivity {

 @Override
 protected void onCreate(Bundle savedInstanceState) {
  super.onCreate(savedInstanceState);
  setContentView(R.layout.activity_main);
  RecyclerView rv = (RecyclerView) findViewById(R.id.rv);
  rv.setLayoutManager(new LinearLayoutManager(this,LinearLayoutManager.HORIZONTAL,false));//设置布局管理器
  rv.setAdapter(new MyRVAdapter(this));
 }
}
其Adapter要继承RecyclerView.Adapter,在Adapter中药先定义ViewHolder,并继承RecyclerView.ViewHolder;如:
public class ViewHolder extends RecyclerView.ViewHolder{
  public ViewHolder(View itemView) {
   super(itemView);
  }
  ImageView rv_item_image;
  TextView rv_item_tv;
 }
在onCreateViewHolder进行初始化操作,在onBindViewHolder中对各种事件进行处理,getItemCount返回的是 RecyclerView的长度,其布局与代码如下:
<?xml version="1.0" encoding="utf-8"?>
<LinearLayout xmlns:android="http://schemas.android.com/apk/res/android"
    android:layout_width="wrap_content"
    android:layout_height="wrap_content"
    android:gravity="center"
    android:layout_marginLeft="18dp"
    android:layout_marginBottom="5dp"
    android:orientation="vertical">

 <ImageView
  android:id="@+id/rv_item_image"
  android:layout_width="82dp"
  android:layout_height="82dp"
  android:scaleType="centerCrop"
  android:src="@drawable/shiqikuangsan"/>

 <TextView
  android:id="@+id/rv_item_tv"
  android:layout_width="wrap_content"
  android:layout_height="wrap_content"
  android:layout_marginTop="9dp"
  android:textSize="15sp"/>
</LinearLayout>
package com.dxx.recycleviewtestdemo;

import android.content.Context;
import android.support.v7.widget.RecyclerView;
import android.view.LayoutInflater;
import android.view.View;
import android.view.ViewGroup;
import android.widget.ImageView;
import android.widget.TextView;

/**
 * Created by duxiaxing on 2016/7/27.
 */
public class MyRVAdapter extends RecyclerView.Adapter<MyRVAdapter.ViewHolder> {
 private Context context;
 public MyRVAdapter(Context context){
  this.context = context;
 }

 @Override
 public ViewHolder onCreateViewHolder(ViewGroup parent, int viewType) {
  View view = LayoutInflater.from(context).inflate(R.layout.layout_rv_item,parent,false);
  ViewHolder holder = new ViewHolder(view);
  holder.rv_item_image = (ImageView) view.findViewById(R.id.rv_item_image);
  holder.rv_item_tv = (TextView) view.findViewById(R.id.rv_item_tv);
  return holder;
 }

 @Override
 public void onBindViewHolder(ViewHolder holder, int position) {
  holder.rv_item_tv.setText(position + "");
 }

 @Override
 public int getItemCount() {
  return 9;
 }

 public class ViewHolder extends RecyclerView.ViewHolder{
  public ViewHolder(View itemView) {
   super(itemView);
  }
  ImageView rv_item_image;
  TextView rv_item_tv;
 }
}
以上就是本文的全部内容,希望对大家的学习有所帮助,也希望大家多多支持自由互联。
