概述
AForge.NET是一个专门为开发者和研究者基于C#框架设计的,提供了不同的类库和关于类库的资源,还有很多应用程序例子,包括计算机视觉与人工智能,图像处理,神经网络,遗传算法,机器学习,机器人等领域。本文主要讲解利用AForge进行图像采集的相关内容【包括拍照,视频录制】,仅供学习分享使用。
AForge.Net相关类库介绍
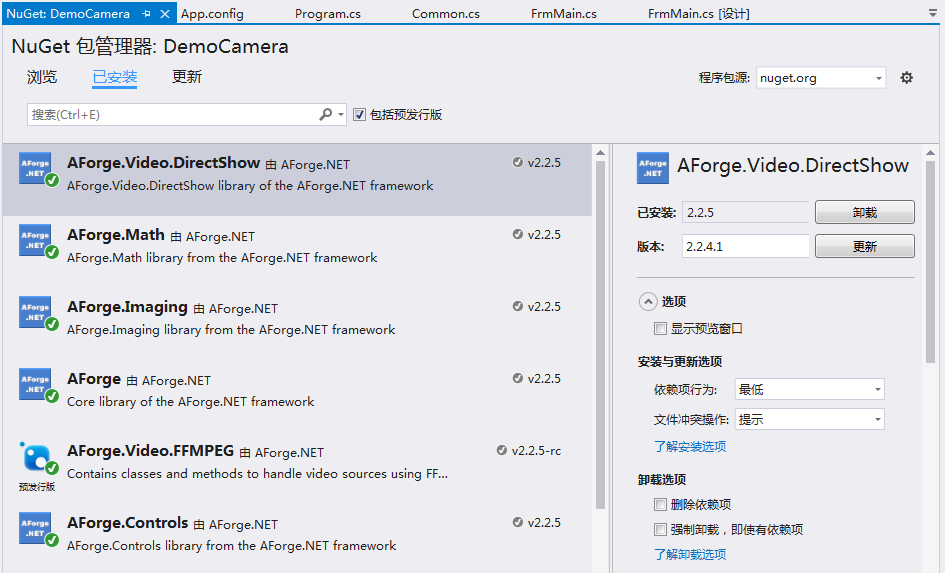
- AForge.dll 是框架的核心基础类库,为其他类库提供服务。
- AForge.Controls.dll 包含AForge.Net的UI控件,主要用于页面显示。
- AForge.Imaging.dll 主要是框架中用于图像处理的类库,主要负责图像的处理
- AForge.Video.dll 主要是框架中对视频处理的类库。
- AForge.Video.DirectShow.dll 主要是通过DirectShow接口访问视频资源的类库。
- AForge.Video.FFMPEG.dll 是一个还未正式发布的类库,通过FFMPEG类库对视频进行读写。
通过NuGet管理器引入AForge类库
项目名称右键-->管理NuGet程序包,打卡NuGet包管理器 如下所示:

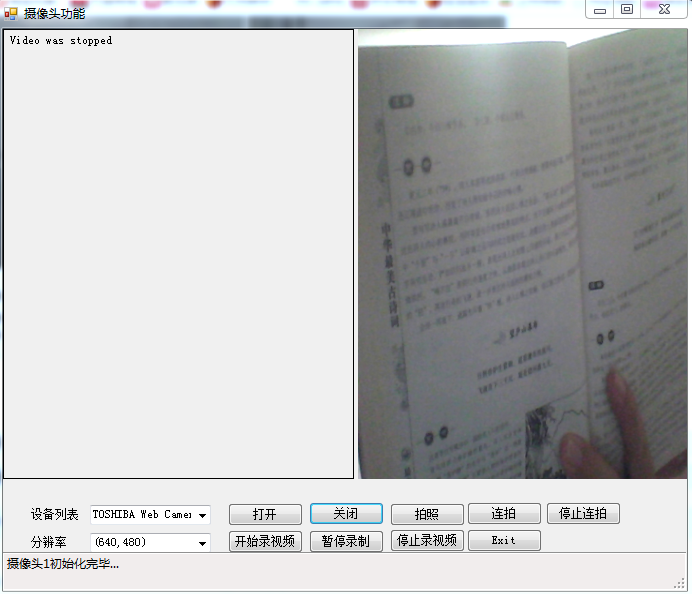
示例效果图
本示例主要包括打开,关闭摄像头,拍照,连续拍照,开始录制视频,暂停录制视频,停止录视频,退出等功能。
如下所示:左侧为摄像头投影区域,右侧为图像控件,显示拍照所得的图片

核心代码
获取视频设备列表以及设备对应的分辨率
/// <summary>
 /// 页面加载摄像头设备
 /// </summary>
 /// <param name="sender"></param>
 /// <param name="e"></param>
 private void FrmMain_Load(object sender, EventArgs e)
 {
  try
  {
  this.lblTime.Text = "";
  // 枚举所有视频输入设备
  videoDevices = new FilterInfoCollection(FilterCategory.VideoInputDevice);
  if (videoDevices.Count == 0)
  {
   lblStatus.Text = "No local capture devices";
  }
  foreach (FilterInfo device in videoDevices)
  {
   int i = 1;
   cmbDevices.Items.Add(device.Name);
   lblStatus.Text = ("摄像头" + i + "初始化完毕..." + "\n");
   i++;
  }
  cmbDevices.SelectedIndex = 0;
  }
  catch (ApplicationException)
  {
  this.lblStatus.Text = "No local capture devices";
  videoDevices = null;
  }
 }

 private void cmbDevices_SelectedIndexChanged(object sender, EventArgs e)
 {
  this.cmbResolution.Items.Clear();
  videoSource = new VideoCaptureDevice(videoDevices[cmbDevices.SelectedIndex].MonikerString);
  foreach(var cap in videoSource.VideoCapabilities) {
  this.cmbResolution.Items.Add(string.Format("({0},{1})",cap.FrameSize.Width,cap.FrameSize.Height));
  }
  if (this.cmbResolution.Items.Count > 0)
  {
  this.cmbResolution.SelectedIndex = 0;
  }
 }
打开视频设备和关闭视频设备
/// <summary>
 /// 设备打开
 /// </summary>
 /// <param name="sender"></param>
 /// <param name="e"></param>
 private void btnOpen_Click(object sender, EventArgs e)
 {
  int index = this.cmbResolution.SelectedIndex;
  videoSource = new VideoCaptureDevice(videoDevices[cmbDevices.SelectedIndex].MonikerString);
  videoSource.VideoResolution = videoSource.VideoCapabilities[index];
  this.vsPlayer.VideoSource = videoSource;
  //设置对应的事件
  videoSource.NewFrame += new NewFrameEventHandler(videoSource_NewFrame);
  this.vsPlayer.Start();
 }

 /// <summary>
 /// 产生新帧的触发事件
 /// </summary>
 /// <param name="sender"></param>
 /// <param name="eventArgs"></param>
 public void videoSource_NewFrame(object sender, NewFrameEventArgs eventArgs)
 {
  lock (objLock)
  {
  Bitmap bmp = null;
  if (isMultiPhoto)
  {
   bmp = (System.Drawing.Bitmap)eventArgs.Frame.Clone();
   string imgFolder = Common.GetImagePath();
   string picName = string.Format("{0}\\{1}.jpg", imgFolder, DateTime.Now.ToString("yyyyMMddHHmmss"));
   Common.SaveImage(picName, bmp);
  }
  //Write Videos
  if (isRecordVideo)
  {
   bmp = (System.Drawing.Bitmap)eventArgs.Frame.Clone();
   videoWriter.WriteVideoFrame(bmp);
  }
  }
 }

 /// <summary>
 /// 设备关闭
 /// </summary>
 /// <param name="sender"></param>
 /// <param name="e"></param>
 private void btnClose_Click(object sender, EventArgs e)
 {
  this.vsPlayer.SignalToStop();
  this.vsPlayer.WaitForStop();
 }
拍照
/// <summary>
 /// 拍照
 /// </summary>
 /// <param name="sender"></param>
 /// <param name="e"></param>
 private void btnCapture_Click(object sender, EventArgs e)
 {
  try
  {
  if (this.vsPlayer.IsRunning)
  {
   Bitmap bitMap = this.vsPlayer.GetCurrentVideoFrame();
   this.pbImage.Image = bitMap;
   //设置图片相对控件的大小
   this.pbImage.SizeMode = PictureBoxSizeMode.StretchImage;
  }
  }
  catch (Exception ex)
  {
  MessageBox.Show("摄像头异常:" + ex.Message);
  }
 }
连拍功能
连拍主要是同时视频控件的一个帧触发事件,在事件中对图像进行保存,达到连拍的效果,如下所示:
 //设置对应的事件
videoSource.NewFrame += new NewFrameEventHandler(videoSource_NewFrame);
视频录制
视频录制,是采用VideoFileWriter对获取到的每一帧进行写入到视频文件中,如下所示:
/// <summary>
 /// 开始录视频
 /// </summary>
 /// <param name="sender"></param>
 /// <param name="e"></param>
 private void btnStartVideo_Click(object sender, EventArgs e)
 {
  try
  {
  //创建一个视频文件
  string vdoPath = Common.GetVideoPath();
  string vdoName = string.Format("{0}\\{1}.avi", vdoPath, DateTime.Now.ToString("yyyyMMdd HH-mm-ss"));

  this.timer1.Enabled = true;//是否执行System.Timers.Timer.Elapsed事件;
  this.lblStatus.Text="录制中...\n";
  tickNum = 0;
  videoWriter = new VideoFileWriter();
  if (this.vsPlayer.IsRunning)
  {
   videoWriter.Open(vdoName, vdoWidth, vdoHeight, frameRate, VideoCodec.MPEG4);
   isRecordVideo = true;
  }
  else
  {
   MessageBox.Show("没有视频源输入,无法录制视频。", "错误", MessageBoxButtons.OK, MessageBoxIcon.Error);
  }
  }
  catch (Exception ex)
  {
  MessageBox.Show("摄像头异常:" + ex.Message);
  }
 }

 /// <summary>
 /// 停止录视频
 /// </summary>
 /// <param name="sender"></param>
 /// <param name="e"></param>
 private void btnStopVideo_Click(object sender, EventArgs e)
 {
  this.isRecordVideo = false;
  this.videoWriter.Close();
  this.timer1.Enabled = false;
  tickNum = 0;
  this.lblStatus.Text="录制停止!\n";
 }

 /// <summary>
 /// 定时器
 /// </summary>
 /// <param name="sender"></param>
 /// <param name="e"></param>
 private void timer1_Tick(object sender, EventArgs e)
 {
  tickNum++;
  int temp = tickNum;
  string tick = Common.GetTimeSpan(temp);
  this.lblTime.Text = tick;
 }

 /// <summary>
 /// 暂停录制
 /// </summary>
 /// <param name="sender"></param>
 /// <param name="e"></param>
 private void btnPauseVideo_Click(object sender, EventArgs e)
 {
  if (this.btnPauseVideo.Text.Trim() == "暂停录像")
  {
  isRecordVideo = false;
  this.btnPauseVideo.Text = "恢复录像";
  this.timer1.Enabled = false; //暂停计时
  return;
  }
  if (this.btnPauseVideo.Text.Trim() == "恢复录像")
  {
  isRecordVideo = true;
  this.btnPauseVideo.Text = "暂停录像";
  this.timer1.Enabled = true; //恢复计时
  }
 }
注意事项
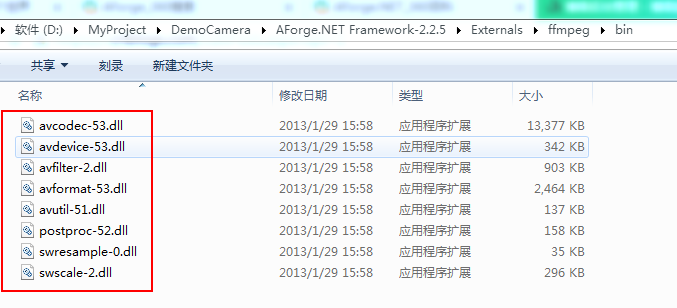
1. 由于视频录制是采用FFMPEG类库进行处理,所以除了需要AForge.Video.FFMPEG.dll以外,还需要FFMPEG类库(C++),位于【AForge.NET Framework-2.2.5\Externals\ffmpeg\bin】目录下,copy到应用程序目下即可,如下图所示:

2. 由于AForge.Video.FFMPEG.dll类库只支持.NetFrameWork2.0,所以需要采用混合模式,App.config配置如下:
 <?xml version="1.0" encoding="utf-8"?>
 <configuration>
 <startup useLegacyV2RuntimeActivationPolicy="true">
 <supportedRuntime version="v4.0" sku=".NETFramework,Version=v4.6.1"/></startup>
 <supportedRuntime version="v2.0.50727"/>
 </configuration>
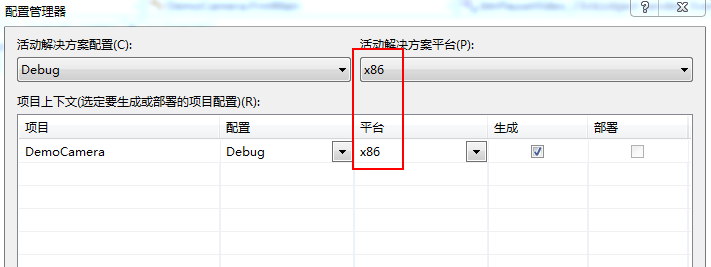
3. 由于FFMPEG只支持x86模式,不支持混合模式,所以需要在配置管理器进行配置x86平台,如下所示:

4. 由于视频帧频率过快,所以需要进行加锁控制,否则会造成【读写受保护的内存】错误。
经过以上4步,才可以进行视频录制。如果是进行拍照,则不需要。
以上就是C# 利用AForge实现摄像头信息采集的详细内容,更多关于c# 摄像头信息采集的资料请关注易盾网络其它相关文章!
