接上一篇在Python端的onnx模型验证结果,上一篇在Pytorch和onnxruntime-gpu推理库上分别进行效果效率统计分析,结论要比最初设置的50ms高很多,这一篇我将在C++端写个测试代码进行推理验证。
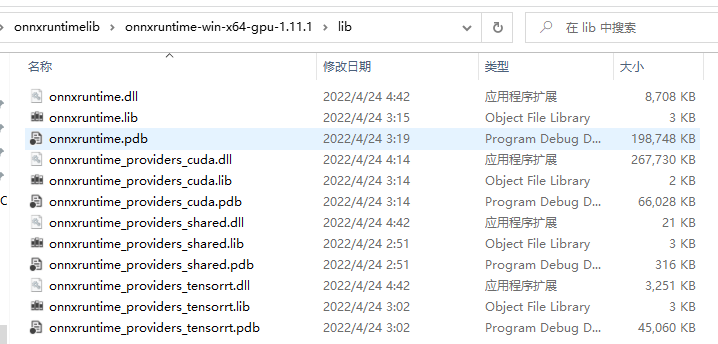
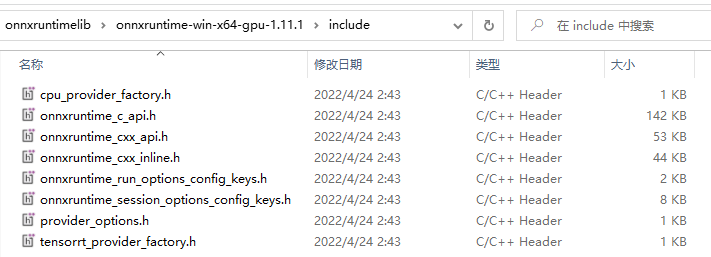
一、onnxruntime的C++库AI模型部署肯定是要用C++的,这是毋庸置疑的,目前onnxruntime提供了适配很多编程语言接口的API,最常用的就是Python和C++,一个简易一个高效,Python接口可用于快速验证idea,C++接口适用于集成到推理引擎中来调用。C++总的来说是把效率排在第一位的,所以没有像Python那样强封装,相对而言比较灵活,但又不像C那样琐碎,毕竟C++也是OOP语言。扯远了,onnxruntime的c++库可以从官方github下载到,可以直接下载对应的release版本,里面包含了动态库和头文件,如下图,我下载的是windows版本的。直接导入到我们的推理引擎中来调用就可以了。


一般我们引入第三方库会包含两部分内容,一个是头文件,这里面是所有我们可以调用的函数声明、错误类型等等,另一部分是库文件,库文件分动态库和静态库,win版的动态库文件还有对应的动态库的导入库(.lib结尾),这很容易和静态库混淆。对于linux来说,动态库.so文件中已经包含了符号表,符号表保存所有函数地址;而对于win来说,动态库的函数实现都保存在.dll中,与之还有一个配套的同名.lib文件单独保存函数符号表,这个导入库是在编译期间就需要明确位置的,需要配置到库目录列表里面,并确定是哪一个.lib文件,编译的时候会将其和可执行文件打包融合,而真正的dll是在运行期间才去加载的,所以dll需要放置到合适的位置,让可执行文件能找到。
这里我把创建一个调用onnxruntime库进行推理的相关配置都打包到一个class里面,这样方便管理,代码如下:
#include <onnxruntime_cxx_api.h>
#include <cmath>
#include <time.h>
#include <algorithm>
#include <fstream>
#include "opencv2/opencv.hpp"

using namespace cv;
using namespace std;

const int class_num = 10;
const int input_height = 32;
const int input_width = 32;
const int input_channel = 3;

const int batch_size = 1;

class Classifier {
public:
	Classifier(const wchar_t* onnx_path) {
		auto allocator_info = Ort::MemoryInfo::CreateCpu(OrtDeviceAllocator, OrtMemTypeCPU);
		input_tensor_ = Ort::Value::CreateTensor<float>(allocator_info, input_.data(), input_.size(), input_shape_.data(), input_shape_.size());
		output_tensor_ = Ort::Value::CreateTensor<float>(allocator_info, output_.data(), output_.size(), output_shape_.data(), output_shape_.size());

		OrtSessionOptionsAppendExecutionProvider_CUDA(session_option, 0);
		session =  Ort::Session(env, onnx_path, session_option);
	}

	int set_input(string& img_paht) {
		Mat img = imread(img_paht);

		//Mat dst(input_height, input_width, CV_8UC3);
		//resize(img, dst, Size(row, col));
		//cvtColor(img, dst, COLOR_BGR2RGB);
		float* input_prt = input_.data();
		for (int c = 0; c < 3; c++) {
			for (int i = 0; i < input_height; i++) {
				for (int j = 0; j < input_width; j++) {
					float tmp = img.ptr<uchar>(i)[j * 3 + c];
					input_prt[c * input_height * input_width + i * input_width + j] = ((tmp) / 255.0 - mean_[c]) / std_[c];
				}
			}
		}
		return 0;
	}

	int forward() {
		session.Run(Ort::RunOptions{ nullptr }, input_names.data(), &input_tensor_, 1, output_names.data(), &output_tensor_, 1);
		return 0;
	}

	int get_result(int& result) {
		result = std::distance(output_.begin(), std::max_element(output_.begin(), output_.end()));
		return 0;
	}

private:
	vector<const char*> input_names{ "img" };
	vector<const char*> output_names{ "output" };
	std::array<float, batch_size* input_height* input_width* input_channel> input_;
	std::array<float, batch_size* class_num> output_;
	std::array<int64_t, 4> input_shape_{ batch_size, input_channel, input_width, input_height };
	std::array<int64_t, 2> output_shape_{ batch_size, class_num };

	Ort::Value input_tensor_{ nullptr };
	Ort::Value output_tensor_{ nullptr };


	Ort::SessionOptions session_option;
	Ort::Env env{ ORT_LOGGING_LEVEL_WARNING, "test" };

	Ort::Session session{ nullptr };

	std::vector<float> mean_{ 0.4914, 0.4822, 0.4465 };
	std::vector<float> std_{ 0.2023, 0.1994, 0.2010 };
};

int load_img_path(string& file_path, vector<string>& img_lst, vector<int>& label_lst) {
	ifstream f(file_path.c_str());
	if (!f.is_open()) {
		cout << "文件打开失败" << endl;
		return -1;
	}
	string img_path;
	int label;
	while (getline(f, img_path)) {
		if (img_path.size() > 0) {
			img_lst.push_back(img_path);
			auto iter = img_path.find(".");
			label = std::atoi(img_path.substr(--iter, iter).c_str());
			label_lst.push_back(label);
		}
	}
	f.close();
	return 0;
}

float cal_acc(vector<int>& labels, vector<int>& results) {
	float TP = 0.;
	for (int i = 0; i < labels.size(); i++) {
		if (labels[i] == results[i]) {
			TP++;
		}
	}
	return TP / labels.size();
}

int main()
{
	const wchar_t* onnx_path = L"D:/Files/projects/vs/onnxruntimelib/onnxruntime-win-x64-gpu-1.11.1/output/resnet_best.onnx";
	string img_path_file = "D:/Files/projects/Py/CNN-Backbone/data/testimg.lst";
	vector<string> img_lst;
	vector<int>  label_lst;
	vector<int> results;
	load_img_path(img_path_file, img_lst, label_lst);
	clock_t start;
	float time_cost;
	int result;
	Classifier classifier(onnx_path);

	start = clock();
	for (int i = 0; i < img_lst.size(); i++) {
		result = -1;
		classifier.set_input(img_lst[i]);
		classifier.forward();
		classifier.get_result(result);
		results.push_back(result);
	}

	time_cost = clock()-start;
	float acc = cal_acc(label_lst, results);
	std::cout << "Total Time cost: " << time_cost << "ms" << std::endl;
	std::cout << "Average Time cost: " << time_cost/img_lst.size() << "ms" << std::endl;
	std::cout << "Test Acc:  " << acc << std::endl;

	system("pause");
	return 0;
}
测试代码比较简单,里面核心调用onnxruntime的代码是Ort::Session和Ort::SessionOptions,Sessionoption是调用onnxruntime的一些配置选项,默认使用CPU推理,这里使用OrtSessionOptionsAppendExecutionProvider_CUDA(session_option, 0)可以选用0号gpu计算,创建好的session_option再拿去初始化session,然后是输入输出有定义好的特殊类型Ort::Value,这里分别采用一个固定大小的array去构建输入输出。最后测试结论为:
CPU下:
Total Time cost: 36289ms
Average Time cost: 3.6289ms
Test Acc:  0.9483
GPU下:
Total Time cost: 29861ms
Average Time cost: 2.9861ms
Test Acc:  0.9483
效果和在Python接口上测试的一致的,GPU下的平均响应时间要比Python接口的3.1ms更快一些。神奇的是CPU下的速度也很快,可能是我这个模型太小没体现出GPU的优势。另外有一个问题是在gpu上测试的时候,退出main函数的时候析构失败,没查出原因。
三、总结- 技术总结:原型训练中大模型的拟合能力比小模型强得多,此外数据增强带来的收益也很明显;模型较简单所以导出onnx没出啥问题,导出的onnx效果也没降低;C++端的验证表明,推理速度远高于最初设置的50ms/张,符合预期。
- 反思:走了一遍这整个流程,发现还是有很多地方不了解,有待进一步学习,五月份主攻工程方向,这个系列到这里暂时告一段落,接下来要深入一下onnxruntime的接口设计,有突破了再继续更新。
