上一篇 https://www.cnblogs.com/redwinter/p/16196359.html 介绍了BeanFactoryPostProcessor的执行过程,这篇文章介绍Spring中配置的注解是如何通过ConfigurationClassPostProcessor解析的,另外分析下Spring Boot自动装配是如何处理的。
在上一篇文章https://www.cnblogs.com/redwinter/p/16196359.html 我们知道ConfigurationClassPostProcessor实际上是BeanFactoryPostProcessor的一个实现类,他特殊的地方是他还实现了BeanDefinitionRegisterPostProcessor接口,所以ConfigurationClassPostProcessor 既要实现BeanFactoryPostProcessor的接口方法postProcessBeanFactory也要实现BeanDefinitionRegisterPostProcessor的接口方法postProcessBeanDefinitionRegistry,并且在解析的时候先执行了postProcessBeanDefinitionRegistry方法,再执行了postProcessBeanDefinitionRegistry方法。
接下来我们看看postProcessBeanDefinitionRegistry做了什么?
上源码:
@Override
public void postProcessBeanDefinitionRegistry(BeanDefinitionRegistry registry) {
  int registryId = System.identityHashCode(registry);
  if (this.registriesPostProcessed.contains(registryId)) {
    throw new IllegalStateException(
      "postProcessBeanDefinitionRegistry already called on this post-processor against " + registry);
  }
  if (this.factoriesPostProcessed.contains(registryId)) {
    throw new IllegalStateException(
      "postProcessBeanFactory already called on this post-processor against " + registry);
  }
  this.registriesPostProcessed.add(registryId);
  // 处理配置的BeanDefinition
  processConfigBeanDefinitions(registry);
}
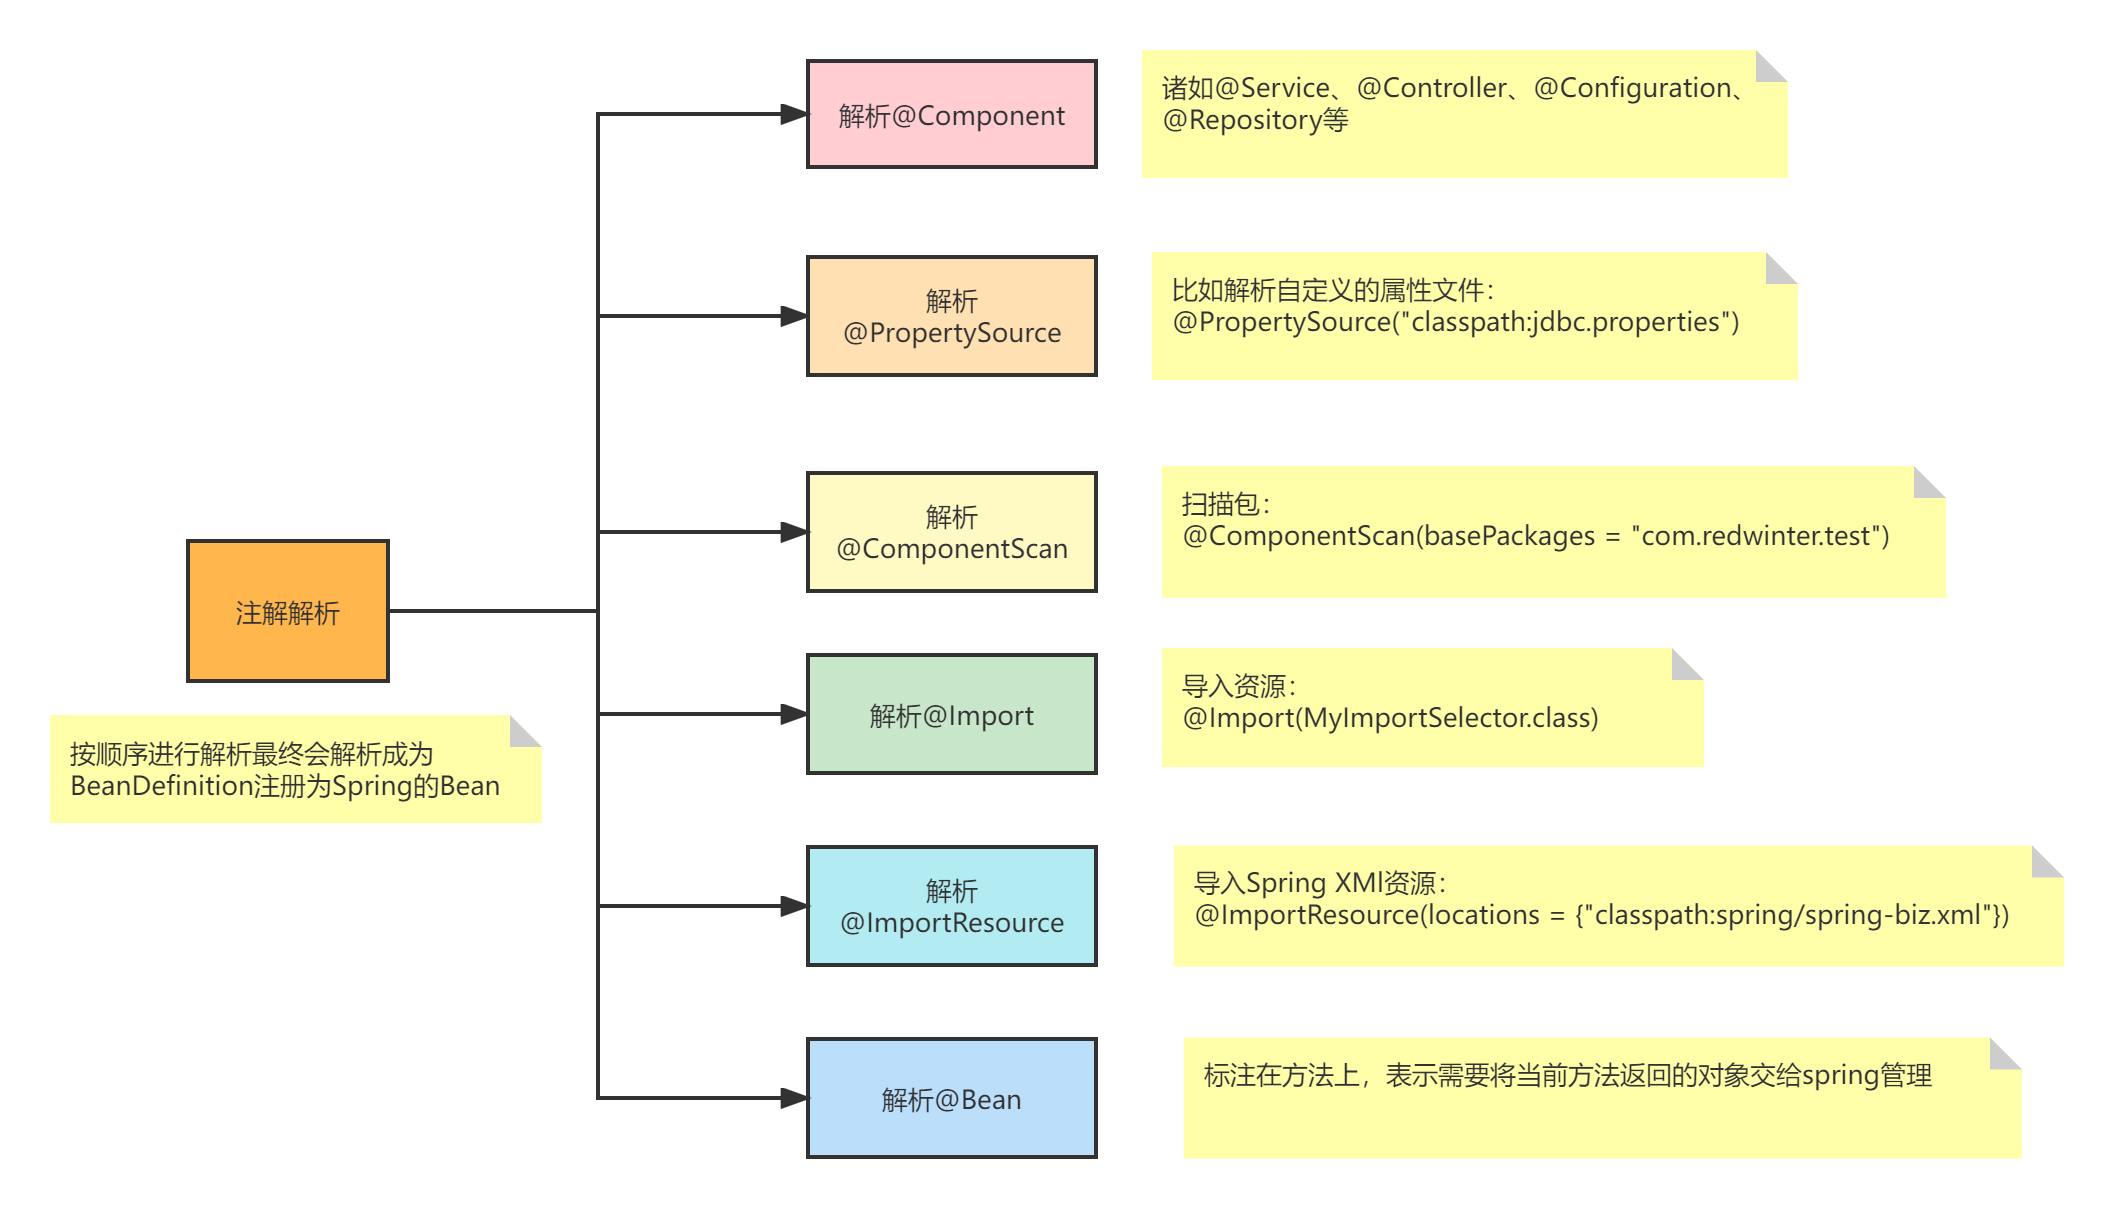
整个方法核心是执行了processConfigBeanDefinitions方法,这个方法非常的长并且逻辑也复杂,代码我就不贴了,说一下大概的流程(较详细):
- 先进行合格的
beanDefinition的检查- 获取到注解的元数据信息
- 判断是包含
@Configuration注解,包含则合格,否则判断是否包含了@Component、@ComponentScan、@Import、@ImportResource注解,包含则合格,如果都不包含则不合格
- 对合格的
BeanDefinition排序 - 创建一个解析
@Configuration注解的解析器 - 对合格的
BeanDefinition集合进行解析- 循环解析,最终调用
processConfigurationClass方法 - 判断是否跳过解析,比如配置了
@Conditional注解的 - 调用
doProcessConfigurationClass方法开始解析(下面的解析中可能会存在递归调用)- 解析
@Component注解- 判断是否包含内部类标记了
@Component,比如在标有@Component注解的类里面创建一个内部类也标记了@Component注解,如果有就会进行递归调用processConfigurationClass方法
- 判断是否包含内部类标记了
- 解析
@PropertySources和@PropertySource注解- 比如标记
@PropertySource("classpath:jdbc.properties"),这样就会把这个属性的值全部解析到环境信息的propertySources属性中
- 比如标记
- 解析
@ComponetScans和@ComponentScan注解- 比如配置了扫描的包,那么就会扫描出合格的
BeanDefinition,然后递归解析
- 比如配置了扫描的包,那么就会扫描出合格的
- 解析
@Import注解(Spring Boot自动装配的实现)- 递归解析出标记了
@Import注解的类放在imports属性中 - 解析
ImportSelector接口的实现类 - 调用
ImportSelector#selectImports方法解析需要注册的类 - 递归调用
processImports方法,然后将需要注册的类注册到importBeanDefinitionRegistrars(这里会在后面进行loadBeanDefinition)
- 递归解析出标记了
- 解析
@ImportResource注解- 比如解析配置的
Spring的xml配置文件,最终放到importedResources属性中(后面会进行loadBeanDefinition)
- 比如解析配置的
- 解析
@Bean注解- 比如解析当前类标记了
@Bean的方法 - 然后放在
beanMethods属性中(后面会进行loadBeanDefinition)
- 比如解析当前类标记了
- 解析
- 加载
BeanDefinition从上面解析出来的类中- 循环遍历加载
BeanDefinition - 判断是否跳过,比如实现了
Condition接口的类 - 加载标有
@Bean的BeanDefinition - 加载从
ImportResource中解析的BeanDefinition - 加载从
ImportSelector中配置的解析的BeanDefinition
- 循环遍历加载
- 循环解析,最终调用
整个过程非常复杂,而且存在递归操作,读者可以按照我写的步骤进行debug调试,当然可能会出现到处跳转不知所措的情况,多调几遍就好了,只要知道大致的流程,应该还是不难的。
总的来说就是解析了这些注解:@Component、@PropertySource、@PropertySources、@ComponentScan、@ComponentScans、@Import、@ImportResource、@Bean,然后将标有这些注解的解析成BeanDefinition,如果加上了@Conditionnal注解,那么按照条件进行解析。

现在开发都是用SpringBoot,原因在于他非常的方便,引入即可使用,那么他是做到的呢?众所周知Spring Boot有几个注解非常重要,比如:@SpringBootApplication、@EnableAutoConfiguration、@SpringBootConfiguration,其中最重要的是@EnableAutoConfiguration,这个注解里面标记了@Import(AutoConfigurationImportSelector.class),当然还标记了其他的,我们现在只关心这个@Import,里面放入了一个AutoConfigurationImportSelector类。
AutoConfigurationImportSelector类实现了DeferredImportSelector接口,这个DeferredImportSelector接口是ImportSelector的子接口,表示延迟导入的意思。在上面的分析中,其实最主要的是实现他的接口selectImports,直接源码:
@Override
public String[] selectImports(AnnotationMetadata annotationMetadata) {
  if (!isEnabled(annotationMetadata)) {
    return NO_IMPORTS;
  }
  // 获取自动装配的实体
  AutoConfigurationEntry autoConfigurationEntry = getAutoConfigurationEntry(annotationMetadata);
  return StringUtils.toStringArray(autoConfigurationEntry.getConfigurations());
}

protected AutoConfigurationEntry getAutoConfigurationEntry(AnnotationMetadata annotationMetadata) {
  if (!isEnabled(annotationMetadata)) {
    return EMPTY_ENTRY;
  }
  AnnotationAttributes attributes = getAttributes(annotationMetadata);
  // 获取合格(候选)的配置
  List<String> configurations = getCandidateConfigurations(annotationMetadata, attributes);
  configurations = removeDuplicates(configurations);
  Set<String> exclusions = getExclusions(annotationMetadata, attributes);
  checkExcludedClasses(configurations, exclusions);
  configurations.removeAll(exclusions);
  configurations = getConfigurationClassFilter().filter(configurations);
  fireAutoConfigurationImportEvents(configurations, exclusions);
  return new AutoConfigurationEntry(configurations, exclusions);
}

protected List<String> getCandidateConfigurations(AnnotationMetadata metadata, AnnotationAttributes attributes) {
  // 加载配置,根据factoryType,这里的FactoryType就是@EnableAutoConfiguration注解
  List<String> configurations = SpringFactoriesLoader.loadFactoryNames(getSpringFactoriesLoaderFactoryClass(),
                                                                       getBeanClassLoader());
  Assert.notEmpty(configurations, "No auto configuration classes found in META-INF/spring.factories. If you "
                  + "are using a custom packaging, make sure that file is correct.");
  return configurations;
}

protected Class<?> getSpringFactoriesLoaderFactoryClass() {
  // 直接返回@EnableAutoConfiguration 注解
  return EnableAutoConfiguration.class;
}


public static List<String> loadFactoryNames(Class<?> factoryType, @Nullable ClassLoader classLoader) {
  String factoryTypeName = factoryType.getName();
  // 加载spring.factories文件并解析
  return loadSpringFactories(classLoader).getOrDefault(factoryTypeName, Collections.emptyList());
}

private static Map<String, List<String>> loadSpringFactories(@Nullable ClassLoader classLoader) {
  MultiValueMap<String, String> result = cache.get(classLoader);
  if (result != null) {
    return result;
  }

  try
    // 这里获取的url就是:
    // public static final String FACTORIES_RESOURCE_LOCATION = "META-INF/spring.factories";
    Enumeration<URL> urls = (classLoader != null ?
                             classLoader.getResources(FACTORIES_RESOURCE_LOCATION) :
                             ClassLoader.getSystemResources(FACTORIES_RESOURCE_LOCATION));
    result = new LinkedMultiValueMap<>();
    while (urls.hasMoreElements()) {
      URL url = urls.nextElement();
      UrlResource resource = new UrlResource(url);
      // 读取属性文件,获取到key为EnableAutoConfiguration,value为需要加载的类
      Properties properties = PropertiesLoaderUtils.loadProperties(resource);
      for (Map.Entry<?, ?> entry : properties.entrySet()) {
        String factoryTypeName = ((String) entry.getKey()).trim();
        for (String factoryImplementationName : StringUtils.commaDelimitedListToStringArray((String) entry.getValue())) {
          result.add(factoryTypeName, factoryImplementationName.trim());
        }
      }
    }
    cache.put(classLoader, result);
    return result;
  }
  catch (IOException ex) {
    throw new IllegalArgumentException("Unable to load factories from location [" +
                                       FACTORIES_RESOURCE_LOCATION + "]", ex);
  }
}
所以我们也可以自己写一个进行自动装配,接下来实现一个简单的自动装配。
定义自动装配注解/**
* @author <a href="https://www.cnblogs.com/redwinter/">redwinter</a>
* @since 1.0
**/
@Target(ElementType.TYPE)
@Retention(RetentionPolicy.RUNTIME)
@Import(MyImportSelector.class)
public @interface EnableRedwinterAutoConfiguration {
}
/**
 * @author <a href="https://www.cnblogs.com/redwinter/">redwinter</a>
 * @since 1.0
 **/
public class MyImportSelector implements DeferredImportSelector {
  @Override
  public String[] selectImports(AnnotationMetadata importingClassMetadata) {
    ClassLoader classLoader = this.getClass().getClassLoader();
    // 加载需要装配的类
    List<String> configurations = SpringFactoriesLoader.loadFactoryNames(getFactoryTypeClass(), classLoader);
    return configurations.toArray(new String[configurations.size()]);
  }

  private Class<?> getFactoryTypeClass() {
    return EnableRedwinterAutoConfiguration.class;
  }


}
/**
 * @author <a href="https://www.cnblogs.com/redwinter/">redwinter</a>
 * @since 1.0
 **/
@Configuration
@EnableRedwinterAutoConfiguration
public class RedwinterApplication {
  	public static void main(String[] args) {
		AnnotationConfigApplicationContext context = new AnnotationConfigApplicationContext();
		context.scan("com.redwinter.test.config");
		context.refresh();
	}
}
/**
 * @author <a href=""https://www.cnblogs.com/redwinter/">redwinter</a>
 * @since 1.0
 **/
@Configuration
public class MyConfiguration {

	@Bean
	@Conditional(RedwinterStrCondition.class)
	public String myStr() {
		return "redwinter";
	}

	public static class RedwinterStrCondition implements ConfigurationCondition {

		@Override
		public ConfigurationPhase getConfigurationPhase() {
			return ConfigurationPhase.REGISTER_BEAN;
		}

		@Override
		public boolean matches(ConditionContext context, AnnotatedTypeMetadata metadata) {
			System.out.println("开始匹配。。。");
			return true;
		}
	}

}
com.redwinter.test.config.EnableRedwinterAutoConfiguration=\
  com.redwinter.test.config.MyConfiguration
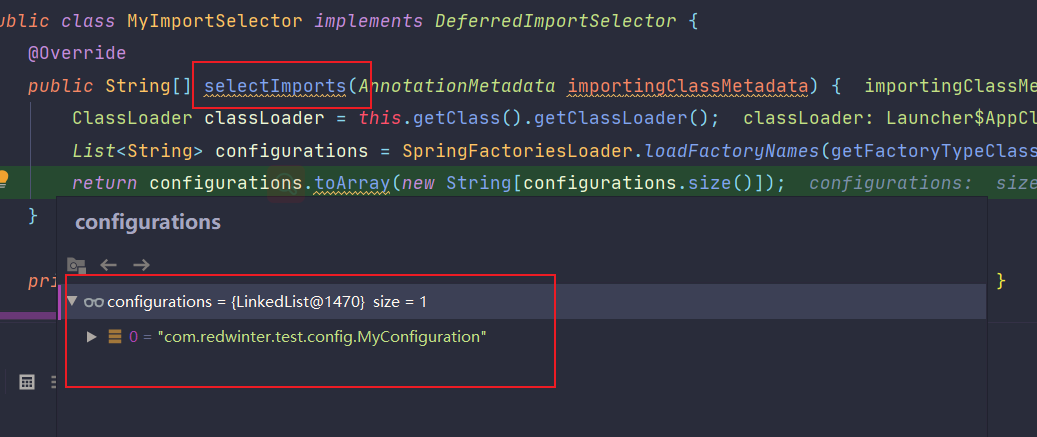
debug断点:

这就是Spring Boot自动装配的简化版,总得来说我们完成了Spring 对BeanFactoryPostProcessor的执行过程的解析,包括Spring是如何进行注解解析的,其实就是Spring在对BeanDefinition在正式初始化为Bean的前置处理,所以我们可以这个阶段进行很多扩展,比如占位符的处理PropertySourcesPlaceholderConfigurer等。
接下来接续解读AbstractApplicationContext#refresh方法对BeanPostProcessor的注册。
