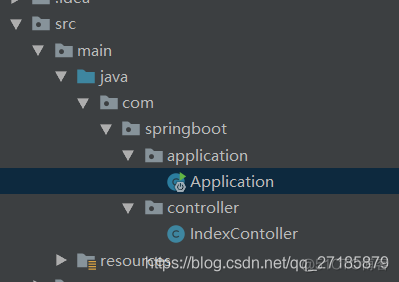
在demo里面,我们把启动方法和controller放在了一个类里面,在实际开发中,启动方法是放在一个单独的类里面的。 为此我们创建一个SpringApplication类作为单独的启动类,和Controller分离。
在demo里面,我们把启动方法和controller放在了一个类里面,在实际开发中,启动方法是放在一个单独的类里面的。
为此我们创建一个SpringApplication类作为单独的启动类,和Controller分离。创建目录如下:


①,Application.java
package com.springboot.application;import org.springframework.boot.SpringApplication;
import org.springframework.boot.autoconfigure.EnableAutoConfiguration;
import org.springframework.boot.autoconfigure.data.redis.RedisAutoConfiguration;
import org.springframework.context.annotation.ComponentScan;
@EnableAutoConfiguration(exclude = {RedisAutoConfiguration.class})
@ComponentScan("com.springboot.controller") //指定Controller所在的包,默认扫描当前包以及当前包的子包
public class Application {
public static void main(String[] args)

②,IndexController.java
package com.springboot.controller;import org.springframework.boot.context.properties.ConfigurationProperties;
import org.springframework.stereotype.Controller;
import org.springframework.web.bind.annotation.RequestMapping;
import org.springframework.web.bind.annotation.ResponseBody;
@Controller
@ConfigurationProperties(prefix = "PEOPLE")
public class IndexContoller {
@RequestMapping("/index")
@ResponseBody
public String index(){
return "Index";
}
/* @Value("${PEOPLE.name}")
private String name;
@Value("${PEOPLE.sex}")
private String sex;*/
private String name;
private String sex;
public String getName() {
return name;
}
public void setName(String name) {
this.name = name;
}
public String getSex() {
return sex;
}
public void setSex(String sex) {
this.sex = sex;
}
@RequestMapping("/info")
@ResponseBody
public String getPeopleInfo(){
return name+":"+sex;
}
}

启动访问:http://localhost:8088/dev/info


二,@SpringBootApplication(组合注解)
在Application启动类中,我们用了两个注解,我们可以用一个注解SpringBootApplication替换它们两个
//@EnableAutoConfiguration(exclude = {RedisAutoConfiguration.class})//@ComponentScan("com.springboot.controller") //指定Controller所在的包,默认扫描当前包以及当前包的子包
@SpringBootApplication(scanBasePackages = {"com.springboot.controller"},exclude = {RedisAutoConfiguration.class})
public class Application {
public static void main(String[] args)

SpringBootApplication注解默认扫描当前包以及当前包的子包
=========扩展=======
@RestController
这个也是一个组合注解,当一个Controller中所有的功能方法都返回restful内容时,我们就可以将@Controller换成@RestController,这样的好处时不用每个方法都使用@ResponseBody。接下来以修改IndexController为例。
①,IndexController.java
package com.springboot.controller;import org.springframework.boot.context.properties.ConfigurationProperties;
import org.springframework.stereotype.Controller;
import org.springframework.web.bind.annotation.RequestMapping;
import org.springframework.web.bind.annotation.ResponseBody;
import org.springframework.web.bind.annotation.RestController;
@RestController
@ConfigurationProperties(prefix = "PEOPLE")
public class IndexContoller {
@RequestMapping("/index")
public String index(){
return "Index";
}
/* @Value("${PEOPLE.name}")
private String name;
@Value("${PEOPLE.sex}")
private String sex;*/
private String name;
private String sex;
public String getName() {
return name;
}
public void setName(String name) {
this.name = name;
}
public String getSex() {
return sex;
}
public void setSex(String sex) {
this.sex = sex;
}
@RequestMapping("/info")
public String getPeopleInfo(){
return name+":"+sex;
}
}

②。启动并访问查看结果,这里我就不截图结果图了,请自行验证。
