目录 一、文章前言 二、具体流程及准备 三、开发步骤 四、完整代码 一、文章前言 此文主要实现识别人体的轮廓范围,与背景进行分离并保存效果图,适用于拍照背景替换及透明背景
目录
- 一、文章前言
- 二、具体流程及准备
- 三、开发步骤
- 四、完整代码
一、文章前言
此文主要实现识别人体的轮廓范围,与背景进行分离并保存效果图,适用于拍照背景替换及透明背景的人像图(png格式)转换。


二、具体流程及准备
2.1、注册百度开放平台及微信公众平台账号。
2.2、下载及安装微信Web开发者工具。
2.3、如需通过SDK调用及需准备对应语言的开发工具。
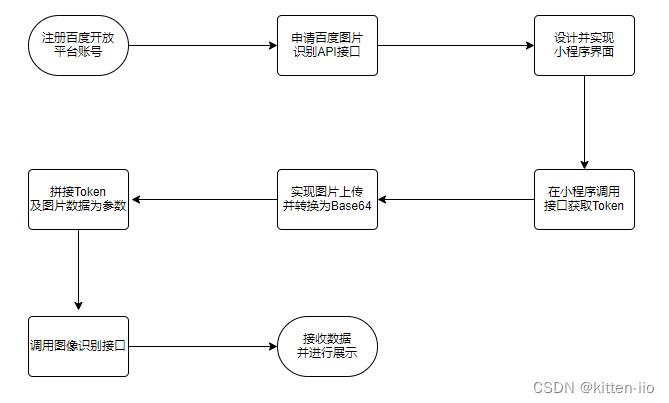
三、开发步骤
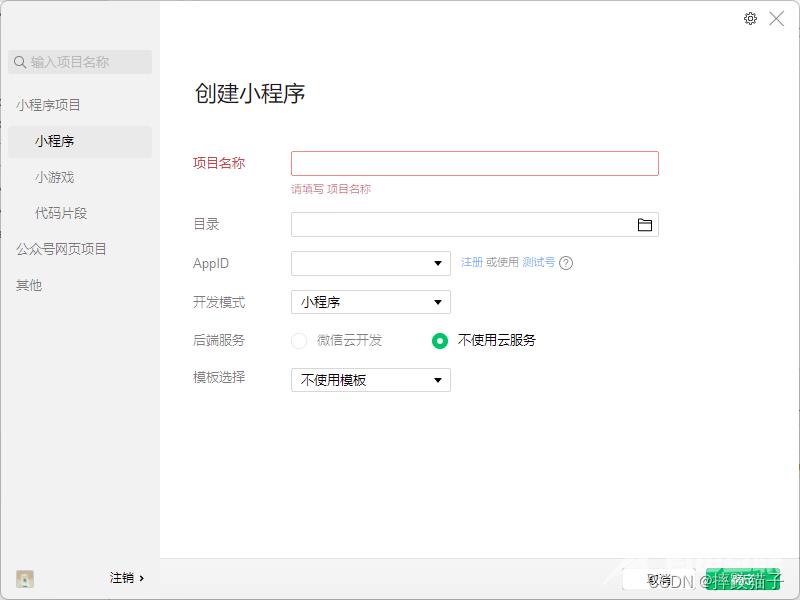
2.1、打开微信开发者工具,新建项目,选择不使用模板、不使用云服务。
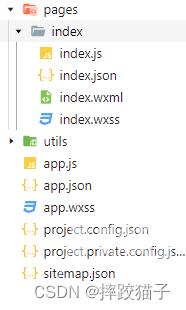
2.2、在pages文件夹下面创建一个文件夹并新建对应的page文件。
2.3、在js的onLoad事件中请求获取Token的接口,将接口返回access_token存储到该页的变量当中,用于后续请求图像分割的接口凭证。ApiKey和SecretKey建议密文保存。
/**
   * 生命周期函数--监听页面加载
   */
  onLoad(options) {
    let that = this;
    let ApiKey='';
    let SecretKey='';
    wx.request({
      url: 'https://aip.baidubce.com/oauth/2.0/token?grant_type=client_credentials&client_id=' + ApiKey+'&client_secret='+SecretKey,
      method: 'POST',
      success: function (res) {
        that.setData({
          AccessToken:res.data.access_token
        });
      }
    });
  },
2.4、随后在wxml和js中实现对应的选择图片及转换base64的功能效果。
<view class="containerBox">
  <view class="leftBtn" bindtap="loadImage">上传图片</view>
  <view class="rightBtn" bindtap="identify">图像转换</view>
</view>
<view >
  <image src="{{choiceImg}}" class="showImg"></image>
  <image src="data:image/png;base64,{{imgBase64}}" class="showImg"></image>
</view>
let that = this;
    wx.chooseImage({
      success: function (res) {
        that.choiceImg = res.tempFilePaths[0];
        wx.getFileSystemManager().readFile({
          filePath:res.tempFilePaths[0],
          encoding:'base64',
          success(data){
            let baseData = data.data;
            that.setData({
              choiceImg: res.tempFilePaths[0],
              baseData:baseData
            })
          }
        });
      }
    });
2.5、给图像转换按钮对应的响应事件中绑定开放平台接口,将参数进行拼接传递。
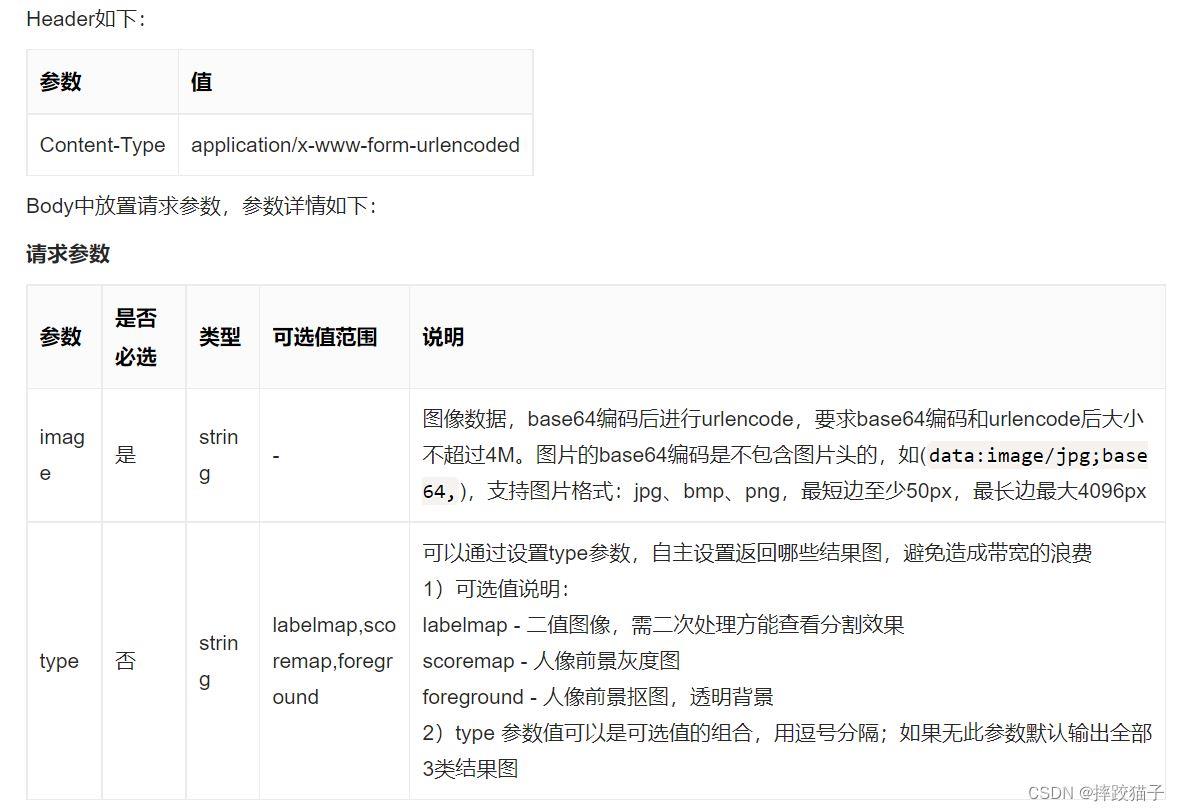
    let that = this;
    wx.request({
      url: 'https://aip.baidubce.com/rest/2.0/image-classify/v1/body_seg?access_token=' + that.data.AccessToken,
      method: 'POST',
      header: {
        'content-type': 'application/x-www-form-urlencoded'
      },
      data:{
        image:that.data.baseData
      },
      success: function (identify) {
        that.setData({
          imgBase64: identify.data.foreground
      })
      }
    })
2.6、根据接口返回的数据来看,我们先取foreground也就是分割后的人像前景抠图进行展示。
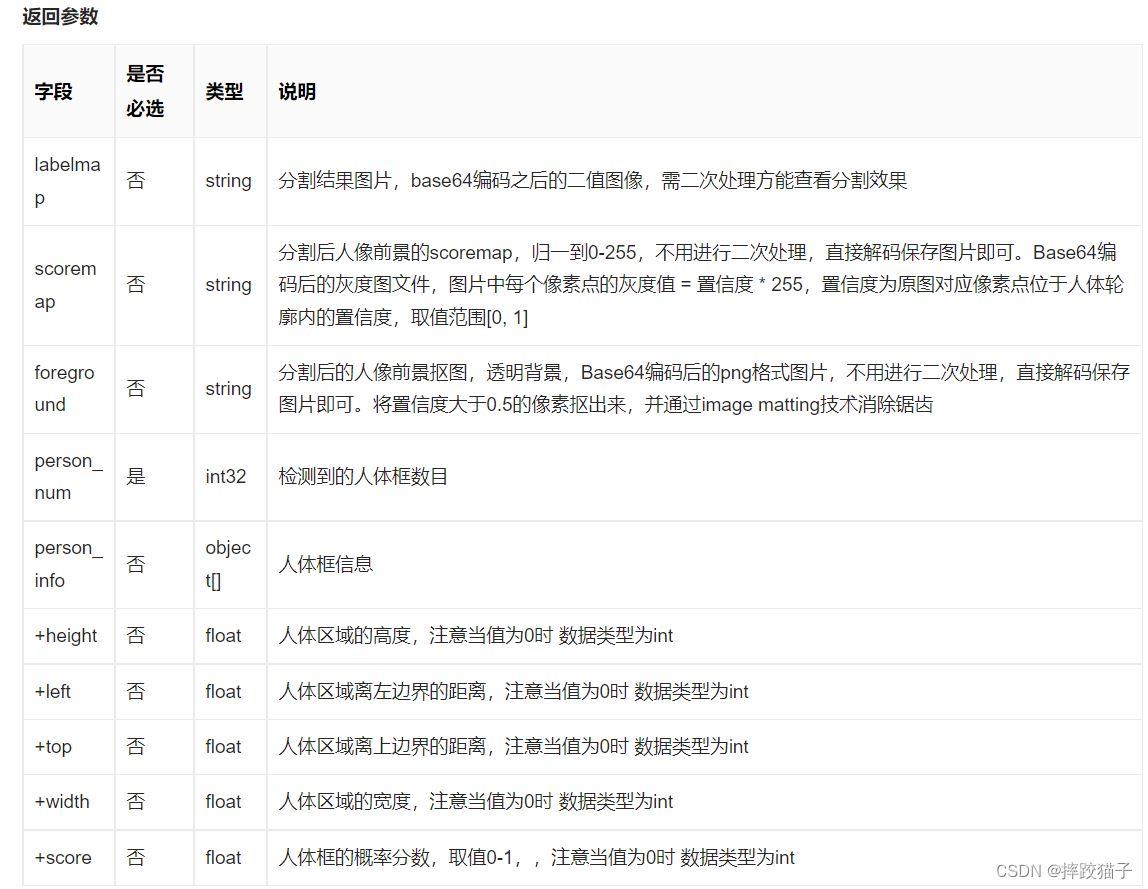
2.7、能够成功将解析后的图片进行展示后,我们将返回的base64格式的图片进行处理然后保存到本地,就可以得到一个透明背景的png,我们可以自己对这个图片进行上色、PS等操作。
//获取文件管理器对象
    const fs = wx.getFileSystemManager()
    //文件保存路径
    const Imgpath = wx.env.USER_DATA_PATH + '/qrcodeImg' + '.png'
    //base64图片文件
    let imageSrc = this.data.imgBase64.replace(/^data:image\/\w+;base64,/, '')
    //写入本地文件
    fs.writeFile({
      filePath: Imgpath,
      data: imageSrc,
      encoding: 'base64',
      success(res) {
        //保存到手机相册
        wx.saveImageToPhotosAlbum({
          filePath: Imgpath,
          success(res) {
            wx.showToast({
              title: '保存成功',
              icon: 'success'
            })
          },
          fail: function(err) {
          }
        })
      }
    })

四、完整代码
<!--index.wxml-->
<view class="containerBox">
  <view class="leftBtn" bindtap="loadImage">上传图片</view>
  <view class="rightBtn" bindtap="identify">图像转换</view>
</view>
<view >
  <image src="{{choiceImg}}" class="showImg"></image>
  <image src="data:image/png;base64,{{imgBase64}}" class="showImg"></image>
</view>
<view class="saveBtn" bindtap="saveBtn">保存图片</view>
<!--index.wxss-->
.containerBox{
  width:750rpx;
  display:flex;
  height:62rpx;
  margin-top:20rpx;
}
.leftBtn{
  width:181rpx;
  height:62rpx;
  color:#4FAFF2;
  border:1rpx solid #4FAFF2;
  border-radius:10rpx;
  text-align: center;
  line-height:62rpx;
  font-size:28rpx;
  margin-left: 158rpx;
}
.rightBtn{
  width:181rpx;
  height:62rpx;
  color:white;
  border:1rpx solid #4FAFF2;
  border-radius:10rpx;
  text-align: center;
  line-height:62rpx;
  font-size:28rpx;
  margin-left: 73rpx;
  background:#4FAFF2;
}
.showImg{
  width:415rpx;
  height:415rpx;
  margin-left:167rpx;
  margin-top:25rpx;
  border-radius:20rpx;
}
.result{
  margin-top:20rpx;
}
.resultTitle{
  margin-left:75rpx;
}
.productTableTr{
  height: 80rpx;line-height: 80rpx;border-bottom: 1rpx solid #F8F8F8;display:flex;
}
.leftTr{
  width: 283rpx;height: 80rpx;line-height: 80rpx;
}
.rightTr{
  width: 419rpx;height: 80rpx;line-height: 80rpx;color: #FF2525;font-size: 26rpx;
}
.leftTrText{
  color: #2B79F5;font-size: 28rpx;margin-left: 15rpx;width: 283rpx;
}
.productDetailTable{
  width: 702rpx;margin-left: 24rpx;border:1rpx solid #F8F8F8;border-radius: 6rpx;
}
.saveBtn{
  width:181rpx;
  height:62rpx;
  color:white;
  border:1rpx solid #4FAFF2;
  border-radius:10rpx;
  text-align: center;
  line-height:62rpx;
  font-size:28rpx;
  margin-left: 284rpx;
  background:#4FAFF2;
  margin-top:20rpx;
}
  identify(){
    let that = this;
    wx.request({
      url: 'https://aip.baidubce.com/rest/2.0/image-classify/v1/body_seg?access_token=' + that.data.AccessToken,
      method: 'POST',
      header: {
        'content-type': 'application/x-www-form-urlencoded'
      },
      data:{
        image:that.data.baseData
      },
      success: function (identify) {
        that.setData({
          imgBase64: identify.data.foreground
      })
      }
    })
  },
  saveBtn(){
    //获取文件管理器对象
    const fs = wx.getFileSystemManager()
    //文件保存路径
    const Imgpath = wx.env.USER_DATA_PATH + '/qrcodeImg' + '.png'
    //base64图片文件
    let imageSrc = this.data.imgBase64.replace(/^data:image\/\w+;base64,/, '')

    //写入本地文件
    fs.writeFile({
      filePath: Imgpath,
      data: imageSrc,
      encoding: 'base64',
      success(res) {
        //保存到手机相册
        wx.saveImageToPhotosAlbum({
          filePath: Imgpath,
          success(res) {
            wx.showToast({
              title: '保存成功',
              icon: 'success'
            })
          },
          fail: function(err) {
          }
        })
      }
    })

  },
到此这篇关于基于小程序实现透明背景人像分割的文章就介绍到这了,更多相关小程序透明背景人像分割内容请搜索自由互联以前的文章或继续浏览下面的相关文章希望大家以后多多支持自由互联!
