1、在安装好element-ui@2.x 以后,首先安装sass-loader
npm i sass-loader node-sass -D
2、安装element-theme
npm i element-theme -D
3、安装theme-chalk
npm i element-theme-chalk -D
# or from github
npm i https://github.com/ElementUI/theme-chalk -D
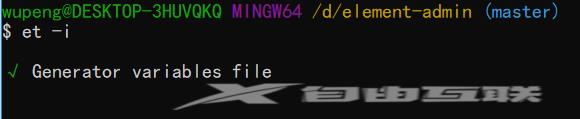
4、初始化变量文件
et -i // 默认的文件是element-variables.scss,也可以自定义文件名 et --init [file path]
安装成功以后,在项目里会自动生成一个element-variables.scss 文件,如下图:
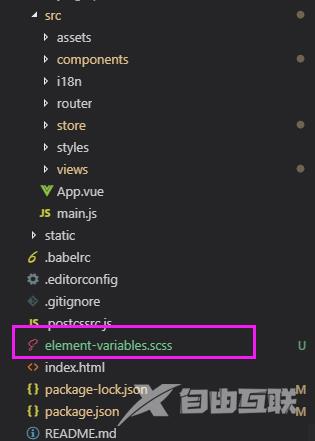
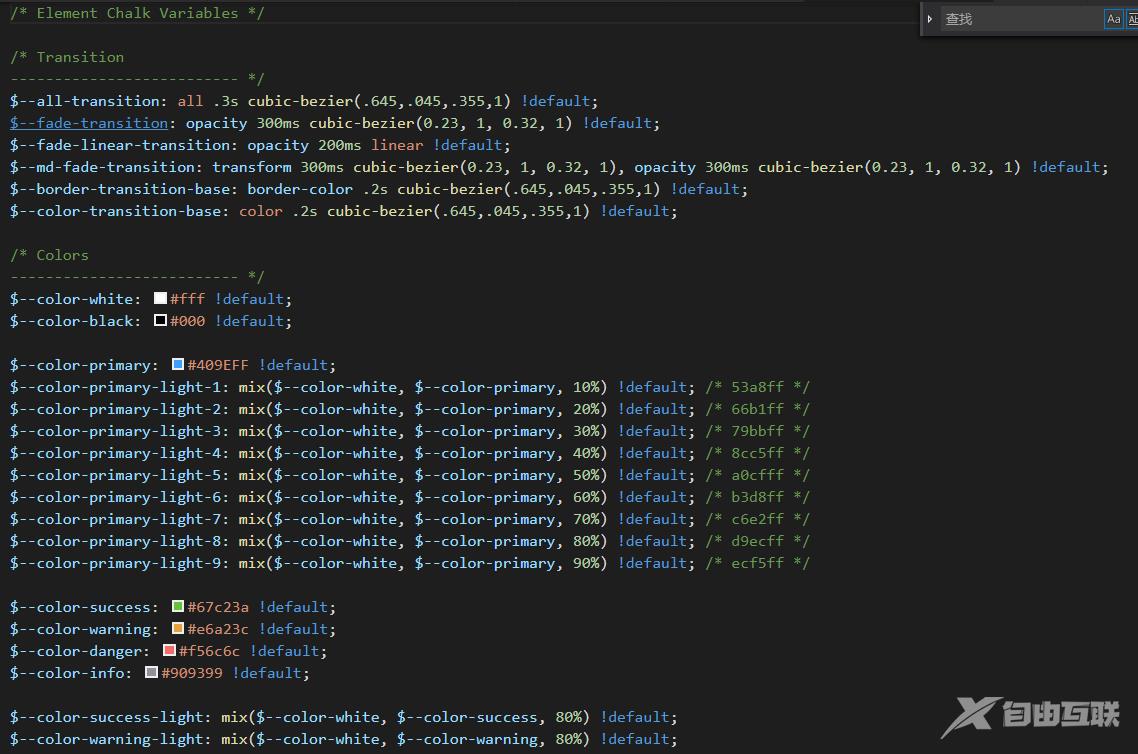
里面定义的是所有的颜色变量
当然,这一步也有可能失败,命令行提示找不到et 这个命令。这个时候需要按照步骤一,重新装一下sass-loader

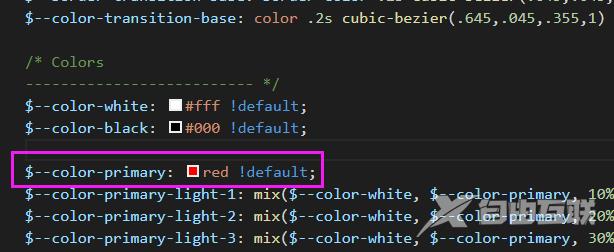
5、修改变量
直接编辑 element-variables.scss 文件,例如修改主题色为红色
6、编译主题
保存文件后,到命令行里执行 et 编译主题,如果你想启用 watch 模式,实时编译主题,增加 -w 参数;如果你在初始化时指定了自定义变量文件,则需要增加 -c 参数,并带上你的变量文件名
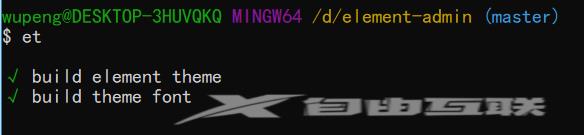
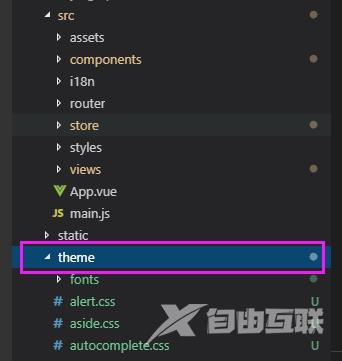
此时,项目中会自动生成一个theme文件夹,里面是编译后所有的字体文件和样式文件
7、引入自定义主题
默认情况下编译的主题目录是放在 ./theme 下,你可以通过 -o 参数指定打包目录。像引入默认主题一样,在代码里直接引用 theme/index.css 文件即可。
import '../theme/index.css'
import ElementUI from 'element-ui'
import Vue from 'vue'

Vue.use(ElementUI)
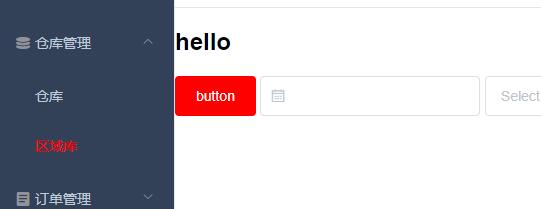
启动项目,会发现原来默认的蓝色会变成红色
官网提供的这种方法仅适用于一次性的更改全局主题颜色,如果想实现官网2.0版本右上角,使用 ColorPicker 颜色选择器 动态换肤。那么建议参考vue-element-admin,作者的 《手摸手,带你用vue撸后台》系列文章非常精彩
ThemePicker.vue
<template>
  <el-tooltip effect="dark" content="theme" placement="bottom">
    <el-color-picker
    v-model="theme"
    class="theme-picker"
    size="small"
    popper-class="theme-picker-dropdown"/>
  </el-tooltip>
</template>
<script>
const version = require('element-ui/package.json').version // element-ui version from node_modules
const ORIGINAL_THEME = '#409EFF' // default color
export default {
  data() {
    return {
      chalk: '', // content of theme-chalk css
      theme: ORIGINAL_THEME
    }
  },
  watch: {
    theme(val, oldVal) {
      if (typeof val !== 'string') return
      const themeCluster = this.getThemeCluster(val.replace('#', ''))
      const originalCluster = this.getThemeCluster(oldVal.replace('#', ''))
      console.log(themeCluster, originalCluster)
      const getHandler = (variable, id) => {
        return () => {
          const originalCluster = this.getThemeCluster(ORIGINAL_THEME.replace('#', ''))
          const newStyle = this.updateStyle(this[variable], originalCluster, themeCluster)
          let styleTag = document.getElementById(id)
          if (!styleTag) {
            styleTag = document.createElement('style')
            styleTag.setAttribute('id', id)
            document.head.appendChild(styleTag)
          }
          styleTag.innerText = newStyle
        }
      }
      const chalkHandler = getHandler('chalk', 'chalk-style')
      if (!this.chalk) {
        const url = `https://unpkg.com/element-ui@${version}/lib/theme-chalk/index.css`
        this.getCSSString(url, chalkHandler, 'chalk')
      } else {
        chalkHandler()
      const styles = [].slice.call(document.querySelectorAll('style'))
        .filter(style => {
          const text = style.innerText
          return new RegExp(oldVal, 'i').test(text) && !/Chalk Variables/.test(text)
        })
      styles.forEach(style => {
        const { innerText } = style
        if (typeof innerText !== 'string') return
        style.innerText = this.updateStyle(innerText, originalCluster, themeCluster)
      })
      this.$message({
        message: '换肤成功',
        type: 'success'
  methods: {
    updateStyle(style, oldCluster, newCluster) {
      let newStyle = style
      oldCluster.forEach((color, index) => {
        newStyle = newStyle.replace(new RegExp(color, 'ig'), newCluster[index])
      return newStyle
    },
    getCSSString(url, callback, variable) {
      const xhr = new XMLHttpRequest()
      xhr.onreadystatechange = () => {
        if (xhr.readyState === 4 && xhr.status === 200) {
          this[variable] = xhr.responseText.replace(/@font-face{[^}]+}/, '')
          callback()
      xhr.open('GET', url)
      xhr.send()
    getThemeCluster(theme) {
      const tintColor = (color, tint) => {
        let red = parseInt(color.slice(0, 2), 16)
        let green = parseInt(color.slice(2, 4), 16)
        let blue = parseInt(color.slice(4, 6), 16)
        if (tint === 0) { // when primary color is in its rgb space
          return [red, green, blue].join(',')
        } else {
          red += Math.round(tint * (255 - red))
          green += Math.round(tint * (255 - green))
          blue += Math.round(tint * (255 - blue))
          red = red.toString(16)
          green = green.toString(16)
          blue = blue.toString(16)
          return `#${red}${green}${blue}`
      const shadeColor = (color, shade) => {
        red = Math.round((1 - shade) * red)
        green = Math.round((1 - shade) * green)
        blue = Math.round((1 - shade) * blue)
        red = red.toString(16)
        green = green.toString(16)
        blue = blue.toString(16)
        return `#${red}${green}${blue}`
      const clusters = [theme]
      for (let i = 0; i <= 9; i++) {
        clusters.push(tintColor(theme, Number((i / 10).toFixed(2))))
      clusters.push(shadeColor(theme, 0.1))
      return clusters
  }
}
</script>
Navbar.vue
<template>
  <el-menu class="navbar" mode="horizontal">
    <hamburger
      class="hamburger-container"
      :toggleClick="toggleSideBar"
      :isActive="!sidebar.opened">
    </hamburger>
    <div class="right-menu">
      <screenfull class="screenfull"></screenfull>
      <div class="lang">
        <el-dropdown>
          <i class="iconfont icon-language4"></i>
          <el-dropdown-menu slot="dropdown">
            <el-dropdown-item @click.native="toggleLang('zh')" :disabled="$i18n.locale == 'zh'">中文</el-dropdown-item>
            <el-dropdown-item @click.native="toggleLang('en')" :disabled="$i18n.locale == 'en'">English</el-dropdown-item>
          </el-dropdown-menu>
        </el-dropdown>
      </div>
      <theme-picker></theme-picker>
    </div>
  </el-menu>
</template>

以上demo代码地址:https://github.com/frwupeng517/element-admin
Element-UI 官方文档地址:http://element-cn.eleme.io/#/zh-CN/component/custom-theme
PanJiachen Git地址:https://github.com/PanJiaChen/vue-element-admin
到此这篇关于element-ui 动态换肤的文章就介绍到这了,更多相关element-ui 动态换肤内容请搜索自由互联以前的文章或继续浏览下面的相关文章希望大家以后多多支持自由互联!