目录 一、基本 (1)利用pytorch建好的层进行搭建 (2)使用网络 二、进阶 一、基本 (1)利用pytorch建好的层进行搭建 import torchfrom torch import nnfrom torch.nn import functional as F#定义一个MLP网
目录
- 一、基本
- (1)利用pytorch建好的层进行搭建
- (2)使用网络
- 二、进阶
一、基本
(1)利用pytorch建好的层进行搭建
import torch
from torch import nn
from torch.nn import functional as F

#定义一个MLP网络
class MLP(nn.Module):
    '''
    网络里面主要是要定义__init__()、forward()
    '''
    def __init__(self):
        '''
        这里定义网络有哪些层(比如nn.Linear,Conv2d……)[可不含激活函数]
        '''
        super().__init__()#调用Module(父)初始化
        self.hidden = nn.Linear(5,10)
        self.out = nn.Linear(10,2)

    def forward(self,x):
        '''
        这里定义前向传播的顺序,即__init__()中定义的层是按怎样的顺序进行连接以及传播的[在这里加上激活函数,以构造复杂函数,提高拟合能力]
        '''
        return self.out(F.relu(self.hidden(x)))
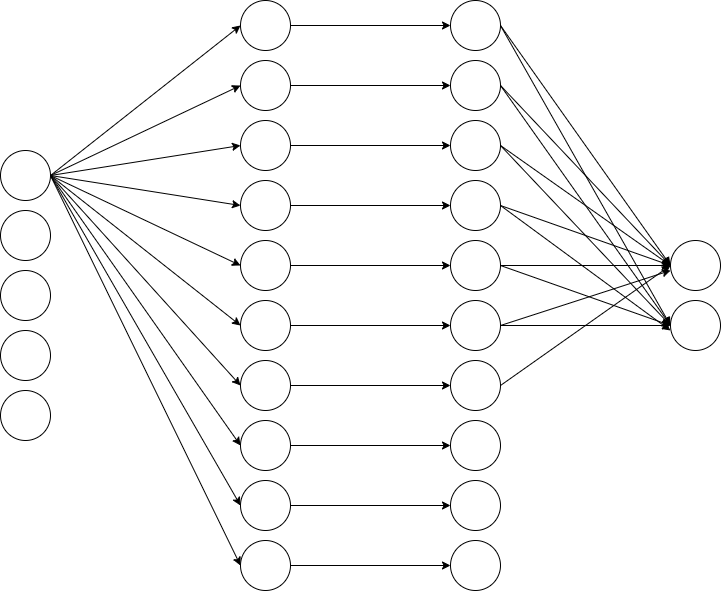
上面的3层感知器可以用于解决一个简单的现实问题:给定5个特征,输出0-1类别概率值,是一个简单的2分类解决方案。
搭建一些简单的网络时,可以用nn.Sequence(层1,层2,……,层n)一步到位:
import torch
from torch import nn
from torch.nn import functional as F

net = nn.Sequential(nn.Linear(5,10),nn.ReLU(),nn.Linear(10,2))
但是nn.Sequence仅局限于简单的网络搭建,而自定义网络可以实现复杂网络结构。

(1)中定义的MLP大致如上(5个输入->全连接->ReLU()->输出)
(2)使用网络
import torch
from torch import nn
from torch.nn import functional as F

net = MLP()
x = torch.randn((15,5))#15个samples,5个输入属性
out = net(x)
#也可调用forward->"out = net.forward(x)"
print(out)
#print(out.shape)
tensor([[-0.0760, -0.1026],
        [-0.3277, -0.2332],
        [-0.0314, -0.1921],
        [ 0.0131, -0.1473],
        [-0.0650, -0.2310],
        [ 0.3009, -0.5510],
        [ 0.1491, -0.0928],
        [-0.1438, -0.1304],
        [-0.1945, -0.1944],
        [ 0.1088, -0.2249],
        [ 0.0016, -0.2334],
        [ 0.1401, -0.3709],
        [-0.1864, -0.1764],
        [ 0.0775, -0.0160],
        [ 0.0150, -0.3198]], grad_fn=<AddmmBackward>)
二、进阶
(1)构建较复杂的网络结构
a. Sequence、net套娃
import torch
from torch import nn
from torch.nn import functional as F

class MLP2(nn.Module):
    def __init__(self):
        super().__init__()
        self.net = nn.Sequential(nn.Linear(5,10),nn.ReLU(),nn.Linear(10,5))
        self.out = nn.Linear(5,4)

    def forward(self,x):
        return self.out(F.relu(self.net(x)))

net2 = nn.Sequential(MLP2(),nn.ReLU(),nn.Linear(4,2))
net2.eval()
# eval()等价print(net2)
Sequential(
  (0): MLP2(
    (net): Sequential(
      (0): Linear(in_features=5, out_features=10, bias=True)
      (1): ReLU()
      (2): Linear(in_features=10, out_features=5, bias=True)
    )
    (out): Linear(in_features=5, out_features=4, bias=True)
  )
  (1): ReLU()
  (2): Linear(in_features=4, out_features=2, bias=True)
)
(2) 参数
a. 权重、偏差的访问
#访问权重和偏差
print(net2[2].weight)#注意weight是parameter类型,.data访问数值
print(net2[2].bias.data)

#输出所有权重、偏差
print(*[(name,param) for name,param in net2[2].parameters()])
b. 不同网络之间共享参数
shared = nn.Linear(8,8)

net = nn.Sequential(nn.Linear(5,8),nn.ReLU(),shared,nn.ReLU(),shared)
print(net[2].weight.data[0])
net[2].weight.data[0][0] = 100
print(net[2].weight.data[0][0])
print(net[2].weight.data[0] == net[4].weight.data[0])
net.eval()
c. 参数初始化
def init_Linear(m):
    if type(m) == nn.Linear:
        nn.init.normal_(m.weight,mean = 0,std = 0.01)   #将权重按照均值为0,标准差为0.01的正态分布进行初始化
        nn.init.zeros_(m.bias)  #将偏差置为0

def init_const(m):
    if type(m) == nn.Linear:
        nn.init.constant_(m.weight,42)   #将权重全部置为42

def my_init(m):
    if type(m) == nn.Linear:
        '''
        对weight和bias自定义初始化
        '''
        pass

#如何调用?
net2.apply(init_const)  #在net2中进行遍历,对每个Linear执行初始化
(3)自定义层(__init__()中可含输入输出层)
a. 不带输入输出的自定义层(输入输出一致,x数进,x数出,对每个值进行相同的操作,类似激活函数)
b. 带输入输出的自定义层
import torch
from torch import nn
from torch.nn import functional as F

#a
class decentralized(nn.Module):
    def __init__(self):
        super().__init__()

    def forward(self,x):
        return x-x.mean()

#b
class my_Linear(nn.Module):
    def __init__(self,dim_in,dim_out):
        super().__init__()
        self.weight = nn.Parameter(torch.ones(dim_in,dim_out))  #由于x行数为dim_out,列数为dim_in,要做乘法,权重行列互换
        self.bias = nn.Parameter(torch.randn(dim_out))

    def forward(self,x):
        return F.relu(torch.matmul(x,self.weight.data)+self.bias.data)

tmp = my_Linear(5,3)
print(tmp.weight)
(4)读写
#存取任意torch类型变量

x = torch.randn((20,20))
torch.save(x,'X')   #存
y = torch.load('X') #取

#存储网络

torch.save(net2.state_dict(),'Past_parameters') #把所有参数全部存储
clone = nn.Sequential(MLP2(),nn.ReLU(),nn.Linear(4,2))   #存储时同时存储网络定义(网络结构)
clone.load_state_dict(torch.load('Past_parameters'))
clone.eval()
到此这篇关于pytorch简单实现神经网络的文章就介绍到这了,更多相关pytorch神经网络内容请搜索自由互联以前的文章或继续浏览下面的相关文章希望大家以后多多支持自由互联!
