目录
- 前言
- 关于Layered Windows(分层窗体)
- 关于同样的实现使用Layered Windows与使用透明窗体的区别
- Control.DrawToBitmap()将控件绘制到Bitmap
- 最终效果
- 几个小问题
- StartPosition设置窗体初始位置设置无效
- 构造函数中设置Location位置无效
- 在设计器中,右键窗体无法显示菜单
- 代码实现
- 修改部分
- 全部代码
前言
在一般能搜到的所有实现圆角窗体的示例中,都是通过绘制圆角的路径,并创建对应的窗体Region区域实现。
目前所知,重新创建Region的所有方法,产生的Region都是有锯齿的【估计要通过消除锯齿的算法额外处理才可能解决】,也就是说,几乎所有圆角窗体的示例都是有锯齿的,其效果几乎不能看,惨不忍睹。
后面看到Creating Smooth Rounded Corners in WinForm Applications介绍了绘制无锯齿的光滑圆角窗体的实现。了解了下,总体非常不错,因此对其进行借鉴并进行了修改。
根据后续的了解,其实现原理是通过LayeredWindow进行绘制(CreateParams样式要添加CreateParams.ExStyle |= 0x00080000),而其理论上,可以在Layered Window上绘制更复杂的(任意形状)图形,并且没有闪烁、边界锯齿的问题。
关于Layered Windows(分层窗体)
Layered Windows:使用一个分层窗口可以显著提高复杂形状、动画特效、透明通道混合效果等类型的窗体的性能和视觉效果。
系统自动构造和绘制分层的窗口以及基础应用的窗体,分层窗体光滑流畅的渲染、没有复杂窗体区域的典型闪烁,同时支持半透明。
在窗体创建后通过调用CreateWindowEx或SetWindowLong函数指定WS_EX_LAYERED额外窗口样式,然后通过调用 SetLayeredWindowAttributes 或 UpdateLayeredWindow 使分层窗口可见。
几个关于LayeredWindow的资料:
用UpdateLayeredWindow实现任意异形窗口
UpdateLayeredWindowIndirect function
这就是引用的stackoverflow中无锯齿圆角窗体的实现的基本原理。
关于同样的实现使用Layered Windows与使用透明窗体的区别
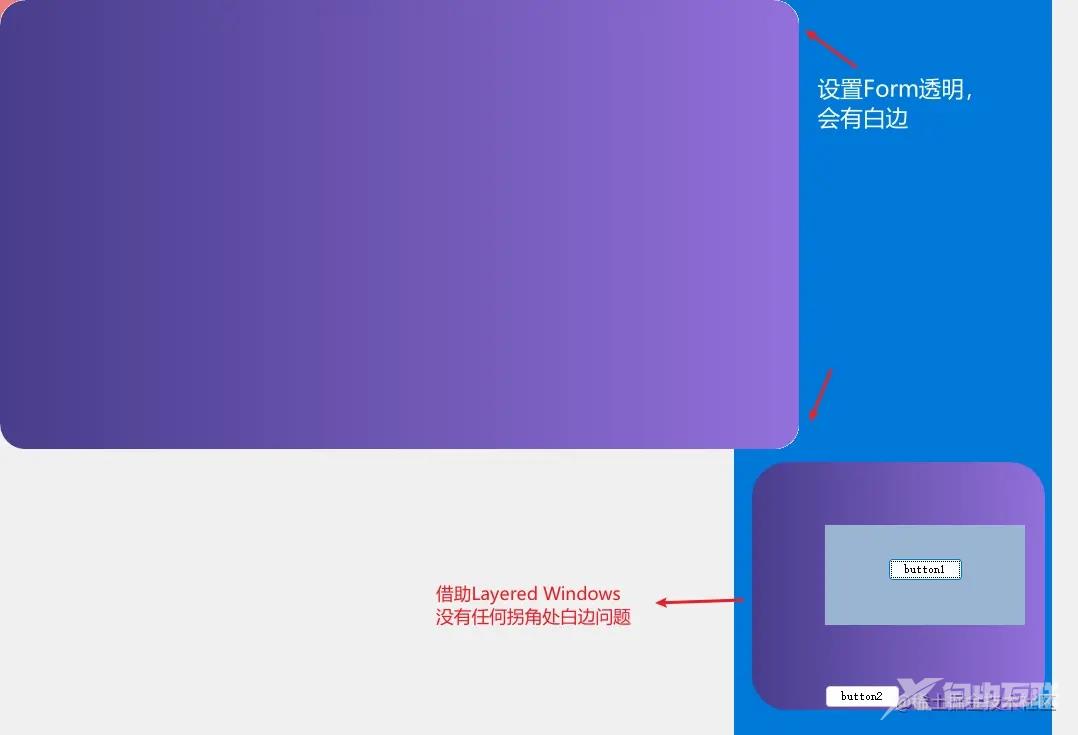
不使用Layered Windows时,如果在设置窗体Form透明的情况下,在OnPaint中绘制,无论执行或不执行SetBitmap()设置透明通道,在圆角边缘处都会有白边出现。
// 设置窗体透明
this.BackColor = Color.Empty;
this.TransparencyKey = BackColor;

注意:继承窗体,在设计器中
Control.DrawToBitmap()将控件绘制到Bitmap
启用分层窗体后,原本的窗体将会隐藏,因此需要在Layered Windows上进行新形状(如圆角)窗体的绘制,才会显示看到,结合透明混合通道的处理,实现正确显示绘制的图形窗体和无锯齿的效果。
显示绘制的分层窗体后,会同样覆盖原窗体上控件,导致只有一个窗体,不会显示内部的控件。
因此,除了绘制分层窗体图形,还需要将原窗体的控件绘制上去。
Control的DrawToBitmap方法:Control.DrawToBitmap(bitmap, Rectangle targetBounds),用于将控件的targetBounds范围绘制到bitmap,通常指定控件的ClientRectangle,将控件整体绘制到bitmap。
然后,绘图对象将控件的bitmap绘制到图像的指定位置(对应于原空间位置)。
ctrl.DrawToBitmap(bmp, ctrl.ClientRectangle);
graphics.DrawImage(bmp, ctrl.Location);
这样可以实现控件绘制到图像上,其显示的渲染效果和使用,与正常控件没有任何区别。
注意在OnPaint方法中,对背景色进行与分层窗体相同的绘制。
最终效果
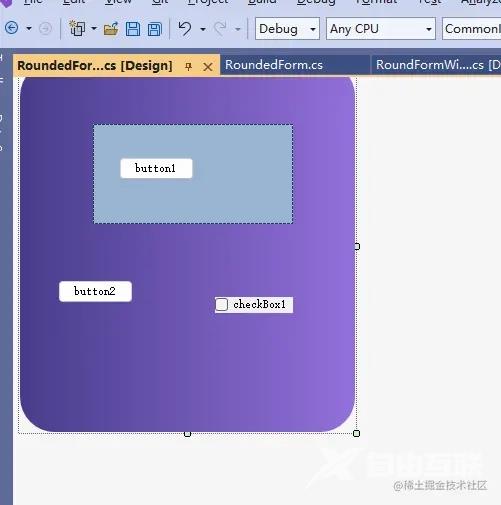
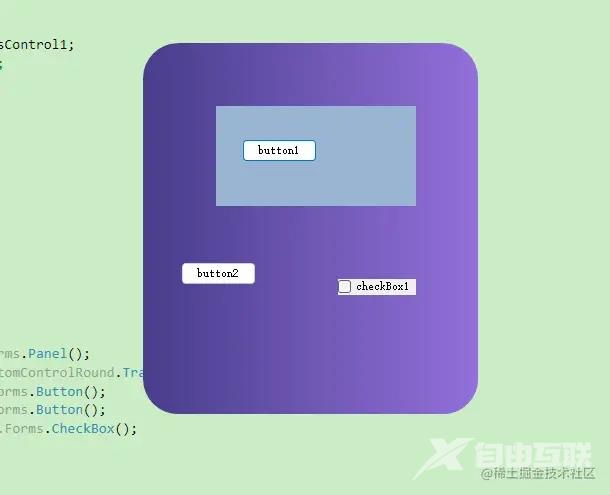
下面是稍微修改后,通过继承窗体,在设计器和生成结果中,不同的显示效果
public class RoundedFormTest : RoundedForm
{
    // 其他相关代码
}


几个小问题
StartPosition设置窗体初始位置设置无效
不知为何,设置窗体初始位置无效StartPosition,具体原因未知。
比如,直接使用StartPosition = FormStartPosition.CenterScreen并不能设置窗体居中
public RoundedForm()
{
    this.FormBorderStyle = FormBorderStyle.None;
    // 居中无效
    //StartPosition = FormStartPosition.CenterScreen;
}
构造函数中设置Location位置无效
Location位置的设置应该放在窗体的Load事件方法中,提前设置并无效果。
public RoundedForm()
{
    this.FormBorderStyle = FormBorderStyle.None;
    // 构造函数中设置Location无效
    // StartPosition = FormStartPosition.Manual;
    // Location = new Point(200, 200);
    // 无效
    //Left = 200;
    //Top = 200;
}
继承窗体RoundedFormTest的Load事件处理程序:
 private void RoundedFormTest_Load(object sender, EventArgs e)
{
    // 有效
    Location = new Point(300, 300);
}
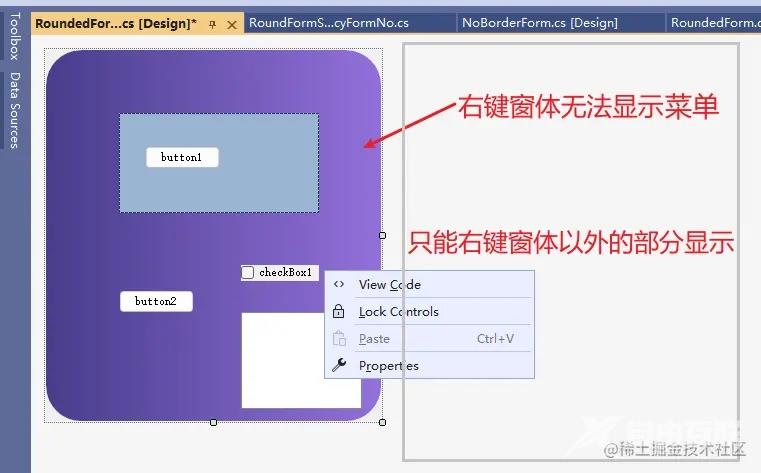
在设计器中,右键窗体无法显示菜单
这也是一个很奇怪的问题,原因不知。只能右键窗体以外的部分来显示菜单,查看属性或代码等。

代码实现
修改部分
- 添加了设置背景颜色的属性、背景渐变方向的属性、是否可以调整窗体大小的属性
[Category("高级"), DefaultValue(true), Description("窗体是否固定大小,为true时,无法拖动边角调整窗体大小,默认true")]
public bool FixedSize { get; set; } = true;
[Category("高级"), DefaultValue(typeof(Color), "DarkSlateBlue"), Description("渐变背景开始的颜色,如果BgStartColor和BgEndColor颜色一样,则无渐变")]
public Color BgStartColor
{
   get => bgStartColor; set
   {
       bgStartColor = value;
       Validate();
   }
}
[Category("高级"), DefaultValue(typeof(Color), "MediumPurple"), Description("渐变背景结束的颜色,如果BgStartColor和BgEndColor颜色一样,则无渐变")]
public Color BgEndColor
{
   get => bgEndColor; set
   {
       bgEndColor = value;
       Validate();
   }
}
[Category("高级"), DefaultValue(0f), Description("背景颜色的渐变方向,默认0度,水平方向渐变")]
public float LinearGradient
{
   get => linearGradient; set
   {
       linearGradient = value;
       Validate();
   }
}
- 去除了原本通过计时器定时执行Layered Windows绘制的实现,改为在OnResize、OnShown方法中绘制
原本的代码在Load加载后,通过定时器定时执行Layered Windows的绘制,感觉这样实现太费性能,且不高效。改为将其绘制放在需要绘制的OnResize、OnShown方法中。
- 添加拖动窗体、创拽调整窗体大小的代码
正常的窗体都应该支持拖动窗体,拖拽调整窗体大小、标题栏等基本功能,此处只添加之前介绍过的拖动和拖拽。其他可根据需要再行修改。
- 添加
RoundRadius属性,圆角半径可以根据需要指定和修改。默认圆角大小为35。
[CategoryAttribute("高级"), DefaultValue(35), Description("圆角半径的大小")]
public int RoundRadius
{
   set
   {
       roundRadius = value;
       this.Invalidate();
   }
   get
   {
       return roundRadius;
   }
}
全部代码
全部的代码200多行,可根据需要进行精简。
 public class RoundedForm : Form
 {
     private Color bgStartColor = Color.DarkSlateBlue;
     private Color bgEndColor = Color.MediumPurple;
     private float linearGradient;
     private int roundRadius;//圆角半径
     // 上面文章列出的属性代码,此处不再重复
     public RoundedForm()
     {
         this.FormBorderStyle = FormBorderStyle.None;
         roundRadius = 35;
     }
     // OnResize、OnShown后绘制Layered Windows
     protected override void OnResize(EventArgs e)
     {
         DrawRoundForm();
         base.OnResize(e);
     }
     protected override void OnShown(EventArgs e)
     {
         DrawRoundForm();
         base.OnShown(e);
     }
     private void DrawRoundForm()
     {
         if (DesignMode) return;
         if (ClientRectangle.Width == 0 || ClientRectangle.Height == 0)
         {
             return;
         }
         using (Bitmap backImage = new Bitmap(this.Width, this.Height))
         {
             using (Graphics graphics = Graphics.FromImage(backImage))
             {
                 Rectangle gradientRectangle = ClientRectangle;
                 using (Brush b = new LinearGradientBrush(gradientRectangle, BgStartColor, BgEndColor, LinearGradient))
                 {
                     graphics.FillRoundRectangle(gradientRectangle, b, 35);
                     foreach (Control ctrl in this.Controls)
                     {
                         using (Bitmap bmp = new Bitmap(ctrl.Width, ctrl.Height, PixelFormat.Format32bppArgb))
                         {
                             ctrl.DrawToBitmap(bmp, ctrl.ClientRectangle); // 结合OnPaint中的绘制,能完美实现ctrl圆角的边角透明底层,原因(猜测可能是)Bitmap没有指定颜色,控件之外的部分透明
                             graphics.DrawImage(bmp, ctrl.Location);
                         }
                     }
                     PerPixelAlphaBlend.SetBitmap(backImage, Left, Top, Handle);//不执行将无法显示窗体
                 }
             }
         }
     }
     protected override void OnPaint(PaintEventArgs e)
     {
         base.OnPaint(e);
         if (ClientRectangle.Width == 0 || ClientRectangle.Height == 0)
         {
             return;
         }
         using (Graphics graphics = e.Graphics)
         {
             //Rectangle gradientRectangle = new Rectangle(0, 0, this.Width - 1, this.Height - 1);
             Rectangle gradientRectangle = ClientRectangle;
             using (Brush b = new LinearGradientBrush(gradientRectangle, BgStartColor, BgEndColor, LinearGradient))
             {
                 graphics.FillRoundRectangle(gradientRectangle, b, 35);
             };
         }
     }
     protected override CreateParams CreateParams
     {
         get
         {
             CreateParams cp = base.CreateParams;
             if (!DesignMode)
                 cp.ExStyle |= 0x00080000;  // Form 添加 WS_EX_LAYERED 扩展样式
             return cp;
         }
     }
     // 通过重写 WndProc 实现拖拽调整窗体大小、拖拽移动窗体
     const int HTLEFT = 10;
     const int HTRIGHT = 11;
     const int HTTOP = 12;
     const int HTTOPLEFT = 13;
     const int HTTOPRIGHT = 14;
     const int HTBOTTOM = 15;
     const int HTBOTTOMLEFT = 0x10;
     const int HTBOTTOMRIGHT = 17;
     protected override void WndProc(ref Message m)
     {
         base.WndProc(ref m);
         if (m.Msg == 0x84)
         {
             if (!FixedSize)
             {
                 // 拖拽调整窗体大小
                 Point vPoint = new Point((int)m.LParam & 0xFFFF, (int)m.LParam >> 16 & 0xFFFF);
                 vPoint = PointToClient(vPoint);
                 if (vPoint.X <= 5)
                     if (vPoint.Y <= 5)
                         m.Result = (IntPtr)HTTOPLEFT;
                     else if (vPoint.Y >= ClientSize.Height - 5)
                         m.Result = (IntPtr)HTBOTTOMLEFT;
                     else m.Result = (IntPtr)HTLEFT;
                 else if (vPoint.X >= ClientSize.Width - 5)
                     if (vPoint.Y <= 5)
                         m.Result = (IntPtr)HTTOPRIGHT;
                     else if (vPoint.Y >= ClientSize.Height - 5)
                         m.Result = (IntPtr)HTBOTTOMRIGHT;
                     else m.Result = (IntPtr)HTRIGHT;
                 else if (vPoint.Y <= 5)
                     m.Result = (IntPtr)HTTOP;
                 else if (vPoint.Y >= ClientSize.Height - 5)
                     m.Result = (IntPtr)HTBOTTOM;
             }
             // 鼠标左键按下实现拖动窗口功能
             if (m.Result.ToInt32() == 1)
             {
                 m.Result = new IntPtr(2);
             }
         }
     }
 }
 public static class PerPixelAlphaBlend
 {
     public static void SetBitmap(Bitmap bitmap, int left, int top, IntPtr handle)
     {
         SetBitmap(bitmap, 255, left, top, handle);
     }
     public static void SetBitmap(Bitmap bitmap, byte opacity, int left, int top, IntPtr handle)
     {
         if (bitmap.PixelFormat != PixelFormat.Format32bppArgb)
             throw new ApplicationException("The bitmap must be 32ppp with alpha-channel.");
         IntPtr screenDc = Win32.GetDC(IntPtr.Zero);
         IntPtr memDc = Win32.CreateCompatibleDC(screenDc);
         IntPtr hBitmap = IntPtr.Zero;
         IntPtr oldBitmap = IntPtr.Zero;
         try
         {
             hBitmap = bitmap.GetHbitmap(Color.FromArgb(0));
             oldBitmap = Win32.SelectObject(memDc, hBitmap);
             Win32.Size size = new Win32.Size(bitmap.Width, bitmap.Height);
             Win32.Point pointSource = new Win32.Point(0, 0);
             Win32.Point topPos = new Win32.Point(left, top);
             Win32.BLENDFUNCTION blend = new Win32.BLENDFUNCTION();
             blend.BlendOp = Win32.AC_SRC_OVER;
             blend.BlendFlags = 0;
             blend.SourceConstantAlpha = opacity;
             blend.AlphaFormat = Win32.AC_SRC_ALPHA;
             Win32.UpdateLayeredWindow(handle, screenDc, ref topPos, ref size, memDc, ref pointSource, 0, ref blend, Win32.ULW_ALPHA);
         }
         finally
         {
             Win32.ReleaseDC(IntPtr.Zero, screenDc);
             if (hBitmap != IntPtr.Zero)
             {
                 Win32.SelectObject(memDc, oldBitmap);
                 Win32.DeleteObject(hBitmap);
             }
             Win32.DeleteDC(memDc);
         }
     }
 }
 internal class Win32
 {
     public enum Bool
     {
         False = 0,
         True
     };
     [StructLayout(LayoutKind.Sequential)]
     public struct Point
     {
         public Int32 x;
         public Int32 y;
         public Point(Int32 x, Int32 y) { this.x = x; this.y = y; }
     }
     [StructLayout(LayoutKind.Sequential)]
     public struct Size
     {
         public Int32 cx;
         public Int32 cy;
         public Size(Int32 cx, Int32 cy) { this.cx = cx; this.cy = cy; }
     }
     [StructLayout(LayoutKind.Sequential, Pack = 1)]
     struct ARGB
     {
         public byte Blue;
         public byte Green;
         public byte Red;
         public byte Alpha;
     }
     [StructLayout(LayoutKind.Sequential, Pack = 1)]
     public struct BLENDFUNCTION
     {
         public byte BlendOp;
         public byte BlendFlags;
         public byte SourceConstantAlpha;
         public byte AlphaFormat;
     }
     public const Int32 ULW_COLORKEY = 0x00000001;
     public const Int32 ULW_ALPHA = 0x00000002;
     public const Int32 ULW_OPAQUE = 0x00000004;
     public const byte AC_SRC_OVER = 0x00;
     public const byte AC_SRC_ALPHA = 0x01;
     [DllImport("user32.dll", ExactSpelling = true, SetLastError = true)]
     public static extern Bool UpdateLayeredWindow(IntPtr hwnd, IntPtr hdcDst, ref Point pptDst, ref Size psize, IntPtr hdcSrc, ref Point pprSrc, Int32 crKey, ref BLENDFUNCTION pblend, Int32 dwFlags);
     [DllImport("user32.dll", ExactSpelling = true, SetLastError = true)]
     public static extern IntPtr GetDC(IntPtr hWnd);
     [DllImport("user32.dll", ExactSpelling = true)]
     public static extern int ReleaseDC(IntPtr hWnd, IntPtr hDC);
     [DllImport("gdi32.dll", ExactSpelling = true, SetLastError = true)]
     public static extern IntPtr CreateCompatibleDC(IntPtr hDC);
     [DllImport("gdi32.dll", ExactSpelling = true, SetLastError = true)]
     public static extern Bool DeleteDC(IntPtr hdc);
     [DllImport("gdi32.dll", ExactSpelling = true)]
     public static extern IntPtr SelectObject(IntPtr hDC, IntPtr hObject);
     [DllImport("gdi32.dll", ExactSpelling = true, SetLastError = true)]
     public static extern Bool DeleteObject(IntPtr hObject);
 }
以上就是Winform 控件优化LayeredWindow无锯齿圆角窗体的详细内容,更多关于LayeredWindow无锯齿圆角窗体的资料请关注自由互联其它相关文章!
