本文实例为大家分享了Qt实现TCP网络编程的具体代码,供大家参考,具体内容如下
1.Qt中的TCP客户端编程

Qt中的TCP客户端编程:
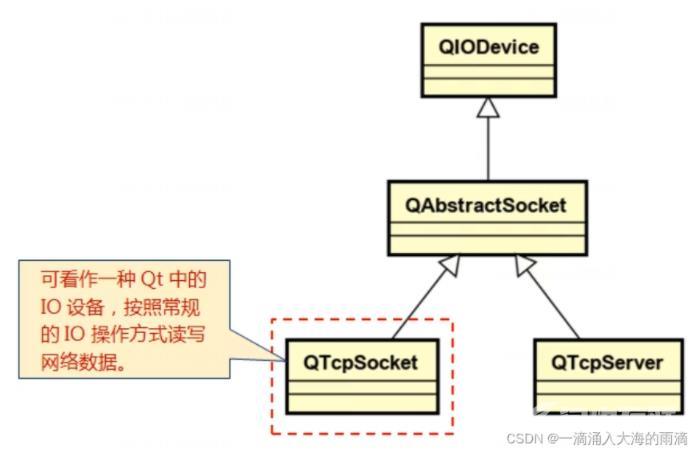
对于Qt编程而言,网络只是数据传输的通道
Qt提供了QTcpSocket类(封装了TCP协议细节)
将QTcpSocket的对象当做黑盒使用,进行数据收发

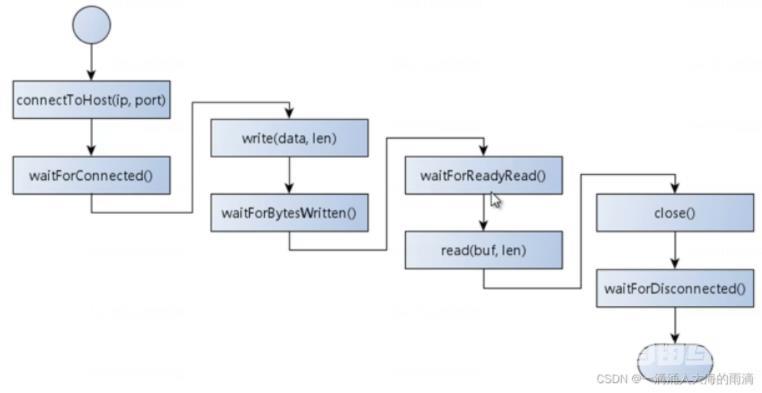
QTcpSocket的使用方式:
1.连接服务端主机(connectToHost())
2.发送数据/接受数据(write()/read())
3.关闭连接(close())
QTcpSocket的注意事项:
默认情况下,QTcpSocket使用异步编程的方式:
操作完成后立即返回
通过发送信号的方式返回操作结果
QTcpSocket提供了辅助函数,可完成同步编程的方式
waitForConnected()/waitForDisconnected()
waitForBytesWritten()/waitForReadyread()
QTcpSocket的同步编程:

编程实验:同步编程
#include <QCoreApplication>
#include <QTcpSocket>
#include <QDebug>
#include <QThread>

void SyncClientDemo()
{
    QTcpSocket client;
    char buf[256] = {0};
    client.connectToHost("127.0.0.1",8080);

    qDebug() << "Connected:" << client.waitForConnected();
    qDebug() << "Send Bytes:" << client.write("CKY");
    qDebug() << "Send Status:" << client.waitForBytesWritten();
    qDebug() << "Data Avilable:" << client.waitForReadyRead();
    qDebug() << "Received Bytes:" << client.read(buf, sizeof(buf));
    qDebug() << "Received Data:" << buf;

    QThread::sleep(5000);

    client.close();

    client.waitForDisconnected();

}

int main(int argc, char *argv[])
{
    QCoreApplication a(argc, argv);

    SyncClientDemo();

    return a.exec();
}
QTcpSocket的异步编程:
QTcpSocket对象通过发送信号的方式返回操作结果
可以在程序中将对应的信号连接到槽函数,获取结果
在GUI应用程序中通常使用QTcpSocket的异步方式
QTcpSocket中的关键信号:
connected():成功连接远端主机
disconnected():远端主机断开连接
readyRead():远程数据到达本机
bytesWritten(qint64):数据成功发送至系统(OS)
编程实验:QTcpSocket异步编程
#include "clientdemo.h"
#include <QDebug>
#include <QHostAddress>

ClientDemo::ClientDemo(QObject* parent) : QObject(parent)
{
    connect(&m_client, SIGNAL(connected()), this, SLOT(onConnected()));
    connect(&m_client, SIGNAL(disconnected()), this, SLOT(onDisconnected()));
    connect(&m_client, SIGNAL(readyRead()), this, SLOT(onDataReady()));
    connect(&m_client, SIGNAL(bytesWritten(qint64)), this, SLOT(onBytesWritten(qint64)));
}


void ClientDemo::onConnected()
{
    qDebug() << "onConnected()";
    qDebug() << "Local Address:" << m_client.localAddress();
    qDebug() << "Loacl Port:" << m_client.localPort();
}
void ClientDemo::onDisconnected()
{
    qDebug() << "onDiecennected()";
}
void ClientDemo::onDataReady()
{
    char buf[256] = {0};

    qDebug() << "onDataReady:" << m_client.read(buf, sizeof(buf));
    qDebug() << "Data:" << buf;
}
void ClientDemo::onBytesWritten(qint64 bytes)
{
    qDebug() << "onBytesWritten" << bytes;
}
void ClientDemo::connectTo(QString ip, int port)
{
    m_client.connectToHost(ip, port);
}
qint64 ClientDemo::send(const char* data, int len)
{
    return m_client.write(data, len);
}
qint64 ClientDemo::available()
{
    return m_client.bytesAvailable();
}
void ClientDemo::close()
{
    m_client.close();
}
1.Qt中的TCP服务端编程
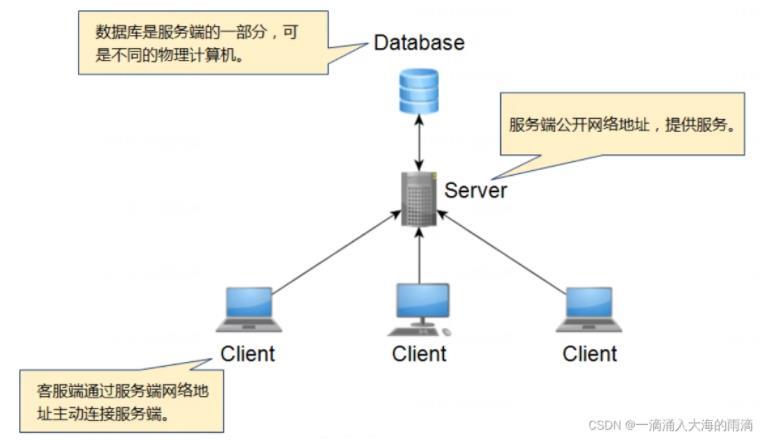
网络中的服务端:
服务端是为客户端服务的,服务的内容诸如向客户端提供资源,保存客户端数据,为客户端提供功能接口,等
Client/Server软件架构简介

特点;
服务端被动接受连接(服务端无法主动连接客户端)
服务端必须公开网络地址(容易受到攻击)
在职责上:
客户端倾向于处理用于交互及体验(GUI)
服务端倾向于用户数据的组织和存储(数据处理)
B/S网络结构是什么?
Browser/Server软件架构简介
B/S是一种特殊的C/S网络架构
B/S中的客户端统一使用浏览器(Browser)
B/S中的客户端GUI通常采用HTML进行开发
B/S中的客户端与服务端通常采用http协议进行通信
Qt中的TCP服务端编程:
Qt提供了QTcpServer类
将QTcpServer的对象当做黑盒使用,进行连接监听
每一个连接生成一个QTcpSocket对象进行通信

QTcpServer的使用方式:
监听本机地址的端口(listen())
通过信号通知客户端连接(newConnection())
获取QTcpSocket通信对象(nextPendingConnection())
停止监听(close())
QTcpServer的注意事项:
用于处理客户端连接,不进行具体通信
监听的端口只用于响应连接请求
监听到连接后,生成QTcpSocket对象与客户端通信
Client/Server交互流程:

编程实验:QServerSocket编程
#include "serverdemo.h"
#include "QHostAddress"
#include <QDebug>
#include <QTcpServer>
#include <QObjectList>

ServerDemo::ServerDemo(QObject* parent) : QObject(parent)
{
    connect(&m_server, SIGNAL(newConnection()), this, SLOT(onNewConnection()));
}

void ServerDemo::onNewConnection()
{
    qDebug() << "onNewConnection";
    QTcpSocket* tcp = m_server.nextPendingConnection();
    connect(tcp, SIGNAL(connected()), this, SLOT(onConnected()));
    connect(tcp, SIGNAL(disconnected()), this, SLOT(onDisconnected()));
    connect(tcp, SIGNAL(readyRead()), this, SLOT(onDataReady()));
    connect(tcp, SIGNAL(bytesWritten(qint64)), this, SLOT(onBytesWritten(qint64)));
}

bool ServerDemo::start(int port)
{
    bool ret = true;

    if(!m_server.isListening())
    {
        ret = m_server.listen(QHostAddress("127.0.0.1", port));
    }

    return ret;
}

void ServerDemo::stop()
{
    if(m_server.isListening())
    {
        m_server.close();
    }
}

void ServerDemo::onConnected()
{
    QTcpServer* tcp = dynamic_cast<QTcpServer*>(sender());

    if(tcp != NULL)
    {
        qDebug() << "onConnected()";
        qDebug() << "Local Address:" << tcp->localAddress();
        qDebug() << "Loacl Port:" << tcp->localPort();
    }

}
void ServerDemo::onDisconnected()
{
    qDebug() << "onDiecennected()";
}
void ServerDemo::onDataReady()
{
    QTcpServer* tcp = dynamic_cast<QTcpServer*>(sender());
    char buf[256] = {0};

    if(tcp != NULL)
    {
        qDebug() << "onDataReady:" << tcp->read(buf, sizeof(buf));
        qDebug() << "Data:" << buf;
    }
}
void ServerDemo::onBytesWritten(qint64 bytes)
{
    qDebug() << "onBytesWritten" << bytes;
}

ServerDemo::~ServerDemo()
{
    const QObjectList& list = m_server.children();
    for(int i = 0; i < list.length(), i++)
    {
        QTcpSocket* tcp = dynamic_cast<QTcpSocket*>(list[i]);
        if(tcp != NULL)
        {
            tcp->close();
        }
    }
}
以上就是本文的全部内容,希望对大家的学习有所帮助,也希望大家多多支持自由互联。
