本文实例为大家分享了Android开发之AlertDialog实现弹出对话框的具体代码,供大家参考,具体内容如下
基本框架
我们在xml中添加一个按钮用来唤出对话框:
<?xml version="1.0" encoding="utf-8"?>
<LinearLayout xmlns:android="http://schemas.android.com/apk/res/android"
    android:layout_width="match_parent"
    android:layout_height="match_parent"
    android:orientation="vertical">

    <Button
        android:text="显示对话框"
        android:onClick="display"
        android:layout_width="wrap_content"
        android:layout_height="wrap_content"/>

</LinearLayout>
然后在java代码中编写点击事件的响应:
package com.example.myalertdialog;

import androidx.appcompat.app.AlertDialog;
import androidx.appcompat.app.AppCompatActivity;

import android.os.Bundle;
import android.view.View;

public class MainActivity extends AppCompatActivity {

    @Override
    protected void onCreate(Bundle savedInstanceState) {
        super.onCreate(savedInstanceState);
        setContentView(R.layout.activity_main);
    }

    public void display(View view) {
        AlertDialog.Builder builder=new AlertDialog.Builder(this);
        builder.setIcon(R.drawable.ic_baseline_all_inclusive_24)
                .setTitle("对话框")
                .setMessage("Hello")
                .create()
                .show();
    }
}
构造方法
先声明一个构造器对象builder:AlertDialog.Builder builder=new AlertDialog.Builder(this);
之后就可以用该构造器的各种方法设置对话框的属性:
builder.setIcon(int iconId); 添加图标builder.setMessage(CharSequence message); 添加消息builder.setTitle(CharSequence title); 添加标题builder.setView(View view); 设置自定义布局builder.create(); 创建对话框builder.show(); 显示对话框
上面的这些函数都是可以链式调用的(详见基本框架),不过由于setXXX是Builder函数,create函数返回Dialog变量,而show是void函数,所以这三类函数的顺序不能交换,setXXX函数的内部顺序可交换。
运行基本框架中的代码就可以得到一个简单的弹出对话框:

添加按钮
常见的对话框一般还有按钮,包含确认、取消等按钮,我们也可以在java代码中设置并声明点击事件:
package com.example.myalertdialog;

import androidx.appcompat.app.AlertDialog;
import androidx.appcompat.app.AppCompatActivity;

import android.content.DialogInterface;
import android.os.Bundle;
import android.util.Log;
import android.view.View;

public class MainActivity extends AppCompatActivity {

    @Override
    protected void onCreate(Bundle savedInstanceState) {
        super.onCreate(savedInstanceState);
        setContentView(R.layout.activity_main);
    }

    public void display(View view) {
        AlertDialog.Builder builder=new AlertDialog.Builder(this);
        builder.setIcon(R.drawable.ic_baseline_all_inclusive_24)
                .setTitle("对话框")
                .setMessage("Hello")
                .setPositiveButton("OK", new DialogInterface.OnClickListener() {
                    @Override
                    public void onClick(DialogInterface dialogInterface, int i) {
                        Log.e("ShadyPi","点击确认");
                    }
                })
                .setNegativeButton("Cancel", new DialogInterface.OnClickListener() {
                    @Override
                    public void onClick(DialogInterface dialogInterface, int i) {
                        Log.e("ShadyPi","点击取消");
                    }
                })
                .setNeutralButton("middle", new DialogInterface.OnClickListener() {
                    @Override
                    public void onClick(DialogInterface dialogInterface, int i) {
                        Log.e("ShadyPi","点击中性");
                    }
                })
                .create()
                .show();
    }
}
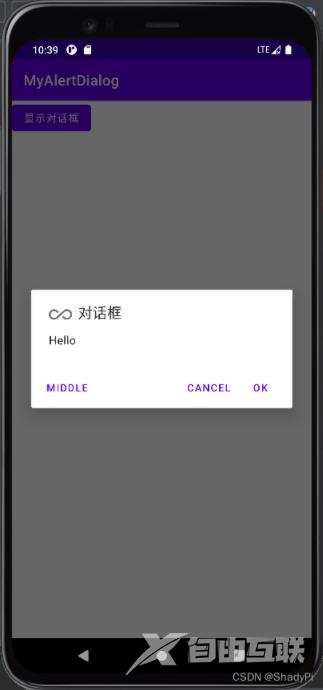
点击对应按钮可以看到事件被触发:
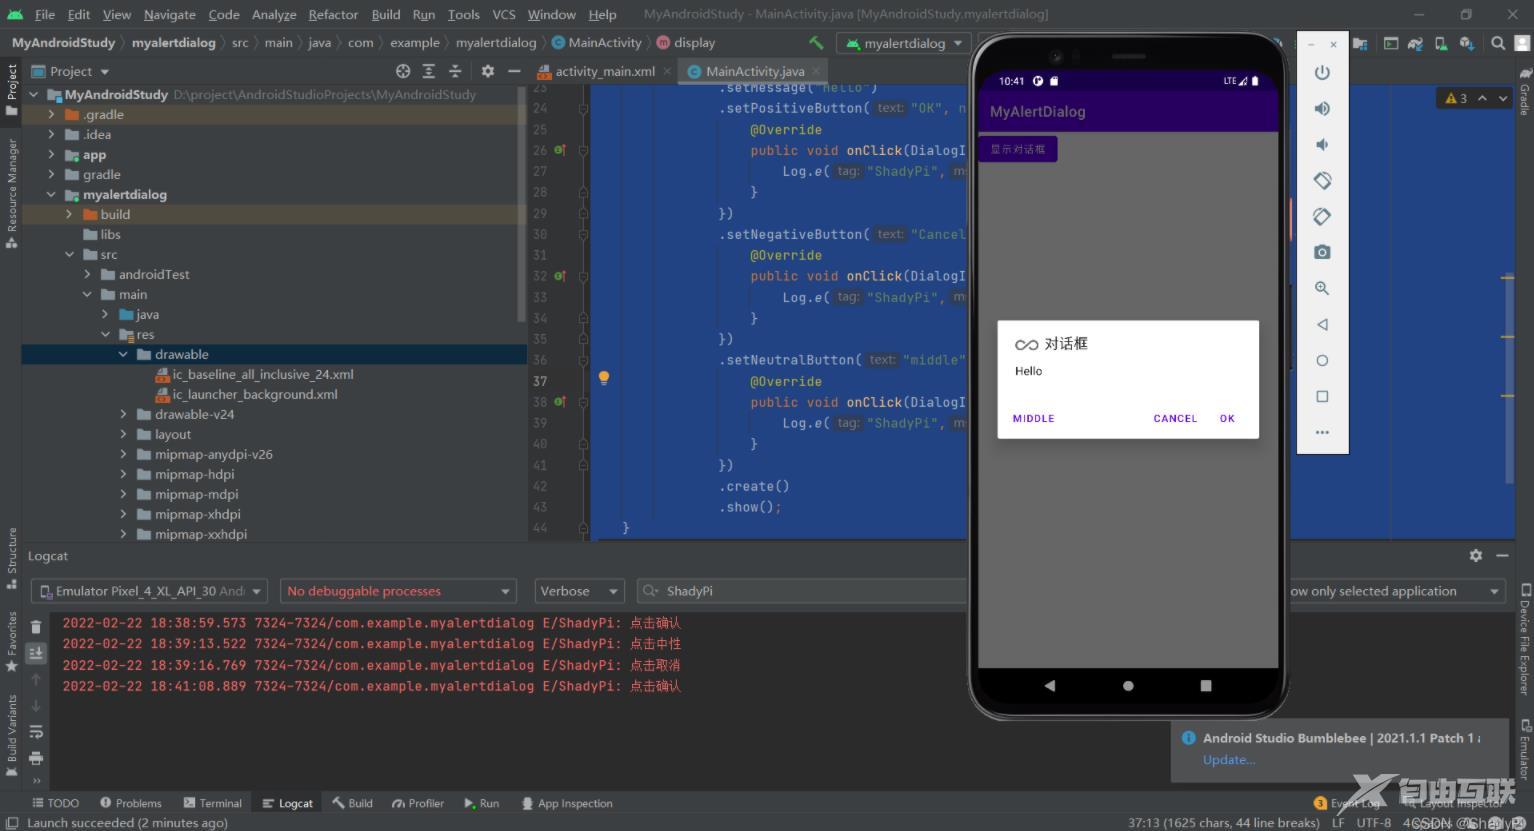
这三个按钮可以根据自己的需要进行取舍与设置。
设置自定义布局
在layout文件夹中新建资源文件:

随便添加一点ImageView和TextView:
<?xml version="1.0" encoding="utf-8"?>
<LinearLayout xmlns:android="http://schemas.android.com/apk/res/android"
    android:layout_width="match_parent"
    android:layout_height="match_parent"
    android:background="@color/purple_500"
    android:orientation="horizontal">

    <ImageView
        android:src="@mipmap/ic_launcher"
        android:layout_width="wrap_content"
        android:layout_height="wrap_content"/>

    <TextView
        android:text="Android"
        android:layout_width="wrap_content"
        android:layout_height="wrap_content"/>

</LinearLayout>
在java代码中利用该资源文件生成一个View:
View dialog_view=getLayoutInflater().inflate(R.layout.dialog_view,null);
之后就可以将对话框的步距设置为该View了:
.setView(dialog_view)

MainActivity.java完整代码:
package com.example.myalertdialog;

import androidx.appcompat.app.AlertDialog;
import androidx.appcompat.app.AppCompatActivity;

import android.content.DialogInterface;
import android.os.Bundle;
import android.util.Log;
import android.view.View;

public class MainActivity extends AppCompatActivity {

    @Override
    protected void onCreate(Bundle savedInstanceState) {
        super.onCreate(savedInstanceState);
        setContentView(R.layout.activity_main);
    }

    public void display(View view) {

        View dialog_view=getLayoutInflater().inflate(R.layout.dialog_view,null);

        AlertDialog.Builder builder=new AlertDialog.Builder(this);
        builder.setIcon(R.drawable.ic_baseline_all_inclusive_24)
                .setTitle("对话框")
                .setMessage("Hello")
                .setPositiveButton("OK", new DialogInterface.OnClickListener() {
                    @Override
                    public void onClick(DialogInterface dialogInterface, int i) {
                        Log.e("ShadyPi","点击确认");
                    }
                })
                .setNegativeButton("Cancel", new DialogInterface.OnClickListener() {
                    @Override
                    public void onClick(DialogInterface dialogInterface, int i) {
                        Log.e("ShadyPi","点击取消");
                    }
                })
                .setNeutralButton("middle", new DialogInterface.OnClickListener() {
                    @Override
                    public void onClick(DialogInterface dialogInterface, int i) {
                        Log.e("ShadyPi","点击中性");
                    }
                })
                .setView(dialog_view)
                .create()
                .show();
    }
}
以上就是本文的全部内容,希望对大家的学习有所帮助,也希望大家多多支持自由互联。