目录 实现原理: 思路: 重写adView 方法 确保每个子View的测量属性宽度填满父组件 重写onLayout 方法是关键 源码 先上效果图 源码 github.com/woshiwzy/Ca 实现原理: 1.继承LinearLayout 2.重写on
目录
- 实现原理:
- 思路:
- 重写adView 方法
- 确保每个子View的测量属性宽度填满父组件
- 重写onLayout 方法是关键
- 源码
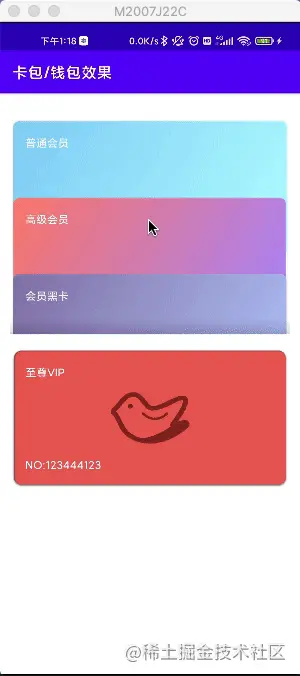
先上效果图
源码 github.com/woshiwzy/Ca…
实现原理:
1.继承LinearLayout
2.重写onLayout,onMeasure 方法
3.利用ValueAnimator 实施动画
4.在动画回调中requestLayout 实现动画效果
思路:
1.用Bounds 对象记录每一个CardView 对象的初始位置,当前位置,运动目标位置
2.点击时计算出对应的view以及可能会产生关联运动的View的运动的目标位置,从当前位置运动到目标位置,然后以这2个位置作为动画参数实施ValueAnimator动画,在动画回调中触发onLayout,达到动画的效果。
重写adView 方法
确保新添加的在这里确保所有的子view 都有一个初始化的bounds位置
   @Override
    public void addView(View child, ViewGroup.LayoutParams params) {
        super.addView(child, params);
        Bounds bounds = getBunds(getChildCount());
    }
确保每个子View的测量属性宽度填满父组件
    boolean mesured = false;
    @Override
    protected void onMeasure(int widthMeasureSpec, int heightMeasureSpec) {
        super.onMeasure(widthMeasureSpec, heightMeasureSpec);
        if (mesured == true) {//只需要测量一次
            return;
        }
        mesured = true;
        int childCount = getChildCount();
        int rootWidth = getWidth();
        int rootHeight = getHeight();
        if (childCount > 0) {
            View child0 = getChildAt(0);
            int modeWidth = MeasureSpec.getMode(child0.getMeasuredWidth());
            int sizeWidth = MeasureSpec.getSize(child0.getMeasuredWidth());

            int modeHeight = MeasureSpec.getMode(child0.getMeasuredHeight());
            int sizeHeight = MeasureSpec.getSize(child0.getMeasuredHeight());

            if (childCount > 0) {
                for (int i = 0; i < childCount; i++) {
                    View childView = getChildAt(i);
                    childView.measure(MeasureSpec.makeMeasureSpec(sizeWidth, MeasureSpec.EXACTLY), MeasureSpec.makeMeasureSpec(sizeHeight, MeasureSpec.EXACTLY));
                    int top = (int) (i * (sizeHeight * carEvPercnet));
                    getBunds(i).setTop(top);
                    getBunds(i).setCurrentTop(top);
                    getBunds(i).setLastCurrentTop(top);
                    getBunds(i).setHeight(sizeHeight);
                }

            }

        }
    }
重写onLayout 方法是关键
是动画触发的主要目的,这里layout参数并不是写死的,而是计算出来的(通过ValueAnimator 计算出来的)
@Override
    protected void onLayout(boolean changed, int sl, int st, int sr, int sb) {
        int childCount = getChildCount();
        if (childCount > 0) {
            for (int i = 0; i < childCount; i++) {
                View view = getChildAt(i);
                int mWidth = view.getMeasuredWidth();
                int mw = MeasureSpec.getSize(mWidth);
                int l = 0, r = l + mw;
                view.layout(l, getBunds(i).getCurrentTop(), r, getBunds(i).getCurrentTop() + getBunds(i).getHeight());
            }
        }
    }
源码
github: github.com/woshiwzy/Ca…
到此这篇关于Android 实现卡片堆叠钱包管理效果(带动画)的文章就介绍到这了,更多相关Android 卡片堆叠钱包管理效果内容请搜索自由互联以前的文章或继续浏览下面的相关文章希望大家以后多多支持自由互联!