作者:京东物流 王北永 姚再毅
1 背景
日常开发过程中,尤其在DDD过程中,经常遇到VO/MODEL/PO等领域模型的相互转换。此时我们会一个字段一个字段进行set|get设置。要么使用工具类进行暴力的属性拷贝,在这个暴力属性拷贝过程中好的工具更能提高程序的运行效率,反之引起性能低下、隐藏细节设置OOM等极端情况出现。
2 现有技术
3 扩展设计
3.1 mapstruct介绍
本扩展组件基于mapstruct进行扩展,简单介绍mapstruct实现原理。
mapstruct是基于JSR 269实现的,JSR 269是JDK引进的一种规范。有了它,能够实现在编译期处理注解,并且读取、修改和添加抽象语法树中的内容。JSR 269使用Annotation Processor在编译期间处理注解,Annotation Processor相当于编译器的一种插件,因此又称为插入式注解处理。
我们知道,java的类加载机制是需要通过编译期运行期。如下图所示

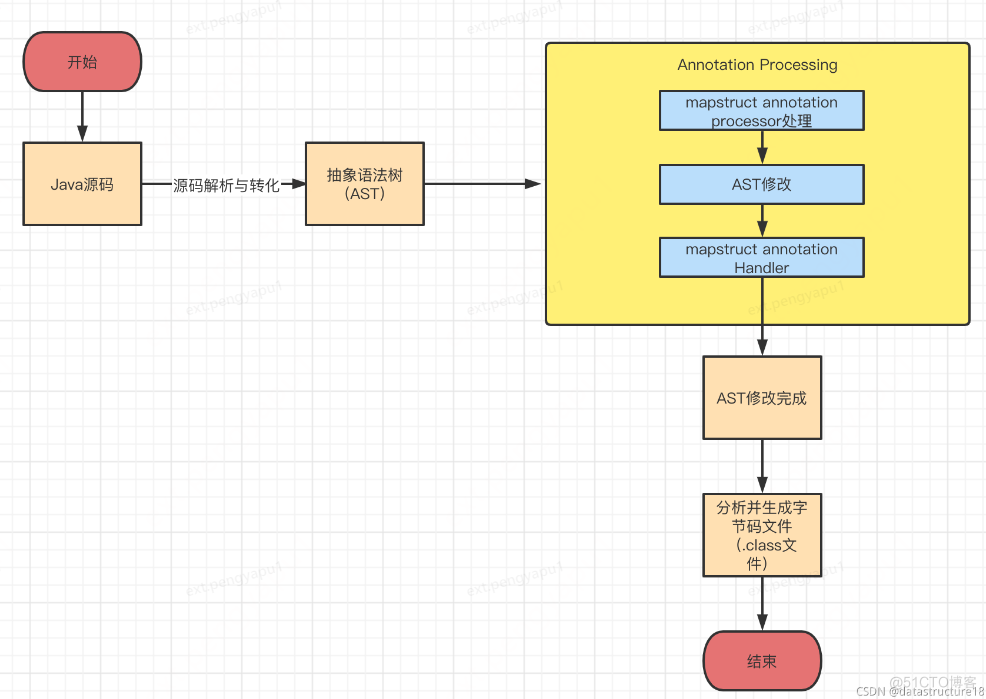
mapstruct正是在上面的编译期编译源码的过程中,通过修改语法树二次生成字节码,如下图所示

以上大概可以概括如下几个步骤:
1、生成抽象语法树。Java编译器对Java源码进行编译,生成抽象语法树(Abstract Syntax Tree,AST)。
2、调用实现了JSR 269 API的程序。只要程序实现了JSR 269 API,就会在编译期间调用实现的注解处理器。
3、修改抽象语法树。在实现JSR 269 API的程序中,可以修改抽象语法树,插入自己的实现逻辑。
4、生成字节码。修改完抽象语法树后,Java编译器会生成修改后的抽象语法树对应的字节码文件件。
从mapstruct实现原理来看,我们发现mapstruct属性转换逻辑清晰,具备良好的扩展性,问题是需要单独写一层转换接口或者添加一个转换方法。能否将转换接口或者方法做到自动扩展呢?
3.2 改进方案
上面所说mapstruct方案,有个弊端。就是如果有新的领域模型转换,我们不得不手动写一层转换接口,如果出现A/B两个模型互转,一般需定义四个方法:A->B、B->A、List<A>->List<B>、List<B>->List<A>
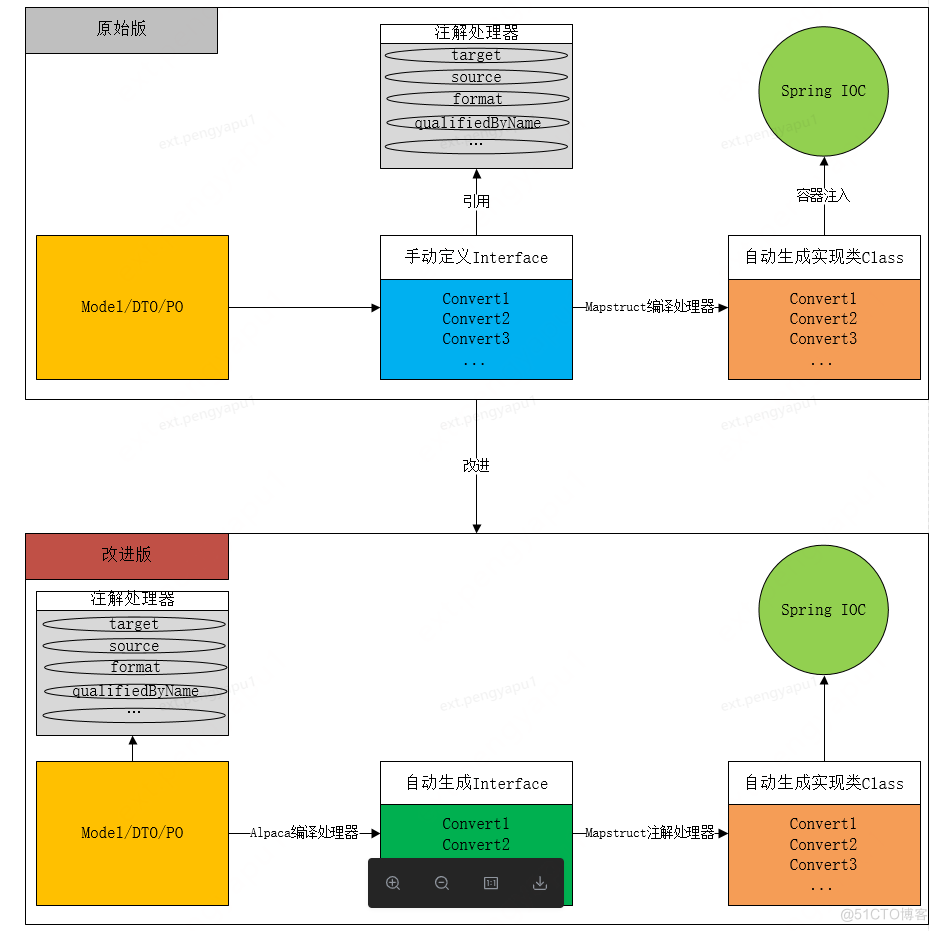
鉴于此,本方案通过将原mapstruct定义在转换接口类注解和转换方法的注解,通过映射,形成新包装注解。将此注解直接定义在模型的类或者字段上,然后根据模型上的自定义注解直接编译期生成转换接口,然后mapstruct根据自动生成的接口再次生成具体的转换实现类。
注意:自动生成的接口中类和方法的注解为原mapstruct的注解,所以mapstruct原有功能上没有丢失。详细调整如下图:

4 实现
4.1 技术依赖
1)继承AbstractProcessor类,并且重写process方法,在process方法中实现自己的注解处理逻辑。
2)在META-INF/services目录下创建javax.annotation.processing.Processor文件注册自己实现的
2. 谷歌AutoService:AutoService是Google开源的用来方便生成符合ServiceLoader规范的开源库,使用非常的简单。只需要增加注解,便可自动生成规范约束文件。
知识点:使用AutoService的好处是帮助我们不需要手动维护Annotation Processor所需要的META-INF文件目录和文件内容。它会自动帮我们生产,使用方法也很简单,只需要在自定义的Annotation Processor类上加上以下注解即可 @AutoService(Processor.class)
1) JavaPoet是一款可以自动生成Java文件的第三方依赖。
2) 简洁易懂的API,上手快。
3) 让繁杂、重复的Java文件,自动化生成,提高工作效率,简化流程。
4.2 实现步骤
- 第一步:自动生成转换接口类所需的枚举,分别为类注解AlpacaMap和字段注解AlpacaMapField。
1) AlpacaMap:定义在类上,属性target指定所转换目标模型;属性uses指定雷专转换过程中所依赖的外部对象。
2)AlpacaMapField:原始mapstruct所支持的所有注解做一次别名包装,使用spring提供的AliasFor注解。
知识点:@AliasFor是Spring框架的一个注解,用于声明注解属性的别名。它有两种不同的应用场景:
注解内的别名
元数据的别名
两者主要的区别在于是否在同一个注解内。
- 第二步:AlpacaMapMapperDescriptor实现。此类主要功能是加载使用第一步定义枚举的所有模型类,然后将类的信息和类Field信息保存起来方便后面直接使用,片段逻辑如下:
AutoMapFieldDescriptor descriptor = new AutoMapFieldDescriptor(); descriptor.target = fillString(alpacaMapField.target()); descriptor.dateFormat = fillString(alpacaMapField.dateFormat()); descriptor.numberFormat = fillString(alpacaMapField.numberFormat()); descriptor.constant = fillString(alpacaMapField.constant()); descriptor.expression = fillString(alpacaMapField.expression()); descriptor.defaultExpression = fillString(alpacaMapField.defaultExpression()); descriptor.ignore = alpacaMapField.ignore(); ..........
- 第三步:AlpacaMapMapperGenerator类主要是通过JavaPoet生成对应的类信息、类注解、类方法以及方法上的注解信息
生成类信息:TypeSpec createTypeSpec(AlpacaMapMapperDescriptor descriptor)生成类注解信息 AnnotationSpec buildGeneratedMapperConfigAnnotationSpec(AlpacaMapMapperDescriptor descriptor) {生成类方法信息: MethodSpec buildMappingMethods(AlpacaMapMapperDescriptor descriptor)生成方法注解信息:List<AnnotationSpec> buildMethodMappingAnnotations(AlpacaMapMapperDescriptor descriptor){
在实现生成类信息过程中,需要指定生成类的接口类AlpacaBaseAutoAssembler,此类主要定义四个方法如下:
public interface AlpacaBaseAutoAssembler<S,T>{ T copy(S source); default List<T> copyL(List<S> sources){ return sources.stream().map(c->copy(c)).collect(Collectors.toList()); } @InheritInverseConfiguration(name = "copy") S reverseCopy(T source); default List<S> reverseCopyL(List<T> sources){ return sources.stream().map(c->reverseCopy(c)).collect(Collectors.toList()); }}
- 第四步:因为生成的类转换器是注入spring容器的。所以需要顶一个专门生成mapstruct注入spring容器的注解,此注解通过类AlpacaMapSpringConfigGenerator自动生成,核心代码如下
private AnnotationSpec buildGeneratedMapperConfigAnnotationSpec() { return AnnotationSpec.builder(ClassName.get("org.mapstruct", "MapperConfig")) .addMember("componentModel", "$S", "spring") .build(); }
- 第五步:通过以上步骤,我们定义好了相关类、相关类的方法、相关类的注解、相关类方法的注解。此时将他们串起来通过Annotation Processor生成类文件输出,核心方法如下
private void writeAutoMapperClassFile(AlpacaMapMapperDescriptor descriptor){ System.out.println("开始生成接口:"+descriptor.sourcePackageName() + "."+ descriptor.mapperName()); try (final Writer outputWriter = processingEnv .getFiler() .createSourceFile( descriptor.sourcePackageName() + "."+ descriptor.mapperName()) .openWriter()) { alpacaMapMapperGenerator.write(descriptor, outputWriter); } catch (IOException e) { processingEnv .getMessager() .printMessage( ERROR, "Error while opening "+ descriptor.mapperName() + " output file: " + e.getMessage()); } }
知识点:在javapoet中核心类第一大概有一下几个类,可参考如下:
JavaFile 用于构造输出包含一个顶级类的Java文件, 是对.java文件的抽象定义
TypeSpec TypeSpec是类/接口/枚举的抽象类型
MethodSpec MethodSpec是方法/构造函数的抽象定义
FieldSpec FieldSpec是成员变量/字段的抽象定义
ParameterSpec ParameterSpec用于创建方法参数
AnnotationSpec AnnotationSpec用于创建标记注解
5 实践
下面举例说明如何使用,在这里我们定义一个模型Person和模型Student,其中涉及字段转换的普通字符串、枚举、时间格式化和复杂的类型换砖,具体运用如下步骤。
5.1 引入依赖
<dependency> <groupId>com.jdl</groupId> <artifactId>alpaca-mapstruct-processor</artifactId> <version>1.1-SNAPSHOT</version> </dependency>
5.2 对象定义
uses方法必须为正常的spring容器中的bean,此bean提供@Named注解的方法可供类字段注解AlpacaMapField中的qualifiedByName 属性以字符串的方式指定,如下图所示
@Data@AlpacaMap(targetType = Student.class,uses = {Person.class})@Servicepublic class Person { private String make; private SexType type; @AlpacaMapField(target = "age") private Integer sax; @AlpacaMapField(target="dateStr" ,dateFormat = "yyyy-MM-dd") private Date date; @AlpacaMapField(target = "brandTypeName",qualifiedByName ="convertBrandTypeName") private Integer brandType; @Named("convertBrandTypeName") public String convertBrandTypeName(Integer brandType){ return BrandTypeEnum.getDescByValue(brandType); } @Named("convertBrandTypeName") public Integer convertBrandType(String brandTypeName){ return BrandTypeEnum.getValueByDesc(brandTypeName); }}
5.3 生成结果
使用maven打包或者编译后观察,此时在target/generated-source/annotatins目录中生成两个文件PersonToStudentAssembler和PersonToStudentAssemblerImpl
类文件PersonToStudentAssembler 是由自定义注解器自动生成,内容如下
@Mapper( config = AutoMapSpringConfig.class, uses = {Person.class})public interface PersonToStudentAssembler extends AlpacaBaseAutoAssembler<Person, Student> { @Override @Mapping( target = "age", source = "sax", ignore = false ) @Mapping( target = "dateStr", dateFormat = "yyyy-MM-dd", source = "date", ignore = false ) @Mapping( target = "brandTypeName", source = "brandType", ignore = false, qualifiedByName = "convertBrandTypeName" ) Student copy(final Person source);}
PersonToStudentAssemblerImpl是mapstruct根据PersonToStudentAssembler接口注解器自动生成,内容如下
@Componentpublic class PersonToStudentAssemblerImpl implements PersonToStudentAssembler { @Autowired private Person person; @Override public Person reverseCopy(Student arg0) { if ( arg0 == null ) { return null; } Person person = new Person(); person.setSax( arg0.getAge() ); try { if ( arg0.getDateStr() != null ) { person.setDate( new SimpleDateFormat( "yyyy-MM-dd" ).parse( arg0.getDateStr() ) ); } } catch ( ParseException e ) { throw new RuntimeException( e ); } person.setBrandType( person.convertBrandType( arg0.getBrandTypeName() ) ); person.setMake( arg0.getMake() ); person.setType( arg0.getType() ); return person; } @Override public Student copy(Person source) { if ( source == null ) { return null; } Student student = new Student(); student.setAge( source.getSax() ); if ( source.getDate() != null ) { student.setDateStr( new SimpleDateFormat( "yyyy-MM-dd" ).format( source.getDate() ) ); } student.setBrandTypeName( person.convertBrandTypeName( source.getBrandType() ) ); student.setMake( source.getMake() ); student.setType( source.getType() ); return student; }}
5.4 Spring容器引用
此时在我们的spring容器中可直接@Autowired引入接口PersonToStudentAssembler实例进行四种维护数据相互转换
AnnotationConfigApplicationContext applicationContext = new AnnotationConfigApplicationContext(); applicationContext.scan("com.jdl.alpaca.mapstruct"); applicationContext.refresh(); PersonToStudentAssembler personToStudentAssembler = applicationContext.getBean(PersonToStudentAssembler.class); Person person = new Person(); person.setMake("make"); person.setType(SexType.BOY); person.setSax(100); person.setDate(new Date()); person.setBrandType(1); Student student = personToStudentAssembler.copy(person); System.out.println(student); System.out.println(personToStudentAssembler.reverseCopy(student)); List<Person> personList = Lists.newArrayList(); personList.add(person); System.out.println(personToStudentAssembler.copyL(personList)); System.out.println(personToStudentAssembler.reverseCopyL(personToStudentAssembler.copyL(personList)));
控制台打印:
personToStudentStudent(make=make, type=BOY, age=100, dateStr=2022-11-09, brandTypeName=集团KA)studentToPersonPerson(make=make, type=BOY, sax=100, date=Wed Nov 09 00:00:00 CST 2022, brandType=1)personListToStudentList[Student(make=make, type=BOY, age=100, dateStr=2022-11-09, brandTypeName=集团KA)]studentListToPersonList[Person(make=make, type=BOY, sax=100, date=Wed Nov 09 00:00:00 CST 2022, brandType=1)]
注意:
- qualifiedByName注解属性使用不太友好,如果使用到此属性时,需要定义反转类型转换函数。因为在前面我们定义的抽象接口AlpacaBaseAutoAssembler有如下图一个注解,从目的对象到源对象的反转映射,因为java的重载性,同名不同参非同一个方法,所以在S转T的时候回找不到此方法。故需要自行定义好转换函数
@InheritInverseConfiguration(name = "copy")
比如从S转换T会使用第一个方法,从T转S的时候必须定义一个同名Named注解的方法,方法参数和前面方法是入参变出参、出参变入参。
@Named("convertBrandTypeName") public String convertBrandTypeName(Integer brandType){ return BrandTypeEnum.getDescByValue(brandType); } @Named("convertBrandTypeName") public Integer convertBrandType(String brandTypeName){ return BrandTypeEnum.getValueByDesc(brandTypeName); }
- 在使用qualifiedByName注解时,指定的Named注解方法必须定义为spring容器可管理的对象,并需要通过模型类注解属性used引入此对象Class
知识点:
InheritInverseConfiguration功能很强大,可以逆向映射,从上面PersonToStudentAssemblerImpl看到上面属性sax可以正映射到sex,逆映射可自动从sex映射到sax。但是正映射的@Mapping#expression、#defaultExpression、#defaultValue和#constant会被逆映射忽略。此外某个字段的逆映射可以被ignore,expression或constant覆盖
6 结束语
参考文档:
https://github.com/google/auto/tree/master/service
https://mapstruct.org/
https://github.com/square/javapoet
