Conditional注解解析
- 含义:基于条件的注解
- 作用:根据是否满足某个特定条件来决定是否创建某个特定的bean
- 意义:是SpringBoot实现自动配置的关键基础能力
@Conditional表示仅当所有指定条件都匹配时,组件才有资格注册 。 该@Conditional注释可以在以下任一方式使用:
- 作为任何@Bean方法的方法级注释
- 作为任何类的直接或间接注释的类型级别注释 @Component,包括@Configuration类
- 作为元注释,目的是组成自定义构造型注释
该注解主要源码之一,通过match匹配,符合条件才装载到Spring容器
@Target({ElementType.TYPE, ElementType.METHOD}) @Retention(RetentionPolicy.RUNTIME) @Documented public @interface Conditional { /** * All {@link Condition Conditions} that must {@linkplain Condition#matches match} * in order for the component to be registered. */ Class<? extends Condition>[] value(); } @FunctionalInterface public interface Condition { /** * Determine if the condition matches. * @param context the condition context * @param metadata metadata of the {@link org.springframework.core.type.AnnotationMetadata class} * or {@link org.springframework.core.type.MethodMetadata method} being checked * @return {@code true} if the condition matches and the component can be registered, * or {@code false} to veto the annotated component's registration */ boolean matches(ConditionContext context, AnnotatedTypeMetadata metadata); } class ProfileCondition implements Condition { @Override public boolean matches(ConditionContext context, AnnotatedTypeMetadata metadata) { MultiValueMap<String, Object> attrs = metadata.getAllAnnotationAttributes(Profile.class.getName()); if (attrs != null) { for (Object value : attrs.get("value")) { if (context.getEnvironment().acceptsProfiles(Profiles.of((String[]) value))) { return true; } } return false; } return true; } }作用:总而言之,只有@Conditional指定的条件成立,才给容器添加组件
@Conditional派生注解:@Conditional派生了很多注解,下面给个表格列举一下派生注解的用法
@Conditional派生注解 作用(都是判断是否符合指定的条件) @ConditionalOnJava 系统的java版本是否符合要求 @ConditionalOnBean 有指定的Bean类 @ConditionalOnMissingBean 没有指定的bean类 @ConditionalOnExpression 符合指定的SpEL表达式 @ConditionalOnClass 有指定的类 @ConditionalOnMissingClass 没有指定的类 @ConditionalOnSingleCandidate 容器只有一个指定的bean,或者这个bean是首选bean @ConditionalOnProperty 指定的property属性有指定的值 @ConditionalOnResource 路径下存在指定的资源 @ConditionalOnWebApplication 系统环境是web环境 @ConditionalOnNotWebApplication 系统环境不是web环境 @ConditionalOnjndi JNDI存在指定的项自定义Conditional注解
- 新建MyConditionAnnotation注解,引入Condition实现类
- 新建MyCondition实现Condition,重写matches方法,符合条件返回true
- 新建A类使用@MyConditionAnnotation注解
- 在application.properties中添加属性
- 在测试类中测试
动手搭建starter
starter简介
SpringBoot可以省略SpringFramework众多的繁琐配置,它的众多starter可以说是功不可没。
springboot非常的流行,就是因为starter的存在,starter是springboot的核心,可以理解成可插拔的插件,你想要什么插件配置什么插件就可以,比如我想要使用mybatis,那么配置starter-mybatis就可以。但是有人会说我用mybatis自己导入jar不行吗???实际上starter和jar区别在于,它能够自己实现配置,这样大大提高了开发效率,使得使用spring开发变得非常简单方便。
- starter类似于SpringBoot的可插拔插件
- 与jar包区别:starter能实现自动配置
- 作用:大幅提升开发效率
常用starter
名称 描述 spring-boot-starter-thymeleaf 使MVC Web applications 支持Thymeleaf spring-boot-starter-mail 使用Java Mail、Spring email发送支持 spring-boot-starter-data-redis 通过Spring Data Redis 、Jedis client使用Redis键值存储数据库 spring-boot-starter-web 构建Web,包含RESTful风格框架SpringMVC和默认的嵌入式容器Tomcat spring-boot-starter-activemq 为JMS使用Apache ActiveMQ spring-boot-starter-data-elasticsearch 使用Elasticsearch、analytics engine、Spring Data Elasticsearch spring-boot-starter-aop 通过Spring AOP、AspectJ面向切面编程 spring-boot-starter-security 使用 Spring Security spring-boot-starter-data-jpa 通过 Hibernate 使用 Spring Data JPA spring-boot-starter Core starter,包括 自动配置支持、 logging and YAML spring-boot-starter-freemarker 使MVC Web applications 支持 FreeMarker spring-boot-starter-batch 使用Spring Batch spring-boot-starter-data-solr 通过 Spring Data Solr 使用 Apache Solr spring-boot-starter-data-mongodb 使用 MongoDB 文件存储数据库、Spring Data MongoDB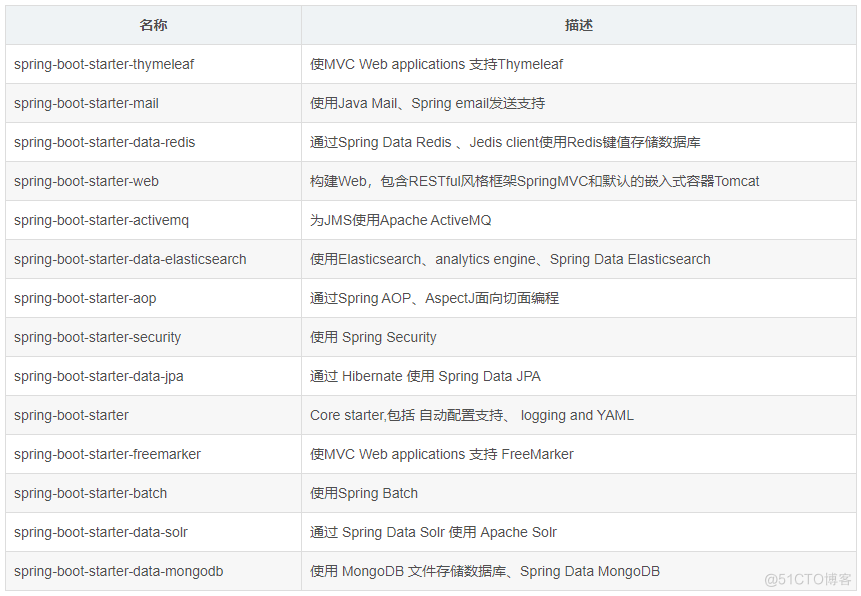
手写starter
新建一个starter
首先我们在IDEA中通过Spring Initializer新建一个weather-starter的SpringBoot项目,然后我们可以在其他SpringBoot项目中作为依赖引入.
- 1、修改weather-starter的pom文件,命名合理一点
- 2、新建一个类作为属性源,读取配置
- 3、新建一个AutoConfiguration自动配置类,用来让SpringBoot依据它自动配置
- 4、写一个类用来对外提供服务
- 5、利用SPI机制,在resources目录下新建一个META-INF目录,新建一个spring.factories文件,内容如下:
- 6、一切完毕之后,需要将我们的starter打包发布,让别人使用,本地使用的话可以通过maven helper插件install到本地仓库,也可以直接使用命令行打包
使用Starter
- 1、在pom文件中引入依赖
- 2、在application.properties中编写配置,用来配置自动配置类
- 3、可以直接注入自动配置类中提供的服务
starter原理解析
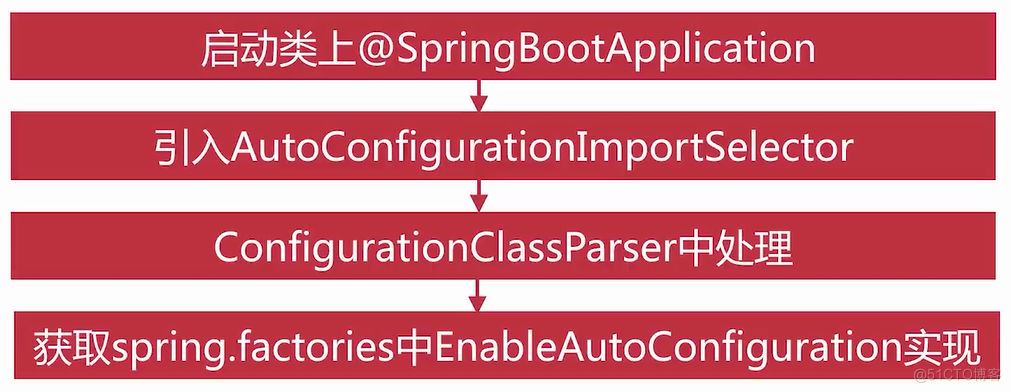
spring-boot启动的时候会找到starter jar包中的resources/META-INF/spring.factories文件,根据spring.factories文件中的配置,找到需要自动配置的类
字段配置的原理就是这边,在之前的SpringBoot--配置类解析已经分析过了,它会将容器中配置的自动配置类加载进来,见下图, // 这就引入了我们自己的WeatherAutoConfigration
public class AutoConfigurationImportSelector implements DeferredImportSelector, BeanClassLoaderAware, ResourceLoaderAware, BeanFactoryAware, EnvironmentAware, Ordered { protected AutoConfigurationEntry getAutoConfigurationEntry(AutoConfigurationMetadata autoConfigurationMetadata, AnnotationMetadata annotationMetadata) { if (!isEnabled(annotationMetadata)) { return EMPTY_ENTRY; } AnnotationAttributes attributes = getAttributes(annotationMetadata); List<String> configurations = getCandidateConfigurations(annotationMetadata, attributes); configurations = removeDuplicates(configurations); Set<String> exclusions = getExclusions(annotationMetadata, attributes); checkExcludedClasses(configurations, exclusions); configurations.removeAll(exclusions); configurations = filter(configurations, autoConfigurationMetadata); fireAutoConfigurationImportEvents(configurations, exclusions); return new AutoConfigurationEntry(configurations, exclusions); } }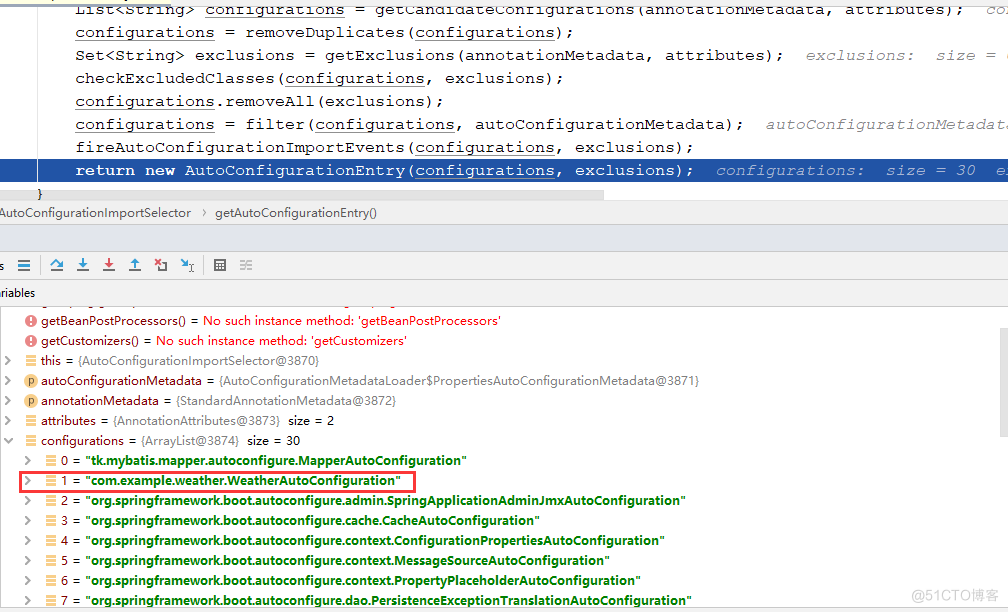
starter自动配置类导入
starter过滤
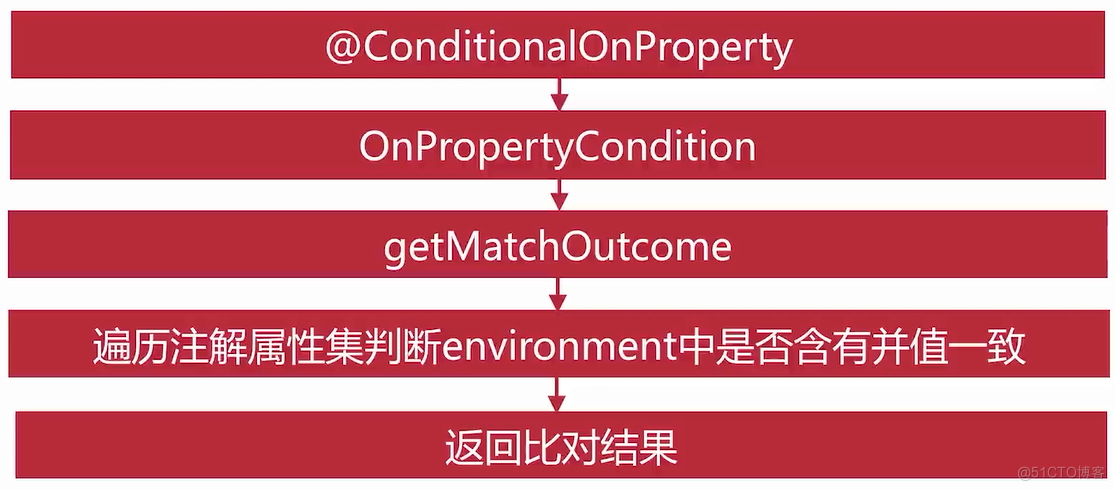
我们发现WeatherAutoConfiguration自动配置类上面使用的是@ConditionalOnProperty注解,点进去看它用来判断的类是OnPropertyCondition,而OnPropertyCondition实现了SpringBootCondition接口,那么我们先看SpringBootCondition中的matches方法
@Configuration @EnableConfigurationProperties({WeatherSource.class}) @ConditionalOnProperty( name = {"weather.enable"}, havingValue = "enable" ) public class WeatherAutoConfiguration {} @Retention(RetentionPolicy.RUNTIME) @Target({ ElementType.TYPE, ElementType.METHOD }) @Documented @Conditional(OnPropertyCondition.class) public @interface ConditionalOnProperty { @Order(Ordered.HIGHEST_PRECEDENCE + 40) class OnPropertyCondition extends SpringBootCondition {} public abstract class SpringBootCondition implements Condition { private final Log logger = LogFactory.getLog(getClass()); @Override public final boolean matches(ConditionContext context, AnnotatedTypeMetadata metadata) { String classOrMethodName = getClassOrMethodName(metadata); try { // 这边调用子类实现的getMatchOutcome方法得到ConditionOutcome // 看了下ConditionOutcome,它只是封装了判断结果和分析,所以我们直接看OnPropertyCondition的getMatchOutCome方法 ConditionOutcome outcome = getMatchOutcome(context, metadata); logOutcome(classOrMethodName, outcome); recordEvaluation(context, classOrMethodName, outcome); return outcome.isMatch(); } catch (NoClassDefFoundError ex) { throw new IllegalStateException("Could not evaluate condition on " + classOrMethodName + " due to " + ex.getMessage() + " not " + "found. Make sure your own configuration does not rely on " + "that class. This can also happen if you are " + "@ComponentScanning a springframework package (e.g. if you " + "put a @ComponentScan in the default package by mistake)", ex); } catch (RuntimeException ex) { throw new IllegalStateException("Error processing condition on " + getName(metadata), ex); } } } public class ConditionOutcome { private final boolean match; private final ConditionMessage message; }接下来我们看OnPropertyCondition的getMatchOutcome方法
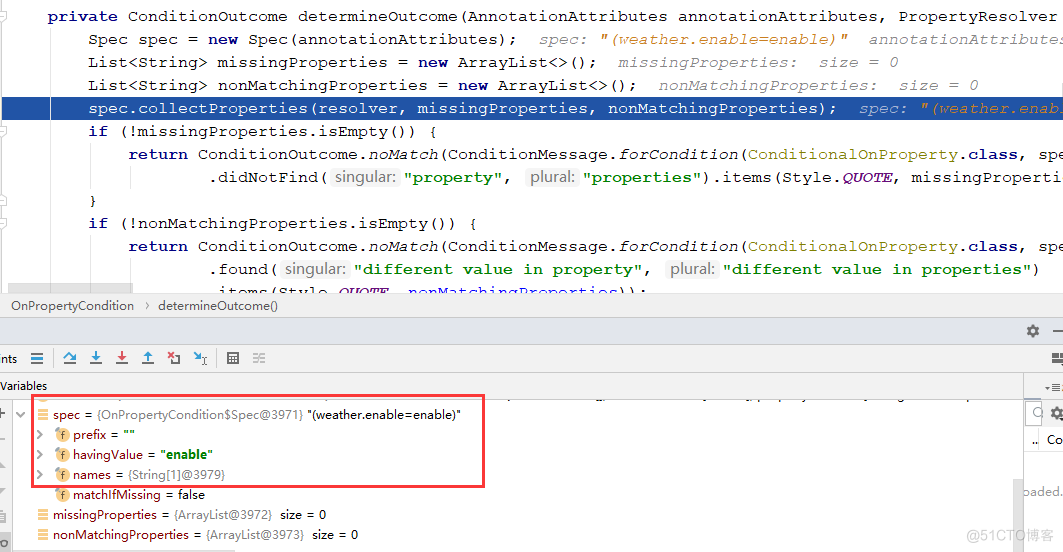
@Override public ConditionOutcome getMatchOutcome(ConditionContext context, AnnotatedTypeMetadata metadata) { // 首先获取@ConditionalOnProperty注解上的属性,如下图 List<AnnotationAttributes> allAnnotationAttributes = annotationAttributesFromMultiValueMap( metadata.getAllAnnotationAttributes(ConditionalOnProperty.class.getName())); // 构造noMatch、match集合,noMatch表示那个注解的属性没有满足 List<ConditionMessage> noMatch = new ArrayList<>(); List<ConditionMessage> match = new ArrayList<>(); // 依次遍历这些注解 for (AnnotationAttributes annotationAttributes : allAnnotationAttributes) { // 对每个注解,遍历其属性判断符不符合,返回outcome结果,下面我们也是重点看这个方法 ConditionOutcome outcome = determineOutcome(annotationAttributes, context.getEnvironment()); (outcome.isMatch() ? match : noMatch).add(outcome.getConditionMessage()); } if (!noMatch.isEmpty()) { return ConditionOutcome.noMatch(ConditionMessage.of(noMatch)); } return ConditionOutcome.match(ConditionMessage.of(match)); }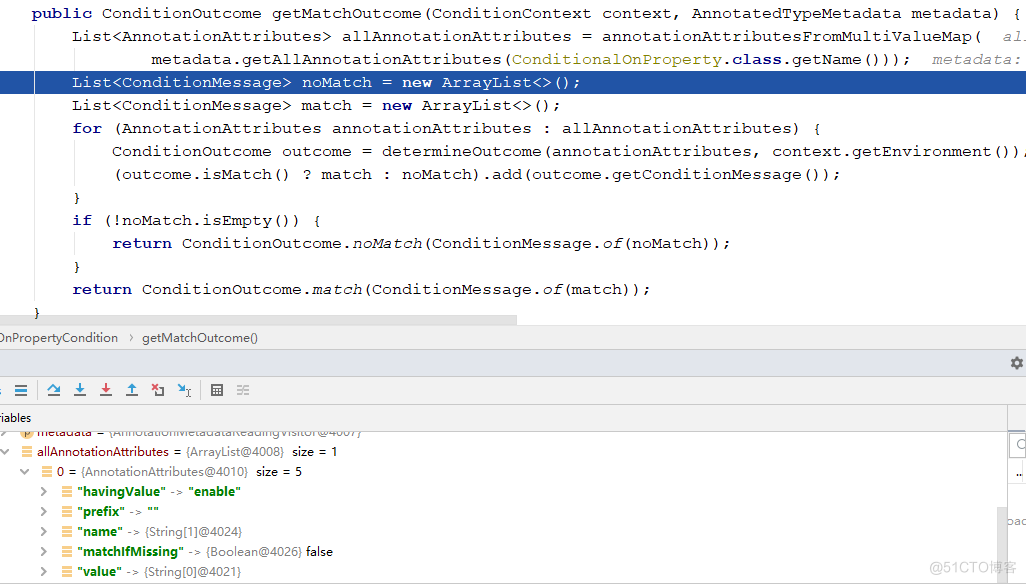 继续跟进determineOutcome(annotationAttributes, context.getEnvironment())方法
starter自动配置类过滤
参考: https://www.cnblogs.com/mzq123/p/11874128.html
https://my.oschina.net/liwanghong/blog/3168503