1. 测试案例
1.1 引入依赖
<!-- https://mvnrepository.com/artifact/org.springframework/spring-webmvc --><dependency> <groupId>org.springframework</groupId> <artifactId>spring-webmvc</artifactId> <version>5.3.5</version></dependency><!-- https://mvnrepository.com/artifact/org.apache.tomcat.embed/tomcat-embed-core --><dependency> <groupId>org.apache.tomcat.embed</groupId> <artifactId>tomcat-embed-core</artifactId> <version>8.5.64</version></dependency><!-- https://mvnrepository.com/artifact/org.apache.tomcat.embed/tomcat-embed-jasper --><dependency> <groupId>org.apache.tomcat.embed</groupId> <artifactId>tomcat-embed-jasper</artifactId> <version>8.5.64</version></dependency>1.2 Servlet处理类
public class HelloServlet extends HttpServlet { @Override protected void doGet(HttpServletRequest req, HttpServletResponse resp) throws ServletException, IOException { doPost(req, resp); } @Override protected void doPost(HttpServletRequest req, HttpServletResponse resp) throws ServletException, IOException { resp.getWriter().write("hello tomcat"); }}1.3 启动类
public class Main { public static void main(String[] args) throws LifecycleException { //自己写Tomcat的启动源码 Tomcat tomcat = new Tomcat(); tomcat.setPort(8888); tomcat.setHostname("localhost"); tomcat.setBaseDir("."); Context context = tomcat.addWebapp("/boot", System.getProperty("user.dir") + "/src/main"); //给Tomcat里面添加一个Servlet Wrapper hello = tomcat.addServlet("/boot", "hello", new HelloServlet()); hello.addMapping("/66"); //指定处理的请求 tomcat.start(); //启动tomcat 注解版MVC利用Tomcat SPI机制 tomcat.getServer().await(); //服务器等待 }}直接运行main方法,在浏览器中输入 http://localhost:8888/boot/66 ,输出为:
hello tomcat以上只是一个Tomcat的启动并使用HelloServlet处理一个请求的案例。下面我们结合SpringMVC,看如何优雅的启动。
2. 嵌入式Tomcat启动SpringMVC
2.1 最简单的方法
public class Main { public static void main(String[] args) throws LifecycleException { //自己写Tomcat的启动源码 Tomcat tomcat = new Tomcat(); tomcat.setPort(8888); tomcat.setHostname("localhost"); tomcat.setBaseDir("."); Context context = tomcat.addWebapp("/boot", System.getProperty("user.dir") + "/src/main"); //自己创建 DispatcherServlet 对象,并且创建ioc容器,DispatcherServlet里面有ioc容器 DispatcherServlet servlet = new DispatcherServlet(); Wrapper hello = tomcat.addServlet("/boot", "hello", servlet); tomcat.start(); //启动tomcat 注解版MVC利用Tomcat SPI机制 tomcat.getServer().await(); //服务器等待 }}当然,如果使用这种方法启动,需要自己往容器中注入DispatcherServlet的各种初始化(九大组件等),所以这种方式比较麻烦,我们不采用这种方式。
2.2 Tomcat的SPI机制启动
利用tomcat的SPI启动机制,SPI机制下 QuickAppStarter生效创建 ioc容器配置DispatcherServlet等各种组件。代码如下:
Main.java:
public class Main { public static void main(String[] args) throws LifecycleException { //自己写Tomcat的启动源码 Tomcat tomcat = new Tomcat(); tomcat.setPort(8888); tomcat.setHostname("localhost"); tomcat.setBaseDir("."); Context context = tomcat.addWebapp("/boot", System.getProperty("user.dir") + "/src/main"); tomcat.start(); //启动tomcat 注解版MVC利用Tomcat SPI机制 tomcat.getServer().await(); //服务器等待 }}QuickAppStarter类:
/** * 最快速的整合注解版SpringMVC和Spring的 */public class QuickAppStarter extends AbstractAnnotationConfigDispatcherServletInitializer { @Override //根容器的配置(Spring的配置文件===Spring的配置类) protected Class<?>[] getRootConfigClasses() { return new Class<?>[]{SpringConfig.class}; } @Override //web容器的配置(SpringMVC的配置文件===SpringMVC的配置类) protected Class<?>[] getServletConfigClasses() { return new Class<?>[]{SpringMVCConfig.class}; } @Override //Servlet的映射,DispatcherServlet的映射路径 protected String[] getServletMappings() { return new String[]{"/"}; } @Override protected void customizeRegistration(ServletRegistration.Dynamic registration) {// super.customizeRegistration(registration);// registration.addMapping("");// }}启动后,在浏览器访问http://localhost:8888/boot/hello66 ,输出为:
66666666~~~~~SpringBoot就是采用上面的这种方式来启动Tomcat的。SpringBoot封装了功能的自动配置,导入各种starter依赖,SpringBoot封装了很多的自动配置,帮我们给容器中放了很多组件。
3. @SpringBootApplication 注解原理
1.@SpringBootApplication注解
对于Springboot项目,它有一个启动类。一般如下(此处以Springboot演示案例为例):
@SpringBootApplicationpublic class DemoSpringbootApplication{ public static void main(String[] args) { SpringApplication.run(DemoSpringbootApplication.class, args); }}从上述代码里看出,启动类引用了一个注解 @SpringBootApplication,而@SpringBootApplication实际上是一个复合注解,它的类定义如下所示:
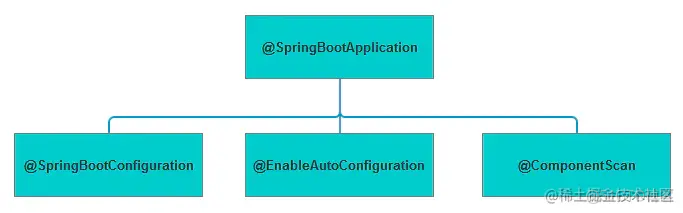
@Target(ElementType.TYPE) @Retention(RetentionPolicy.RUNTIME)@Documented @Inherited @SpringBootConfiguration // 继承了Configuration,表示当前是注解类@EnableAutoConfiguration // 开启自动配置@ComponentScan(excludeFilters = { // 扫描组件 @Filter(type = FilterType.CUSTOM, classes = TypeExcludeFilter.class), @Filter(type = FilterType.CUSTOM, classes = AutoConfigurationExcludeFilter.class) })public @interface SpringBootApplication {...}实际上 @SpringBootApplication内的核心注解有三个: @SpringBootConfiguration, @EnableAutoConfiguration, @ComponentScan
3.1 @SpringBootConfiguration
@SpringBootConfiguration实际上是引入的@Configuration,而@Configuration是Spring的注解类,用于定义配置类,并会将当前类内声明的一个或多个以@Bean注解标记的方法的实例纳入到srping容器中,并且实例名就是方法名,等同于spring的XML配置文件。
@Target({ElementType.TYPE})@Retention(RetentionPolicy.RUNTIME)@Documented@Configurationpublic @interface SpringBootConfiguration {}@Configuration与XML配置的简单对比如下:
@Configurationpublic class SpringDemo{}等价于XML形式的<beans></beans>:
<?xml version="1.0" encoding="UTF-8" ?><beans xmlns="http://www.springframework.org/schema/beans" xmlns:xsi="http://www.w3.org/2001/XMLSchema-instance" xsi:schemaLocation="http://www.springframework.org/schema/beans http://www.springframework.org/schema/beans/spring-beans-3.0.xsd"></beans>3.2 @EnableAutoConfiguration
@EnableAutoConfiguration是借助@Import的帮助,将所有符合自动配置条件的bean定义加载到IoC容器,它也是复合注解,定义如下所示:
@Target({ElementType.TYPE})@Retention(RetentionPolicy.RUNTIME)@Documented@Inherited@AutoConfigurationPackage //自动配置包@Import({AutoConfigurationImportSelector.class}) //借助AutoConfigurationImportSelector自动配置类public @interface EnableAutoConfiguration { String ENABLED_OVERRIDE_PROPERTY = "spring.boot.enableautoconfiguration"; Class<?>[] exclude() default {}; String[] excludeName() default {};}@EnableAutoConfiguration里重要的注解分别是@AutoConfigurationPackage和@Import(AutoConfigurationImportSelector.class),看名知意,@AutoConfigurationPackage:自动配置包,AutoConfigurationImportSelector:自动配置组件的导入。
3.2.1 @AutoConfigurationPackage
@AutoConfigurationPackage具体定义如下所示:
@Target({ElementType.TYPE})@Retention(RetentionPolicy.RUNTIME)@Documented@Inherited@Import({Registrar.class})public @interface AutoConfigurationPackage {}由@AutoConfigurationPackage定义可以看出,实际是借助@Import导入了Registrar,而Registrar中主要调用了registerBeanDefinition方法来进行bean定义的注册。Registrar类定义如下:
static class Registrar implements ImportBeanDefinitionRegistrar, DeterminableImports { Registrar() { } public void registerBeanDefinitions(AnnotationMetadata metadata, BeanDefinitionRegistry registry) { //此处是注册了一个Bean的定义。 //getPackageName()其实返回了当前主程序类的 同级以及子级的包组件。 AutoConfigurationPackages.register(registry, (new AutoConfigurationPackages.PackageImport(metadata)).getPackageName()); } public Set<Object> determineImports(AnnotationMetadata metadata) { return Collections.singleton(new AutoConfigurationPackages.PackageImport(metadata)); } }Registrar里registerBeanDefinitions实际是调用AutoConfigurationPackages的register方法,其定义如下:
public static void register(BeanDefinitionRegistry registry, String... packageNames) { if (registry.containsBeanDefinition(BEAN)) { BasePackagesBeanDefinition beanDefinition = (BasePackagesBeanDefinition) registry.getBeanDefinition(BEAN); beanDefinition.addBasePackages(packageNames); } else { registry.registerBeanDefinition(BEAN, new BasePackagesBeanDefinition(packageNames)); }}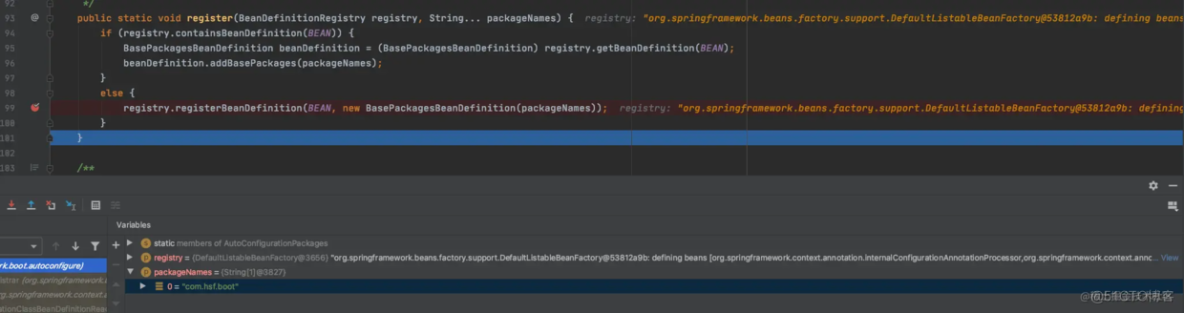
可以看到这里主要面有一个注册bean定义的方法,主要就是把被org.springframework.boot.autoconfigure.SpringBootApplication注解标记的包的定义信息注册到容器中中 。
3.2.2 AutoConfigurationImportSelector
AutoConfigurationImportSelector实现了DeferredImportSelector,所以@EnableAutoConfiguration什么时候处理已经清楚了: ConfigurationClassParser解析启动类这个配置类过程中处理了该注解,由于AutoConfigurationImportSelector是一个DeferredImportSelector,所以会将AutoConfigurationImportSelector暂存在DeferredImportSelectorHandler#deferredImportSelectors一个List中,等当前一轮配置类都解析完了才会处理AutoConfigurationImportSelector。
DeferredImportSelector
// ImportSelectorpublic interface ImportSelector { String[] selectImports(AnnotationMetadata importingClassMetadata); @Nullable default Predicate<String> getExclusionFilter() { return null; }}public interface DeferredImportSelector extends ImportSelector { @Nullable default Class<? extends Group> getImportGroup() { return null; } interface Group { void process(AnnotationMetadata metadata, DeferredImportSelector selector); Iterable<Entry> selectImports(); class Entry { private final AnnotationMetadata metadata; private final String importClassName; // constructor, getters and setters } }}ImportSelector比较简单,就是一个selectImports方法,就是基于当前配置类的AnnotationMetadata返回一些需要import的类名。DeferredImportSelector扩展了ImportSelector,增加了getImportGroup方法,作用是什么?
由于DeferredImportSelector是先暂存,延迟到一批配置类处理完后会统一处理这些DeferredImportSelector,此时这些不同的DeferredImportSelector导入哪些类可以放在一起做一定的逻辑处理。每个DeferredImportSelector的会属于一个Group,属于同一个Group的DeferredImportSelector会统一处理,Group为null则默认为DefaultDeferredImportSelectorGroup。Entry保存了需要import的类名和配置类的AnnotationMetadata的映射关系,因为多个DeferredImportSelector可能是由多个配置类导入的,最后返回的时候要知道import进来的类是由哪个配置类import进来的
DeferredImportSelector调用上与ImportSelector不同,对于ImportSelector,会直接调用selectImports;而对于DeferredImportSelector,外部先按照Group对所有DeferredImportSelector进行分组,属于同一组的DeferredImportSelector,调用这个组的Group#process方法处理每个DeferredImportSelector,Group#process里面一般会调用DeferredImportSelector#selectImports将导入进来的类暂存一下,然后调用一次Group#selectImports方法,返回这一组DeferredImportSelector最重要import的类
DefaultDeferredImportSelectorGroup
先看一下默认的DefaultDeferredImportSelectorGroup实现细节
private static class DefaultDeferredImportSelectorGroup implements Group { private final List<Entry> imports = new ArrayList<>(); @Override public void process(AnnotationMetadata metadata, DeferredImportSelector selector) { for (String importClassName : selector.selectImports(metadata)) { this.imports.add(new Entry(metadata, importClassName)); } } @Override public Iterable<Entry> selectImports() { return this.imports; }}imports保存了导入类的Entry。process方法将DeferredImportSelector导入了的类缓存一下;然后selectImports返回每个DeferredImportSelector导入的类。
既然多个DeferredImportSelector属于一个Group,那么哪些DeferredImportSelector属于AutoConfigurationGroup?
- AutoConfigurationImportSelector和ImportAutoConfigurationImportSelector都属于AutoConfigurationGroup,分别对应@EnableAutoConfiguration注解和@ImportAutoConfiguration注解
AutoConfigurationGroup
private static class AutoConfigurationGroup implements DeferredImportSelector.Group, BeanClassLoaderAware, BeanFactoryAware, ResourceLoaderAware { private final Map<String, AnnotationMetadata> entries = new LinkedHashMap<>(); private final List<AutoConfigurationEntry> autoConfigurationEntries = new ArrayList<>(); @Override public void process(AnnotationMetadata annotationMetadata, DeferredImportSelector deferredImportSelector) { Assert.state(deferredImportSelector instanceof AutoConfigurationImportSelector, () -> String.format("Only %s implementations are supported, got %s", AutoConfigurationImportSelector.class.getSimpleName(), deferredImportSelector.getClass().getName())); AutoConfigurationEntry autoConfigurationEntry = ((AutoConfigurationImportSelector) deferredImportSelector) .getAutoConfigurationEntry(annotationMetadata); this.autoConfigurationEntries.add(autoConfigurationEntry); for (String importClassName : autoConfigurationEntry.getConfigurations()) { this.entries.putIfAbsent(importClassName, annotationMetadata); } }}AutoConfigurationGroup#process过程
AutoConfigurationGroup#process方法调用了AutoConfigurationImportSelector或者ImportAutoConfigurationImportSelector的selectImports方法,拿到AutoConfigurationEntry,暂存在autoConfigurationEntries里,并且每个导入进来的类都暂存在entries里。
两个ImportSelector的selectImports做了什么?
AutoConfigurationImportSelector#selectImports
public String[] selectImports(AnnotationMetadata annotationMetadata) { if (!isEnabled(annotationMetadata)) { return NO_IMPORTS; } AutoConfigurationEntry autoConfigurationEntry = getAutoConfigurationEntry(annotationMetadata); return StringUtils.toStringArray(autoConfigurationEntry.getConfigurations());}protected AutoConfigurationEntry getAutoConfigurationEntry(AnnotationMetadata annotationMetadata) { if (!isEnabled(annotationMetadata)) { return EMPTY_ENTRY; } AnnotationAttributes attributes = getAttributes(annotationMetadata); // 从 spring.factories 里面去读取配置的好的AutoConfiguration类 List<String> configurations = getCandidateConfigurations(annotationMetadata, attributes); configurations = removeDuplicates(configurations); Set<String> exclusions = getExclusions(annotationMetadata, attributes); checkExcludedClasses(configurations, exclusions); configurations.removeAll(exclusions); configurations = getConfigurationClassFilter().filter(configurations); fireAutoConfigurationImportEvents(configurations, exclusions); return new AutoConfigurationEntry(configurations, exclusions);}可以看到这里主要做了三件事:
接下来,我们看一下getCandidateConfigurations()方法:
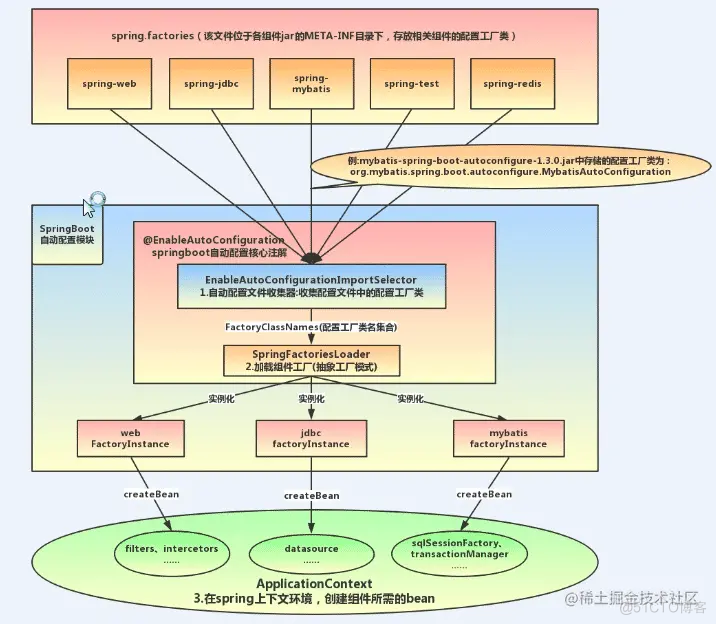
protected List<String> getCandidateConfigurations(AnnotationMetadata metadata, AnnotationAttributes attributes) { List<String> configurations = SpringFactoriesLoader.loadFactoryNames(getSpringFactoriesLoaderFactoryClass(), getBeanClassLoader()); Assert.notEmpty(configurations, "No auto configuration classes found in META-INF/spring.factories. If you " + "are using a custom packaging, make sure that file is correct."); return configurations;}protected Class<?> getSpringFactoriesLoaderFactoryClass() { return EnableAutoConfiguration.class;}接下来,我们看一下SpringFactoriesLoader.loadFactoryNames()方法:
private static Map<String, List<String>> loadSpringFactories(ClassLoader classLoader) { Map<String, List<String>> result = cache.get(classLoader); if (result != null) { return result; } result = new HashMap<>(); try { Enumeration<URL> urls = classLoader.getResources(FACTORIES_RESOURCE_LOCATION); while (urls.hasMoreElements()) { URL url = urls.nextElement(); UrlResource resource = new UrlResource(url); Properties properties = PropertiesLoaderUtils.loadProperties(resource); for (Map.Entry<?, ?> entry : properties.entrySet()) { String factoryTypeName = ((String) entry.getKey()).trim(); String[] factoryImplementationNames = StringUtils.commaDelimitedListToStringArray((String) entry.getValue()); for (String factoryImplementationName : factoryImplementationNames) { result.computeIfAbsent(factoryTypeName, key -> new ArrayList<>()) .add(factoryImplementationName.trim()); } } } // Replace all lists with unmodifiable lists containing unique elements result.replaceAll((factoryType, implementations) -> implementations.stream().distinct() .collect(Collectors.collectingAndThen(Collectors.toList(), Collections::unmodifiableList))); cache.put(classLoader, result); } catch (IOException ex) { throw new IllegalArgumentException("Unable to load factories from location [" + FACTORIES_RESOURCE_LOCATION + "]", ex); } return result;}AutoConfigurationImportSelector#selectImports实际上就是调用了SpringFactoriesLoader从spring.factories里面去读取配置的好的AutoConfiguration类。
我们来看一下 META-INF/spring.factories下的文件:

我们看其中一个类:
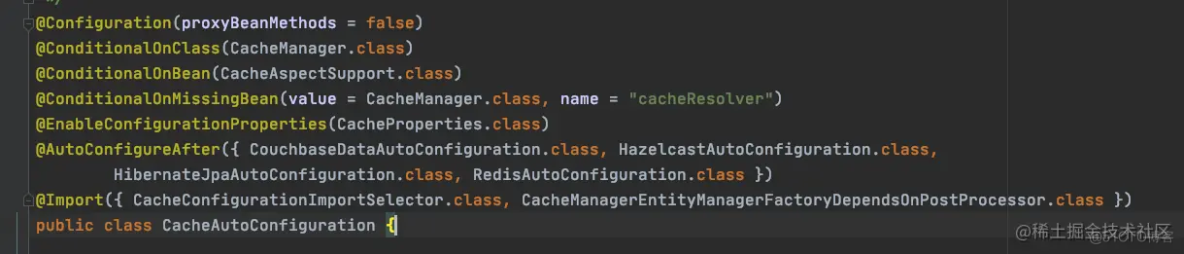
可以看到这里面定义了一堆需要自动装配的bean,而这些ben里面都会有一个或多个条件,也就是说他要装配这个bean,需要满足已经达成这些条件才进行自动装配
AutoConfigurationGroup#selectImports过程
AutoConfigurationGroup#selectImports方法主要做了两个事情
- 导进来的类排掉exclusion
- 排序,返回
- 主要看一下配置类的排序逻辑:
其实还是通过AutoConfigurationSorter来排序的,看一下AutoConfigurationSorter#getInPriorityOrder方法:
List<String> getInPriorityOrder(Collection<String> classNames) { AutoConfigurationClasses classes = new AutoConfigurationClasses(this.metadataReaderFactory, this.autoConfigurationMetadata, classNames); List<String> orderedClassNames = new ArrayList<>(classNames); // Initially sort alphabetically Collections.sort(orderedClassNames); // Then sort by order orderedClassNames.sort((o1, o2) -> { int i1 = classes.get(o1).getOrder(); int i2 = classes.get(o2).getOrder(); return Integer.compare(i1, i2); }); // Then respect @AutoConfigureBefore @AutoConfigureAfter orderedClassNames = sortByAnnotation(classes, orderedClassNames); return orderedClassNames;}注释上:先按字母顺序排序,再按order排序,最后按@AutoConfigureBefore @AutoConfigureAfter两个注解排序,由于排序是稳定排序,所有三种排序方法中:注解定义的顺序优先;注解没定义顺序则按order来;order相同则按字母顺序
order排序怎么排?
- classes.get(o1)获取到了AutoConfigurationClass,AutoConfigurationClass#getOrder实际上获取的是AutoConfigureOrder定义的order,跟ordered接口、@Order注解都没关系,主要是为了不影响bean注册的顺序
- getAutoConfigurationMetadata()封装自动配置元数据信息
AutoConfigurationMetadataLoader类:
static AutoConfigurationMetadata loadMetadata(ClassLoader classLoader, String path) { try { Enumeration<URL> urls = (classLoader != null) ? classLoader.getResources(path) : ClassLoader.getSystemResources(path); Properties properties = new Properties(); while (urls.hasMoreElements()) { properties.putAll(PropertiesLoaderUtils.loadProperties(new UrlResource(urls.nextElement()))); } return loadMetadata(properties); } catch (IOException ex) { throw new IllegalArgumentException("Unable to load @ConditionalOnClass location [" + path + "]", ex); }}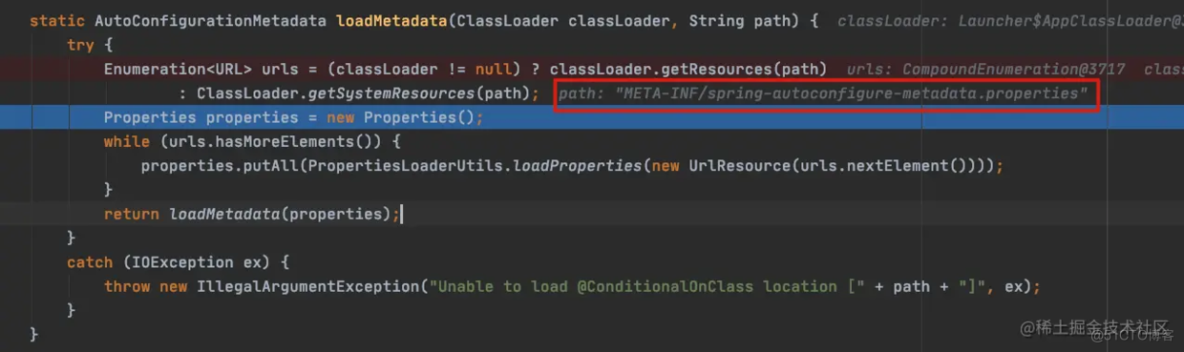
可以看到这里主要就是去加载spring-autoconfigure-metadata.properties文件中的信息进行封装返回,那这个文件里都定义了啥呢:

可以看到这里主要就是定义了一些需要自动配置的类自动装配需要满足的一些条件
3.3 @ComponentScan
@ComponentScan的功能其实就是自动扫描并加载符合条件的组件(比如@Component和@Repository等)或者bean定义,最终将这些bean定义加载到IoC容器中。我们可以通过basePackages等属性来细粒度的定制@ComponentScan自动扫描的范围,如果不指定,则默认Spring框架实现会从声明@ComponentScan所在类的package进行扫描。
注意:开发者可以通过basePakage等属性来细粒度的定制@ComponentScan自动扫描的范围。如果不指定,则默认Spring框架实现会从声明·@ComponentScan·所在类的·package·进行扫描。这就是SpringBoot的启动类为什么最好放在root package包下面的原因
3.4 流程框图