初始化器
Spring 是一个扩展性很强的容器框架,为开发者提供了丰富的扩展入口,其中一个扩展点便是 ApplicationContextInitializer (应用上下文初始化器 )。
ApplicationContextInitializer 是 Spring 在执行 ConfigurableApplicationContext.refresh() 方法对应用上下文进行刷新之前调用的一个回调接口,用来完成对 Spring 应用上下文个性化的初始化工作,该接口定义在 org.springframework.context 包中,其内部仅包含一个 initialize() 方法,其定义代码如下。
public interface ApplicationContextInitializer<C extends ConfigurableApplicationContext> { /** * Initialize the given application context. * @param applicationContext the application to configure */ void initialize(C applicationContext); }自定义初始化器
在 Springboot 中使用自定义初始化器大致可以分为以下两个步骤:
- 自定义初始化器,一般是实现 ApplicationContextInitializer 接口。
- 注册初始化器。
第一步:自定义初始化器,此处为了测试初始化器的执行顺序定义了如下3个初始化器
@Order(1) public class Initializer1 implements ApplicationContextInitializer<ConfigurableApplicationContext> { @Override public void initialize(ConfigurableApplicationContext applicationContext) { ConfigurableEnvironment environment = applicationContext.getEnvironment(); Map<String,Object> map = new HashMap<>(); map.put("key1","value1"); MapPropertySource mapPropertySource = new MapPropertySource("Initializer1", map); environment.getPropertySources().addLast(mapPropertySource); System.out.println("run Initializer1"); } } @Order(2) public class Initializer2 implements ApplicationContextInitializer<ConfigurableApplicationContext> { @Override public void initialize(ConfigurableApplicationContext applicationContext) { ConfigurableEnvironment environment = applicationContext.getEnvironment(); Map<String,Object> map = new HashMap<>(); map.put("key2","value2"); MapPropertySource mapPropertySource = new MapPropertySource("Initializer2", map); environment.getPropertySources().addLast(mapPropertySource); System.out.println("run Initializer2"); } } @Order(3) public class Initializer3 implements ApplicationContextInitializer<ConfigurableApplicationContext> { @Override public void initialize(ConfigurableApplicationContext applicationContext) { ConfigurableEnvironment environment = applicationContext.getEnvironment(); Map<String,Object> map = new HashMap<>(); map.put("key3","value3"); MapPropertySource mapPropertySource = new MapPropertySource("Initializer3", map); environment.getPropertySources().addLast(mapPropertySource); System.out.println("run Initializer3"); } }第二步:注册初始化器,有以下三种方式
- 方式一:在启动类中,使用 SpringApplication.addInitializers() 方法注册。
- 方式二:在 Springboot 核心配置文件 application.properties 中增加 context.initializer.classes = [ 初始化器全类名 ] 进行注册。
- 方式三:通过在CLASSPATH/META-INF/spring.factories中添加 org.springframework.context.ApplicationContextInitializer 配置项进行注册。
注意:虽然可以使用 @Order 注解来控制多个初始化器的执行顺序(数值越小越先执行),但是,通过不同方式注册的初始化器的执行顺序也有所不同,若多个初始化器注册的方式不同会导致 @Order 注解顺序无效,从以上程序执行后的打印结果来看,三种方式注册的初始化器的执行顺序依次是:方式二 --> 方式一 --> 方式三。
Springboot定义的初始化器
Springboot定义的 ApplicationContextInitializer 接口的实现类有下面几个,如图所示。
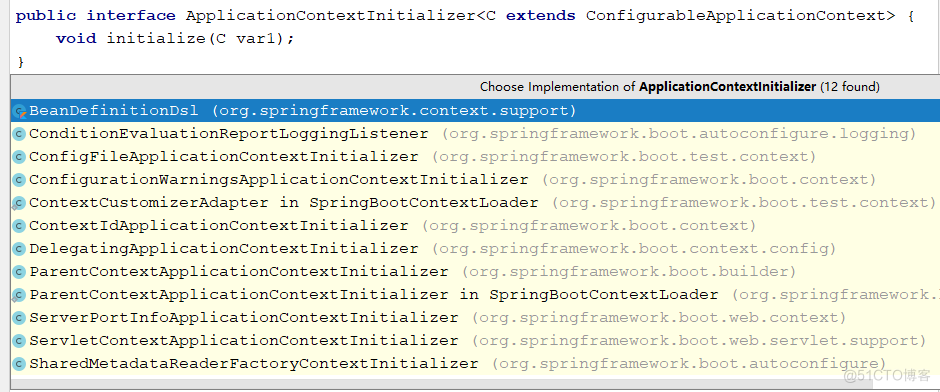
DelegatingApplicationContextInitializer
DelegatingApplicationContextInitializer 初始化器负责读取核心配置文件 context.initializer.classes 配置项指定的初始化器,并调用它们的 initialize() 方法来完成对应用上下文的初始化工作。
public class DelegatingApplicationContextInitializer implements ApplicationContextInitializer<ConfigurableApplicationContext>, Ordered { private static final String PROPERTY_NAME = "context.initializer.classes"; private int order = 0; public DelegatingApplicationContextInitializer() { } /** * 对应用上下文进行初始化 */ public void initialize(ConfigurableApplicationContext context) { // 获取核心配置文件中指定的初始化器类 ConfigurableEnvironment environment = context.getEnvironment(); List<Class<?>> initializerClasses = this.getInitializerClasses(environment); if (!initializerClasses.isEmpty()) { // 利用获取到的初始化器类对应用上下文进行初始化 this.applyInitializerClasses(context, initializerClasses); } } /** * 读取核心配置文件中 context.initializer.classes 指定的初始化器类 */ private List<Class<?>> getInitializerClasses(ConfigurableEnvironment env) { String classNames = env.getProperty("context.initializer.classes"); List<Class<?>> classes = new ArrayList(); if (StringUtils.hasLength(classNames)) { String[] var4 = StringUtils.tokenizeToStringArray(classNames, ","); int var5 = var4.length; for(int var6 = 0; var6 < var5; ++var6) { String className = var4[var6]; classes.add(this.getInitializerClass(className)); } } return classes; } /** * 使用指定的初始化器类对应用上下文进行初始化 */ private void applyInitializerClasses(ConfigurableApplicationContext context, List<Class<?>> initializerClasses) { Class<?> contextClass = context.getClass(); List<ApplicationContextInitializer<?>> initializers = new ArrayList(); Iterator var5 = initializerClasses.iterator(); while(var5.hasNext()) { Class<?> initializerClass = (Class)var5.next(); initializers.add(this.instantiateInitializer(contextClass, initializerClass)); } this.applyInitializers(context, initializers); } /** * 使用指定的初始化器对应用上下文进行初始化 */ private void applyInitializers(ConfigurableApplicationContext context, List<ApplicationContextInitializer<?>> initializers) { // 对初始化器进行 Order 排序 initializers.sort(new AnnotationAwareOrderComparator()); Iterator var3 = initializers.iterator(); while(var3.hasNext()) { ApplicationContextInitializer initializer = (ApplicationContextInitializer)var3.next(); initializer.initialize(context); } } ...... }ContextIdApplicationContextInitializer
ContextIdApplicationContextInitializer 初始化器的作用是给应用上下文设置一个ID,这个ID通过environment中的"spring.application.name"获取,如果不存在则直接返回默认"application"
public class ContextIdApplicationContextInitializer implements ApplicationContextInitializer<ConfigurableApplicationContext>, Ordered { private int order = 2147483637; public ContextIdApplicationContextInitializer() { } public void setOrder(int order) { this.order = order; } public int getOrder() { return this.order; } public void initialize(ConfigurableApplicationContext applicationContext) { ContextIdApplicationContextInitializer.ContextId contextId = this.getContextId(applicationContext); applicationContext.setId(contextId.getId()); applicationContext.getBeanFactory().registerSingleton(ContextIdApplicationContextInitializer.ContextId.class.getName(), contextId); } private String getApplicationId(ConfigurableEnvironment environment) { String name = environment.getProperty("spring.application.name"); return StringUtils.hasText(name) ? name : "application"; } }ConfigurationWarningsApplicationContextInitializer
ConfigurationWarningsApplicationContextInitializer 初始化器用来对常见的由于配置错误而引起的警告进行打印报告。
public class ConfigurationWarningsApplicationContextInitializer implements ApplicationContextInitializer<ConfigurableApplicationContext> { private static final Log logger = LogFactory.getLog(ConfigurationWarningsApplicationContextInitializer.class); public void initialize(ConfigurableApplicationContext context) { // 添加一个 ConfigurationWarningsPostProcessor 用来打印警告信息 context.addBeanFactoryPostProcessor(new ConfigurationWarningsApplicationContextInitializer.ConfigurationWarningsPostProcessor(this.getChecks())); } }其中的 ConfigurationWarningsPostProcessor 是一个静态内部类,用来打印注册 BeanDefinition 过程中产生的配置错误警告信息。
protected static final class ConfigurationWarningsPostProcessor implements PriorityOrdered, BeanDefinitionRegistryPostProcessor { private ConfigurationWarningsApplicationContextInitializer.Check[] checks; public ConfigurationWarningsPostProcessor(ConfigurationWarningsApplicationContextInitializer.Check[] checks) { this.checks = checks; } public int getOrder() { return 2147483646; } public void postProcessBeanFactory(ConfigurableListableBeanFactory beanFactory) throws BeansException { } public void postProcessBeanDefinitionRegistry(BeanDefinitionRegistry registry) throws BeansException { ConfigurationWarningsApplicationContextInitializer.Check[] var2 = this.checks; int var3 = var2.length; for(int var4 = 0; var4 < var3; ++var4) { ConfigurationWarningsApplicationContextInitializer.Check check = var2[var4]; String message = check.getWarning(registry); if (StringUtils.hasLength(message)) { this.warn(message); } } } private void warn(String message) { if (ConfigurationWarningsApplicationContextInitializer.logger.isWarnEnabled()) { ConfigurationWarningsApplicationContextInitializer.logger.warn(String.format("%n%n** WARNING ** : %s%n%n", message)); } } }ServerPortInfoApplicationContextInitializer
ServerPortInfoApplicationContextInitializer 初始化器通过监听 EmbeddedServletContainerInitializedEvent 事件,来对内部服务器实际要监听的端口号进行属性设置。
public class ServerPortInfoApplicationContextInitializer implements ApplicationContextInitializer<ConfigurableApplicationContext>, ApplicationListener<WebServerInitializedEvent> { public ServerPortInfoApplicationContextInitializer() { } public void initialize(ConfigurableApplicationContext applicationContext) { applicationContext.addApplicationListener(this); } public void onApplicationEvent(WebServerInitializedEvent event) { String propertyName = "local." + this.getName(event.getApplicationContext()) + ".port"; this.setPortProperty((ApplicationContext)event.getApplicationContext(), propertyName, event.getWebServer().getPort()); } private String getName(WebServerApplicationContext context) { String name = context.getServerNamespace(); return StringUtils.hasText(name) ? name : "server"; } private void setPortProperty(ApplicationContext context, String propertyName, int port) { if (context instanceof ConfigurableApplicationContext) { this.setPortProperty(((ConfigurableApplicationContext)context).getEnvironment(), propertyName, port); } if (context.getParent() != null) { this.setPortProperty(context.getParent(), propertyName, port); } } private void setPortProperty(ConfigurableEnvironment environment, String propertyName, int port) { MutablePropertySources sources = environment.getPropertySources(); PropertySource<?> source = sources.get("server.ports"); if (source == null) { source = new MapPropertySource("server.ports", new HashMap()); sources.addFirst((PropertySource)source); } ((Map)((PropertySource)source).getSource()).put(propertyName, port); } }SharedMetadataReaderFactoryContextInitializer
SharedMetadataReaderFactoryContextInitializer 初始化器用来创建一个可以在 ConfigurationClassPostProcessor 和Spring Boot 之间共享的CachingMetadataReaderFactory。
class SharedMetadataReaderFactoryContextInitializer implements ApplicationContextInitializer<ConfigurableApplicationContext>, Ordered { public static final String BEAN_NAME = "org.springframework.boot.autoconfigure.internalCachingMetadataReaderFactory"; SharedMetadataReaderFactoryContextInitializer() { } public void initialize(ConfigurableApplicationContext applicationContext) { applicationContext.addBeanFactoryPostProcessor(new SharedMetadataReaderFactoryContextInitializer.CachingMetadataReaderFactoryPostProcessor()); } }看下SpringBoot是如何加载初始化器的
入口类
@SpringBootApplication @MapperScan("com.yibo.source.code.mapper")//扫描Mapper接口 public class Application { public static void main(String[] args) { SpringApplication.run(Application.class,args); } }@SpringBootApplication我们上一篇文章https://blog.51cto.com/u_14014612/6007650 中大概的讲过了,有兴趣的可以看看我第一篇关于SpringBoot的文章,本篇文章主要关注SpringApplication.run(Application.class, args);,我们跟进去看看
// 调用静态类,参数对应的就是HelloWorldMainApplication.class以及main方法中的args public static ConfigurableApplicationContext run(Class<?> primarySource, String... args) { return run(new Class[]{primarySource}, args); } public static ConfigurableApplicationContext run(Class<?>[] primarySources, String[] args) { return (new SpringApplication(primarySources)).run(args); }它实际上会构造一个SpringApplication的实例,并把我们的启动类Application.class作为参数传进去,然后运行它的run方法 SpringApplication构造器
public SpringApplication(ResourceLoader resourceLoader, Class<?>... primarySources) { this.sources = new LinkedHashSet(); this.bannerMode = Mode.CONSOLE; this.logStartupInfo = true; this.addCommandLineProperties = true; this.addConversionService = true; this.headless = true; this.registerShutdownHook = true; this.additionalProfiles = new HashSet(); this.isCustomEnvironment = false; this.resourceLoader = resourceLoader; Assert.notNull(primarySources, "PrimarySources must not be null"); //把Application.class设置为属性存储起来 this.primarySources = new LinkedHashSet(Arrays.asList(primarySources)); //设置应用类型是Standard还是Web this.webApplicationType = WebApplicationType.deduceFromClasspath(); //设置初始化器(Initializer),最后会调用这些初始化器 this.setInitializers(this.getSpringFactoriesInstances(ApplicationContextInitializer.class)); //设置监听器(Listener) this.setListeners(this.getSpringFactoriesInstances(ApplicationListener.class)); this.mainApplicationClass = this.deduceMainApplicationClass(); }设置应用类型
public enum WebApplicationType { NONE, SERVLET, REACTIVE; private static final String[] SERVLET_INDICATOR_CLASSES = new String[]{"javax.servlet.Servlet", "org.springframework.web.context.ConfigurableWebApplicationContext"}; private static final String WEBMVC_INDICATOR_CLASS = "org.springframework.web.servlet.DispatcherServlet"; private static final String WEBFLUX_INDICATOR_CLASS = "org.springframework.web.reactive.DispatcherHandler"; private static final String JERSEY_INDICATOR_CLASS = "org.glassfish.jersey.servlet.ServletContainer"; private static final String SERVLET_APPLICATION_CONTEXT_CLASS = "org.springframework.web.context.WebApplicationContext"; private static final String REACTIVE_APPLICATION_CONTEXT_CLASS = "org.springframework.boot.web.reactive.context.ReactiveWebApplicationContext"; private WebApplicationType() { } static WebApplicationType deduceFromClasspath() { if (ClassUtils.isPresent("org.springframework.web.reactive.DispatcherHandler", (ClassLoader)null) && !ClassUtils.isPresent("org.springframework.web.servlet.DispatcherServlet", (ClassLoader)null) && !ClassUtils.isPresent("org.glassfish.jersey.servlet.ServletContainer", (ClassLoader)null)) { return REACTIVE; } else { String[] var0 = SERVLET_INDICATOR_CLASSES; int var1 = var0.length; for(int var2 = 0; var2 < var1; ++var2) { String className = var0[var2]; if (!ClassUtils.isPresent(className, (ClassLoader)null)) { return NONE; } } return SERVLET; } } }这里主要是通过类加载器判断REACTIVE相关的Class是否存在,如果不存在,则web环境即为SERVLET类型。这里设置好web环境类型,在后面会根据类型初始化对应环境。大家还记得我们第一篇文章中引入的依赖吗?
<dependency> <groupId>org.springframework.boot</groupId> <artifactId>spring-boot-starter-web</artifactId> </dependency>spring-boot-starter-web 的pom又会引入Tomcat和spring-webmvc,如下
<dependencies> <dependency> <groupId>org.springframework.boot</groupId> <artifactId>spring-boot-starter</artifactId> <version>2.1.10.RELEASE</version> <scope>compile</scope> </dependency> <dependency> <groupId>org.springframework.boot</groupId> <artifactId>spring-boot-starter-json</artifactId> <version>2.1.10.RELEASE</version> <scope>compile</scope> </dependency> <dependency> <groupId>org.springframework.boot</groupId> <artifactId>spring-boot-starter-tomcat</artifactId> <version>2.1.10.RELEASE</version> <scope>compile</scope> </dependency> <dependency> <groupId>org.hibernate.validator</groupId> <artifactId>hibernate-validator</artifactId> <version>6.0.18.Final</version> <scope>compile</scope> </dependency> <dependency> <groupId>org.springframework</groupId> <artifactId>spring-web</artifactId> <version>5.1.11.RELEASE</version> <scope>compile</scope> </dependency> <dependency> <groupId>org.springframework</groupId> <artifactId>spring-webmvc</artifactId> <version>5.1.11.RELEASE</version> <scope>compile</scope> </dependency> </dependencies>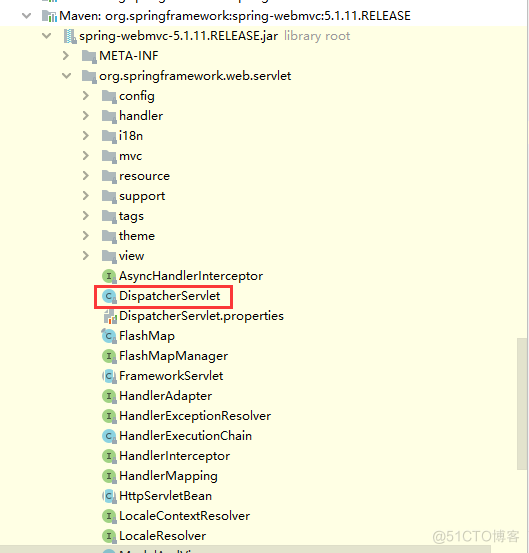
很明显spring-webmvc中存在DispatcherServlet这个类,也就是我们以前SpringMvc的核心Servlet,通过类加载能加载DispatcherServlet这个类,那么我们的应用类型自然就是WebApplicationType.SERVLET
设置初始化器(Initializer)
this.setInitializers(this.getSpringFactoriesInstances(ApplicationContextInitializer.class));我们先来看看this.getSpringFactoriesInstances(ApplicationContextInitializer.class)
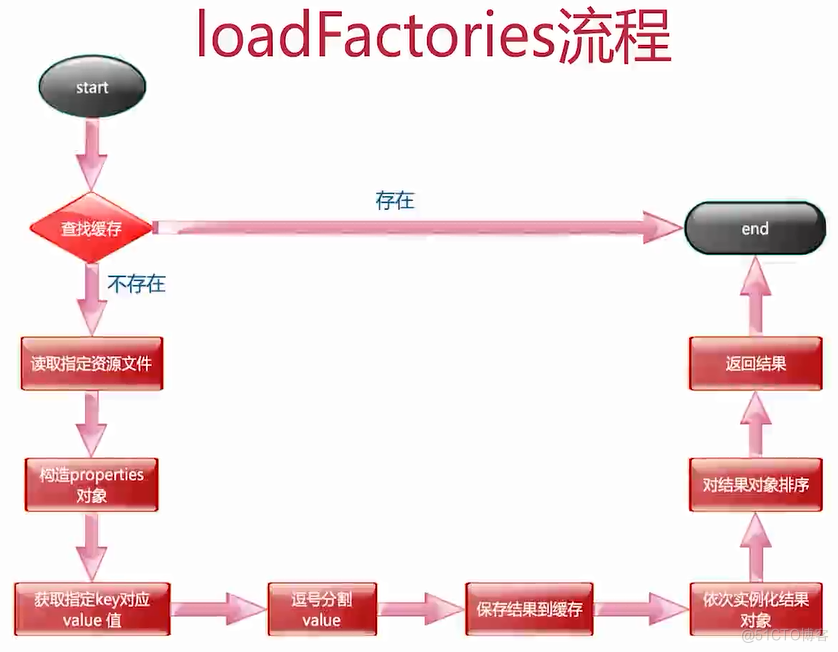
private <T> Collection<T> getSpringFactoriesInstances(Class<T> type) { return this.getSpringFactoriesInstances(type, new Class[0]); } // 这里的入参type就是ApplicationContextInitializer.class private <T> Collection<T> getSpringFactoriesInstances(Class<T> type, Class<?>[] parameterTypes, Object... args) { ClassLoader classLoader = this.getClassLoader(); // 使用Set保存names来避免重复元素 Set<String> names = new LinkedHashSet(SpringFactoriesLoader.loadFactoryNames(type, classLoader)); // 根据names来进行实例化 List<T> instances = this.createSpringFactoriesInstances(type, parameterTypes, classLoader, args, names); // 对实例进行排序 AnnotationAwareOrderComparator.sort(instances); return instances; }这里面首先会根据入参type读取所有的names(是一个String集合),然后根据这个集合来完成对应的实例化操作:
public final class SpringFactoriesLoader { public static final String FACTORIES_RESOURCE_LOCATION = "META-INF/spring.factories"; // 入参就是ApplicationContextInitializer.class public static List<String> loadFactoryNames(Class<?> factoryClass, @Nullable ClassLoader classLoader) { String factoryClassName = factoryClass.getName(); return (List)loadSpringFactories(classLoader).getOrDefault(factoryClassName, Collections.emptyList()); } private static Map<String, List<String>> loadSpringFactories(@Nullable ClassLoader classLoader) { MultiValueMap<String, String> result = (MultiValueMap)cache.get(classLoader); if (result != null) { return result; } else { try { //从类路径的META-INF/spring.factories中加载所有默认的自动配置类 Enumeration<URL> urls = classLoader != null ? classLoader.getResources("META-INF/spring.factories") : ClassLoader.getSystemResources("META-INF/spring.factories"); LinkedMultiValueMap result = new LinkedMultiValueMap(); while(urls.hasMoreElements()) { URL url = (URL)urls.nextElement(); UrlResource resource = new UrlResource(url); Properties properties = PropertiesLoaderUtils.loadProperties(resource); Iterator var6 = properties.entrySet().iterator(); while(var6.hasNext()) { Entry<?, ?> entry = (Entry)var6.next(); //获取ApplicationContextInitializer.class的所有值 String factoryClassName = ((String)entry.getKey()).trim(); String[] var9 = StringUtils.commaDelimitedListToStringArray((String)entry.getValue()); int var10 = var9.length; for(int var11 = 0; var11 < var10; ++var11) { String factoryName = var9[var11]; result.add(factoryClassName, factoryName.trim()); } } } cache.put(classLoader, result); return result; } catch (IOException var13) { throw new IllegalArgumentException("Unable to load factories from location [META-INF/spring.factories]", var13); } } } }这个方法会尝试从类路径的META-INF/spring.factories处读取相应配置文件,然后进行遍历,读取配置文件中Key为:org.springframework.context.ApplicationContextInitializer的value。以spring-boot-autoconfigure这个包为例,它的META-INF/spring.factories部分定义如下所示:

这两个类名会被读取出来,然后放入到Set<String>集合中,准备开始下面的实例化操作:
// parameterTypes: 上一步得到的names集合 private <T> List<T> createSpringFactoriesInstances(Class<T> type, Class<?>[] parameterTypes, ClassLoader classLoader, Object[] args, Set<String> names) { List<T> instances = new ArrayList(names.size()); Iterator var7 = names.iterator(); while(var7.hasNext()) { String name = (String)var7.next(); try { Class<?> instanceClass = ClassUtils.forName(name, classLoader); //确认被加载类是ApplicationContextInitializer的子类 Assert.isAssignable(type, instanceClass); Constructor<?> constructor = instanceClass.getDeclaredConstructor(parameterTypes); //反射实例化对象 T instance = BeanUtils.instantiateClass(constructor, args); //加入List集合中 instances.add(instance); } catch (Throwable var12) { throw new IllegalArgumentException("Cannot instantiate " + type + " : " + name, var12); } } return instances; }确认被加载的类确实是org.springframework.context.ApplicationContextInitializer的子类,然后就是得到构造器进行初始化,最后放入到实例列表中。
因此,所谓的初始化器就是org.springframework.context.ApplicationContextInitializer的实现类,这个接口是这样定义的:
public interface ApplicationContextInitializer<C extends ConfigurableApplicationContext> { /** * Initialize the given application context. * @param applicationContext the application to configure */ void initialize(C applicationContext); }在Spring上下文被刷新之前进行初始化的操作。即在SpringApplication.prepareContext方法中调用applyInitializers方法进行初始化操作,典型地比如在Web应用中,注册Property Sources或者是激活Profiles。Property Sources比较好理解,就是配置文件。Profiles是Spring为了在不同环境下(如DEV,TEST,PRODUCTION等),加载不同的配置项而抽象出来的一个实体。
public class SpringApplication { public ConfigurableApplicationContext run(String... args) { ...... this.prepareContext(context, environment, listeners, applicationArguments, printedBanner); ...... } private void prepareContext(ConfigurableApplicationContext context, ConfigurableEnvironment environment, SpringApplicationRunListeners listeners, ApplicationArguments applicationArguments, Banner printedBanner) { ...... this.applyInitializers(context); ...... } }SpringFactoriesLoader介绍
- 1、框架内部使用的通用工厂加载机制
- 2、从classpath下多个jar包特定的位置读取文件并初始化类
- 3、文件内容必须是kv形式,即properties类型
- 4、key是全限定名,value是实现,多个实现用逗号分隔
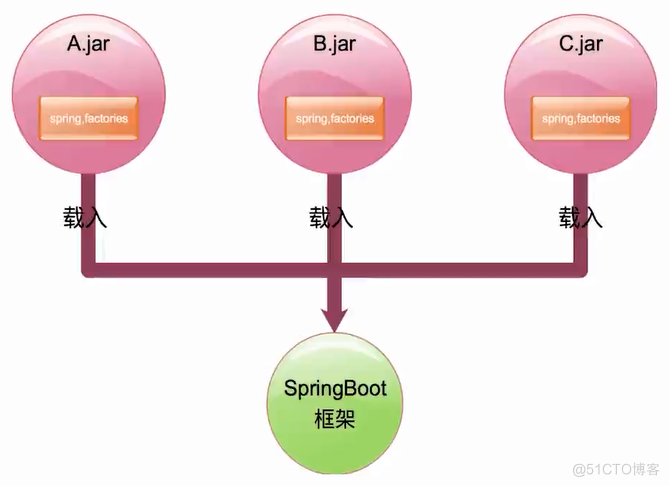
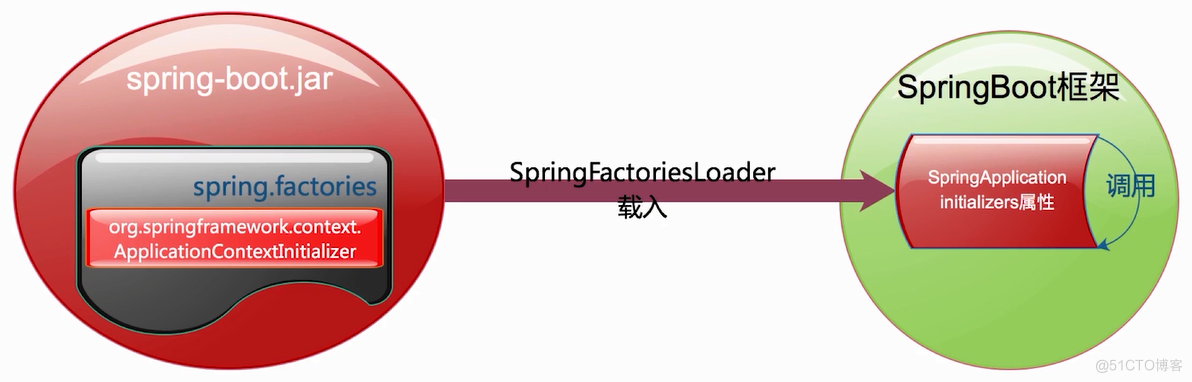
SpringFactoriesLoader的作用
SpringBoot框架中从类路径jar包中读取特定文件实现扩展类的载入
系统初始化器调用流程

文章开始的三种自定义初始化器实现原理
- 定义在spring.factories文件中被SpringFactoriesLoader发现注册
- SpringApplication初始化完毕后手动添加
- 定义成环境变量被DelegatingApplicationContextInitializer发现注册
推荐使用在spring.factories文件中定义系统初始化器被SpringFactoriesLoader发现注册的方式
在spring.factories文件中定义系统初始化器,被SpringFactoriesLoader载入,成为SpringBoot框架的SpringApplicationInitializer属性,在运行的时候会遍历这个属性依次调用initialize方法完成向容器内注册属性。
参考: https://blog.csdn.net/pengjunlee/article/details/79394735
https://www.cnblogs.com/java-chen-hao/p/11829344.html